Users Online
· Members Online: 0
· Total Members: 188
· Newest Member: meenachowdary055
Forum Threads
Latest Articles
Articles Hierarchy
Skill 3.3: Manage Secrets using Azure Key Vault
Skill 3.3: Manage Secrets using Azure Key Vault
Skill 3.3: Manage Secrets using Azure Key Vault
Cloud applications typically need a safe workflow for secret management. Azure Key Vault provides a secure service for Azure applications and services for:
![]() Encrypting storage account keys, data encryption keys, certificates, passwords and other keys and secrets
Encrypting storage account keys, data encryption keys, certificates, passwords and other keys and secrets
![]() Protecting those keys using hardware security modules (HSMs)
Protecting those keys using hardware security modules (HSMs)

Exam Tip
Azure Key Vault supports importing and generating keys in HSMs. This means that keys are processed in FIPS 140-2 Level 2 validated HSMs.
Developers can easily create keys to support development efforts, while administrators are able to grant or revoke access to keys as needed. This section covers how to manage secrets with Azure Key Vault.
This skill covers how to:
![]() Configure Azure Key Vault
Configure Azure Key Vault
![]() Manage access, including tenants
Manage access, including tenants
![]() Implement HSM protected keys
Implement HSM protected keys
![]() Manage service limits
Manage service limits
![]() Implement logging
Implement logging
![]() Implement key rotation
Implement key rotation
More Info: Key Vault Overview
For detailed documentation on Azure Key Vault, see this reference: https://docs.microsoft.com/en-us/azure/key-vault/key-vault-whatis.
Configure Azure Key Vault
You can create one or more key vault in a subscription, according to your needs for management isolation. To create a new key vault, follow these steps:
-
Navigate to the Azure portal accessed via https://portal.azure.com.
-
Click New and select Security + Identity, then select Key Vault from the list of choices (Figure 3-36).
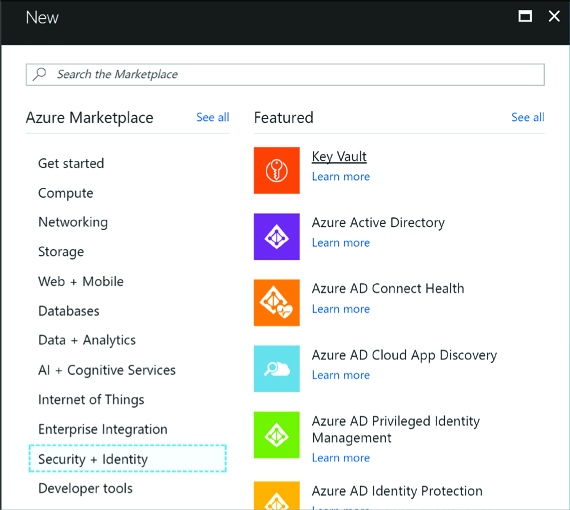
FIGURE 3-36 Selecting Key Vault from the Security + Identity features
-
From the Create key vault blade, enter the following values (Figure 3-37):
-
A name for the key vault
-
Choose the subscription
-
Create or choose a resource group
-
A location
-
Choose a pricing tier - primarily based on your requirements for HSM
-
Set up policies for user access to keys, secrets and certificates
-
Optionally grant access for Azure Virtual Machines, Azure Resource Manager or Azure Disk Encryption
-
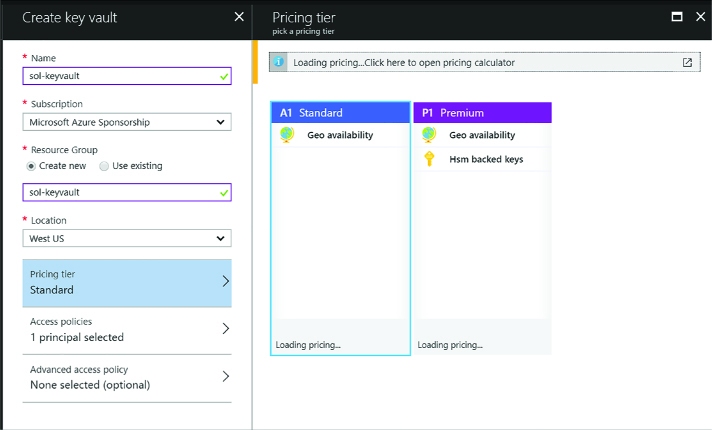
FIGURE 3-37 The Create key vault blade
-
Click Create to create the key vault.
Manage access, including tenants
There are two ways to access the key vault - through the management plane or the data plane. The management plane exposes an interface for managing the key vault settings and policies, and the data plane exposes an interface for managing the actual secrets and policies related directly to managing those secrets. You can set up policies that control access through each of these planes, granting users, applications or devices access to specific functionality (service principals). These service principals must be associated with the same Azure AD tenant as the key vault.
To create policies for your key vault, navigate to the key vault Overview and do the following (Figure 3-38):
-
Select Access policies from the navigation pane.
-
Select Add new from the Access policies blade.
-
Select Configure from template and select Key, Secret & Certificate Management. This will initialize a set of permissions based on the template, which you can later adjust.
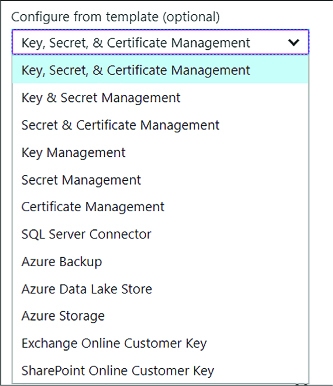
FIGURE 3-38 Options for configuring a policy
-
Click Select a principal and enter a username, application id or device id from your directory.
-
Review key permissions selected by the template-modify them as needed according to the requirements for the principal selected (Figure 3-39).
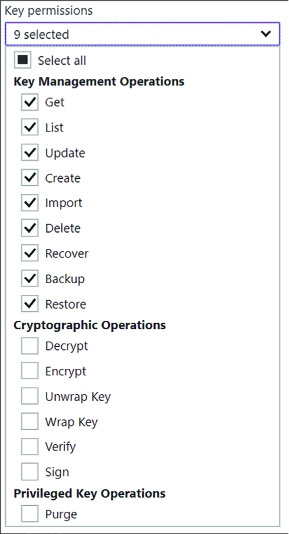
FIGURE 3-39 The options for customizing key permissions for a policy
-
Review secret permissions selected by the template, modify them as needed according to the requirements for the principal selected (Figure 3-40).
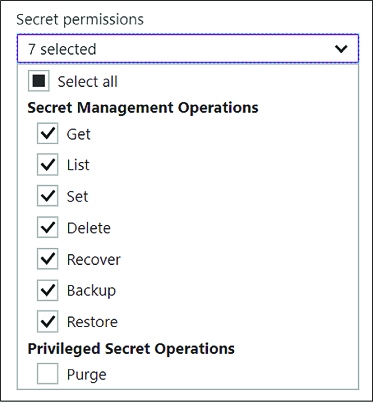
FIGURE 3-40 The options for customizing secret permissions for a policy
-
Review certificate permissions selected by the template, and modify them as needed according to the requirements for the principal selected (Figure 3-41).
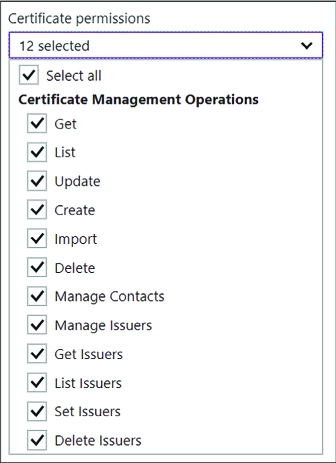
FIGURE 3-41 The options for customizing certificate permissions for a policy
-
Click OK to save the policy settings (Figure 3-42).
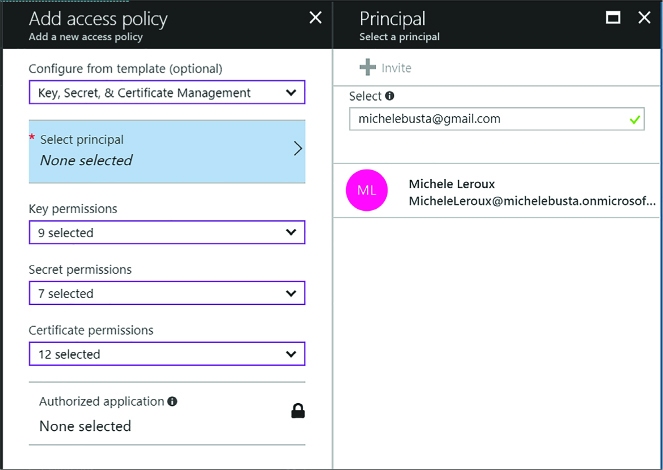
FIGURE 3-42 The options for customizing key permissions for a policy
-
From the key vault blade, click Save from the command bar to commit the changes.
In addition to granting access to service principals, you can also set advance access policies to allow access to Azure Virtual Machines, Azure Resource Manager, or Azure Disk Encryption as follows (Figure 3-43):
-
Select the Advanced access policies tab from the navigation pane.
-
Enable access by Azure Virtual Machines, Azure Resource Manager or Azure Disk Encryption as appropriate.
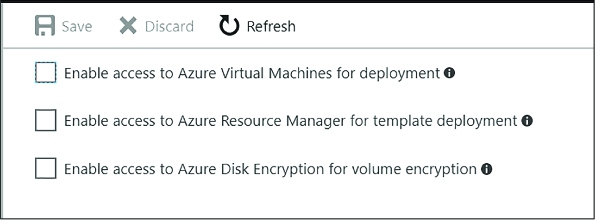
FIGURE 3-43 The options for setting advanced rules for a policy

Exam Tip
Your key vault is initially associated with the default Azure AD tenant for the subscription it belongs to. You may move the key vault to a new subscription, or simply need to associate the key vault to another Azure AD tenant. You can change this tenant association using PowerShell command as described by this reference: https://docs.microsoft.com/en-us/azure/key-vault/key-vault-subscription-move-fix.
More Info: Keys, Secrets and Certificates
See the following reference for details on how to distinguish between keys, secrets and cerificates: https://docs.microsoft.com/en-us/rest/api/keyvault/about-keys--secrets-and-certificates?redirectedfrom=MSDN.
Implement HSM protected keys
If you create a key vault based on a premium subscription, you will be able to generate, store and manage Hardware Security Module (HSM) protected keys. To create an HSM protected key follow these steps:
-
Navigate to the Azure portal accessed via https://portal.azure.com.
-
Navigate to More Services from the navigation menu and type key vault to filter the list and find Key Vaults and then select it.
-
From the Key vaults blade, select a previously created key vault that supports HSM.
-
Select the Keys tab from the navigation pane, and click Add from the command bar.
-
From the Create key blade, enter the following information (Figure 3-44):
-
For Options, select Generate. You can also upload a key or restore a key from a backup.
-
Provide a name for the key.
-
For key type, select HSM protected key.
-
Optionally provide an activation and expiry date for the key. Otherwise there is no set expiry.
-
Indicate if the key should be enabled now.
-
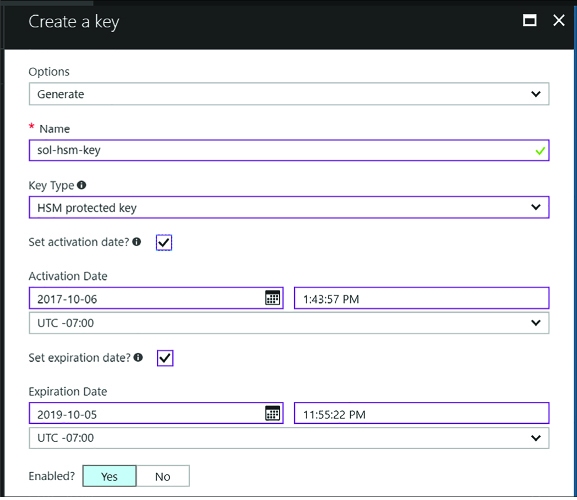
FIGURE 3-44 The Create a key blade
-
Click Create to complete the creation of the key.
More Info: Managing HSM Keys with Powershell
See this reference for more on managing HSM keys with PowerShell: https://docs.microsoft.com/en-us/azure/key-vault/key-vault-hsm-protected-keys.

Exam Tip
Software keys (not protected by HSM) can be later exported from the key vault. HSM keys, on the other hand, can never be exported. In addition, all cryptographic operations using HSM keys are always performed within the HSM boundary.
Implement logging
You can monitor access to Key Vault by enabling logging. Logs include:
![]() All REST API requests including failed, unauthenticated or unauthorized requests
All REST API requests including failed, unauthenticated or unauthorized requests
![]() Key vault operations to create, delete or change settings
Key vault operations to create, delete or change settings
![]() Operations that involve keys, secrets, and certificates in the key vault
Operations that involve keys, secrets, and certificates in the key vault
Logs are saved to an Azure storage account of your choice, in a new container (generated for you) named insights-logs-auditevent. To set up diagnostic logging, follow these steps:
-
Navigate to the Azure portal accessed via https://portal.azure.com.
-
Navigate to More Services from the navigation menu and type “key vault “ to filter the list and find Key Vaults, and then select it.
-
From the Key vaults blade, select the key vault to enable logging for.
-
From the Key vault blade, select the Diagnostics logs tab from the navigation pane.
-
From the Diagnostics logs blade, select the Turn on diagnostics link.
-
From the Diagnostics settings blade enter the following settings (Figure 3-45):
-
Provide a name for the diagnostics settings.
-
One of the following optional settings must be chosen:
-
![]() Select Archive to a storage account and configure a storage account where the logs should be stored. This storage account must be previously created using the Resource Manager deployment model (not Classic), and a new container for key vault logs will be created in this storage account.
Select Archive to a storage account and configure a storage account where the logs should be stored. This storage account must be previously created using the Resource Manager deployment model (not Classic), and a new container for key vault logs will be created in this storage account.
![]() Optionally select Stream to an event hub if you want logs to be part of your holistic log streaming solution.
Optionally select Stream to an event hub if you want logs to be part of your holistic log streaming solution.
![]() Optionally select Send logs to Log Analytics and configure an OMS workspace for the logs to be sent to.
Optionally select Send logs to Log Analytics and configure an OMS workspace for the logs to be sent to.
-
-
Select AuditEvent (the only category for key vault logging) and configure retention preferences for storage. If you configure retention settings, older logs will be deleted.
-
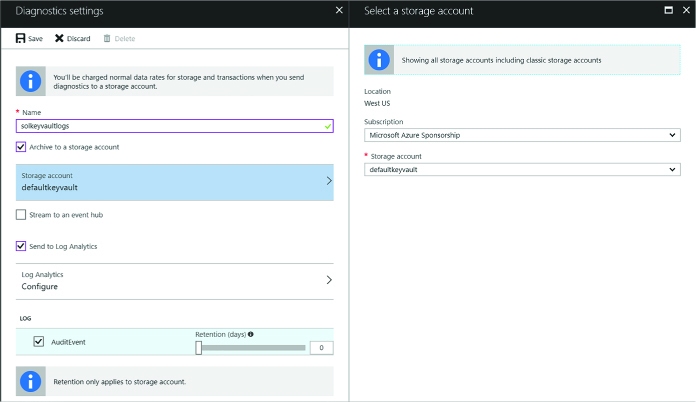
FIGURE 3-45 The Diagnostics settings blade
-
Click Save from the command bar to save these diagnostics settings.
-
You will now be able to see logs from the Diagnostics output.

Exam Tip
You can use the same storage account to collect logs for multiple key vaults. You can also seamlessly integrate key vault logs with log analytics, provided by Operations Management Services (OMS).
More Info: Manage Key Vault Logging with Powershell
See this reference for more on how to set up key vault logging including the use of PowerShell: https://docs.microsoft.com/en-us/azure/key-vault/key-vault-logging.
Implement key rotation
The beauty of working with a key vault is the ability to roll keys without impact to applications. Applications do not hold on to key material, and they reference keys indirectly through the key vault. Keys are updated without affecting this reference and so application configuration updates are no longer necessary when keys are updated. This opens the door to simplified key update procedures and the ability to embrace regular or ad-hoc key rotation schedules.
Each key, secret or certificate stored in Azure Key Vault can have one or more versions associated. The first version is created when you first create the key. Subsequent versions can be created through the Azure Portal, through key vault management interfaces, or through automation procedures.
To rotate a key from the Azure Portal, navigate to the key vault and follow these steps:
-
Select the Keys tab from the navigation pane.
-
Select the key to rotate.
-
From the key’s Versions blade (Figure 3-46), you will see the first version of the key that was created.
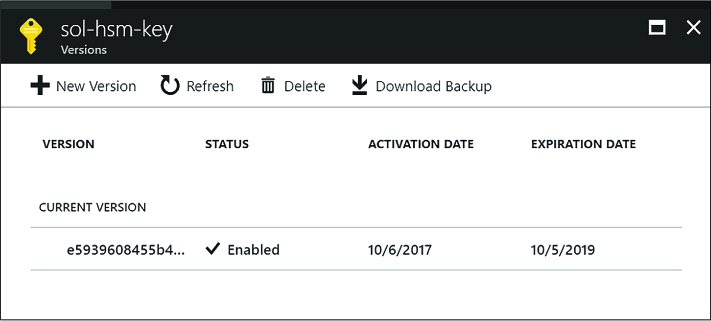
FIGURE 3-46 The Versions blade where you can create a new version
-
Click New Version from the command bar and you will be presented with the Create A Key Blade where you can generate or upload a new key to be associated with the same key name. You can choose the type of key (Software key or HSM protected key) and optionally indicate an activation and expiry timeframe. Click Create to replace the key.
-
You will now see two versions of the key on the Versions blade (Figure 3-47). Applications querying for the key will now retrieve the new version.
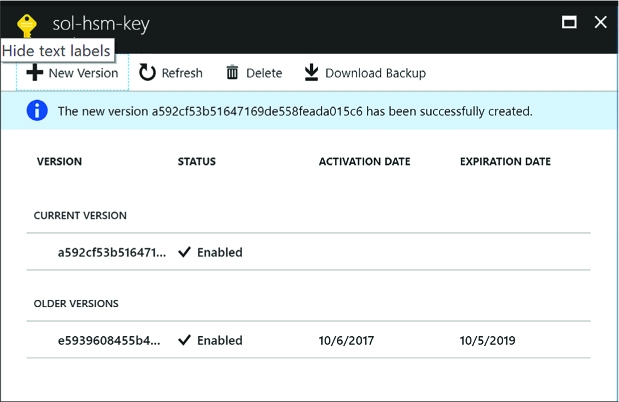
FIGURE 3-47 The Versions blade showing a new version and older versions
This key rotation procedure works similarly for secrets and certificates. Applications will now retrieve the newer version when contacting the key vault for the specified key.
More Info: Implementing Key Rotation
See this reference for more details on managing a key rotation process with PowerShell: https://docs.microsoft.com/en-us/azure/key-vault/key-vault-key-rotation-log-monitoring.

