Users Online
· Members Online: 0
· Total Members: 188
· Newest Member: meenachowdary055
Forum Threads
Latest Articles
Articles Hierarchy
Skill 2.5: Implement Azure Cosmos DB DocumentDB
Skill 2.5: Implement Azure Cosmos DB DocumentDB
Skill 2.5: Implement Azure Cosmos DB DocumentDB
Azure Cosmos DB DocumentDB is a JSON document store database, similar to MongoDB. JSON document stores are quite a bit different than traditional relational database engines, and any attempt to map concepts will likely be futile. With that in mind, we’ll do our best to use your existing knowledge of RDBMS’s while discussing this topic. JSON document stores are the fastest growing NoSQL solutions. Developers gravitate towards it because it doesn’t require assembling or disassembling object hierarchies into a flat relational design. Azure Cosmos DB was originally designed as a JSON document storage product. It has since added support for key-value (Table API) and graph (Gremlin).
JSON has been the lingua franca of data exchange on the internet for over a decade. Here is an example of JSON:
{
{
“glossary”: {
“title”: “example glossary”,
“GlossDiv”: {
“title”: “S”,
“GlossList”: {
“GlossEntry”: {
“ID”: “SGML”,
“SortAs”: “SGML”,
“GlossTerm”: “Standard Generalized Markup Language”,
“Acronym”: “SGML”,
“Abbrev”: “ISO 8879:1986”,
“GlossDef”: {
“para”: “A meta-markup language, used to create markup languages such as DocBook.”,
“GlossSeeAlso”: [“GML”, “XML”]
},
“GlossSee”: “markup”
}
}
}
}
}
Notice the hierarchal nature of JSON. One of the key advantages of JSON is that it can express an object model that developers often create in code. Object models have parent nodes and child nodes. In our above example, GlossTerm is a child object of GlossEntry. JSON can also express arrays: GlossSeeAlso has two values in it. When relational database developers create an API to store JSON, they have to undergo a process called shredding where they remove each individual element and store them in flat tables that have relationships with each other. This process was time-consuming, offered little in real business value, and was prone to errors. Because of these drawbacks, developers often turn towards JSON document stores, where saving a document is as easy as pressing the Save icon in Microsoft Word. In this section we’ll show how to create an object model, save it, and query it using Azure Cosmos DB DocumentDB.
This skill covers how to:
![]() Choose the Cosmos DB API surface
Choose the Cosmos DB API surface
![]() Create Cosmos DB API Databases and Collections
Create Cosmos DB API Databases and Collections
![]() Query documents
Query documents
![]() Run Cosmos DB queries
Run Cosmos DB queries
![]() Create Graph API databases
Create Graph API databases
![]() Execute GraphDB queries
Execute GraphDB queries
Choose the Cosmos DB API surface
Like previously mentioned, Azure Cosmos DB is a multi-model database that has several different APIs you can choose between: Table, DocumentDB, and GraphDB.
Azure Cosmos DB Table API provides the same functionality and the same API surface as Azure Storage tables. If you have an existing application that uses Azure Storage tables, you can easily migrate that application to use Azure Cosmos DB. This will allow you to take advantage of better performance, global data distribution, and automatic indexing of all fields, thus reducing significant management overhead of your existing Azure Storage table application.
Azure Cosmos DB Document DB is an easy-to-implement JSON document storage API. It is an excellent choice for mobile applications, web application, and IoT applications. It allows for rapid software development by cutting down the code the developer has to write to either shred their object model into a relational store, or manage the consistency of manual indexing in Azure Storage Tables. It also is compatible with MongoDB, another JSON document storage product. You can migrate an existing MongoDB application to Azure Cosmos DB DocumentDB.
Azure Cosmos DB supports the Gremlin, a popular graph API. This allows developers to write applications that take advantage of Graph traversal of their data structures. Graph databases allow us to define the relationship between entities that are stored. For instance, we can declare that one entity works for another one, is married to a different one, and owns even a different one. Entities are not people, rather they are entries defined in our data store. We can say Paula works for Sally and is married to Rick. Paula owns a vintage Chevy Corvette. Knowing these, we can write a simple line of code in Gremlin to find out what car Paula owns. Graph databases excel at defining relationships and exploring the network of those relationships. As a result, they have been popular as engines for social media applications. Because Azure Cosmos DB supports the Gremlin API, it is easy to port existing applications that use it to Azure Cosmos DB.
Create Cosmos DB API Database and Collections
Each Cosmos DB account must have at least one database. A database is a logical container that can contain collections of documents and users. Users are the mechanism that get permissions to Cosmos DB resources. Collections primarily contain JSON documents. Collections should store JSON documents of the same type and purpose, just like a SQL Server table. Collections are different than tables because they don’t enforce that documents have a particular schema. This can be very foreign to the relational database developer who assumes that every record in a table will have the same number of columns with the same data types. Collections should have documents of the same properties and data types, but they aren’t required to. Azure Cosmos DB DocumentDB gracefully handles if columns don’t exist on a document. For instance, if we are looking for all customers in zip code 92101, and a customer JSON document doesn’t happen to have that property, Azure Cosmos DB just ignores the document and doesn’t return it.
Collections can also store stored procedures, triggers, and functions. These concepts are also similar to relational databases, like Microsoft SQL Server. Stored procedures are application logic that are registered with a collection and repeatedly executed. Triggers are application logic that execute either before or after an insert, update (replace), or delete operation. Functions allow you to model a custom query operator and extend the core DocumentDB API query language. Unlike SQL Server, where these components are written in Transact-SQL, Azure DocumentDB stored procedures, triggers, and functions are written in JavaScript.
Before we can begin writing code against Azure Cosmos DB, we must first create an Azure Cosmos DB account. Follow these steps:
-
Sign in to the Azure portal.
-
On the left pane, click New, Databases, and then click Azure Cosmos DB.
-
On the New account blade, choose your programming model. For our example, click SQL (DocumentDB).
-
Choose a unique ID for this account. It must be globally unique, such as developazure1, but then you should call yours developazure(your given name here). This will be prepended to documents.azure.com to create the URI you will use to gain access to your account.
-
Choose the Subscription, Resource Group, and Location of your account.
-
Click Create.
-
Now let’s create a Visual Studio solution.
-
Open Visual Studio 2015 or 2017.
-
Create a New Project.
-
Select Templates, Visual C#, Console Application.
-
Name your project.
-
Click OK.
-
Open Nuget Package Manager.
-
In the Browse tab, look for Azure DocumentDB. Add the Microsoft.Azure.DocumentDB client to your project.
-
In order to use the code, you may need a using statement like this:
using Microsoft.Azure.Documents.Client;
using Microsoft.Azure.Documents;
using Newtonsoft.Json;
Azure Cosmos DB requires two things in order to create and query documents, an account name and an access key. This should be familiar to you if you read the section on Azure Storage blobs or Azure Storage tables. You should store them in constants in your application like this:
private const string account = "<your account URI>";
private const string key = "<your key>";
Azure DocumentDB SDK also has several async calls, so we’ll create our own async function called TestDocDb. We’ll call it in the Main function of the console app.
static void Main(string[] args)
{
TestDocDb().Wait();
}
You can find both of these things in Azure portal for your Azure Cosmos DB account. To create a database named SalesDB, use the following code:
private static async Task TestDocDb()
{
string id = "SalesDB";
var database = _client.CreateDatabaseQuery().Where(db => db.Id == id).AsEnumerable().FirstOrDefault();
if (database == null)
{
database = await client.CreateDatabaseAsync(new Database { Id = id });
}
Now that we have a database for our sales data, we’ll want to store our customers. We’ll do that in our Customers collection. We’ll create that collection with the following code:
string collectionName = "Customers";
var collection = client.CreateDocumentCollectionQuery(database.CollectionsLink).
Where(c => c.Id == collectionName).AsEnumerable().FirstOrDefault();
if (collection == null)
{
collection = await client.CreateDocumentCollectionAsync(database.CollectionsLink,
new DocumentCollection { Id = collectionName});
}
Now let’s add a few documents to our collection. Before we can do that, let’s create a couple of plain-old CLR objects (POCOs). We want a little complexity to see what those documents look like when serialized out to Azure Cosmos DB. First we’ll create a phone number POCO:
public class PhoneNumber
{
public string CountryCode { get; set; }
public string AreaCode { get; set; }
public string MainNumber { get; set; }
}
And now we add another POCO for each customer and their phone numbers:
public class Customer
{
public string CustomerName { get; set; }
public PhoneNumber[] PhoneNumbers { get; set; }
}
Now let’s instantiate a few customers:
var contoso = new Customer
{
CustomerName = "Contoso Corp",
PhoneNumbers = new PhoneNumber[]
{
new PhoneNumber
{
CountryCode = "1",
AreaCode = "619",
MainNumber = "555-1212" },
new PhoneNumber
{
CountryCode = "1",
AreaCode = "760",
MainNumber = "555-2442" },
}
};
var wwi = new Customer
{
CustomerName = "World Wide Importers",
PhoneNumbers = new PhoneNumber[]
{
new PhoneNumber
{
CountryCode = "1",
AreaCode = "858",
MainNumber = "555-7756" },
new PhoneNumber
{
CountryCode = "1",
AreaCode = "858",
MainNumber = "555-9142" },
}
};
Once the customers are created, it becomes really easy to save them in Azure Cosmos DB DocumentDB. In order to serialize the object model to JSON and save it, it is really only once line of code:
await client.CreateDocumentAsync(collection.DocumentsLink, contoso);
And, to save the other document:
await _client.CreateDocumentAsync(collection.DocumentsLink, wwi);
Now that the documents are saved, you can log into your Cosmos DB account in the Azure portal, open Document Explorer and view them. Document Explorer is accessible on the top menu toolbar of your Cosmos DB configuration pane.
Query documents
Retrieving documents from Azure Cosmos DB DocumentDB is where the magic really happens. The SDK allows you to call a query to retrieve a JSON document and store the return in an object model. The SDK wires up any properties with the same name and data type automatically. This will sound amazing to a relational database developer who might be used to writing all of that code by hand. With Cosmos DB, the wiring up of persistence store to the object model happens without any data layer code.
In addition, the main way to retrieve data from Azure Cosmos DB is through LINQ, the popular C# feature that allows developers to interact with objects, Entity Framework, XML, and SQL Server.
Run Cosmos DB queries
There are three main ways you can query documents using the Azure Cosmos DB SDK: lambda LINQ, query LINQ, and SQL (a SQL-like language that’s compatible with Cosmos DB).
A query of documents using lambda LINQ looks like this:
var customers = client.CreateDocumentQuery<Customer>(collection.DocumentsLink).
Where(c => c.CustomerName == "Contoso Corp").ToList();
A query of documents using LINQ queries looks like this:
var linqCustomers = from c in
client.CreateDocumentQuery<Customer>(collection.DocumentsLink)
select c;
A query for documents using SQL looks like this:
var customers = client.CreateDocumentQuery<Customer>(collection.DocumentsLink,
"SELECT * FROM Customers c WHERE c.CustomerName = 'Contoso Corp'");
More Info: Documentdb Query Tutorial
Azure Cosmos DB has a demo tool that will teach you how to write SQL against the hierarchal nature of JSON. It can be found here: https://www.documentdb.com/sql/demo.
Create Graph API databases
In order to create a Graph API database, you should follow the exact steps at the beginning of this objective. The difference would be that in the creation blade of Azure Cosmos DB, instead of choosing SQL as the API, choose Gremlin Graph API.
Use the following code to create a document client to your new Azure Cosmos DB Graph API account:
using (DocumentClient client = new DocumentClient(
new Uri(endpoint),
authKey,
new ConnectionPolicy { ConnectionMode = ConnectionMode.Direct, ConnectionProtocol
= Protocol.Tcp }))
Once you have a client instantiated, you can create a new graph database with this code:
Database database = await client.CreateDatabaseIfNotExistsAsync(new Database
{ Id = "graphdb" });
Just like before, we need a collection for our data, so we’ll create it like this:
DocumentCollection graph = await client.CreateDocumentCollectionIfNotExistsAsync(
UriFactory.CreateDatabaseUri("graphdb"),
new DocumentCollection { Id = "graph" },
new RequestOptions { OfferThroughput = 1000 });
Execute GraphDB queries
GraphDB API queries are executed very similarly to the queries we looked at before. GraphDB queries are defined through a series of Gremlin steps. Here is a simple version of that query:
IDocumentQuery<dynamic> query = client.CreateGremlinQuery<dynamic>
(graph, "g.V().count()");
while (query.HasMoreResults)
{
foreach (dynamic result in await query.ExecuteNextAsync())
{
Console.WriteLine($"\t {JsonConvert.SerializeObject(result)}");
}
}
Implement MongoDB database
Azure Cosmos DB can be used with applications that were originally written in MongoDB. Existing MongoDB drivers are compatible with Azure Cosmos DB. Ideally, you would switch between from MongoDB to Azure Cosmos DB by just changing a connection string (after loading the documents, of course).
You can even use existing MongoDB tooling with Azure Cosmos DB.
Manage scaling of Cosmos DB, including managing partitioning, consistency, and RUs
The main method for scaling performance in Azure Cosmos DB is the collection. Collections are assigned a specific amount of storage space and transactional throughput. Transactional throughput is measured in Request Units(RUs). Collections are also used to store similar documents together. An organization can choose to organize their documents into collections in any manner that logically makes sense to them. A software company might create a single collection per customer. A different company may choose to put heavy load documents in their own collection so they can scale them separately from other collections.
We described sharding in the last section and when we discussed Azure Storage Tables. Sharding is a feature of Azure Cosmos DB also. We can shard automatically by using a partition key. Azure Cosmos DB will automatically create multiple partitions for us. Partitioning is completely transparent to your application. All documents with the same partition key value will always be stored on the same partition. Cosmos DB may store different partition keys on the same partition or it may not. The provisioned throughput of a collection is distributed evenly among the partitions within a collection.
You can also have a single partition collection. It’s important to remember that partitioning is always done at the collection, not at the Cosmos DB account level. You can have a collection that is a single partition alongside multiple partition collections. Single partition collections have a 10GB storage limit and can only have up to 10,000 RUs. When you create them, you do not have to specify a partition key. To create a single partition collection, follow these steps:
-
On you Cosmos DB account, click the overview tab and click Add Collection (Figure 2-21).

FIGURE 2-21 Creating a collection in the Azure Portal
-
On the Add Collection pane, name the collection and click Fixed for Storage Capacity. Notice how the partition key textbox automatically has a green check next to it indicating that it doesn’t need to be filled out.
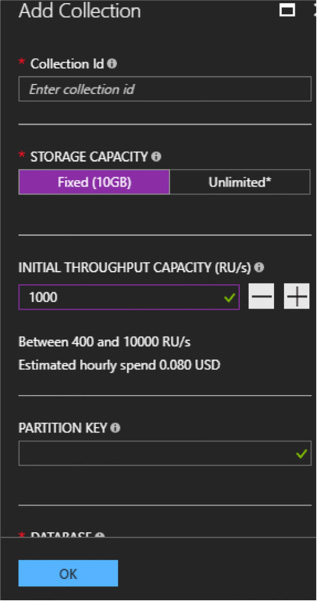
FIGURE 2-22 The Azure Portal
For multiple partition collections, it is important that you choose the right partition key. A good partition key will have a high number of distinct values without being unique to each individual document. Partitioning based on geographic location, a large date range, department, or customer type is a good idea. The storage size for documents with the same partition key is 10GB. The partition key should also be in your filters frequently.
A partition key is also the transaction boundary for stored procedures. Choose a key on documents that often get updated together with the same partition key value.
Consistency
Traditional relational databases have a little bit of baggage as it relates to data consistency. Users of those systems have the expectation that when they write data, all readers of that data will see the latest version of it. That strong consistency level is great for data integrity and notifying users when data changes, but creates problems with concurrency. Writers have to lock data as they write, blocking readers of the data until the write is over. This creates a line of readers waiting to read until the write is over. In most transactional applications, reads outnumber writes 10 to 1. Having writes block readers gives the readers the impression that the application is slow.
This has particularly created issues when scaling out relational databases. If a write occurs on one partition and it hasn’t replicated to another partition, readers are frustrated that they are seeing bad or out of date data. It is important to note that consistency has long had an inverse relationship with concurrency.
Many JSON document storage products have solved that tradeoff by having a tunable consistency model. This allows the application developer to choose between strong consistency and eventual consistency. Strong consistency slows down reads and writes while giving the best data consistency between users. Eventual consistency allows the readers to read data while writes happen on a different replica, but isn’t guaranteed to return current data. Things are faster because replicas don’t wait to get the latest updates from a different replica.
In DocumentDB, there are five tunable consistency levels:
![]() Strong Mentioned in the previous paragraph.
Strong Mentioned in the previous paragraph.
![]() Bounded Staleness Tolerates inconsistent query results, but with a freshness guarantee that the results are at least as current as a specified period of time.
Bounded Staleness Tolerates inconsistent query results, but with a freshness guarantee that the results are at least as current as a specified period of time.
![]() Session The default in DocumentDB. Writers are guaranteed strong consistency on writers that they have written. Readers and other writer sessions are eventually consistent.
Session The default in DocumentDB. Writers are guaranteed strong consistency on writers that they have written. Readers and other writer sessions are eventually consistent.
![]() Consistent Prefix Guarantees that readers do not see out of order writes. Meaning the writes may not have arrived yet, but when they do, they’ll be in the correct order.
Consistent Prefix Guarantees that readers do not see out of order writes. Meaning the writes may not have arrived yet, but when they do, they’ll be in the correct order.
![]() Eventual Mentioned in the previous paragraph.
Eventual Mentioned in the previous paragraph.
Manage multiple regions
It is possible to globally distribute data in Azure Cosmos DB. Most people think of global distribution as an high availability/disaster recovery (HADR) scenario. Although that is a side effect in Cosmos DB, it is primarily to get data closer to the users with lower network latency. European customers consume data housed in a data center in Europe. Indian customers consume data housed in India. At this writing, there are 30 data centers that can house Cosmos DB data.
Each replica will add to your Cosmos DB costs.
In a single geo-location Cosmos DB collection, you cannot really see the difference in consistency choices from the previous section. Data replicates so fast that the user always sees the latest copy of the data with few exceptions. When replicating data around the globe, choosing the correct consistency level becomes more important.
To choose to globally distribute your data, follow these steps:
-
In the Azure portal, click on your Cosmos DB account.
-
On the account blade, click Replicate data globally (Figure 2-23).
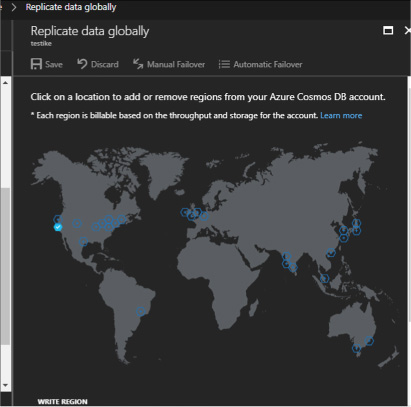
FIGURE 2-23 The Replicate data globally blade
-
In the Replicate data globally blade, select the regions to add or remove by clicking the regions on the map.
![]() One region is flagged as the write region. The other regions are read regions. This consolidates the writes while distributing the reads, and since reads often outnumber writes significantly, this can drastically improve the perceived performance of your application.
One region is flagged as the write region. The other regions are read regions. This consolidates the writes while distributing the reads, and since reads often outnumber writes significantly, this can drastically improve the perceived performance of your application.
-
You can now set that region for either manual or automatic failover (Figure 2-24). Automatic failover will switch the write region in order of priority.
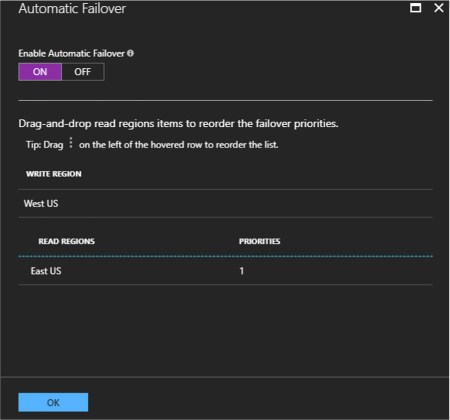
FIGURE 2-24 The Automatic Failover pane
It is also possible to choose your preferred region in your application by using the DocumentDB API. The code looks like this in C#:
ConnectionPolicy connectionPolicy = new ConnectionPolicy();
//Setting read region selection preference
connectionPolicy.PreferredLocations.Add(LocationNames.WestUS); // first preference
connectionPolicy.PreferredLocations.Add(LocationNames.EastUS); // second preference
connectionPolicy.PreferredLocations.Add(LocationNames.NorthEurope); // third preference
// initialize connection
DocumentClient docClient = new DocumentClient(
accountEndPoint,
accountKey,
connectionPolicy);
Implement stored procedures
Cosmos DB collections can have stored procedures, triggers, and user defined functions (UDFs), just like traditional database engines. In SQL Server, these objects are written using T-SQL. In Cosmos DB, they are written in JavaScript. This code will be executed directly in the collection’s partition itself. Batch operations executed on the server will avoid network latency and will be fully atomic across multiple documents in that collection’s partition. Operations in a stored procedure either all succeed or none succeed.
In order to create a Cosmos DB stored procedure in C#, you would use code that looked something like this.
var mySproc = new StoredProcedure
{
Id = "createDocs",
Body = "function(documentToCreate) {" +
"var context = getContext();" +
"var collection = context.getCollection();" +
"var accepted = collection.createDocument(collection.getSelfLink()," +
"documentToCreate," +
"function (err, documentCreated) {" +
"if (err) throw new Error('Error oh ' + documentToCreate.Name +
'- ' + err.message);" +
"context.getResponse().setBody(documentCreated.id)" +
"});" +
"if (!accepted) return;" +
"}"
};
var response = await client.CreateStoredProcedureAsync(conferenceCollection.
SelfLink, mySproc);
This code creates a stored procedure using a string literal. It takes a document in as a parameter and saves it in the collection. It does that by using the context object inside the stored procedure.
More Info: Azure Cosmos DB Stored Procedures
There’s a tutorial for implementing server side objects that’s worth going through: https://docs.microsoft.com/en-us/azure/cosmos-db/programming.
Access Cosmos DB from REST interface
Cosmos DB has a REST API that provides a programmatic interface to create, query, and delete databases, collections, and documents. So far, we’ve been using the Azure Document DB SDK in C#, but it’s possible to call the REST URIs directly without the SDK. The SDK makes these calls simpler and easier to implement, but are not strictly necessary. SDKs are available for Python, JavaScript, Java, Node.js, and Xamarin. These SDKs all call the REST API underneath. Using the REST API allows you to use a language that might not have an SDK, like Elixir. Other people have created SDKs for Cosmos DB, like Swift developers for use in creating iPhone applications. If you choose other APIs, there are SDKs in even more langauges. For instance, the MongoDB API supports Golang.
The REST API allows you to send HTTPS requests using GET, POST, PUT, or DELETE to a specific endpoint.
More Info: Azure Cosmos DB Rest API
Rest API documentation can be found here: https://docs.microsoft.com/en-us/rest/api/documentdb/.
Manage Cosmos DB security
Here are the various types of Cosmos DB security.
Encryption at rest
Encryption at rest means that all physical files used to implement Cosmos DB are encrypted on the hard drives they are using. Anyone with direct access to those files would have to unencrypt them in order to read the data. This also applies to all backups of Cosmos DB databases. There is no need for configuration of this option.
Encryption in flight
Encryption in flight is also required when using Cosmos DB. All REST URI calls are done over HTTPS. This means that anyone sniffing a network will only see encryption round trips and not clear text data.
Network firewall
Azure Cosmos DB implements an inbound firewall. This firewall is off by default and needs to be enabled. You can provide a list of IP addresses that are authorized to use Azure Cosmos DB. You can specify the IP addresses one at a time or in a range. This ensures that only an approved set of machines can access Cosmos DB. These machines will still need to provide the right access key in order to gain access. Follow these steps to enable the firewall:
-
Navigate to your Cosmos DB account.
-
Click Firewall.
-
Enable the firewall and specify the current IP address range.
-
Click Save (see Figure 2-25).
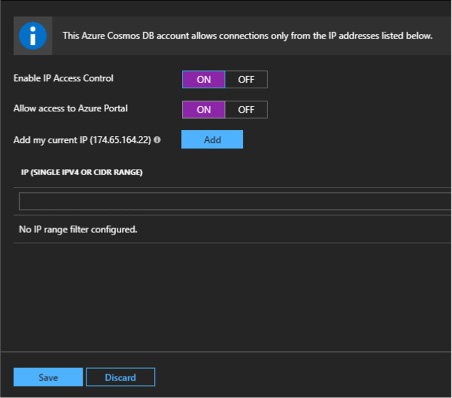
FIGURE 2-25 The Cosmos DB firewall pane
Users and permissions
Azure Cosmos DB support giving access to users in the database to specific resources or using Active Directory users.
Users can be granted permissions to an application resource. They can have two different access levels, either All or Read. All means they have full permission to the resource. Read means they can only read the resource, but not write or delete.
More Info: Azure Users AND Permissions
More information on creating permissions for database users can be found here: https://docs.microsoft.com/en-us/azure/cosmos-db/secure-access-to-data/.
Active Directory
You can use Active Directory users and give them access to the entire Cosmos DB database by using the Azure portal. Follow these steps to grant access:
-
Click on your Cosmos DB account and click Access Control (IAM).
-
Click Add to add a new Active Directory user.
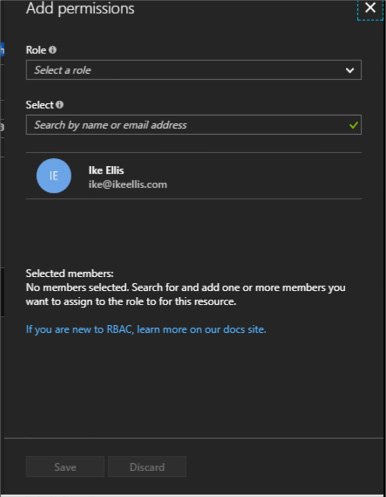
FIGURE 2-26 The Cosmos DB Add permission pane
-
Choose the appropriate role for the user and enter the user’s name or email address (Figure 2-27).
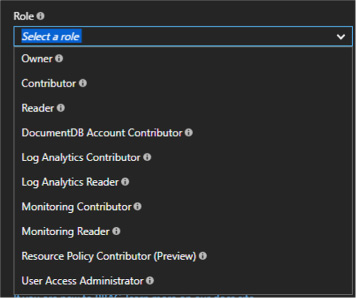
FIGURE 2-27 The Cosmos DB user role list
Now you’ve given permission to another user to that database. Note that you can give them reader access which will stop them from writing over documents. This might be good for ETL accounts, business/data analysts, or report authors.

