Users Online
· Members Online: 0
· Total Members: 188
· Newest Member: meenachowdary055
Forum Threads
Latest Articles
Articles Hierarchy
Skill 3.1: Integrate an app with Azure AD Part 1
Skill 3.1: Integrate an app with Azure AD Part 1
Azure Active Directory (Azure AD) provides a cloud-based identity management service for application authentication, Single Sign-On (SSO), and user management. Azure AD can be used for the following core scenarios:
![]() A standalone cloud directory service
A standalone cloud directory service
![]() Corporate access to Software-as-a-Service (SaaS) applications with directory synchronization
Corporate access to Software-as-a-Service (SaaS) applications with directory synchronization
![]() SSO between corporate and SaaS applications
SSO between corporate and SaaS applications
![]() Application integration for SaaS applications using different identity protocols
Application integration for SaaS applications using different identity protocols
![]() User management through a Graph API
User management through a Graph API
![]() Manage multi-factor authentication settings for a directory
Manage multi-factor authentication settings for a directory
In this section, you learn how to do the following:
![]() Set up a directory
Set up a directory
![]() How to integrate applications with Azure AD using WS-Federation,
How to integrate applications with Azure AD using WS-Federation,
OAuth and SAML-P
![]() How to query the user directory with the Microsoft Graph API
How to query the user directory with the Microsoft Graph API
![]() How to work with multi-factor authentication (MFA) features
How to work with multi-factor authentication (MFA) features
More Info: Azure AD Documentation
You can find the Azure AD documentation at: https://docs.microsoft.com/en-us/azure/active-directory/.
More Info: Using Windows Powershell to Manage Azure AD
This section will walk you through the steps to achieve results through the Azure Portal. You may want to manage some aspects of Azure AD with Windows PowerShell. For example, to initialize Azure AD for application integration you would create applications, permissions, users, and groups. For more information, see: https://docs.microsoft.com/en-us/powershell/module/Azuread/?view=azureadps-2.0.
This skill covers how to:
![]() Develop apps that use WS-Federation, SAML-P, and OpenID Connect and OAuth endpoints
Develop apps that use WS-Federation, SAML-P, and OpenID Connect and OAuth endpoints
![]() Query the directory using Microsoft Graph API, MFA and MFA API
Query the directory using Microsoft Graph API, MFA and MFA API
Preparing to integrate an app with Azure AD
There are several common scenarios for application integration with Azure AD, including the following:
![]() Users sign in to web applications
Users sign in to web applications
![]() Users sign in to JavaScript application (for example, single page applications or SPAs)
Users sign in to JavaScript application (for example, single page applications or SPAs)
![]() Browser-based applications call Web APIs from JavaScript
Browser-based applications call Web APIs from JavaScript
![]() Users sign in to native / mobile applications that call Web APIs
Users sign in to native / mobile applications that call Web APIs
![]() Web applications call Web APIs
Web applications call Web APIs
![]() Server applications or processes call Web APIs
Server applications or processes call Web APIs
Where a user is present, the user must first be authenticated at Azure AD, thus presenting proof of authentication back to the application in the form of a token. You can choose from a few protocols to authenticate the user: WS-Federation, SAML-P, or OpenID Connect. OpenID Connect is the recommended path because it is the most modern protocol available, and is based on OAuth 2.0. Scenarios that involve API security are typically based on OAuth 2.0 flows, though this is not a strict requirement.
Authentication workflows involve details at the protocol level, but Figure 3-1 illustrates from a high level the OpenID Connect workflow for authenticating users to a web app. The user typically starts by navigating to a protected area of the web app, or electing to login (1). The application then sends an OpenID Connect sign in request (2) to Azure AD. If the user does not yet have a session at Azure AD (usually represented by a cookie), they are prompted to login (3). After successfully authenticating the user’s credential (4) Azure AD writes a single sign-on (SSO) session cookie to establish the user session, and sends the OpenID Connect sign in response back to the browser (5), including an id token to identify the user. This is posted to the web app (6). The application validates the response and establishes the user session at the application (7).
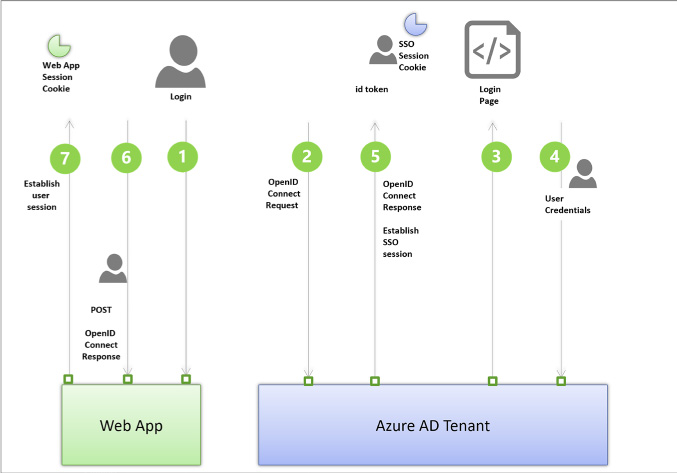
FIGURE 3-1 The high-level workflow for an OpenID Connect sign-in request
More Info: Authentication Scenarios
See the following reference for a review of these key authentication scenarios with related sample applications: https://docs.microsoft.com/en-us/azure/active-directory/develop/active-directory-authentication-scenarios.
The following steps are involved in application integration scenarios with Azure AD:
-
Create your Azure AD directory. This is your tenant.
-
Create your application.
-
Register the application with Azure AD with information about your application.
-
Write code in your application to satisfy one of the scenarios for user authentication or token requests to call APIs.
-
Receive protocol-specific responses to your application from Azure AD, including a valid token for proof of authentication or for authorization purposes.
In this section, you’ll learn how to create a directory, register an application in the Azure portal, and learn how to find integration endpoints for each protocol.
More Info: Azure AD Code Samples
Integration between applications and Azure AD involves selecting a protocol for user authentication and for specific application authorization scenarios and choosing components for your application platform to simplify working with protocols. The following reference has many authentication and authorization samples to help you apply the review in this section to code, illustrating the most common integration scenarios: https://azure.microsoft.com/en-us/resources/samples/?service=active-directory&sort=0.
Creating a directory
To create a new Azure AD directory, follow these steps:
-
Navigate to the Azure portal accessed via https://portal.azure.com.
-
Click New and select Security + Identity, then select Azure Active Directory from the list of choices.
-
From the Create Directory blade, (Figure 3-2) enter your Organization name and your domain name. Select the country or region and click Create.
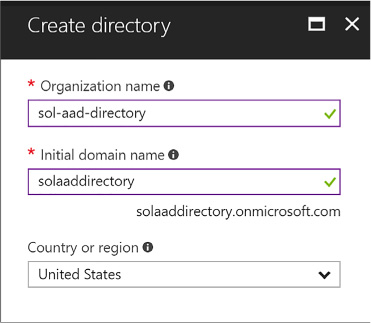
FIGURE 3-2 The Create Directory blade
-
Once created there will be a link shown on the same blade, that you can click to navigate to the directory. You can also navigate to the directory by selecting More Services from the navigate panel, then from the search textbox type active, then select Azure Active Directory. The blade for the new directory that you have created will be shown.
-
If the Azure Active Directory blade shown is not your new directory, you can switch directories by selecting the Switch Directories link from the directory blade (Figure 3-3). This drops down the directory selection menu from which you can choose the directory you want to navigate to.

FIGURE 3-3 The Switch directory link available from an Azure Active Directory blade
More Info: Creating a Premium Directory
See the following reference for setting up a premium directory: https://docs.microsoft.com/en-us/azure/active-directory/active-directory-get-started-premium.
More Info: Azure AD Connect
See the following reference for how to use Azure AD Connect to integrate your on-premises directories with your Azure AD directory: https://docs.microsoft.com/en-us/azure/active-directory/connect/active-directory-aadconnect.
Registering an application
You can register Web/API or Native applications with your directory. Web/API applications require setting up a URL for sign in responses. Native applications require setting up an application URI for OAuth2 responses to be redirected to. Visual Studio has tooling integration that supports automating the creation of applications if you configure your directory authentication while setting up the project with a template that supports this. This removes the need to manually register applications, and it initializes the configuration of the application for you as well, using middleware that understands how to integrate with Azure Active Directory.
You can manually add a Web/API application using the Azure portal by following these steps:
-
Navigate to the Azure portal accessed via https://portal.azure.com.
-
Select Azure Active Directory from the navigation panel and navigate to your directory.
-
Select App registrations (Figure 3-4) from the navigation pane, and click New Application Registration from the command bar at the top of the blade.

FIGURE 3-4 The App registrations blade
-
From the Create application blade (Figure 3-5), supply a name for the application. Choose the application type Web/API and supply the Sign-on URL, which is the address where the sign in response can be posted to the application. If you are using the OpenID Connect middleware for aspnetcore, the address will end with /signin-oidc and the middleware knows to look for responses arriving with that path.
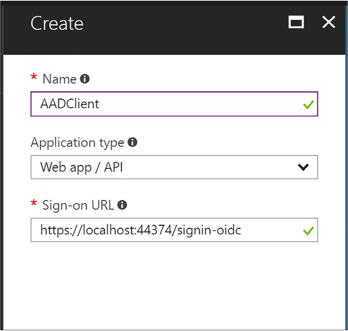
FIGURE 3-5 The Create application blade
-
Click Create to register the application.
-
Select App registrations from the navigation pane for the directory. The new application will be listed in the blade.
-
Select your application by clicking it. From here you can customize additional settings such as the following:
-
Uploading a logo for login branding
-
Indicating if the application is single or multi-tenant
-
Managing keys for OAuth scenarios
-
Controlling consent settings
-
Granting permissions
-
More Info: Integrating Applications
For additional details related to integrating applications see this reference: https://docs.microsoft.com/en-us/azure/active-directory/develop/active-directory-integrating-applications.
Viewing integration endpoints
You can integrate applications with Azure AD through several protocol endpoints including:
![]() WS-Federation metadata and sign-on endpoints
WS-Federation metadata and sign-on endpoints
![]() SAML-P sign-on and sign-out endpoints
SAML-P sign-on and sign-out endpoints
![]() OAuth 2.0 token and authorization endpoints
OAuth 2.0 token and authorization endpoints
![]() Azure AD Graph API endpoint
Azure AD Graph API endpoint

Exam Tip
The graph endpoint exposed in the Azure Portal for Azure AD directories and applications is the Azure AD Graph API, which relates to Azure AD v1 capabilities. This chapter covers the Microsoft Graph API which is the preferred way to integrate, so a different endpoint will be discussed later.
To view the endpoints (Figure 3-6) available to your directory, do the following:
-
Navigate to the Azure portal accessed via https://portal.azure.com.
-
Select Azure Active Directory from the navigation panel and navigate to your directory.
-
Select App registrations from the navigation pane for the directory, and click Endpoints from the command bar.
-
The endpoints blade (see Figure 3-2) lists protocol endpoints, such as the following:
![]() https://login.microsoftonline.com/c6cad604-0f11-4c1c-bdc0-44150037bfd9/wsfed
https://login.microsoftonline.com/c6cad604-0f11-4c1c-bdc0-44150037bfd9/wsfed
![]() https://login.microsoftonline.com/c6cad604-0f11-4c1c-bdc0-44150037bfd9/saml2
https://login.microsoftonline.com/c6cad604-0f11-4c1c-bdc0-44150037bfd9/saml2
![]() https://graph.windows.net/c6cad604-0f11-4c1c-bdc0-44150037bfd9
https://graph.windows.net/c6cad604-0f11-4c1c-bdc0-44150037bfd9
![]() https://login.microsoftonline.com/c6cad604-0f11-4c1c-bdc0-44150037bfd9/oauth2/token
https://login.microsoftonline.com/c6cad604-0f11-4c1c-bdc0-44150037bfd9/oauth2/token
![]() https://login.microsoftonline.com/c6cad604-0f11-4c1c-bdc0-44150037bfd9/oauth2/authorize
https://login.microsoftonline.com/c6cad604-0f11-4c1c-bdc0-44150037bfd9/oauth2/authorize
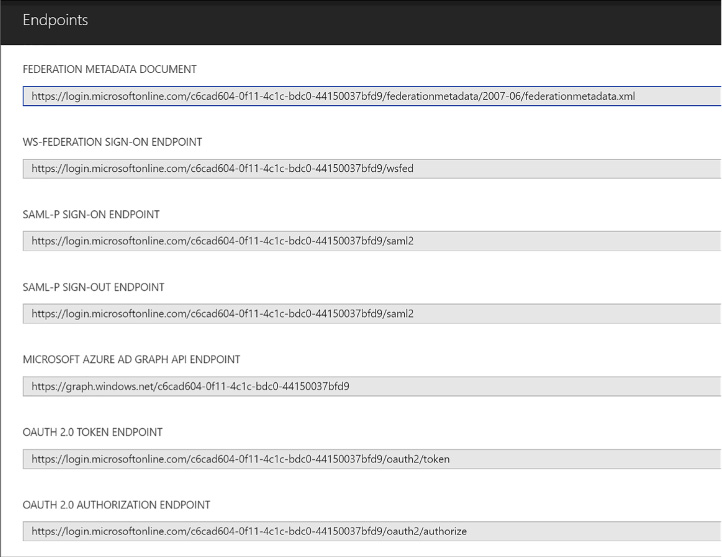
FIGURE 3-6 A list of protocol endpoints for an Azure AD tenant
Develop apps that use WS-Federation, SAML-P, OpenID Connect and OAuth endpoints
You can integrate your applications for authentication and authorization workflows using WS-Federation, SAML Protocol (SAML-P), OpenID Connect and OAuth 2.0. Azure AD OAuth 2.0 and endpoints support both OpenID Connect and OAuth 2.0 integration for authentication or authorization requests. If your applications require support for WS-Federation or SAML 2.0 protocol you can use those endpoints to achieve the integration. This section discusses integration using these protocols.
Note: Openid Connect
OpenID Connect extends the features of OAuth 2.0 protocol to support user authentication workflows and session management. The OAuth 2.0 authorization endpoint is the endpoint used by OpenID Connect to perform authentication, and some new endpoints are introduced with OpenID Connect that also support session management, although you may not see all of these endpoints exposed directly by Azure AD. The endpoints exposed by an identity service are often implementation specific while they still (should) follow the protocols at their core.
Integrating with OpenID Connect
OAuth 2.0 is an authorization protocol, not an authentication protocol. OpenID Connect extends OAuth 2.0 with standard flows for user authentication and session management. Today’s applications typically use OpenID Connect workflows authenticating users from web, JavaScript, or mobile applications (via the browser). OpenID Connect authentication involves the application sending a sign in request to the directory, and receiving a sign in response at the application. The sign in response includes an id token representing proof of authentication, and the application uses this to establish the user session at the application.
To create an aspnetcore application that authenticates users with OpenID Connect, do the following from Visual Studio 2017:
-
Open Visual Studio 2017 and create a new project based on the ASP.NET Core Web Application project template (Figure 3-7). Select Web Application for the style of application on the second dialog and then click Change Authentication.
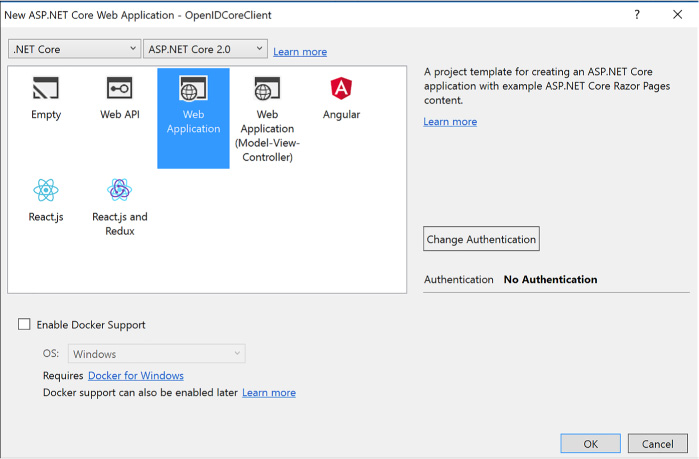
FIGURE 3-7 The new ASP.NET Core Web Application dialog
-
Select Work or School Accounts and enter your Azure AD domain into the textbox provided (if you are signed in, this will also be available in the drop-down list). Click OK to return to the previous dialog, and again click OK to accept the settings and create the project (Figure 3-8).
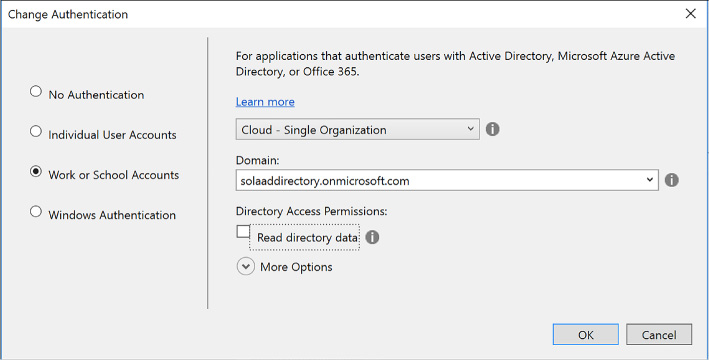
FIGURE 3-8 The Change Authentication dialog
-
Visual Studio will register this application with your Azure AD directory, and configure the project with the correct application settings in the appsettings.json file. These settings provide the following key information to the middleware:
-
Which directory to communicate with (Domain and TenantId).
-
Which registered application is making the request (ClientId).
-
Which redirect URI should be provided with the sign in request, so that Azure AD can validate this in its list of approved redirect URIs (built from the CallbackPath).
-
The base address of the Azure AD instance to send requests to (Instance).
-
-
The following settings are found in the web.config for the new project:
"AzureAd": { "Instance": "https://login.microsoftonline.com/",
"Domain": "solaaddirectory.onmicrosoft.com",
"TenantId": "c6cad604-0f11-4c1c-bdc0-44150037bfd9",
"ClientId": "483db32c-f517-495d-a7b5-03d6453c939c",
"CallbackPath": "/signin-oidc"
},
-
Navigate to your Azure AD directory (Figure 3-9) at the Azure portal and view the App registrations. Select your new application to view its properties. The properties show the App ID URI used to uniquely identify your application at the directory, and the home page URL used to send protocol responses post sign in.
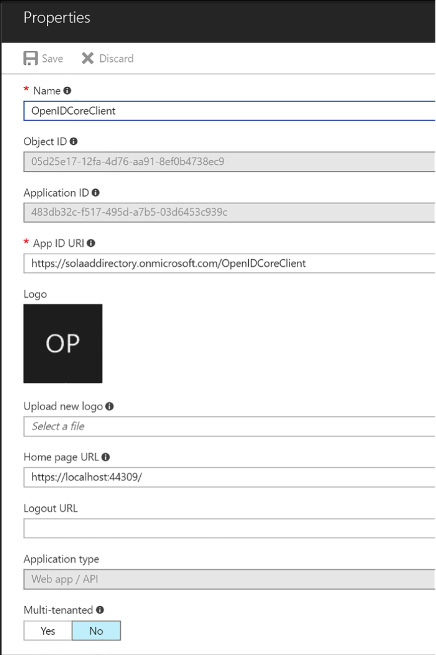
FIGURE 3-9 Azure AD application settings blade
When you run the new project from Visual Studio you will see a workflow like this:
-
A user navigates to the application.
-
When the user browses to a protected page or selects Login, the application redirects anonymous users to sign in at Azure AD, sending an OpenID Connect sign in request to the OAuth endpoint.
-
The user is presented with a login page, unless she has previously signed in and established a user session at the Azure AD tenant.
-
When authenticated, an OpenID Connect response is returned via HTTP POST to the application URL, and this response includes an id token showing proof of user authentication.
-
The application processes this response, using the configured middleware that supports OpenID Connect protocol, and verifies the token is signed by the specified trusted issuer (your Azure AD tenant), onfirming that the token is still valid.
-
The application can optionally use claims in the token to personalize the application experience for the logged in user.
-
The application can also optionally query Azure AD for groups for authorization purposes.
Note: Oauth Endpoints
Azure AD exposes two OAuth endpoints: the authorization endpoint (supports authentication via OpenID Connect) and the token endpoint (supports requests pertaining to access tokens). These are protocol endpoints defined by the OAuth 2.0 protocol. Middleware components that support OpenID Connect and OAuth 2.0 usually rely on a well-known OpenID Connect metadata endpoint at the identity service to discover which endpoint to send requests to. This metadata endpoint for a given directory looks something like this: https://login.microsoftonline.com/solaaddirectory.onmicrosoft.com/.well-known/openid-configuration.
More Info: Openid Connect Sample
For more information on integrating an ASP.NET MVC application using the OWIN framework to handle OpenID Connect requests and responses, see: https://github.com/Azure-Samples/active-directory-dotnet-webapp-openidconnect.
Integrating with OAuth
OAuth 2.0 is an authorization protocol that is typically used for delegated authorization scenarios where user consent is required to access resources, and for access token requests. The desired response from an OAuth 2.0 authorization request is an access token, which is typically used to call APIs protecting resources.
Before an application can request tokens, it must be registered with the Azure AD tenant and have both a client id and secret (key) that can be used to make OAuth requests on behalf of the application.
To generate a secret for an application, complete the following steps:
-
Navigate to the directory from the Azure portal accessed via https://portal.azure.com.
-
Click App registrations in the navigation pane, and select the application you want to enable for token requests via OAuth.
-
Select Keys in the navigation pane. Provide a friendly name for the key and select a duration for the key to be valid (Figure 3-10).
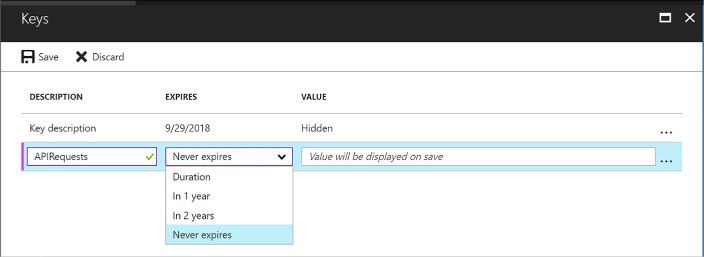
FIGURE 3-10 The Keys blade for an application in Azure AD
-
Click Save on the command bar and the value for the key appears.
-
Copy the key somewhere safe; it will not be presented again.
-
You can now use the client id and secret (key) to perform OAuth token requests from your application.
A later section, “Query the Graph API,” covers an example of an OAuth token request authorizing an application to use the Graph API.
More Info: Oauth Token Request Samples
The following samples illustrate authorizing users and applications for OAuth token requests: https://github.com/Azure-Samples/active-directory-dotnet-webapp-webapi-oauth2-useridentity and https://github.com/Azure-Samples/active-directory-dotnet-webapp-webapi-oauth2-appidentity.
Integrating with WS-Federation
WS-Federation is an identity protocol used for browser-based applications for user authentication. To create a new ASP.NET MVC application that integrates with the WS-Federation endpoint there are a number of custom coding steps that are required since the templates do not support this directly. Those steps are discussed at the following reference: https://github.com/Azure-Samples/active-directory-dotnet-webapp-wsfederation.
Note: Visual Studio
The reference uses Visual Studio 2013 but the steps work for Visual Studio 2017.
A few key points to call out about the setup for WS-Federation are as follows:
-
When you create a new project using Visual Studio (for example, based on the ASP.NET Web Application project template) you will select MVC for the style of application on the second dialog and leave No Authentication as the authentication option for the template (Figure 3-11). If you choose other authentication options, the generated code will always use OpenID Connect as the protocol, and this will not work for WS-Federation or other protocols.
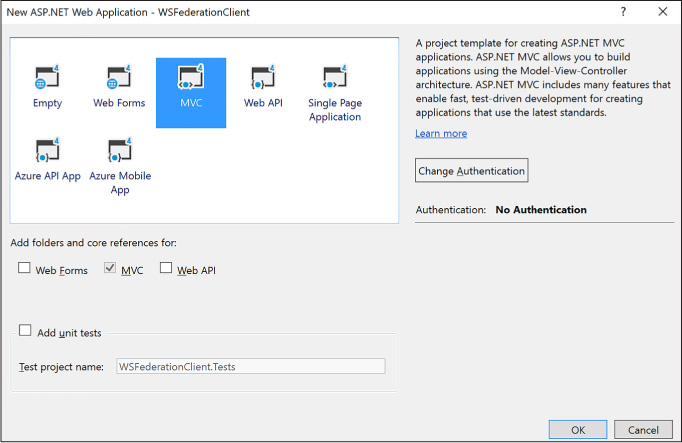
FIGURE 3-11 The new ASP.NET Web Application dialog with no authentication option selected
-
You will have to add code per the above reference to communicate using WS-Federation protocol and set up the application settings required to match your Azure AD setup for the application.
-
You will register an Azure AD application following the steps shown earlier in this skill. Here is an example for a WS-Federation application setup (Figure 3-12).
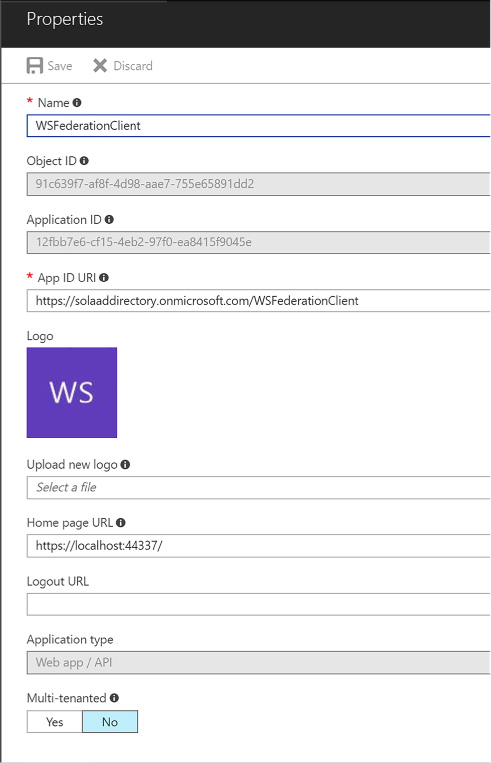
FIGURE 3-12 The settings for a registered WS-Federation compatible application in Azure AD
-
The details for connecting an MVC application with the registered Azure AD application for WS-Federation are covered in the reference. It shows you how to setup the OWIN middleware for WS-Federation: WsFederationAuthenticationMiddleware. In addition to following those steps, note the following:
-
Ensure that the App ID URI matches the wtrealm parameter that will be passed in the WS-Federation request from the client application.
-
Ensure SSL is enabled for your application.
-
Ensure that the Home page URL is an HTTPS endpoint and matches the application SSL path.
-
When you run a WS-Federation client you will see the following workflow:
-
A user navigates to the application.
-
When the user browses to a protected page or selects Login, the application redirects anonymous users to sign in at Azure AD, sending a WS-Federation protocol request that indicates the application URI for the realm parameter. The URI matches the App ID URI shown in the registered application settings.
-
The request is sent to the tenant WS-Federation endpoint.
-
The user is presented with a login page, unless she has previously signed in and established a user session at the Azure AD tenant.
-
When authenticated, a WS-Federation response is returned via HTTP POST to the application URL - and this response includes a SAML token showing proof of user authentication.
-
The application processes this response, using the configured OWIN middleware that supports WS-Federation, and verifies the token is signed by the specified trusted issuer (your Azure AD tenant), and confirms that the token is still valid.
-
The application can optionally use claims in the token to personalize the application experience for the logged in user.
-
The application can optionally query Azure AD for groups for authorization purposes.
Note: Federation Metadata
WS-Federation exposes two endpoints: one for metadata and one for sign-in and sign-out. The metadata endpoint exposes the standard federation metadata document that many identity middleware know how to consume to discover the address of the sign-in and sign-out endpoint, the certificate required to validate signatures in a response, and other endpoints available at the service, such as SAML-P endpoints. If you use the metadata endpoint, your application should dynamically receive updates, such as new certificates used by the service. The sign-in and sign-out endpoint expects parameters indicating the purpose of the request.
Integrating with SAML-P
SAML 2.0 Protocol (SAML-P) can be used like WS-Federation to support user authentication to browser-based applications. For example, SAML-P integration with Azure AD might follow steps like this:
-
A user navigates to your application.
-
Your application redirects anonymous users to authenticate at Azure AD, sending a SAML-P request that indicates the application URI for the ConsumerServiceURL element in the request.
-
The request is sent to your tenant SAML2 sign in endpoint.
-
The user is presented with a login page, unless she has previously signed in and established a user session at the Azure AD tenant.
-
When authenticated, a SAML-P response is returned via HTTP POST to the application URL. The URL to use is specified in the single sign-on settings as the Reply URL. This response contains a SAML token.
-
The application processes this response, verifies the token is signed by a trusted issuer (Azure AD), and confirms that the token is still valid.
-
The application can optionally use claims in the token to personalize the application experience for the logged in user.
-
The application can optionally query Azure AD for groups for authorization purposes.
Note: SAML-P Endpoints
SAML-P support in Azure AD includes a sign-on and sign-out endpoint, and they are both the same URL. The protocol describes how to format each request so that the endpoint knows which action is requested.
More Info: SAML Protocol
SAML-P tools are not provided as part of the .NET Framework libraries; however, there are a few third-party libraries available for building applications based on this protocol. Typically, support for SAML-P becomes important when you are integrating other SaaS applications with your Azure AD because some applications do not support WS-Federation or OpenID Connect. For more information on SAML-P and Azure AD, see https://docs.microsoft.com/en-us/azure/active-directory/active-directory-saml-protocol-reference.

