Users Online
· Members Online: 0
· Total Members: 188
· Newest Member: meenachowdary055
Forum Threads
Latest Articles
Articles Hierarchy
Skill 1.7: Design and implement DevTest Labs Part 2
Skill 1.7: Design and implement DevTest Labs Part 2
Configure cost management
Azure DevTest Labs was designed to help development teams more effectively manage costs and resources. One of the key features of this is Cost Management, which allows you to track the cost associated with operating your lab. You can also view trends, set cost targets and thresholds, and configure alerts to keep you informed about your monthly costs. Cost threshold targets allow you to monitor usage throughout the month, and potentially alter behavior accordingly if you see spending happening faster than anticipated during a specified time period.
To view your Cost trend chart, navigate to the blade for your DevTest Labs instance, and select Cost trend from the Configuration and policies blade of your lab (Figure 1-84).
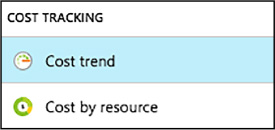
FIGURE 1-84 Cost Trend
Cost trend
The Monthly Estimated Cost Trend chart displays the current calendar month’s estimated cost-to-date, and the projected end-of-month cost for the current calendar month (Figure 1-85).
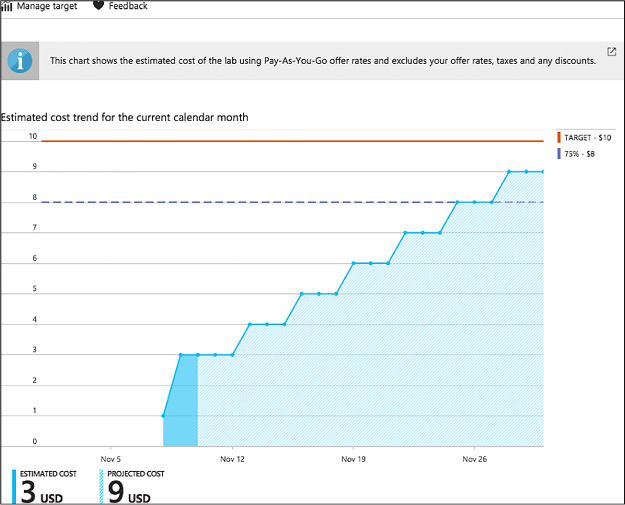
FIGURE 1-85 Cost trend chart
Azure DevTest Labs allows you to modify the time span displayed on the chart, specify target costs, and set up notifications. You can configure these options by completing the following steps:
-
From the Cost trend blade, select Manage target (Figure 1-86).
![]()
FIGURE 1-86 Manage Target
-
On the Manage target blade:
-
Select the time period you would like displayed on the chart. Monthly is the default, and will display the current month. Selecting Fixed allows you to specify a set time period to display on the chart (Figure 1-87).
-
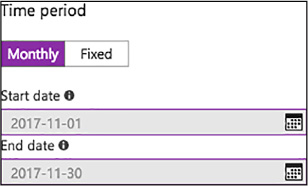
FIGURE 1-87 Target Time Period
-
-
Specify a numeric value (in USD) for your target monthly cost (Figure 1-88).
-
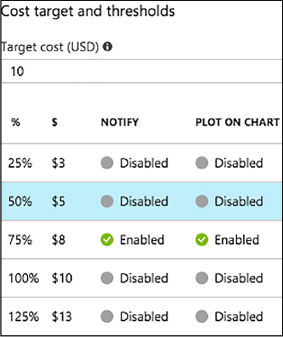
FIGURE 1-88 Target cost value
-
-
Select any desired cost thresholds, and on the Cost threshold blade, specify whether to send notifications, and if you would like the threshold displayed on the trend chart, then select OK (Figure 1-89).
-
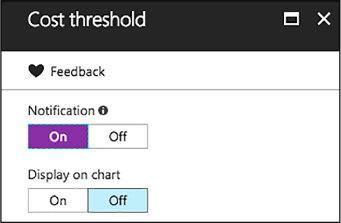
FIGURE 1-89 Target thresholds
-
-
If you chose to enable notifications, click to add an integration of a Webhook under Cost integrations. The lab will post a notification to the specified endpoint if lab spending reaches a threshold for which you have opted to receive notification (Figure 1-90).
-
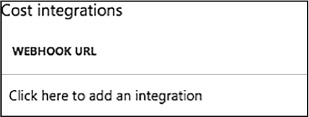
FIGURE 1-90 Add Webhook integration
-
-
On the Configure notification blade, enter a Webhook URL, and Select OK (Figure 1-91).
-
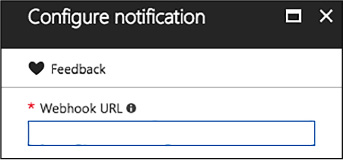
FIGURE 1-91 Webhook URL
-
-
Select OK to save the trend chart targets.
-
The estimated cost value is the current calendar month’s estimated cost-to-date. The projected cost is the estimated cost for the entire calendar month, calculated using the lab cost for the previous five days. These cost numbers are rounded up the nearest whole number, and do not reflect actual costs.
More Info: Webhooks
Webhooks are user defined HTTP/HTTPS endpoints that are usually triggered by an event. You must create a Webhook prior to entering it here. For more details on creating Webhooks, see: https://docs.microsoft.com/azure/azure-functions/functions-create-github-webhook-triggered-function.
Cost by resource
To provide you with more insight into cost of operating each individual resource in your lab, you can also view a breakdown of cost by resource. To view this breakdown, follow these steps:
-
Navigate to the blade of your DevTest Labs instance.
-
On the Configuration and policies blade for your lab, select Cost by resource (Figure 1-92).
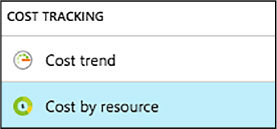
FIGURE 1-92 Cost By Resource
-
View the list of individual resources, and how much money (in USD) is being spent per resource (Figure 1-93).

FIGURE 1-93 Viewing cost by resource
-
The list can be sorted to easier view those resources which have the most associated cost.
Secure access to labs
Security access in DevTest Labs is determined by Azure Role-Based Access Control (RBAC). To understand how access works, it helps to understand the differences between a permission, a role, and a scope as defined by RBAC.
![]() Permission Defined access to a specific action (e.g. read-access to all virtual machines).
Permission Defined access to a specific action (e.g. read-access to all virtual machines).
![]() Role A set of permissions that can be grouped and assigned to a user. For example, the subscription owner role has access to all resources within a subscription.
Role A set of permissions that can be grouped and assigned to a user. For example, the subscription owner role has access to all resources within a subscription.
![]() Scope A level within the hierarchy of an Azure resource, such as a resource group, a single lab, or the entire subscription.
Scope A level within the hierarchy of an Azure resource, such as a resource group, a single lab, or the entire subscription.
Using RBAC, you can segregate duties within your team into roles where you grant only the amount of access necessary to users to perform their jobs. The three RBAC roles most relevant to Azure DevTest Labs are Owner, DevTest Labs User, and Contributor.
The Table 1-3 provides a breakdown of the actions that can be performed by users in each of these roles.
TABLE 1-3 Actions that can be performed by users in specified roles.
|
Actions users in this role can perform |
DevTest Labs User |
Owner |
Contributor |
|
LAB TASKS |
|
|
|
|
Add users to a lab |
No |
Yes |
No |
|
Update cost settings |
No |
Yes |
Yes |
|
VM BASE TASKS |
|
|
|
|
Add and remove custom images |
No |
Yes |
Yes |
|
Add, update, and delete formulas |
Yes |
Yes |
Yes |
|
Whitelist Azure Marketplace images |
No |
Yes |
Yes |
|
VM TASKS |
|
|
|
|
Create VMs |
Yes |
Yes |
Yes |
|
Start, stop, and delete VMs |
Only VMs created by the user |
Yes |
Yes |
|
Update VM policies |
No |
Yes |
Yes |
|
Add/remove data disks to/from VMs |
Only VMs created by the user |
Yes |
Yes |
|
ARTIFACT TASKS |
|
|
|
|
Add and remove artifact repositories |
No |
Yes |
Yes |
|
Apply artifacts |
Yes |
Yes |
Yes |
Add an owner or user at the lab level
Owners and users can be added at the lab level via the Azure portal. This includes external users with a valid Microsoft account (MSA). The following steps guide you through the process of adding an owner or user to a lab in Azure DevTest Labs:
-
Navigate to the blade of your DevTest Labs instance.
-
On your lab’s blade, select Configuration and policies.
-
On the Configuration and policies blade (Figure 1-94), select Access control (IAM).
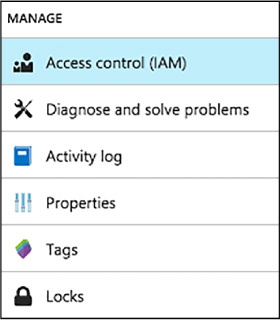
FIGURE 1-94 Access Control (IAM)
-
Select +Add
-
On the Add permission blade, select a role, Owner or DevTest Labs User (Figure 1-95).
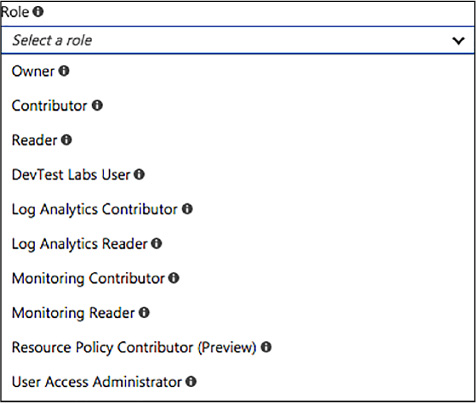
FIGURE 1-95 New lab owner role
-
On the Add permissions blade, enter a name or an email address, and select the user (Figure 1-96).
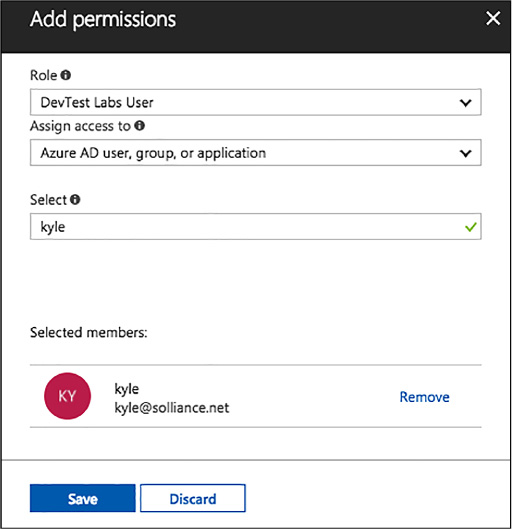
FIGURE 1-96 Add permissions to users
-
Click Save.
Add an external user to a lab using PowerShell
In addition to adding users in the Azure portal, you can add an external user to your lab using a PowerShell script.
The PowerShell script below assumes that the specified user has been added as a guest to the Active Directory, and will fail if that is not the case. To add a user not in the Active Directory to a lab, use the Azure portal to assign the user to a role as illustrated in the section, Add an owner or user at the lab level, above.
To add an external user to a lab, complete the following steps:
-
At a PowerShell prompt, log into your Azure account with the following call to the Login-AzureRmAccount cmdlet.
Login-AzureRmAccount
-
Select the desired Azure subscription by calling the Select-AzureRmSubscription cmdlet. Replace the placeholder for $subscriptionId variable with a valid Azure subscription ID.
$subscriptionId = '<Specify your subscription ID here>'
Select-AzureRmSubscription -SubscriptionId $subscriptionId
-
Retrieve the user object with the Get-AzureRmAdUser cmdlet. Replace the $userDisplayName placeholder with the appropriate value.
$userDisplayName = "<Specify the User's Display Name here>"
$adObject = Get-AzureRmADUser -SearchString $userDisplayName
-
Get the lab object by calling the Get-AzureRmResource cmdlet. Replace the following placeholders for the $labRg and $labName variables with the appropriate values for your environment.
$labRg = '<Specify your lab resource group name here>'
$labName = '<Specify your lab name here>'
$lab = Get-AzureRmResource -ResourceId ('/subscriptions/' + $subscriptionId +
'/resourceGroups/' + $labRg + '/providers/Microsoft.DevTestLab/labs/' + $labName)
-
Create the role assignment, using the New-AzureRmRoleAssignment cmdlet.
New-AzureRmRoleAssignment -ObjectId $adObject.Id -RoleDefinitionName 'DevTest
Labs User' -Scope $labId
Use lab settings to set access rights to the environment
Lab settings allow you to modify the access rights of your lab users to the resource group containing your lab resources. By giving your lab users Contributor access rights, you enable them to edit resources, such as SQL Server or Cosmos DB, in the resource group that contains your lab environment. By default, lab users have Reader access rights, and cannot change the resources in the resource group.
-
Navigate to the blade of your DevTest Labs instance.
-
On the DevTest Lab’s Overview blade, select Configuration and policies.
-
On the lab’s Configuration and policies menu, select Lab settings (Figure 1-97).
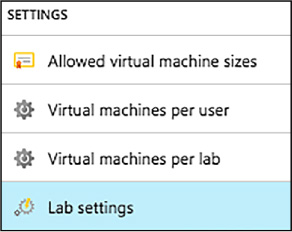
FIGURE 1-97 Lab Settings blade
-
Specify whether lab users should have Contributor or Reader access rights on the environment resource group (Figure 1-98).

FIGURE 1-98 Access rights for lab users
-
Select Save.
Use environments in a lab
The Azure portal enables you to easily create and add VMs to your lab one at a time. Sometimes, however, there is a requirement to deploy an environment containing multiple VMs, such as a multi-tier web app or a SharePoint farm. For this scenario, you can use Azure Resource Manager (ARM) templates to spin up a complete environment in DevTest labs, allowing your infrastructure to be as complicated as it needs to be for your environment.
More Info: ARM Templates
For more information on the benefits of using ARM templates to deploy, update, or delete all your lab resources in a single operation, see: https://docs.microsoft.com/azure/azure-resource-manager/resource-group-overview#the-benefits-of-using-resource-manager.
Following infrastructure-as-code and configuration-as-code best practices, environment templates are managed in source control. Azure DevTest Labs loads all ARM templates directly from your GitHub or VSTS Git repositories. As a result, Resource Manager templates can be used across the entire release cycle, from the test environment to the production environment.
Configure an ARM template repository
To provide the greatest flexibility, Azure DevTest Labs allow you to build your own repositories, which can contain multiple environment templates, each in a separate folder. There are a couple of rules to follow for organizing your Azure Resource Manager templates in a repository:
-
The master template file must be named azuredeploy.json.
-
If you want to use parameter values defined in a parameter file, the parameter file must be named azuredeploy.parameters.json.
-
You can use the parameters _artifactsLocation and _artifactsLocationSasToken to construct the parametersLink URI value, allowing DevTest Labs to automatically manage nested templates.
-
Metadata can be defined to specify the template display name and description. This metadata must be in a file named metadata.json. The following example metadata file illustrated how to specify the display name and description:
{
"itemDisplayName": "<your template name>",
"description": "<description of the template>"
}
With your ARM template added to the repo, you are now ready to add the repository to your lab. To add a repository to your lab using the Azure portal, follow the steps below:
-
Navigate to the blade of your DevTest Labs instance.
-
On your lab’s blade, select Configuration and policies.
-
From the Configuration and policies blade, select Repositories. The Repositories blade (Figure 1-99) lists the repositories that have been added to the lab. A repository named Public Repo is automatically generated for all labs, and connects to the DevTest Labs GitHub repo that contains several VM artifacts for your use.
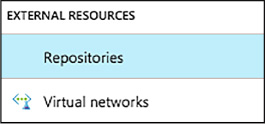
FIGURE 1-99 Repositories blade
-
Select +Add to add your Azure Resource Manager template repository.
-
When the second Repositories blade opens, enter the necessary information as follows:
-
Enter a name for the repository.
-
Enter the GIT HTTPS clone URL from GitHub or Visual Studio Team Services account.
-
Enter the branch name to access your Azure Resource Manager template definitions.
-
The personal access token is used to securely access your repository. To get your token from Visual Studio Team Services, select <YourName> > My profile > Security > Public access token. To get your token from GitHub, select your avatar followed by selecting Settings > Public access token.
-
Using one of the two input fields, enter a folder path that starts with a forward slash - / - and is relative to your Git clone URI to either your artifact definitions (first input field) or your Azure Resource Manager template definitions (Figure 1-100).
-
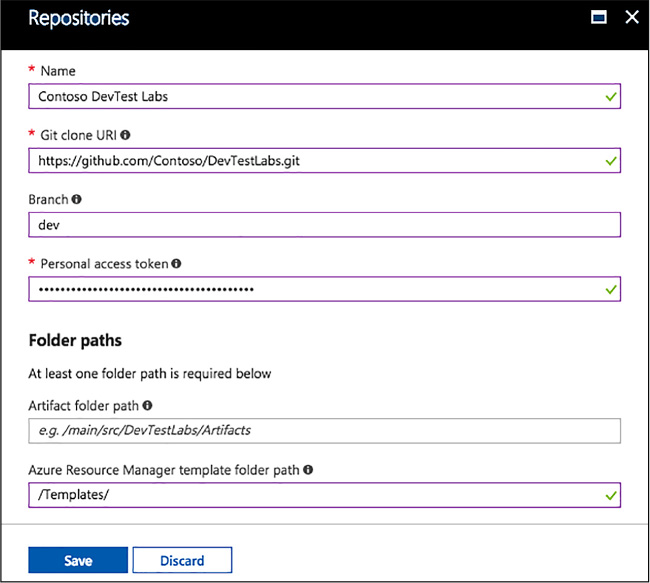
FIGURE 1-100 Repositories configuration
-
Select Save (Figure 1-101).

FIGURE 1-101 Available repositories
Create an environment from an ARM template
Once an ARM template repository has been configured in the lab, your lab users can create an environment using the Azure portal by following the steps below:
-
Navigate to the blade of your DevTest Labs instance.
-
On your lab’s Overview blade, select +Add.
-
On the Choose a base blade, you will see resources with a Type of ARM template listed first. Select the desired ARM Template.
-
On the Add blade, enter an Environment name value. This is what will be displayed to your users in the lab. The remaining input fields come from the parameters defined in the ARM template. If default values are defined in the template or the azuredeploy.parameters.json file is present, default values are displayed in those input fields. For parameter types of secure string, you can use the secrets store in the lab’s personal secret store (Figure 1-102).
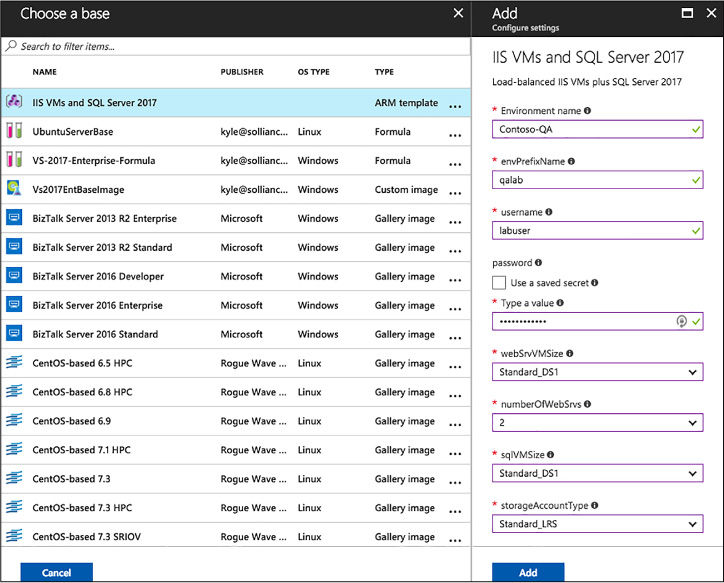
FIGURE 1-102 New environment from ARM template
-
Select Add to create the environment. The environment starts provisioning immediately with the status displaying in the My Virtual Machines list. A new resource group is automatically created by the lab to provision all the resources defined in the ARM template (Figure 1-103).

FIGURE 1-103 My Virtual Machines blade
-
Once the deployment of the environment completes, select the environment in the My Virtual Machines list to open the resource group blade, and browse all the resources provisioned in the environment (Figure 1-104).

FIGURE 1-104 Resource group for a new environment
-
You can also expand the environment in the My Virtual Machines list to view just the list of VMs that are provisioned in the environment (Figure 1-105).

FIGURE 1-105 Viewing the VMs
-
You can select any of the resources in the environment to view the available actions, such as applying artifacts, attaching data disks, changing the auto-shutdown time, and more (Figure 1-106).
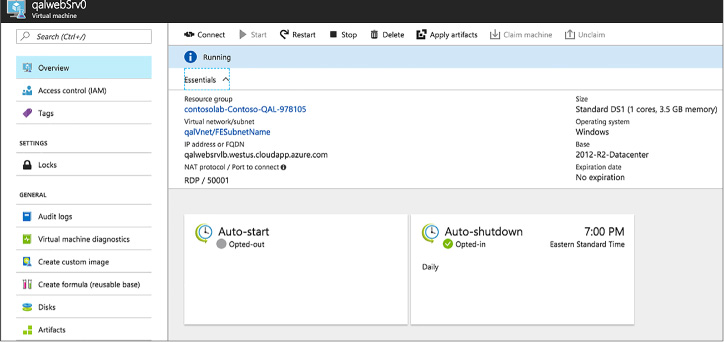
FIGURE 1-106 Available actions
Thought experiment
In this thought experiment, apply what you’ve learned about this skill. You can find answers to these questions in the “Answers” section at the end of this chapter.
Your solution architecture has two tiers: a front-end web tier that you want to configure the so that is available and scales out during the busiest times, which are weekdays, and a diagnostics VM that enables you to analyze any issues with the web tier VM instances.
-
How would you place the VMs within Scale Sets and what constraints would you need to ensure you meet them?
-
How would you configure scaling?
Thought experiment answer
This section contains the answers to the thought experiment.
-
You should ensure that you create a Virtual machine scale set for the web tier VM’s The diagnostic VM, since it does not have any scaling needs, should not be placed in a Virtual machine scale set, but it should be deployed in the same Virtual Network as used by the Scale Set so that it can reach the VM instances across the network.
-
You should configure Autoscale on the Scale Set with a condition that increases the VMs count to the desired capacity on weekdays and a default condition that sets the VM count that is in effect at all other times
Chapter summary
![]() There are two approaches to identifying supported workloads in Azure: looking for explicit support by a listing in the Marketplace and performing a manual comparison of the workload requirements against the capacities of VMs.
There are two approaches to identifying supported workloads in Azure: looking for explicit support by a listing in the Marketplace and performing a manual comparison of the workload requirements against the capacities of VMs.
![]() New VMs can be created by uploading a VM you have already created on-premises or by instantiating one from a selection of pre-built images that are available in the Marketplace.
New VMs can be created by uploading a VM you have already created on-premises or by instantiating one from a selection of pre-built images that are available in the Marketplace.
![]() Azure supports the creation of “bare-bones” VMs that provide just Windows or Linux operating system from pre-built images available in the Marketplace.
Azure supports the creation of “bare-bones” VMs that provide just Windows or Linux operating system from pre-built images available in the Marketplace.
![]() The Marketplace provides the ability to provision single VMs with pre-configured applications. The example shown in this chapter provisions SQL Server in a VM.
The Marketplace provides the ability to provision single VMs with pre-configured applications. The example shown in this chapter provisions SQL Server in a VM.
![]() The Marketplace use ARM templates to deploy and configure a complex topology consisting of multiple VMs, such as a SQL Server AlwaysOn or a SharePoint farm, the network resources and any supporting resources required.
The Marketplace use ARM templates to deploy and configure a complex topology consisting of multiple VMs, such as a SQL Server AlwaysOn or a SharePoint farm, the network resources and any supporting resources required.
![]() The VM Agent is a very lightweight process. When installed on a VM, it makes it possible to bootstrap additional VM extensions such as DSC.
The VM Agent is a very lightweight process. When installed on a VM, it makes it possible to bootstrap additional VM extensions such as DSC.
![]() The Custom Script Extension makes it possible to download files from Azure Storage, run Windows PowerShell of Linux Shell scripts, and automate copying files and configuring a VM.
The Custom Script Extension makes it possible to download files from Azure Storage, run Windows PowerShell of Linux Shell scripts, and automate copying files and configuring a VM.
![]() DSC helps you avoid configuration drift by specifying the desired state for VM provisioning and subsequent updates.
DSC helps you avoid configuration drift by specifying the desired state for VM provisioning and subsequent updates.
![]() Azure VM sizes control the capacity of the resources available to a VM instance. The size can be scaled up and scaled down using the portal or Windows PowerShell.
Azure VM sizes control the capacity of the resources available to a VM instance. The size can be scaled up and scaled down using the portal or Windows PowerShell.
![]() Virtual machine scale sets enable you to easily manage the scale up and scale down of the number of instances of a particular virtual machine image.
Virtual machine scale sets enable you to easily manage the scale up and scale down of the number of instances of a particular virtual machine image.
![]() Autoscale can be used with Virtual Machine Scale Sets to adjust the capacity based on resource metrics or according to a schedule.
Autoscale can be used with Virtual Machine Scale Sets to adjust the capacity based on resource metrics or according to a schedule.
![]() Storage capacity for VMs is dictated by the scalability limits (IOPS, throughput, and maximum file size) of Azure Storage as well as per-VM limits that adjust with the VM size (the number of VHD disks that can be attached).
Storage capacity for VMs is dictated by the scalability limits (IOPS, throughput, and maximum file size) of Azure Storage as well as per-VM limits that adjust with the VM size (the number of VHD disks that can be attached).
![]() Azure VMs support Standard Storage and Premium storage in both unmanaged and managed variants.
Azure VMs support Standard Storage and Premium storage in both unmanaged and managed variants.
![]() Disk caching provides a cache on the machine hosting your VM that can avert the need to read from or write to Blob storage. The options are None, Read Only, and Read/Write.
Disk caching provides a cache on the machine hosting your VM that can avert the need to read from or write to Blob storage. The options are None, Read Only, and Read/Write.
![]() Geo-replication should not be used for Azure Storage accounts that store VHDs because the added redundancy does not provide additional protection against corrupting the data and may in fact result in data loss if you attempt to restore from a geo-replication.
Geo-replication should not be used for Azure Storage accounts that store VHDs because the added redundancy does not provide additional protection against corrupting the data and may in fact result in data loss if you attempt to restore from a geo-replication.
![]() Azure File storage enables you to use network shares to provide distributed access to files from your VMs.
Azure File storage enables you to use network shares to provide distributed access to files from your VMs.
![]() A VM can be configured to collect diagnostics data (that is, logs) as well as performance counter metrics (CPU percentage, memory utilization, and so on).
A VM can be configured to collect diagnostics data (that is, logs) as well as performance counter metrics (CPU percentage, memory utilization, and so on).
![]() Endpoint monitoring can be configured on a VM to provide outside-in monitoring of HTTP or HTTPS endpoints provided by your VM.
Endpoint monitoring can be configured on a VM to provide outside-in monitoring of HTTP or HTTPS endpoints provided by your VM.
![]() You can monitor various metrics using the management portal, and you can configure alerts on these metrics to send out emails when a metric threshold is exceeded.
You can monitor various metrics using the management portal, and you can configure alerts on these metrics to send out emails when a metric threshold is exceeded.
![]() Diagnostic logs can be retrieved from Azure Storage (Table or Blob storage, depending on the specific type of log).
Diagnostic logs can be retrieved from Azure Storage (Table or Blob storage, depending on the specific type of log).
![]() An availability set defines both the update domains and fault domains to which VMs are assigned.
An availability set defines both the update domains and fault domains to which VMs are assigned.
![]() VMs in the same update domain will not all be updated at the same time.
VMs in the same update domain will not all be updated at the same time.
![]() VMs in the same fault domain share either the same power supply, network switch or both.
VMs in the same fault domain share either the same power supply, network switch or both.
![]() An Azure Load Balancer can be used to load balance traffic between VMs in an availability set.
An Azure Load Balancer can be used to load balance traffic between VMs in an availability set.
![]() It is a best practice to deploy VMs that represent the same application tier in the same availability set.
It is a best practice to deploy VMs that represent the same application tier in the same availability set.
![]() Azure DevTest Labs allows you to quickly spin up virtual machines (VMs) or complete environments in Azure.
Azure DevTest Labs allows you to quickly spin up virtual machines (VMs) or complete environments in Azure.
![]() Custom images and formulas facilitate the rapid deployment of pre-configured VMs in DevTest Labs.
Custom images and formulas facilitate the rapid deployment of pre-configured VMs in DevTest Labs.
![]() Custom images provide a static, immutable way to create VMs from a desired configuration, and can be created from a provisioned VM, or from a VDH, using either PowerShell or the Azure portal.
Custom images provide a static, immutable way to create VMs from a desired configuration, and can be created from a provisioned VM, or from a VDH, using either PowerShell or the Azure portal.
![]() Formulas are modifiable lists of default property values, providing a dynamic way to create VMs from a desired configuration, and can be created from a base image or an existing VM.
Formulas are modifiable lists of default property values, providing a dynamic way to create VMs from a desired configuration, and can be created from a base image or an existing VM.
![]() DevTest Labs enable you to better manage resources by specifying limits and quotas, allowing you to better control cost and minimize waste by managing policies.
DevTest Labs enable you to better manage resources by specifying limits and quotas, allowing you to better control cost and minimize waste by managing policies.
![]() Security access in DevTest Labs is determined by Azure Role-Based Access Control (RBAC), mainly using the owner, DevTest Labs user, and contributor roles.
Security access in DevTest Labs is determined by Azure Role-Based Access Control (RBAC), mainly using the owner, DevTest Labs user, and contributor roles.
![]() Azure Resource Manager (ARM) templates can be used to spin up complete environments in DevTest labs, allowing your infrastructure to be as complicated as it needs to be for your environment.
Azure Resource Manager (ARM) templates can be used to spin up complete environments in DevTest labs, allowing your infrastructure to be as complicated as it needs to be for your environment.

