Users Online
· Members Online: 0
· Total Members: 188
· Newest Member: meenachowdary055
Forum Threads
Latest Articles
Articles Hierarchy
Skill 1.6: Manage ARM VM Availability
Skill 1.6: Manage ARM VM Availability
For an application running in Azure to remain highly available, it should run across multiple identical Virtual Machines so that the overall availability of the application is not affected when a small subset of the Virtual Machines are unavailable due to events like updates, networking failures and power failures. The actual approach to achieving this requires the proper configuration of availability sets and may require the use of the Azure Load Balancer.
This skill covers how to:
![]() Configure availability sets
Configure availability sets
![]() Combine the Load Balancer with availability sets
Combine the Load Balancer with availability sets
Configure availability sets
Availability sets enable you to improve the availability of VMs deployed to your cloud service by identifying to Azure a group of VMs that should never be brought down simultaneously during updates and that should be physically separated (that is, connected to a separate power source and network switch) so that the failure of a host does not cause all of the VMs in that group to fail. In other words, an availability set does what it says, it describes a set of VMs that Azure will respect to ensure that the service provided by the VMs remains available because at no point in time should all VMs in the set be offline.
By defining an availability set, you constrain how Azure locates your VM in update and fault domains.
Update domains
An update domain constrains how Azure performs updates to the underlying host machine that is running your VM. VMs located in separate update domains will never experience an update (or a restart of the host machine) at the same time. Azure uses five update domains by default in which it places your VMs in a round-robin process. When you add VMs to an availability set, Azure places the first five VMs in separate update domains, then continues to distribute additional VMs across update domains in a round-robin fashion, assigning the sixth VM to the first update domain, the seventh VM to the second update domain, and so on until all VMs have been assigned to one of the five update domains. The constraint on update domains is that Azure will never bring down more than one update domain at a time, effectively ensuring that when Azure updates the host machines, never more than 50 percent of your VMs will be affected (assuming you have two VMs) or, if you are filling all update domains, 20 percent (assuming you have five or more VMs).
Fault domains
Whereas update domains apply to the roll out of host machine updates, fault domains consider isolation in terms of power and network. When two VMs are placed in separate fault domains, they will never be located such that they share the power source or network switch, which basically means that they will not be on the same host machine or even on the same server rack as one another. When you add VMs to an availability set, they are distributed between by default between two fault domains in round-robin fashion.
In short, the strategic placement of your VMs across update and fault domains is controlled simply by their membership in an availability set.
Availability sets and application tiers
For multi-tier applications (such as those having separate front-end, middle, and back-end tiers), it is a best practice to place all the VMs belonging to a single tier in a single availability set and to have separate availability sets for each application tier. This helps ensure that at no point are all instances for a particular tier in the solution down and, therefore, that the complete solution across all tiers is available.
Configuring availability sets
There are multiples ways to define an availability set and to configure the VMs that belong to it. When you are creating a new VM, you can create a new availability set and add the VM to it, or you can specify an existing availability set and add the new VM to it. The same options exist if you have an existing VM.
Configuring an availability set for a new ARM VM
To create a new VM and associate it with an availability group, complete the following steps:
-
Navigate to the portal accessed via https://manage.windowsazure.com.
-
Select New on the command bar.
-
Within the Marketplace list, select the Compute option.
-
On the Compute blade, select the image for the version of Windows Server or Linux you want for your VM.
-
On the Basics blade, provide a name for your VM.
-
Select the VM disk type: a VM disk type of SSD will use Premium Storage and a type of HDD will use Standard Storage.
-
Provide a user name and password (or SSH public key), and choose the subscription, resource group and location into which you want to deploy.
-
Select OK.
-
On the Choose a size blade, select the desired tier and size for your VM.
-
Choose select.
-
On the Settings blade, under the High availability header, select Availability set (Figure 1-39).
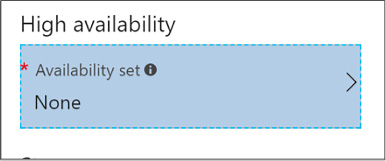
FIGURE 1-39 High Availability Set
-
Choose an existing Availability Set (Figure 1-40), or select the Create new option to define a new availability set. When defining a new availability set, provide a name for the availability set, the desired number of fault domains (between 1 and 3), the number of update domains (between 1 and 20).
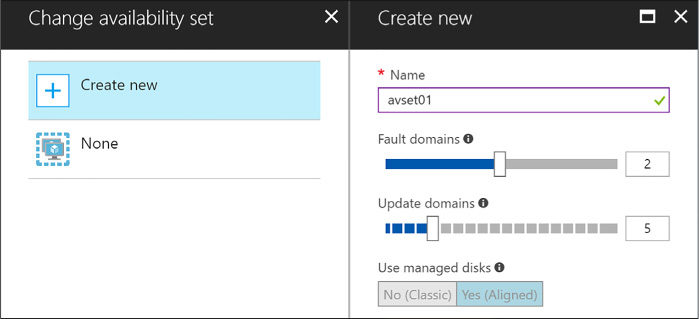
FIGURE 1-40 Create New option
-
Select OK.
-
Select OK once more.
-
On the Purchase blade, review the summary and select Purchase to deploy the VM.
Configuring an availability set for an existing ARM VM
Once a VM has been deployed, you cannot alter the availability set to which it belongs. The availability set can only be configured when creating a virtual machine. You must recreate the virtual machine to move it in or out of an availability set.
Configuring an availability set using Windows PowerShell
An availability set can be created using Windows PowerShell only during the process of creating a new VM:
New-AzureRmAvailabilitySet -ResourceGroupName "<ResourceGroupName>"
-Name "<AvailabilitySetName>" -Location "<Location>"
$AvailabilitySet = Get-AzureRmAvailabilitySet -ResourceGroupName "<ResourceGroupName>"
-Name "<AvailabilitySetName>"
$VirtualMachine = New-AzureRmVMConfig -VMName "<VirtualMachineName>"
-VMSize "<VM_Size>" -AvailabilitySetID $AvailabilitySet.Id
After the preceding command, use the following cmdlet to provision and start the VM:
Start-AzureRmVM -ResourceGroupName "<ResourceGroupName>"
-Name "<VirtualMachineName>"
Combine the Load Balancer with availability sets
The Azure Load Balancer enables you to distribute traffic entering from either a public IP address or from an internal IP to the collection of VMs in an availability set in a round robin manner. It can also automatically remove non-responsive VMs from rotation so that they are not routed traffic when they are unavailable.
Configuring a Load Balancer for VMs in an Availability Set
Once you have deployed your VMs in an availability set, you can perform load balancing between them by performing the following steps:
-
In the Azure Portal, select New and search for Load Balancer and select the Load Balancer entry.
-
On the Load Balancer select Create.
-
On the Create a Load Balancer, provide a name for the new load balancer.
-
If you want to load balance traffic from the public Internet:
-
For the type, select Public.
-
Select Public IP address and select an existing Public IP or create a new one. If you create a new Public IP, provide a name for the Public IP and select if it should have a dynamically assigned IP or a statically assigned IP by setting the Assignment toggle to Dynamic or Static respectively (Figure 1-41).

FIGURE 1-41 Create Load Balancer
-
If you want to load balance traffic only within your Virtual Network:
-
For the type, select Internal.
-
Select Virtual network and choose an existing Virtual Network.
-
Select Subnet and choose a subnet within the Virtual Network.
-
Select if the Load Balancer (Figure 1-42) should have a dynamically assigned IP or a statically assigned IP by setting the IP address assignment toggle to Dynamic or Static respectively.
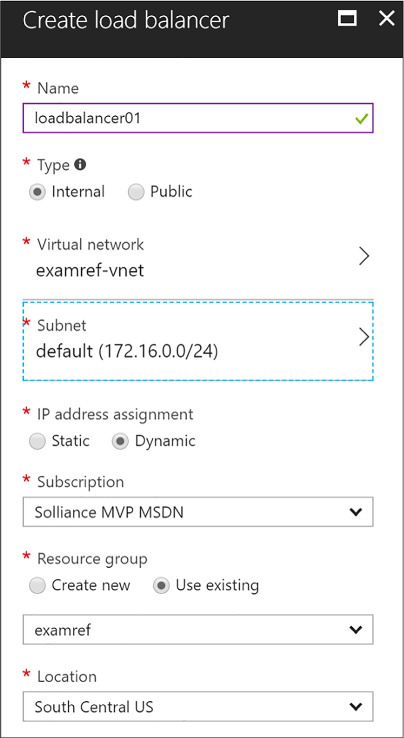
FIGURE 1-42 Load Balancer within a Virtual Network
-
Select the Subscription, Resource Group and Location as appropriate. Your VMs should exist in the same Location as you select for the Load Balancer.
-
Select create to deploy the Load Balancer.
-
When your Load Balancer is deployed, navigate to it in the Azure Portal.
-
From the menu, under the Settings header, select Backend Pools (Figure 1-43).
-
Select +Add.
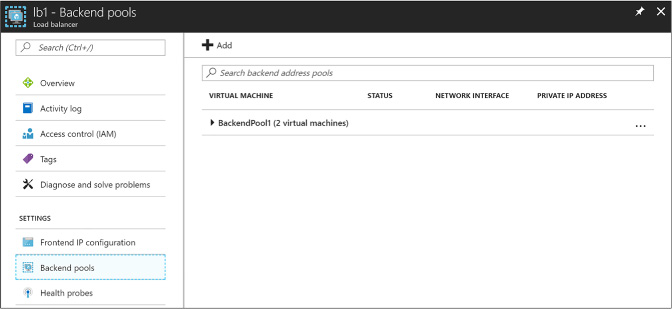
FIGURE 1-43 Backend Pools
-
On the Add backend pool blade, provide a name for the new Backend pool, and in the Associated to dropdown list, select Availability Set.
-
In the dropdown that appears, select the Availability Set that contains your VMs to load balance.
-
For each VM that you want to add to backend pool, perform the following:
-
Select +Add target network IP configuration.
-
Select the VM from the Target virtual machine dropdown.
-
Select the IP configuration for the VM from the Network IP configuration dropdown.
-
Select OK (Figure 1-44).
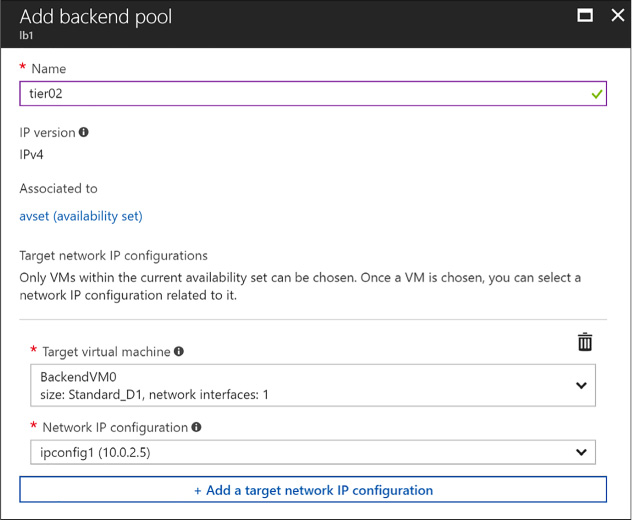
FIGURE 1-44 Add Backend Pool
-
From the menu, under the Setting header, select Health probes.
-
Select +Add.
-
Provide a name for the health probe (Figure 1-45).
-
Choose protocol (either HTTP or TCP).
-
Provide the Port that the probe will use in testing the VMs availability.
-
If you chose the HTTP protocol, also specify the path on the HTTP endpoint to use when probing the VMs availability.
-
Specify an interval in seconds between probe attempts in the Interval field.
-
In the Unhealthy threshold, specify the number of consecutive probe failures that must occur before the VM is considered unhealthy.
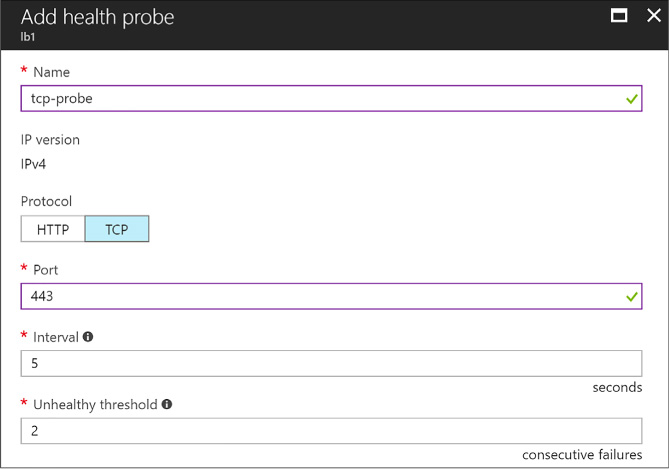
FIGURE 1-45 Add Health Probe
-
Select OK.
-
From the menu, under the Setting header, select Load balancing rules.
-
Select +Add.
-
On the Add load balancing rule, provide a name.
-
Set the protocol to TCP or UDP as desired.
-
Specify the Port for incoming traffic.
-
Specify the Backend port used when communicating with the VMs.
-
From the Backend pool dropdown, select the pool your previously created.
-
From the Health probe dropdown, select the health probe you previously created (Figure 1-46).
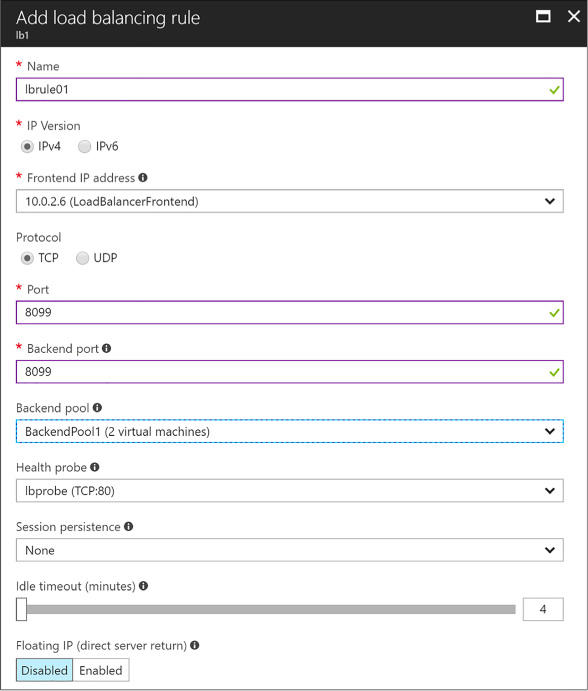
FIGURE 1-46 Add Load Balancing Rule
-
Select OK to apply load balancing rule.
More Info: Configuring a Load Balanced Deployment with Powershell
For a step by step guide on performing the previous steps using PowerShell, see: https://docs.microsoft.com/en-us/azure/virtual-machines/windows/tutorial-load-balancer.

