Users Online
· Members Online: 0
· Total Members: 188
· Newest Member: meenachowdary055
Forum Threads
Latest Articles
Articles Hierarchy
Skill 1.1: Deploy workloads on Azure ARM virtual machines
Skill 1.1: Deploy workloads on Azure ARM virtual machines
Microsoft Azure ARM VMs can run more than just Windows and .NET applications. They provide support for running many forms of applications using various operating systems. This section describes where and how to analyze what is supported and how to deploy three different forms of VMs.
This skill covers how to:
![]() Identify supported workloads
Identify supported workloads
![]() Create a Windows Server VM
Create a Windows Server VM
![]() Create a Linux VM
Create a Linux VM
![]() Create a SQL Server VM
Create a SQL Server VM
Identify supported workloads
A workload describes the nature of a solution, including consideration such as: whether it is an application that runs on a single machine or it requires a complex topology that prescribes the operating system used, the additional software installed, the performance requirements, and the networking environment. Azure enables you to deploy a wide variety of VM workloads, including:
![]() “Bare bones” VM workloads that run various versions of Windows Client, Windows Server and Linux (such as Debian, Red Hat, SUSE and Ubuntu)
“Bare bones” VM workloads that run various versions of Windows Client, Windows Server and Linux (such as Debian, Red Hat, SUSE and Ubuntu)
![]() Web servers (such as Apache Tomcat and Jetty)
Web servers (such as Apache Tomcat and Jetty)
![]() Data science, database and big-data workloads (such as Microsoft SQL Server, Data Science Virtual Machine, IBM DB2, Teradata, Couchbase, Cloudera, and Hortonworks Data Platform)
Data science, database and big-data workloads (such as Microsoft SQL Server, Data Science Virtual Machine, IBM DB2, Teradata, Couchbase, Cloudera, and Hortonworks Data Platform)
![]() Complete application infrastructures (for example, those requiring server farms or clusters like DC/OS, SharePoint, SQL Server AlwaysOn, and SAP)
Complete application infrastructures (for example, those requiring server farms or clusters like DC/OS, SharePoint, SQL Server AlwaysOn, and SAP)
![]() Workloads that provide security and protection (such as antivirus, intrusion detection systems, firewalls, data encryption, and key management)
Workloads that provide security and protection (such as antivirus, intrusion detection systems, firewalls, data encryption, and key management)
![]() Workloads that support developer productivity (such as the Windows 10 client operating system, Visual Studio, or the Java Development Kit)
Workloads that support developer productivity (such as the Windows 10 client operating system, Visual Studio, or the Java Development Kit)
There are two approaches to identifying supported Azure workloads. The first is to determine whether the workload is already explicitly supported and offered through the Azure Marketplace, which provides a large collection of free and for-pay solutions from Microsoft and third parties that deploy to VMs. The Marketplace also offers access to the VM Depot, which provides a large collection of community provided and maintained VMs. The VM configuration and all of the required software it contains on the disk (or disks) is called a VM image. The topology that deploys the VM and any supporting infrastructure is described in an Azure Resource Manager (ARM) template that is used by the Marketplace to provision and configure the required resources.
The second approach is to compare the requirements of the workload you want to deploy directly to the published capabilities of Azure VMs or, in some cases, to perform proof of concept deployments to measure whether the requirements can be met. The following is a representative, though not exhaustive, list of the requirements you typically need to take into consideration:
![]() CPU and RAM memory requirements
CPU and RAM memory requirements
![]() Disk storage capacity requirements, in gigabytes (GBs)
Disk storage capacity requirements, in gigabytes (GBs)
![]() Disk performance requirements, usually in terms of input/output operations per second (IOPS) and data throughput (typically in megabytes per second)
Disk performance requirements, usually in terms of input/output operations per second (IOPS) and data throughput (typically in megabytes per second)
![]() Operating system compatibility
Operating system compatibility
![]() Networking requirements
Networking requirements
![]() Availability requirements
Availability requirements
![]() Security and compliance requirements
Security and compliance requirements
This section covers what is required to deploy the “bare bones” VM (that is, one that has the operating system and minimal features installed) that can serve as the basis for your more complex workloads, and describes the options for deploying a pre-built workload from the Marketplace.
Create a Windows Server VM
Fundamentally, there are two approaches to creating a new VM. You can upload a VM that you have built on-premises, or you can instantiate one from the pre-built images available in the Marketplace. This section focuses on the latter and defers coverage of the upload scenario until the next section.
To create a bare bones Windows Server VM in the portal, complete the following steps:
-
Navigate to the portal accessed via https://manage.windowsazure.com.
-
Select New on the command bar.
-
Within the Marketplace list, select the Compute option.
-
On the Compute blade, select the image for the version of Windows Server you want for your VM (such as Windows Server 2016 VM).
-
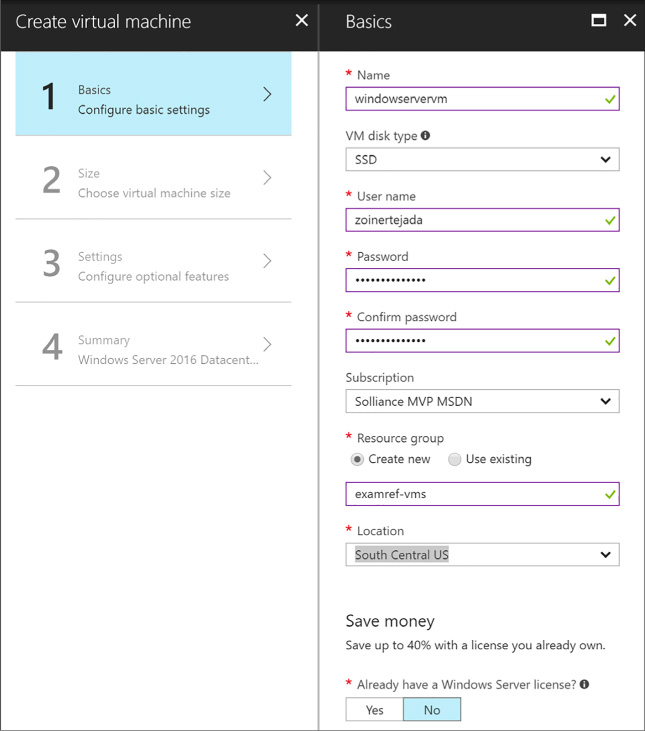
On the Basics blade, provide a name for your VM, the Disk Type, a User Name and Password, and choose the Subscription, Resource Group and Location into which you want to deploy (Figure 1-1).

FIGURE 1-1 The Basics blade
-
Select OK.
-
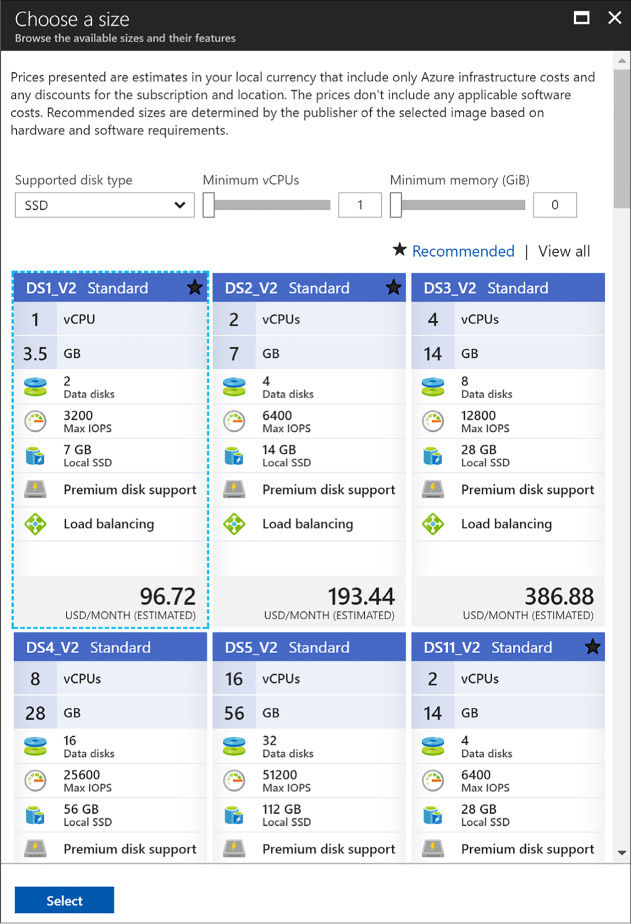
On the Choose A Size Blade, select the desired tier and size for your VM (Figure 1-2).

FIGURE 1-2 The Choose A Size blade
-
Choose Select.
-
On the Settings blade, leave the settings at their defaults and select OK.
-
On the Purchase blade, review the summary and select Purchase to deploy the VM.
Create a Linux VM
To create a bare bones Linux VM in the portal, complete the following steps:
-
Navigate to the portal accessed via https://portal.azure.com.
-
Select New on the command bar.
-
Within the Marketplace list, select the Compute option.
-
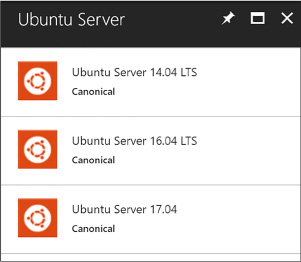
On the Compute blade, select the image for the version of Ubuntu Server (Figure 1-3) you want for your VM (such as Ubuntu Server 16.04 LTS).

FIGURE 1-3 The Ubuntu Server option
-
Select Create.
-
On the Basics blade, provide a name for your VM, the Disk Type, a User Name and Password (or SSH public key if preferred), and choose the Subscription, Resource Group and Location into which you want to deploy.
-
Select OK.
-
On the Choose a size blade, select the desired tier and size for your VM.
-
Choose select.
-
On the Settings blade, leave the settings at their defaults and select OK.
-
On the Purchase blade, review the summary and select Purchase to deploy the VM.
More Info: SSH Key Generation
To create the SSH public key that you need to provision your Linux VM, run ssh-keygen on a Mac OSX or Linux terminal, or, if you are running Windows, use PuTTYgen. A good reference, if you are not familiar with using SSH from Windows, is available at: https://docs.microsoft.com/azure/virtual-machines/linux/ssh-from-windows.
Create a SQL Server VM
The steps for creating a VM that has SQL Server installed on top of Windows Server are identical to those described earlier for provisioning a Windows Server VM using the portal. The primary differences surface in the fourth step: instead of selecting a Windows Server from the Marketplace list, select a SQL Server option (such as SQL Server 2016 SP1 Enterprise) and follow the prompts to complete the configuration (such as the storage configuration, patching schedule and enablement of features like SQL Authentication and R Services) of the VM with SQL Server and to deploy the VM.

