Tweet-a-Light – Twitter-Enabled Electric Light
In Chapter 1, Internet-Controlled PowerSwitch, we learned how to control a PowerSwitch Tail (or any relay) through the Internet by using the Arduino Ethernet library. Now, we will look into how Twitter tweets can be used to control the PowerSwitch Tail.
In this chapter, we will learn:
How to install Python on Windows
How to install some useful libraries on Python, including pySerial and Tweepy
How to create a Twitter account and obtain Twitter API keys
How to write a simple Python Script to read Twitter tweets and write data on serial port
How to write a simple Arduino sketch to read incoming data from serial port
To complete this project, you will require the following hardware and software.
Arduino UNO Rev3 board (https://store.arduino.cc/product/A000066)
A computer with Windows installed and Internet connected
PowerSwitch Tail (120V or 240V depending on your voltage of mains electricity supply)—(http://www.powerswitchtail.com/Pages/default.aspx)
A light bulb (120V or 240V depending on your voltage of mains electricity supply), holder, and wires rating with 120V/240V
A USB A-to-B cable (https://www.sparkfun.com/products/512)
Some hook-up wires
The software needed for this project is mentioned under each topic so that it will be easier to download and organize without messing things up.
Python is an interpreted, object-oriented, and high-level computer programming language with very powerful features that's easy to learn because of its simple syntax. For this project, we can easily write an interface between Twitter and Arduino using the Python script.
The following steps will explain how to install Python on a Windows computer:
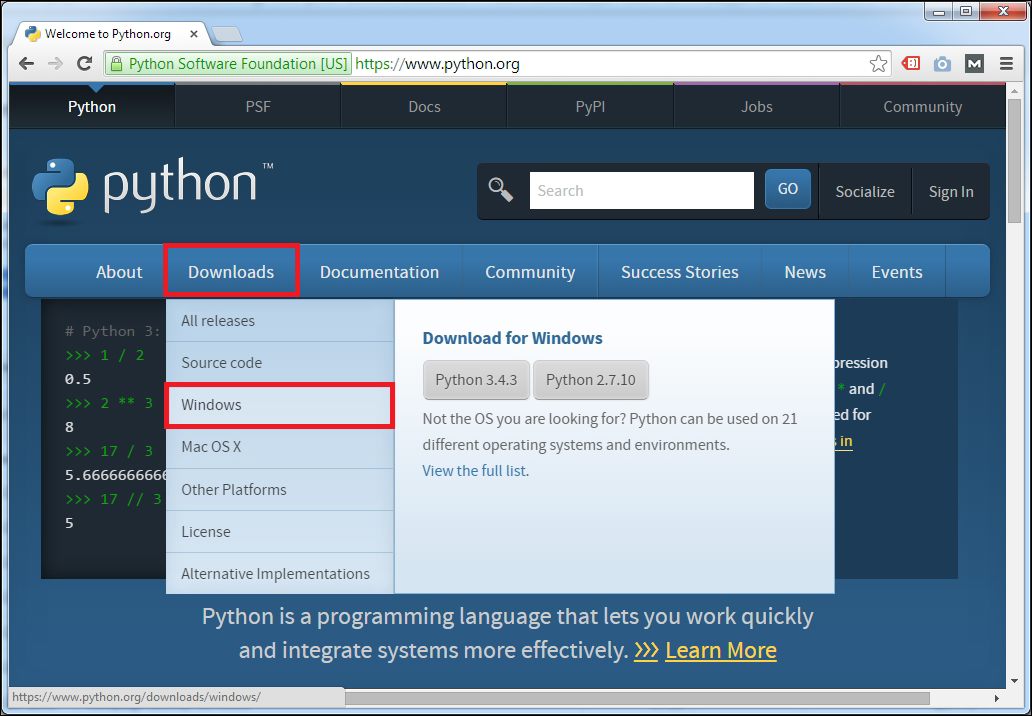
Visit https://www.python.org/.
Click on Downloads | Windows.

The Python home page
Then, you will navigate to the Python Releases for Windows web page:
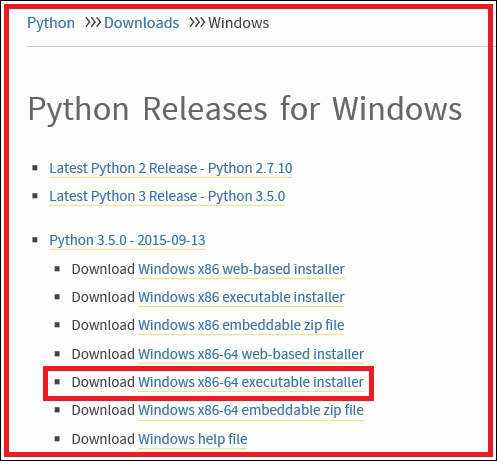
The Python download page
Python can be downloaded from two development branches: legacy and present. The legacy releases are labeled as 2.x.x, and present releases are labeled as 3.x.x. (For reference, the major difference of 2.7.x and 3.0 can be found athttp://learntocodewith.me/programming/python/python-2-vs-python-3/). Click on the latest (see the date) Windows x86-64-executable installer to download the executable installer setup file to your local drive under Python 3.x.x.
Alternately, you can download a web-based installer or embedded ZIP file to install Python on your computer.
Browse the default Downloads folder in your computer and find the downloaded setup file. (My default downloads folder is C:\Downloads).
Double-click on the executable file to start the setup:
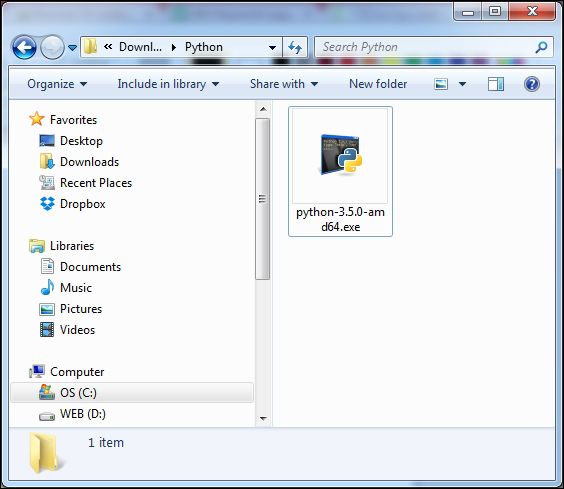
The Python setup
Click on the Run button if prompted as a security warning:
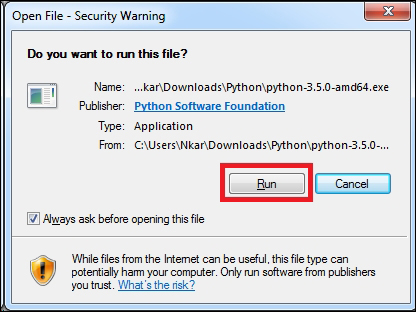
Security warning
The Python setup wizard starts:
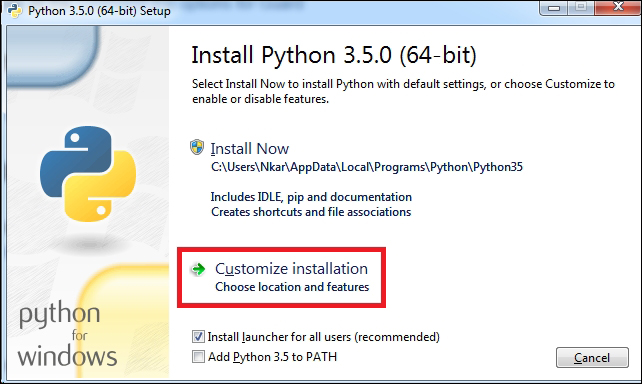
The Python setup wizard—start screen
Optionally, you can check Add Python 3.5 to PATH, or later, you can add it using Windows system properties. Click on the Customize installation section. The Optional Features dialog box will appear:
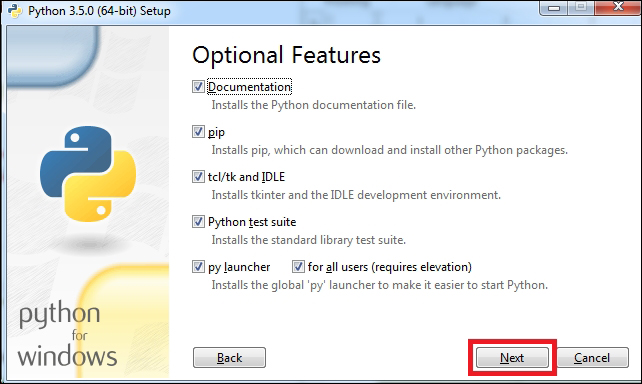
The Python setup wizard—Optional Features
Click on the Next button to proceed. The Advanced Options dialog box will appear. Keep the selected options as default.
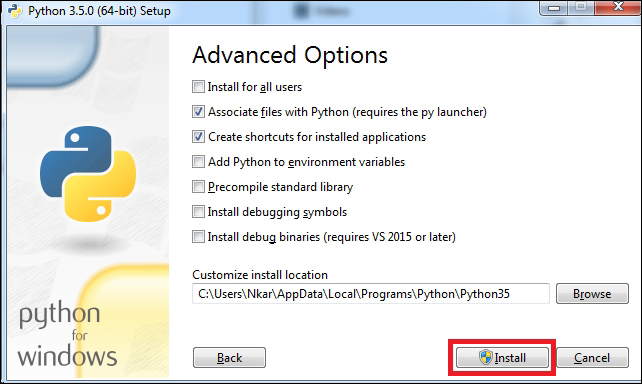
The Python setup wizard—Advanced Options
The default installation path can be found under Customize install location. If you like, you can change the installation location by clicking on the Browse button and selecting a new location in your computer's local drive.
Finally, click on the Install button.
If prompted for User Access Control, click on OK. The Setup Progress screen will be displayed on the wizard:
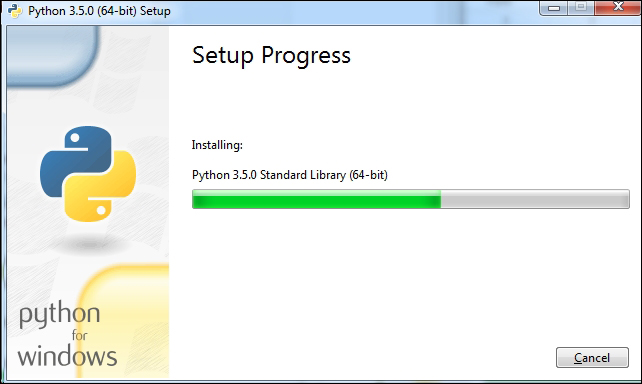
Python setup installation progress
If the setup is successful, you will see the following dialog box. Click on the Close button to close the dialog box:
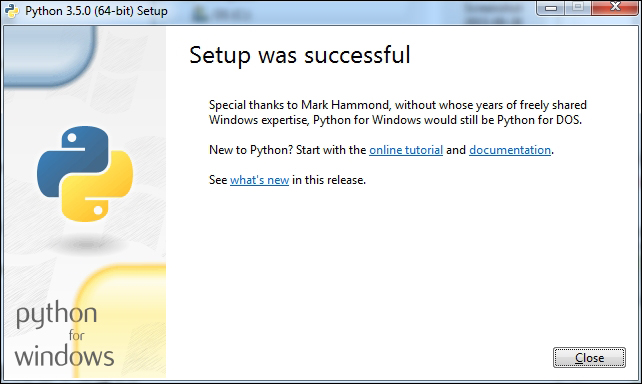
The Python setup is successful
If you have already set to Add Python 3.5 to PATH for writing the environment variables during the Python setup installation process, ignore this section. If not, then follow these steps to set environment variables for Python.
Open the Windows Control Panel and click on System. Then, click on Advanced system settings.
The System Properties dialog box will appear. Click on the Advanced tab. Then, click on the Environment Variables… button:
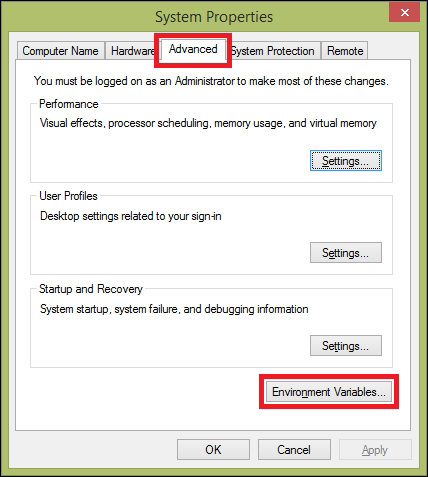
The System Properties dialog box
The Environment Variables dialog box will appear. Click on the New… button under user variables:
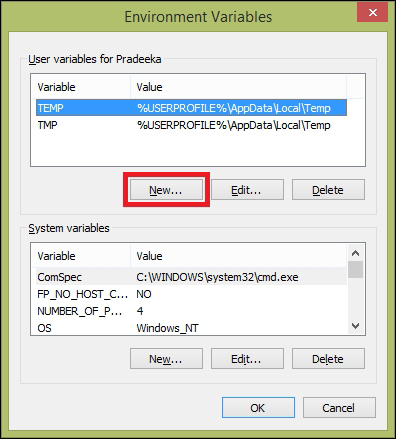
The Environment Variables dialog box
The New User Variable dialog box appears:
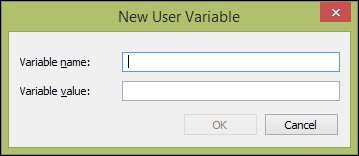
The New User Variable dialog box
Type the following for the respective textboxes:
Variable name: PATH
Variable Value: C:\Users\Pradeeka\AppData\Local\Programs\Python\Python35;C:\Users\Pradeeka\AppData\Local\Programs\Python\Python35\Lib\site-packages\;C:\Users\Pradeeka\AppData\Local\Programs\Python\Python35\Scripts\;
Modify the preceding paths according to your Python installation location:
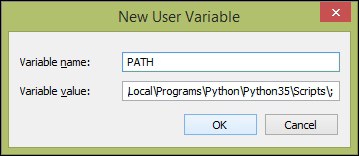
The New User Variable dialog box
Click on the OK button three times to close all the dialog boxes.
Open Windows Command Prompt and type python, and then press the Enter key. The Python Command Prompt will start. The prompt begins with >>> (three greater than marks):
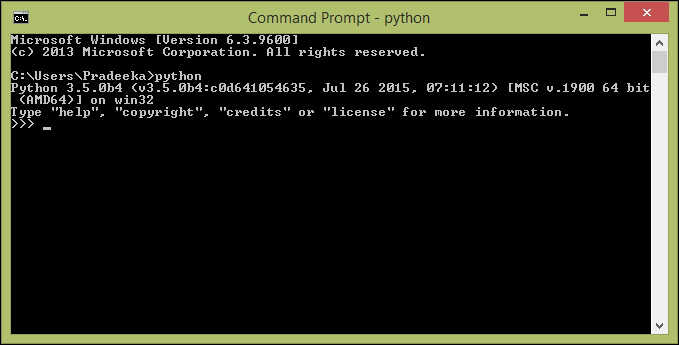
Python Command Prompt
This ensures that the Python environment variables are successfully added to Windows. From now, you can execute Python commands from the Windows command prompt. Press Ctrl + C to return the default (Windows) command prompt.
The setuptools utility lets you download, build, install, upgrade, and uninstall Python packages easily. To add the setuptools utility to your Python environment, follow the next steps. At the time of writing this book, the setuptools utility was in version 18.0.1.
Visit the setuptools download page at https://pypi.python.org/pypi/setuptools.
Download the ez_setup.py script by clicking on the link (https://bootstrap.pypa.io/ez_setup.py):
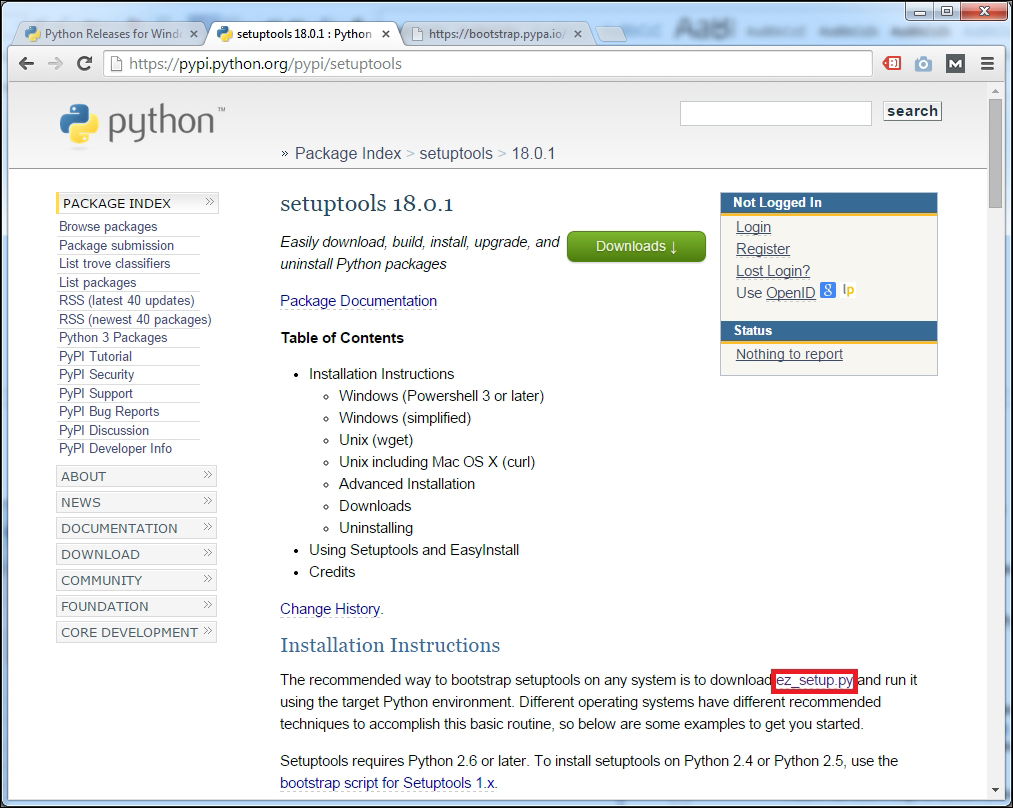
The setuptools download page
The script opens in the browser's window itself, rather than downloading as a file. Therefore, press Ctrl + A to select all the code and paste it on a new Notepad file:
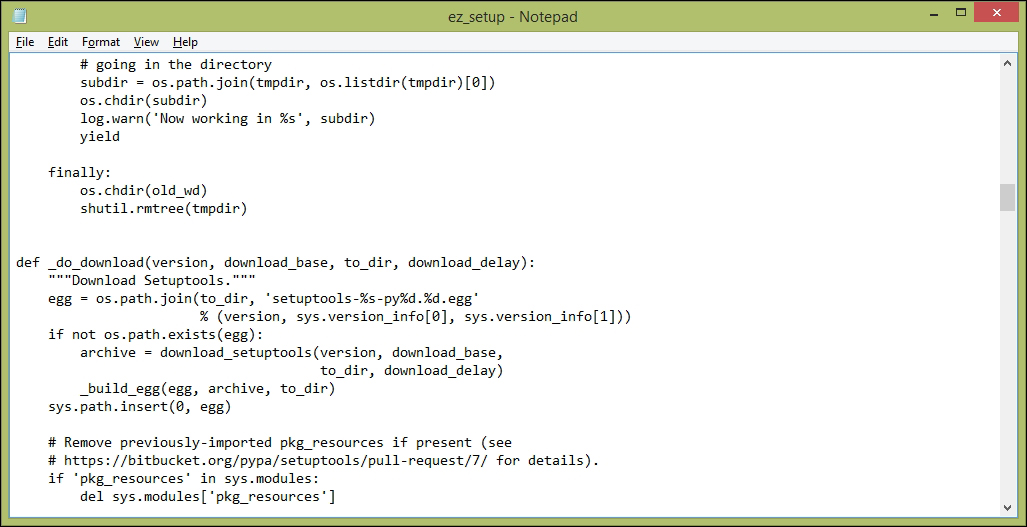
Next, save the file as ez_setup.py in your local drive.
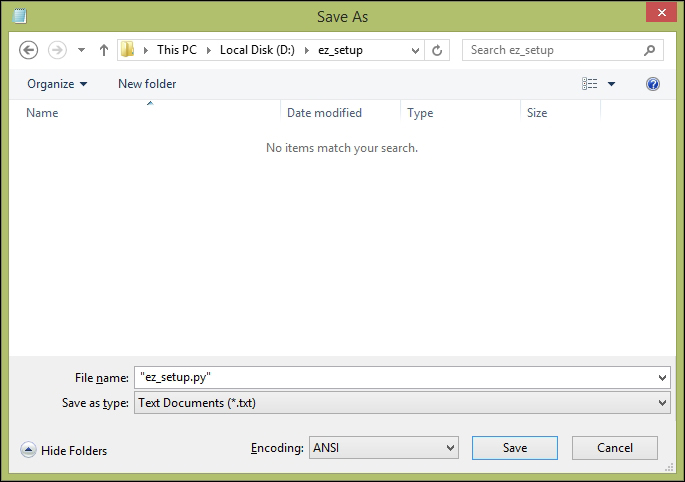
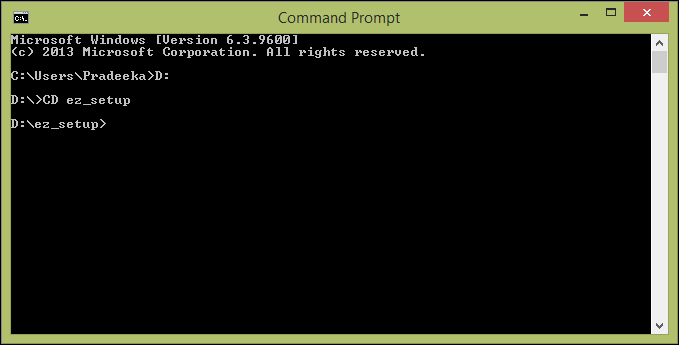
Open Windows Command Prompt and navigate to the location of the ez_setup.py file using the cd command. We assume that the drive is labeled as the letter D:, and the folder name is ez_setup:
C:\>D:
D:\>CD ez_setup
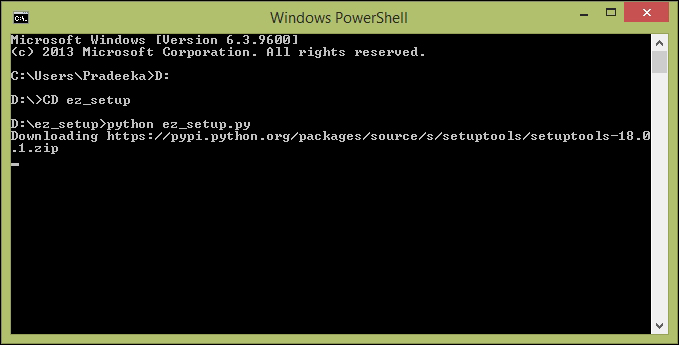
Type python ez_setup.py and press the Enter key to run the Python script:
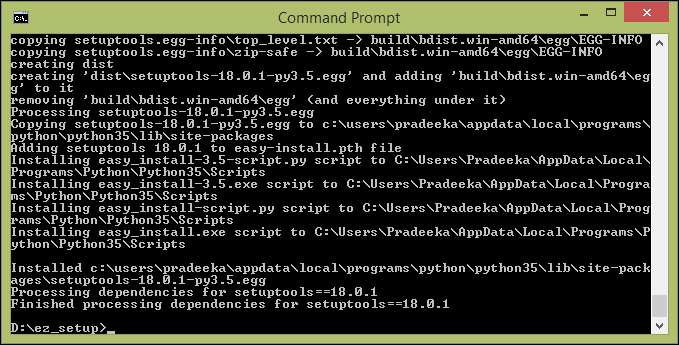
This installs the easysetup utility package on your Python environment:
The pip utility package can be used to improve the functionality of setuptools. The pip utility package can be downloaded from https://pypi.python.org/pypi/pip. You can now directly install the pip utility package by typing the following command into Windows Command Prompt:
C:\> easy_install pip
However, you can ignore this section if you have selected pip, under Optional Features, during the Python installation.

Follow these steps to open the Python interpreter:
Open Command Prompt and type the following:
C:\> Python
This command will load the Python interpreter:
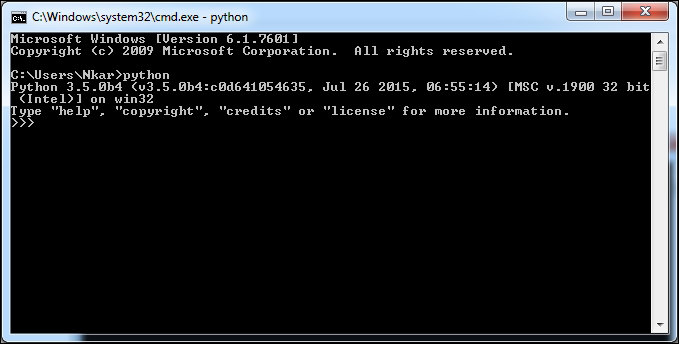
To exit from the Python Interpreter, simply type exit() and hit the Enter key.
The Tweepy library provides an interface for the Twitter API. The source code can be found at https://github.com/tweepy/tweepy. You do not have to download the Tweepy library to your computer. The pip install command will automatically download the library and install it on your computer.
Follow these steps to install the Python-Twitter library on your Python installation:
Open the Windows command prompt and type:
C:\>pip install tweepy
This begins the installation of the Tweepy library on Python:
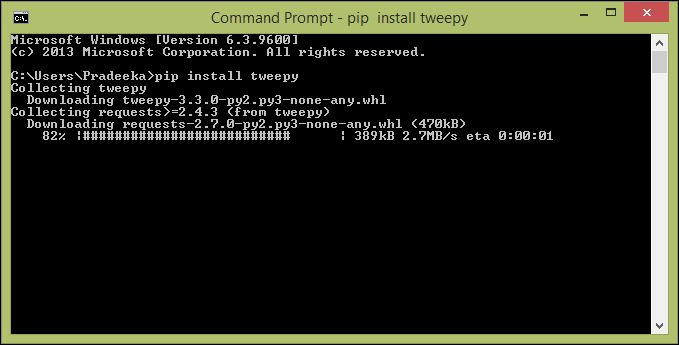
To access the serial port in the Python environment, we have to first install the pySerial library on Python:
Open the Windows Command Prompt and type the following:
C:\>pip install pyserial
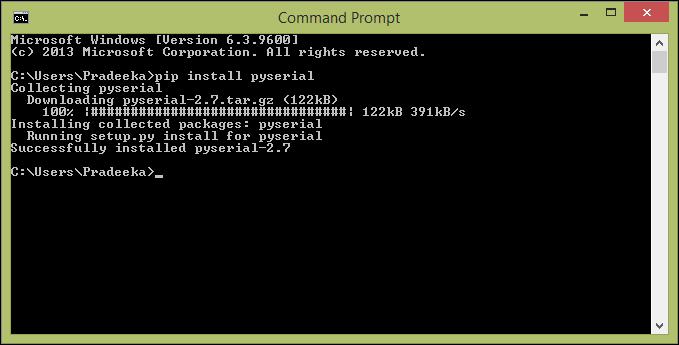
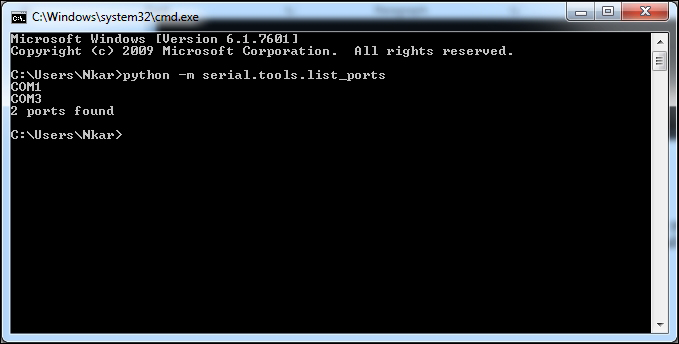
After installing the pySerial library, type the following command to list the available COM ports in your computer:
C:/> python -m serial.tools.list_ports
To proceed with our project, use the following steps to create a Twitter App and obtain the API keys.
Go to https://apps.twitter.com/ and sign in with your Twitter login credentials (create a new Twitter account if you don't have one). The following page will display on the browser:
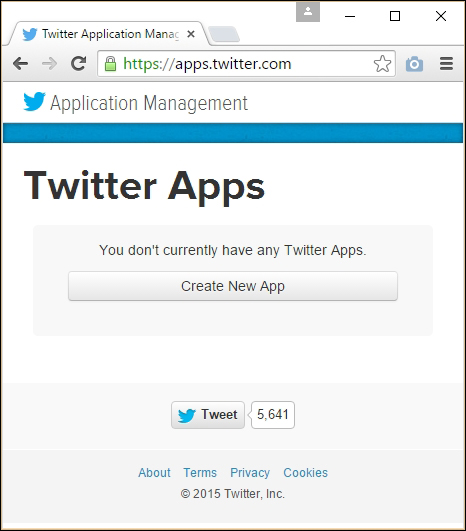
apps.twitter.com, the Application Management start page
Click on the Create New App button. The Create an application page will display:
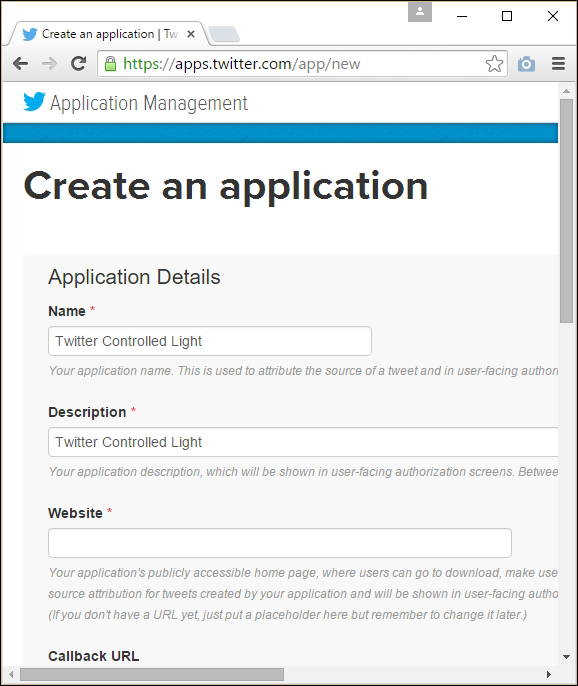
Twitter's Create an application page
Fill in the required fields (for the website textbox, just type http://www.example.com as a placeholder), accept the Developer Agreement by clicking on the Yes, I agree checkbox.
After this, click on the Create your Twitter application button.
You will be navigated to the following page:
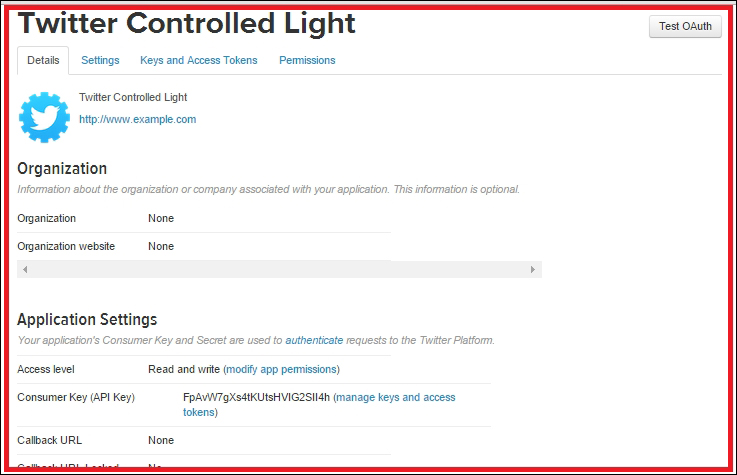
The Twitter application settings page
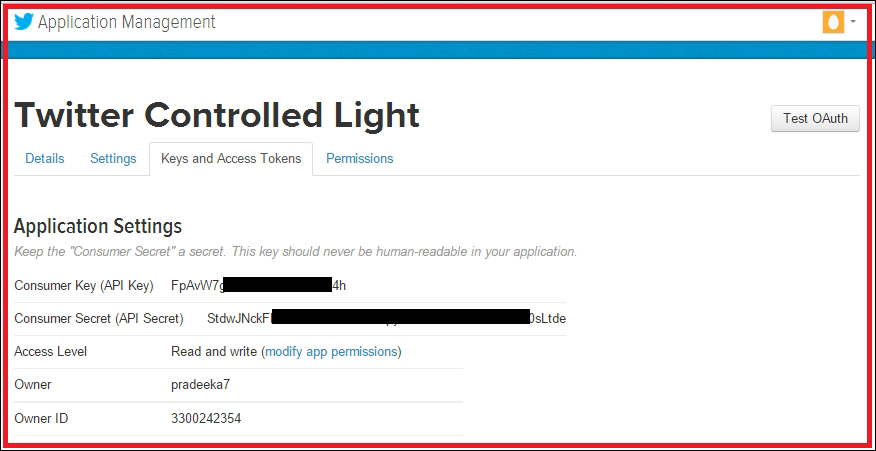
Click on the Keys and Access Tokens tab. Under this tab, you will find Consumer Key (API Key) and Consumer Secret (API Secret). Copy these two keys and paste them in a Notepad file, because you will require them in the next section:
The Tweepy library provides a set of easy functions to interface with the Twitter API. Our Python script provides the following operations and services:
Read tweets from the specified twitter screen name. For example, @PacktPub, every 30 seconds (if you want, you can change the delay period)
Always read the latest tweet
If the tweet includes the text, #switchon, then print the tweet on the console and write 1 on the serial port
If the tweet includes the text, #switchoff, then print the tweet on the console and write 0 on the serial port
Otherwise, maintain the last state
The following Python script will provide an interface between Twitter and the serial port of your computer. The sample script, twitter_test.py, can be found inside the Chapter 7 codes folder. Copy the file to your local drive and open it using Notepad or NotePad++:
import tweepy
import time
import serial
import struct
auth = tweepy.OAuthHandler('SZ3jdFXXXXXXXXXXPJaL9w4wm', 'jQ9MBuy7SL6wgRK1XXXXXXXXXXGGGGIAFevITkNEAMglUNebgK')
auth.set_access_token('3300242354-sJB78WNygLXXXXXXXXXXGxkTKWBck6vYIL79jjE', 'ZGfOgnPBhUD10XXXXXXXXXXt3KsxKxwqlcAbc0HEk21RH')
api = tweepy.API(auth)
ser = serial.Serial('COM3', 9600, timeout=1)
last_tweet="#switchoff"
public_tweets = api.user_timeline(screen_name='@PacktPub',count=1)
while True: # This constructs an infinite loop
for tweet in public_tweets:
if '#switchon' in tweet.text: #check if the tweet contains the text #switchon
print (tweet.text) #print the tweet
if last_tweet == "#switchoff":
if not ser.isOpen(): #if serial port is not open
ser.open(); #open the serial port
ser.write('1') # write 1 on serial port
print('Write 1 on serial port') #print message on console
last_tweet="#switchon"
elif "#switchoff" in tweet.text: #check if the tweet contains the text #switchoff
print (tweet.text) #print the tweet
if last_tweet == "#switchon":
if not ser.isOpen(): #if serial port is not open
ser.open(); #open the serial port
ser.open(); #open the serial port
ser.write("0") # write 0 on serial port
print('Write 0 on serial port') #print message on console
last_tweet="#switchoff"
else:
ser.close() #close the serial port
time.sleep(30) #wait for 30 seconds
Now, replace the following code snippet with your Twitter Consumer Key and Consumer Secret:
auth = tweepy.OAuthHandler('SZ3jdFXXXXXXXXXXPJaL9w4wm', 'jQ9MBuy7SL6wgRK1XXXXXXXXXXGGGGIAFevITkNEAMglUNebgK')
auth = tweepy.OAuthHandler(' Consumer Key (API Key)', ' Consumer Secret (API Secret)')
Also, replace the following code snippet with Access Token and Access Token Secret:
auth.set_access_token('3300242354-sJB78WNygLXXXXXXXXXXGxkTKWBck6vYIL79jjE', 'ZGfOgnPBhUD10XXXXXXXXXXt3KsxKxwqlcAbc0HEk21RH')
auth.set_access_token(' Access Token, ' Access Token Secret ')
Next, replace the COM port number with which you wish to attach the Arduino UNO board. Also, use the same baud rate (in this case, 9,600) in Python script and Arduino sketch (you will write in the final step of this chapter):
ser = serial.Serial('Your Arduino Connected COM Port', 9600, timeout=1)
Finally, replace the Twitter screen name with your Twitter account's screen name:
public_tweets = api.user_timeline(screen_name='@PacktPub',count=1)
public_tweets = api.user_timeline(screen_name='@your_twitter_screen_name',count=1)
Now, save the file and navigate to the file location using Windows Command Prompt. Then, type the following command and press Enter:
>python your_python_script.py
Replace your_python_script with the filename. The script will continuously monitor any incoming new Twitter tweets and write data on the serial port according to the command that has been sent:
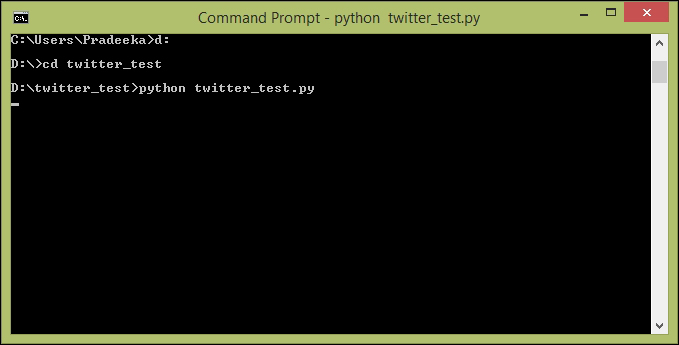
Windows Command Prompt will display any incoming Tweets and actions against them.
You can read incoming data from the serial port where we wrote data using the Python script in the previous section using Arduino. The following Arduino sketch will read the incoming data from the serial port and turn on the PowerSwitch Tail if it finds 1, and turn off the PowerSwich Tail if it finds 0.
The sample code, B04844_07_01.ino, can be found in the Chapter 7 codes folder, so you can copy and paste it on a new Arduino IDE and upload it to your Arduino UNO board.
Connect the PowerSwitch Tail to your Arduino UNO board, as shown in the following Fritzing diagram. For this project, we will use a 240V AC PowerSwitch Tail:
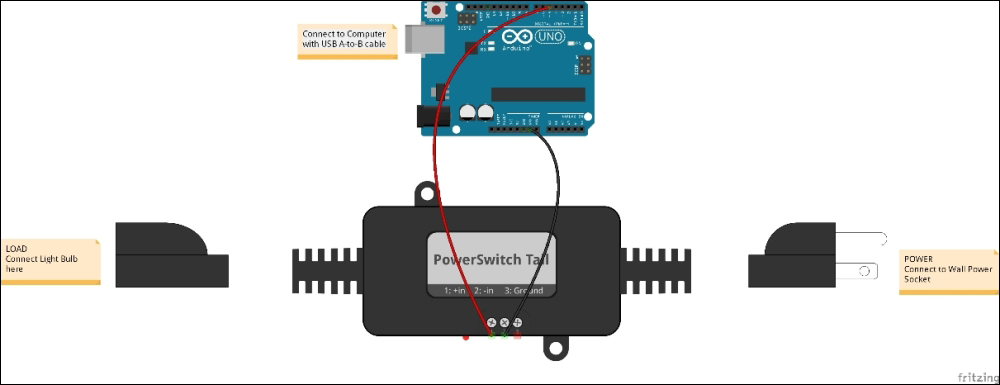
Using a hook-up wire, connect the Arduino digital pin 5 with the PowerSwitch Tail positive (+ in) connecter.
Using another hook-up wire, connect the Arduino ground pin with the PowerSwitch Tail negative (- in) connector.
Connect a 240V AC light bulb to the LOAD end of the PowerSwitch Tail.
Connect the LINE end of the PowerSwitch Tail to the wall power socket and make sure that the main's electricity is available to the PowerSwitch Tail.
Using a USB A-to-B cable, connect the Arduino UNO board to the computer or laptop on which you wish to run the Python script. Make sure that you attach the USB cable to the correct USB port that is mentioned in the Python script.
Connect your computer to the Internet using Ethernet or Wi-Fi.
Now, run the Python script using Windows Command Prompt.
Log in to your Twitter account and create a new tweet including the text, #switchon. In a few seconds, the light bulb will turn on. Now, create a new tweet that includes the text, #switchoff. In a few seconds, the light bulb will turn off.
Tip
The drawback to this system is that you can't send the same Tweet more than once, because of the Twitter restrictions. Each time, make sure you create different combinations of text to make your tweet, and include your control word (#switchon, #switchoff) with it.
In this chapter, you learned how to use Twitter, a social media platform, to interact with our Arduino UNO board and control its functionalities.