Azure AD supports user sign-in with social identity providers such as Google and Facebook as part of Azure AD B2C. Azure AD also enables access to applications from external partners as part of Azure B2B collaboration. This section discusses these features.
This skill covers how to:
![]() Design and implement .NET MVC, Web API, and Windows desktop apps that leverage social identity provider authentication
Design and implement .NET MVC, Web API, and Windows desktop apps that leverage social identity provider authentication
![]() Leverage Azure AD B2B to design and implement applications that support partner-managed identities and enforce multi-factor authentication
Leverage Azure AD B2B to design and implement applications that support partner-managed identities and enforce multi-factor authentication
Azure AD B2C makes it possible for users of your applications to authenticate with social identity providers, enterprise accounts using open standards, and local accounts where users are managed by Azure AD. Fundamentally this means that the user signs in at the identity provider, and therefore, credentials are managed by the identity provider.
Figure 3-26 illustrates the workflow assuming OpenID Connect protocol for communication between a web application and the Azure AD B2C tenant. The user navigates to the application to login (1) and is redirected to Azure AD with an OpenID Connect sign in request (2). Azure AD redirects the user to the third party identity provider (3) with the protocol that is established for communication between Azure AD and that provider (it may not be OpenID Connect). If the user does not yet have an active session at the identity provider, they are typically presented with a login page to enter credentials (4), and upon successful authentication (5), the identity provider issues a protocol response and sets up the user session (6) possibly in the form of an SSO session cookie. The response is posted to Azure AD (7) and validated. Upon successful validation of the response (and user identity) Azure AD establishes a user session (SSO session cookie) and issues an OpenID Connect response to the calling web app (8). This response is posted to the web app (9) and validated to establish the user session at the web app (10).

FIGURE 3-26 The high-level workflow for user sign-in to an external identity provider via Azure AD B2C
There are a few important things to point out about this workflow:
![]() Applications need not be aware of the identity provider where the user signs in, since the application trusts the response from Azure AD.
Applications need not be aware of the identity provider where the user signs in, since the application trusts the response from Azure AD.
![]() The trust relationships are between applications and Azure AD, and between Azure AD and the identity provider(s) that are configured (see Figure 3-27).
The trust relationships are between applications and Azure AD, and between Azure AD and the identity provider(s) that are configured (see Figure 3-27).
![]() The protocols to be used between Azure AD and identity provider can vary per identity provider. This has no relationship to how the application communicates with Azure AD.
The protocols to be used between Azure AD and identity provider can vary per identity provider. This has no relationship to how the application communicates with Azure AD.
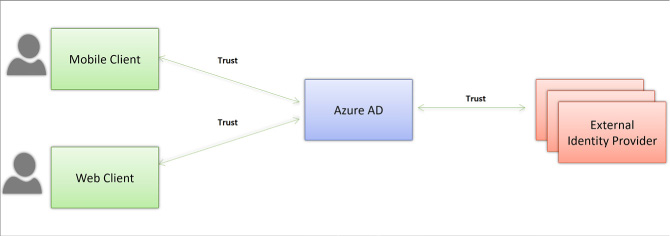
FIGURE 3-27 Trust relationships between Applications and Azure AD, and between Azure AD and external identity providers
This section covers how to set up Azure AD B2C to enable users to login with their preferred social identity provider such as Microsoft Account, Facebook, Google+, Amazon or Linked In.
More Info: Azure AD B2C Overview
For a complete look at Azure AD B2C see this overview: https://docs.microsoft.com/en-us/azure/active-directory-b2c/active-directory-b2c-overview.
To create a new Azure AD B2C tenant follow these steps:
Navigate to the Azure portal accessed via https://portal.azure.com.
Click New and select Security + Identity, then select Azure Active Directory B2C from the list of choices (Figure 3-28).

FIGURE 3-28 The list of options under Security + Identity in the Azure portal where Azure Active Directory B2C can be found
Click Create from the Azure Active Directory B2C blade.
You may be prompted to switch to a directory with a subscription attached. If so, click Switch directories and select the correct subscription where you want to create the new B2C tenant. You may also have to repeat steps 1-3.
From the Create new B2C tenant or Link to existing tenant blade, select Create a new Azure AD B2C tenant (Figure 3-29).
Enter a name for the organization, a domain name, and select the country or region for the new tenant.
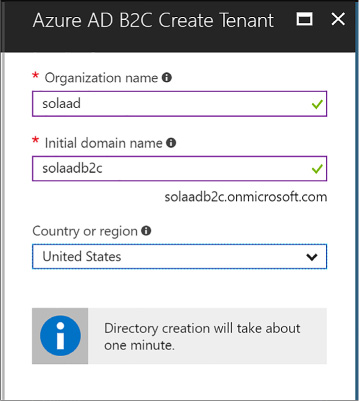
FIGURE 3-29 Settings for creating a new Azure AD B2C tenant.
You can navigate to your directory by clicking the link supplied in the create blade, after the directory is created. Or, you can navigate to More Services from the navigation menu and type Azure AD to filter the list and find Azure AD B2C, then select it (Figure 3-30).
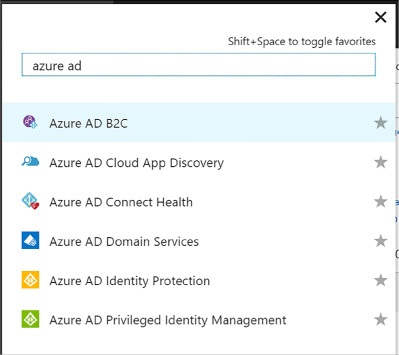
FIGURE 3-30 Filtering services to show Azure AD B2C
Your tenant will appear in the B2C Tenant dashboard and may show a notification indicating that it is not attached to a subscription. If this happens, switch directories again, select your subscription from the list, and repeat steps 1-3. At step 4 select Link to existing tenant and choose your tenant. This will remove the warning.
Repeat step 6 to return to your Azure B2C tenant dashboard and click the tenant settings component. From here you will be able to manage your tenant settings.
A given solution may have one or more applications that will integrate with Azure AD B2C. Integration requires an application be registered with the B2C tenant. When you register an application, you can configure how the application will integrate with the tenant, for example:
![]() Indicate if the application is a web or API application, or a native application
Indicate if the application is a web or API application, or a native application
![]() Indicate if OpenID Connect will be used to authenticate users interactively
Indicate if OpenID Connect will be used to authenticate users interactively
![]() Indicate any required redirect URLs or URIs
Indicate any required redirect URLs or URIs
Follow these steps to register a web application:
Navigate to your B2C tenant settings (Figure 3-31) as described in the previous section
Select Applications and click Add from the command bar
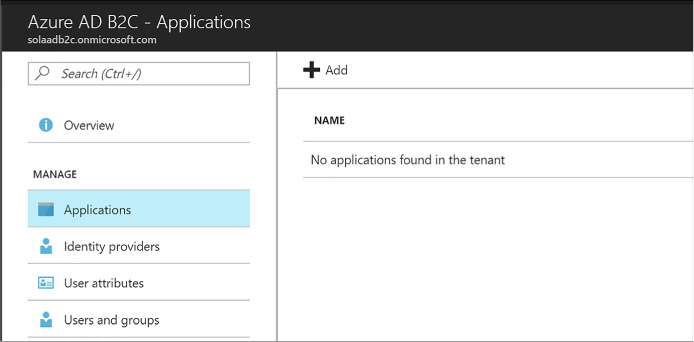
FIGURE 3-31 The applications list where you can register a new application
In the New application blade, provide the following settings (Figure 3-32):
Enter a name for the application
Select Yes for Web App / Web API
Select Yes for Allow implicit flow
Provide a reply URL authentication responses should be posted
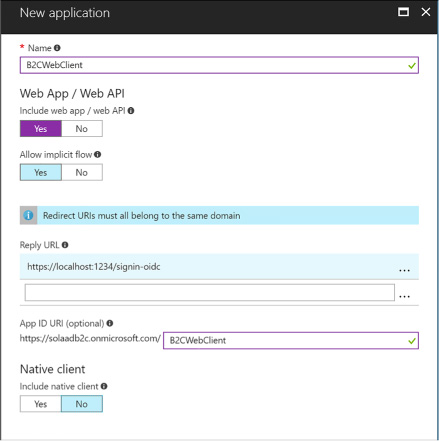
FIGURE 3-32 The New application blade
An application ID is created for the application once you create it (Figure 3-33). Select the application from the applications list and you can review its settings including this new application ID.
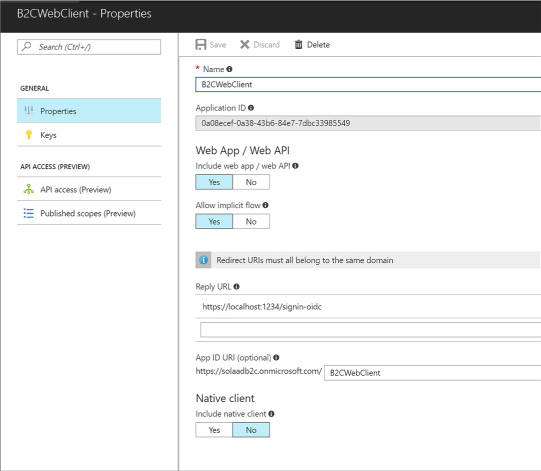
FIGURE 3-33 The settings for an application
Now you can set up your application with the following settings:
![]() Configure any external identity providers to be supported for sign in
Configure any external identity providers to be supported for sign in
![]() Manage user attributes
Manage user attributes
![]() Manage users and groups
Manage users and groups
![]() Manage policies
Manage policies
You may want to give your users a choice between one or more external identity providers to sign in. Azure AD supports a pre-defined set of well-known social identity providers to choose from (Figure 3-34).
To configure an external identity provider, follow these steps:
Navigate to your directory settings as discussed previously.
Select identity providers from the navigation pane.
Enter a name for the identity provider, something that matches the provider you will configure such as “google” or “facebook.”
Select the identity provider to configure and click OK.
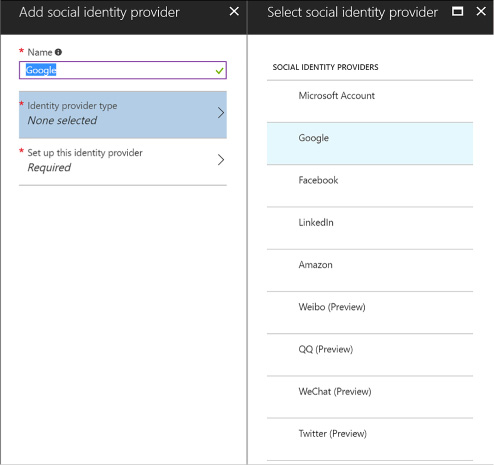
FIGURE 3-34 The identity providers supported by Azure B2C tenants
Set up the identity provider in the final tab. Based on the selected identity provider, you will be presented with required settings that typically include a client id and secret for the provider. You must have previously set up an application with the identity provider, in order to have the required settings for this configuration. Once you have entered the required settings, click OK (see Figure 3-35).
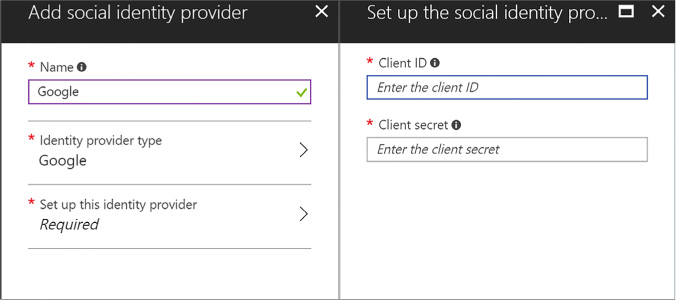
FIGURE 3-35 Required settings for Google as an identity provider
Click Create to complete the configuration of the identity provider. You will see your new provider listed in the identity providers blade.
More Info: Configuring Identity Providers
The setup for each identity provider involves setting up an application at the identity provider, sometimes through a development account, and then setting up the credentials and related information required by that identity provider in your Azure AD B2C settings. See this reference for setting up a Microsoft Account: https://docs.microsoft.com/en-us/azure/active-directory-b2c/active-directory-b2c-setup-msa-app. Additional provider setup instructions can be found in the same area of the documentation including Google and Facebook.
There are several policies you can configure for your Azure AD B2C tenant. These policies enable features and govern the user experience for the following scenarios:
![]() Sign-up
Sign-up
![]() Sign-in
Sign-in
![]() Profile editing
Profile editing
![]() Password reset
Password reset
These policies all provide default UI templates but allow for overriding those templates for further customization. You can also determine which identity provider shall be supported, support for multi-factor authentication, and control over which claims shall be returned with the id token post authentication. For sign-up, you can also configure which profile attributes you want to collect for the user.
More Info: B2C Application Samples
Once you have set up your Azure B2C tenant, configuring applications to integrate involves similar steps to those described earlier for OpenID Connect application integration. See the following samples from the Azure Samples GitHub repository, specifically related to B2C applications:
https://github.com/Azure-Samples/active-directory-b2c-dotnetcore-webapp https://github.com/Azure-Samples/active-directory-b2c-xamarin-native
https://github.com/Azure-Samples/active-directory-b2c-dotnet-webapp-and-webapi
Azure AD B2B collaboration capabilities enable organizations using Azure AD to allow users from other organizations, with or without Azure AD, to have limited access to documents, resources and applications.
From your Azure AD tenant you can:
![]() Set up single sign-on to enterprise applications such as Salesforce and Dropbox through Azure AD
Set up single sign-on to enterprise applications such as Salesforce and Dropbox through Azure AD
![]() Support user authentication via Azure AD for your own applications
Support user authentication via Azure AD for your own applications
![]() Enable access to these applications to users outside of your directory
Enable access to these applications to users outside of your directory
![]() Enforce multi-factor authentication for these users
Enforce multi-factor authentication for these users
More Info: Azure AD B2B
For details on Azure AD B2B collaboration and adding guest users to access applications, see this reference: https://docs.microsoft.com/en-us/azure/active-directory/active-directory-b2b-what-is-azure-ad-b2b.