Skill 3.1: Integrate an app with Azure AD Part 2
Beyond authentication and authorization workflows for your applications, you can also interact with the Microsoft Graph API to manage users and request information about users, and integrate multi-factor authentication scenarios into your solutions. This section discusses those capabilities.
Note: Microsoft Graph VS. Azure AD Graph
Microsoft Graph is the recommended API to be used over Azure AD Graph API - as it is where future investments in functionality are being made. Microsoft Graph already supports most everything that is exposed today through Azure AD graph and will ultimately support all of Azure AD Graph functionality. In the meantime, both APIs are supported for those applications that were already implemented against Azure AD Graph. New applications are recommended to use Microsoft Graph unless there is a feature that only Azure AD Graph exposes. See this reference for the roadmap: https://dev.office.com/blogs/microsoft-graph-or-azure-ad-graph.
Using the Microsoft Graph API, you can interact with your Azure AD tenant to manage users, groups, and more. If the application is limited to read access only, query activity will be allowed. With read and write access, the application can perform additional management activities:
![]() Add, update, and delete users and groups
Add, update, and delete users and groups
![]() Find users
Find users
![]() Request a user’s group and role membership
Request a user’s group and role membership
![]() Manage group membership
Manage group membership
![]() Create applications
Create applications
![]() Query and create directory properties
Query and create directory properties
More Info: Microsoft Graph API Reference
See this reference for documentation regarding the Microsoft Graph: https://developer.microsoft.com/en-us/graph/docs.

Exam Tip
The Microsoft Graph API is accessible via the Azure AD v2 endpoint. The Azure AD v2 endpoint is an evolution of the Azure AD v1 endpoint that modernizes some of the protocol payloads, allows you to use a single endpoint for both Azure AD and Microsoft Account users, and also adds other features. At the time of this writing, the only way to use the Azure AD v2 endpoint is to register applications at the new Microsoft Application Registry at https://apps.dev.microsoft.com. For more details on this see: https://docs.microsoft.com/en-us/azure/active-directory/develop/active-directory-appmodel-v2-overview.
Before you can interact with the Microsoft Graph API programmatically, you must create an application with the Microsoft Application Registry as follows (Figure 3-13):
Navigate to the Microsoft Application Registry accessed via https://apps.dev.microsoft.com.
Click Add an app, and from the app registration page enter a friendly name for your application and supply your contact email for administering the applications. You can optionally select the Guided Setup checkbox for a walkthrough to complete additional settings. Click to create the application.
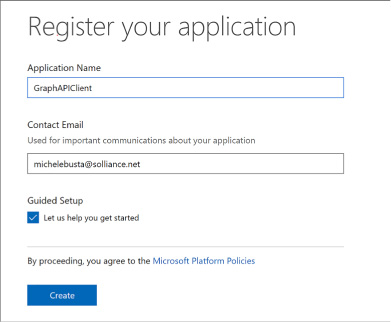
FIGURE 3-13 The Register your application page
If you do not select the guided setup, you will see the registration details for your new application and be able to view and manage those details, for example:
View the application id (a GUID) identifying your application.
Generate a password or set up a key pair for the application to support token requests.
Supply web application integration details such as redirect URL and single sign-out URL.
Supply mobile application integration details such as redirect URI.
Set any delegated or application permissions that the application requires.
Provide other application customization details that are relevant during sign in such as the logo, home page URL, terms of service URL, and privacy statement URL.
An application can query the Microsoft Graph API in a few ways:
![]() The application can directly query the graph API with the application id and secret, to access information that the application has direct access to (without user consent being required).
The application can directly query the graph API with the application id and secret, to access information that the application has direct access to (without user consent being required).
![]() The application can request information about the user through delegated permissions, which implies that the user must first authenticate to the application, grant consent (or at least have consent automatically granted at the administrative level), and then make requests on behalf of that user.
The application can request information about the user through delegated permissions, which implies that the user must first authenticate to the application, grant consent (or at least have consent automatically granted at the administrative level), and then make requests on behalf of that user.
To set up a web application to support user authentication, consent and delegated permissions to user information exposed via the Graph API:
Create an application password. Click Generate New Password from the Application secrets section. In the dialog presented save the generated password somewhere safe as it will not be presented again (Figure 3-14).

FIGURE 3-14 The Application Secrets section of the registered application
From Platforms section, select Add Platform and select Web. Provide the web application sign in URL and for single sign-out scenarios you can optionally provide the application sign out URL (Figure 3-15).
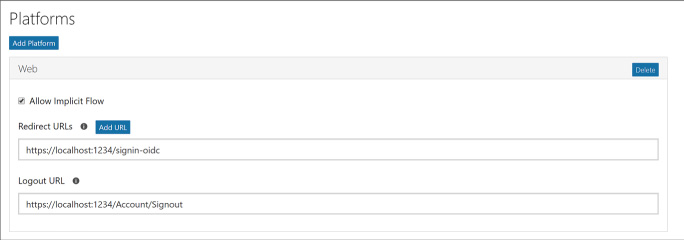
FIGURE 3-15 The web application configuration for sign in and sign out
By default, the Microsoft Graph Permissions will have delegated permissions for User.Read selected. You may choose to change the delegated permissions, or add application permissions, based on the type of requests your application may make to the Graph API.
More Info: Azure Samples for Microsoft Graph
See the Azure Samples on GitHub for more examples for calling the Microsoft Graph API including the following examples for web apps and JavaScript based applications:
https://github.com/Azure-Samples/active-directory-dotnet-webapp-openidconnect-v2 and https://github.com/Azure-Samples/active-directory-javascript-singlepageapp-dotnet-webapi-v2.
Multi-factor authentication (MFA) requires that users provide more than one verification method during the authentication process, including two or more of the following:
![]() A password (something you know)
A password (something you know)
![]() An email account or phone (something you have)
An email account or phone (something you have)
![]() Biometric input like a thumbprint (something you are)
Biometric input like a thumbprint (something you are)
Azure Multi-Factor Authentication (MFA) is the Microsoft solution for two-step verification workflows that can work with phone, text messages or mobile app verification methods.
Note: MFA Settings
At the time of this writing, you must still navigate to the (old) management portal to enable MFA for users in your directory, and to configure MFA settings. This will change in the near future.
You can enable MFA for users in your directory by doing the following:
Navigate to the Azure portal accessed via https://portal.azure.com.
Click New and select Security + Identity, then select Multi-Factor Authentication from the list of choices (Figure 3-16).
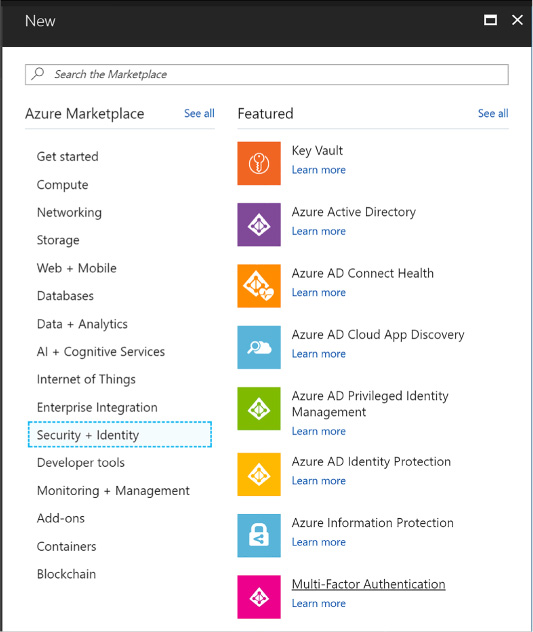
FIGURE 3-16 The Multi-Factor Authentication selection in the Azure Portal
You will see a link that will take you to the (old) management portal. Click Go to navigate to that portal (Figure 3-17).
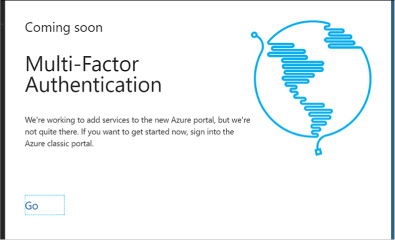
FIGURE 3-17 The Coming Soon screen that links to the old management portal for managing Multi-Factor Authentication
From the (old) management portal select your directory and click the Configure tab (Figure 3-18).
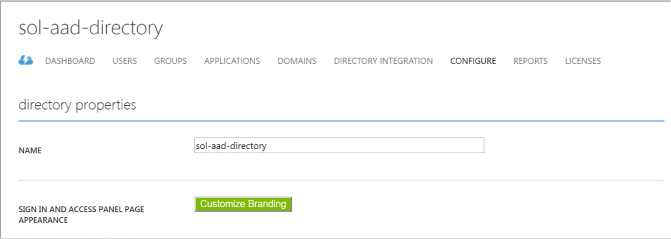
FIGURE 3-18 A directory view in the (old) management portal where you can configure MFA settings
Scroll down to the multi-factor authentication section and click Manage service settings. You will navigate to another portal where you can configure your multi-factor authentication service settings (Figure 3-19).
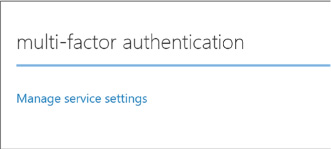
FIGURE 3-19 The configuration section where you can manage multi-factor authentication
From the multi-factor authentication portal, select the service settings tab. You can optionally customize settings for the following:
App passwords
Trusted IPs to bypass multi-factor authentication
Enabled multi-factor verification options such as call or text to phone, mobile notifications or mobile apps
Device remember-me settings
Select the users tab. From here you can select users and enable multi-factor authentication (Figure 3-20). Select a user from your directory who does not yet have multi-factor enabled, and click Enable from the action pane to the right.
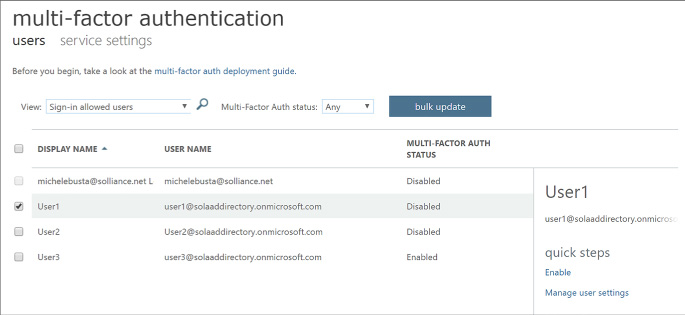
FIGURE 3-20 The user configuration settings for multi-factor authentication
Users with multi-factor authentication enabled will be prompted to set up their multi-factor authentication settings during their next login. The login workflow will follow these steps:
First, the user is taken to the directory login where they are prompted to login with their username and password.
Once authenticated, they are presented with a request to set up their multi-factor settings (Figure 3-21).
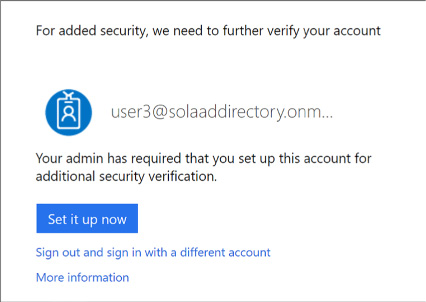
FIGURE 3-21 A user prompt to set up multi-factor authentication
If the user has not yet supplied their email address or phone number for multi-factor authentication, they will be asked to provide this information now. In addition, they will be taken through the process of verifying this information to ensure they can be used safely for future multi-factor authentication workflows.

Exam Tip
Azure Multi-Factor Authentication is included inAzure Active Directory Premium plans and Enterprise Mobility + Security plans, and can be deployed either in the cloud or on-premises. See the following documentation for the full details about Microsoft’s MFA solution: https://docs.microsoft.com/en-us/azure/multi-factor-authentication.
You may choose to integrate multi-factor authentication directly into your applications. This can be done by using the Multi-factor Authentication Software Development Kit (SDK), which provides an API for interacting with Azure MFA from your application.
In order to use these MFA APIs you must first create a Multi-factor Authentication Provider from the Azure portal following these steps:
Navigate to the Azure portal accessed via https://portal.azure.com.
Click New and select Security + Identity, then select Multi-Factor Authentication from the list of choices. You will see a link that will take you to the (old) management portal (Figure 3-22). Click Go to navigate to that portal.
Select Active Directory from the navigation pane and select the Multi-factor Auth Providers tab.

FIGURE 3-22 The list of directories in the (old) management portal
Create a new provider and set these values (Figure 3-23):
Name for the provider.
Usage model, choosing between Per Enabled User or Per Authentication.
Associate the provider with one of your directories.
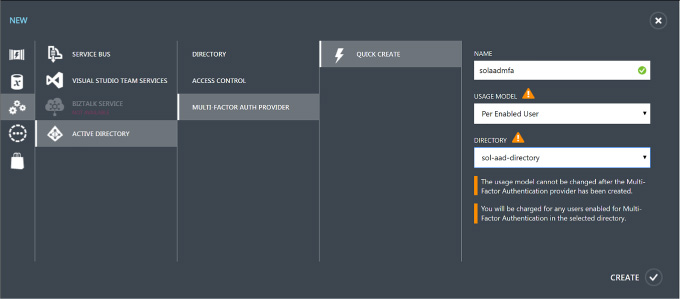
FIGURE 3-23 Creating a new multi-factor auth provider in the (old) management portal
Click Create to create the new multi-factor authentication provider (Figure 3-24). You will see it in the list of the providers once it’s created.

FIGURE 3-24 The list of multi-factor authentication providers
To manage settings for the multi-factor authentication provider, select it and click Manage from the command bar below. You will be taken to the Azure Multi-Factor Authentication portal (Figure 3-25).
Select Downloads to view the available MFA SDK downloads and choose the one for your development environment for download.
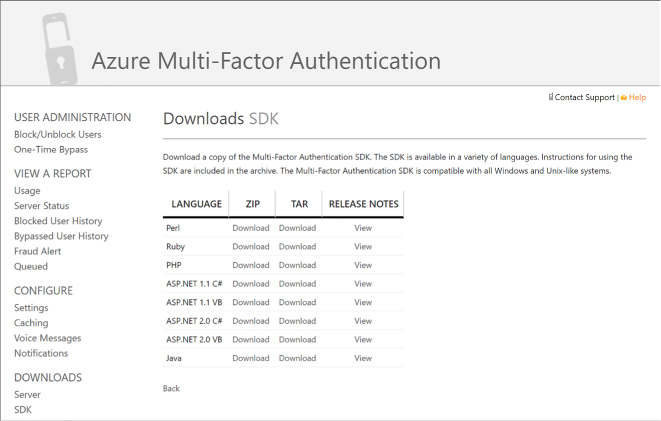
FIGURE 3-25 The Azure Multi-factor Authentication portal and Downloads SDK area
More Info: Multi-Factor Authentication SDK
For more information on using the MFA SDK to integrate with your applications see this resource: https://docs.microsoft.com/en-us/azure/multi-factor-authentication/multi-factor-authentication-sdk.

Exam Tip
You can only associate one multi-factor authentication provider to a directory.