Azure App Service Web Apps (or, just Web Apps) provides a managed service for hosting your web applications and APIs with infrastructure services such as security, load balancing, and scaling provided as part of the service. In addition, Web Apps has an integrated DevOps experience from code repositories and from Docker image repositories. You pay for compute resources according to your App Service Plan and scale settings. This section covers key considerations for designing and deploying your applications as Web Apps.
This skill covers how to:
![]() Define and manage App Service plans
Define and manage App Service plans
![]() Configure Web App settings
Configure Web App settings
![]() Configure Web App certificates and custom domains
Configure Web App certificates and custom domains
![]() Manage Web Apps by using the API, Azure PowerShell, and Xplat-CLI
Manage Web Apps by using the API, Azure PowerShell, and Xplat-CLI
![]() Implement diagnostics, monitoring, and analytics
Implement diagnostics, monitoring, and analytics
![]() Design and configure Web Apps for scale and resilience
Design and configure Web Apps for scale and resilience
An App Service plan defines the supported feature set and capacity of a group of virtual machine resources that are hosting one or more web apps, logic apps, mobile apps, or API apps (this section discusses web apps specifically, and the other resources are covered in later sections in this chapter).
Each App Service plan is configured with a pricing tier (for example, Free, Shared, Basic, and Standard), and each tier describes its own set of capabilities and cost. An App Service plan is unique to the region, resource group, and subscription. In other words, two web apps can participate in the same App Service plan only when they are created in the same subscription, resource group, and region (with the same pricing tier requirements).
This section describes how to create a new App Service plan without creating a web app, and how to create a new App Service plan while creating a web app. It also reviews some of the settings that can be useful for managing the App Service plan.
More Info: App Services Overview
For an overview of App Services and Web App development see https://docs.microsoft.com/en-us/azure/app-service/.
To create a new App Service plan in the portal, complete the following steps:
Navigate to the portal accessed via https://portal.azure.com.
Select New on the command bar.
Within the Marketplace (Figure 4-1) search text box, type App Service Plan and press Enter.

FIGURE 4-1 The Marketplace search for App Service Plan.
Select App Service Plan from the results.
On the App Service Plan blade, select Create.
On the New App Service Plan blade (Figure 4-2), provide a name for your App Service plan, choose the subscription, resource group, operating system (Windows or Linux), and location into which you want to deploy. You should also confirm and select the desired pricing tier.
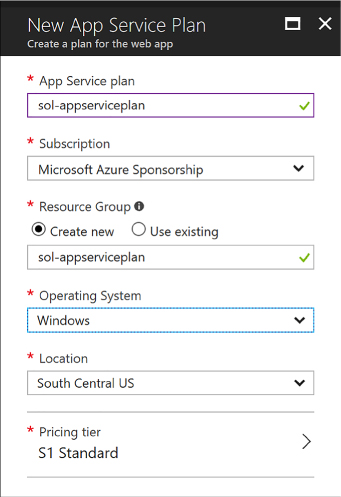
FIGURE 4-2 The settings for a new App Service Plan
Click Create to create the new App Service plan.
Following the creation of the new App Service plan, you can create a new web app and associate this with the previously created App Service plan. Or, as discussed in the next section, you can create a new App Service plan as you create a new web app.
More Info: App Service Pricing Tiers
App Service plan pricing tiers range from Free, Shared, Basic, Standard, Premium, and Isolated tiers. It is important to understand the features offered by each tier related to custom domains, certificates, scale, deployment slots, and more. For more information see https://azure.microsoft.com/en-us/pricing/details/app-service.
To create a new Web App and a new App Service plan in the portal, complete the following steps:
Navigate to the portal accessed via https://portal.azure.com.
Select New on the command bar.
Within the Marketplace list (Figure 4-3), select the Web + Mobile option.
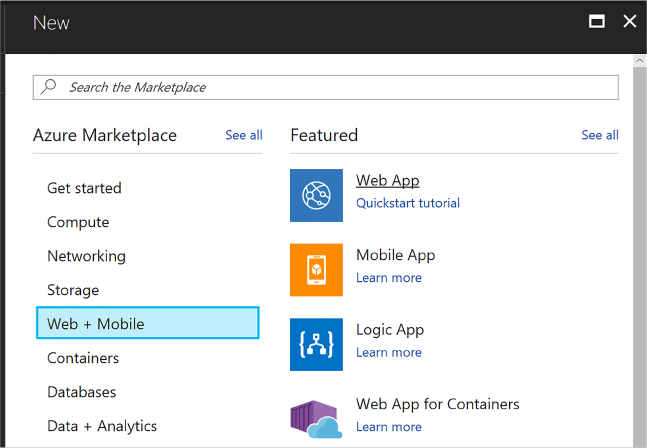
FIGURE 4-3 The Marketplace list for Web + Mobile
On the Web + Mobile blade, select Web App.
On the Web App blade (Figure 4-4), provide an app name, choose the subscription, resource group, operating system (Windows or Linux), and choose a setting for Application Insights. You also select the App Service plan into which you want to deploy.
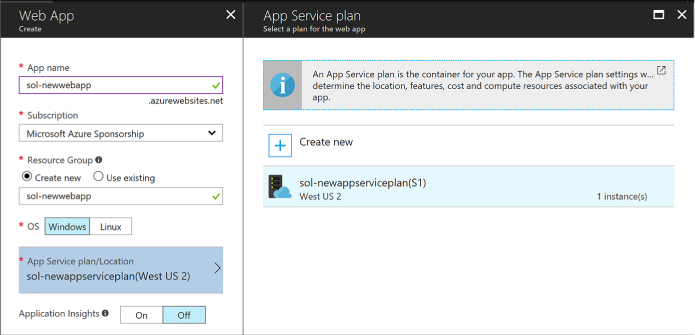
FIGURE 4-4 The selections for a new App Service.
When you click the App Service plan selection, you can choose an existing App Service plan, or create a new App Service plan. To create a new App Service plan, click Create New from the App Service Plan blade.
From the New App Service Plan blade (Figure 4-5), choose a name for the App Service plan, select a location, and select a pricing tier. Click OK and the new App Service plan is created with these settings.
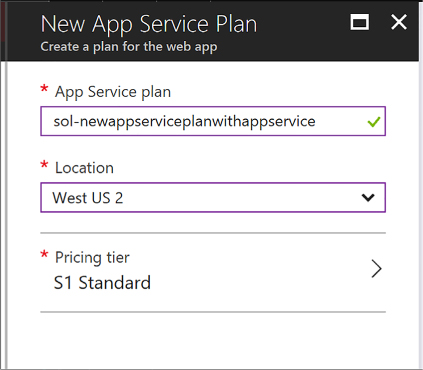
FIGURE 4-5 Options for a new App Service Plan.
From the Web App blade, click Create to create the web app and associate it with the new App Service plan.
Once you’ve created a new App Service plan, you can select the App Service plan in the portal and manage relevant settings including managing web apps and adjusting scale.
To manage an App Service plan, complete the following steps:
Navigate to the portal accessed via https://portal.azure.com.
Select More Services on the command bar.
In the filter text box, type App Service Plans, and select App Service Plans (Figure 4-6).
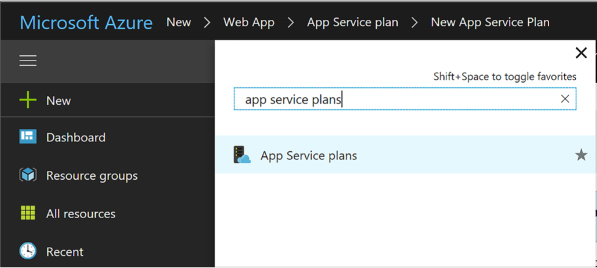
FIGURE 4-6 Search results for App Service plans
Review the list of App Service plans (Figure 4-7). Note the number of apps deployed to each is shown in the list. You can also see the pricing tiers. Select an App Service plan from the list to navigate to the App Service Plan blade.

FIGURE 4-7 List of App Service plans
From the left navigation pane, select Apps to view the apps that are deployed to the App Service plan (Figure 4-8). You can select from the list of apps to navigate to the app blade and manage its settings.
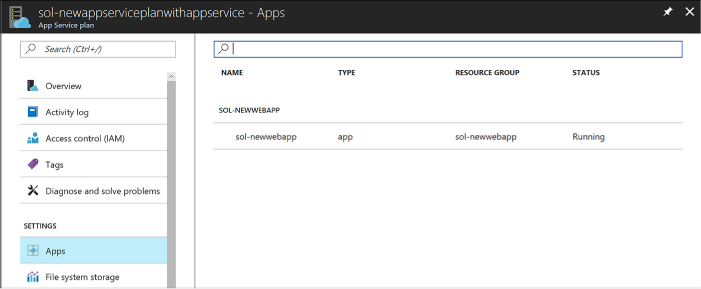
FIGURE 4-8 List of apps deployed to the App Service plan.
From the left navigation pane, select Scale Up to choose a new pricing tier for the App Service plan.
From the left navigation pane, select Scale Out to increase or decrease the number of instances of the App Service plan, or to configure Autoscale settings.