Azure DevTest Labs is a service designed to help developers and testers quickly spin up virtual machines (VMs) or complete environments in Azure, enabling rapid deployment and testing of applications. This allows you to easily spin up and tear down development and test resources, minimizing waste and providing better control cost. You can test the latest version of your application by quickly provisioning environments using reusable templates and artifacts, integrate it with your deployment pipeline, or create pre-provisioned environments for training and demos.
This skill covers how to:
![]() Create and manage custom images and formulas
Create and manage custom images and formulas
![]() Configure a lab to include policies and procedures
Configure a lab to include policies and procedures
![]() Configure cost management
Configure cost management
![]() Secure access to labs
Secure access to labs
![]() Use environments in a lab
Use environments in a lab
To get started, complete the following steps to create a lab:
Navigate to the Azure portal, accessed via https://portal.azure.com.
From the main menu on the left side, select More services (at the bottom of the list), and then select DevTest Labs (Figure 1-47) from the list of available services.
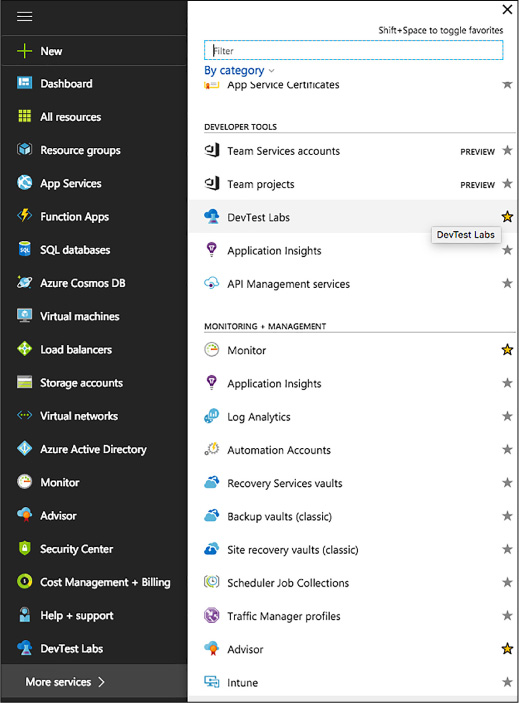
FIGURE 1-47 The DevTest Labs
In the DevTest Labs blade, select +Add (Figure 1-48).

FIGURE 1-48 Add a new DevTest Labs
On the Create a DevTest Lab blade:
Enter a Lab Name for the new lab.
Select the Subscription to associate with the lab.
Select a Location in which to store the lab.
Select Auto-shutdown to specify if you want to enable, and define parameters for, the automatic shutting down of all of the lab’s VMs. The auto-shutdown feature is mainly a cost-saving feature whereby you can specify when you want the VMs to automatically be shut down. You can change auto-shutdown settings after creating the lab by following the steps outlined in the Auto-shutdown section below.
Enter NAME and VALUE information for Tags if you want to create custom tagging that is added to every resource you will create in the lab. Tags are useful to help you manage and organize lab resources by category.
Select Create (Figure 1-49).
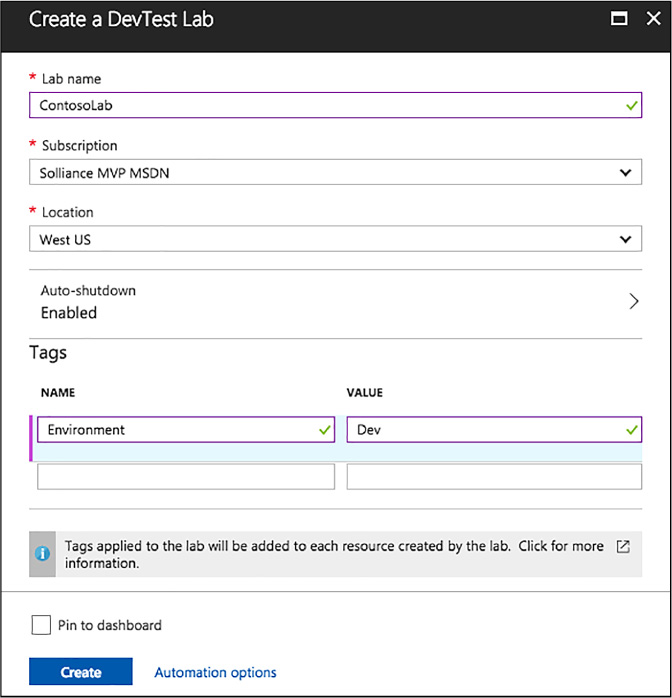
FIGURE 1-49 The Create A DevTest Lab blade
The deployment of a DevTest lab creates a new resource group. Within that resource group, you will find the following resources:
![]() The DevTest Lab instance
The DevTest Lab instance
![]() A Key vault instance
A Key vault instance
![]() A Storage account
A Storage account
![]() A Virtual network
A Virtual network
Upon initially accessing your DevTest Lab, you will want to create your first VM. This can be accomplished using a custom image or formula, or by using a pre-loaded base Marketplace image. This section focuses on the latter, and defers coverage of using custom images and formulas to the Create and manage custom images and formulas section.
Navigate to the blade for your DevTest Lab in the Azure portal.
On the lab’s Overview blade, select +Add (Figure 1-50).

FIGURE 1-50 A New VM to DevTest Lab
On the Choose a base blade, select a base image for the VM.
On the Virtual Machine blade:
Enter a name for the new VM in the Virtual Machine Name text box.
Enter a User Name that is granted administrator privileges on the VM.
Enter a password in the text field labeled Type a value. We will cover the Use a saved secret check box in the Secure access to your lab section below.
The Virtual machine disk type determines which storage disk type is allowed for the VMs in the lab. Select Hard Drive Disks (HDD) or Solid-State Drives (SSD).
Select Virtual machine size, and select one of the predefined items that specify the processor cores, RAM size, and the hard drive size of the VM to create.
Select Artifacts and, from the list of artifacts, select and configure the artifacts that you want to add to the base image.
Select Advanced settings to configure the VM’s Network options, expiration policy, and Claim options. Set Make this machine claimable to Yes if you want the machine to be claimable by lab users.
Select Create to add the new VM to the lab (Figure 1-51).
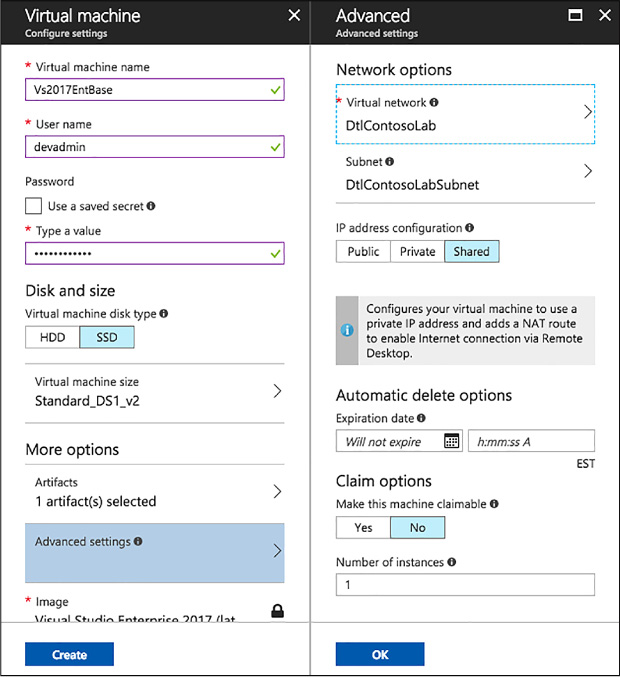
FIGURE 1-51 Virtual Maching and Advanced settings
When a VM is created, ownership is assigned to either you (the creator), or it can be made claimable. Claimable VMs are unassigned, and can be claimed by lab user. To make a VM claimable you can select Yes under Make this machine claimable on the Advanced settings blade during the VM creation process. It is also possible to make a VM you own claimable, by selecting Unclaim from the VM’s overview blade (Figure 1-52).
![]()
FIGURE 1-52 Unclaiming a VM
Unclaiming a VM will result in it being moved from your My Virtual Machines section to the Claimable Virtual Machines section on the lab’s blade.
Custom images and formulas facilitate the rapid deployment of pre-configured VMs. The key difference between custom images and formulas is that a custom image is simply an image based on a VHD, while a formula is an image based on a VHD in addition to preconfigured settings, such as VM size, virtual network, subnet, and artifacts. These preconfigured settings are set up with default values that can be overridden at the time of VM creation. Both custom images and formulas can be used as bases for creating new VMs.
Custom images provide a static, immutable way to create VMs from a desired configuration. They allow you to pre-install all the software that you need in a Virtual Hard Disk (VHD) file, and then use that VHD file to create a VM. Because the software is already installed, the VM creation time is much quicker. In addition, custom images can be used to clone VMs by creating a custom image from a VM, and then creating VMs based on that custom image.
Pros of using custom images:
![]() VM provisioning is fast as nothing changes after the VM is spun up from the image.
VM provisioning is fast as nothing changes after the VM is spun up from the image.
![]() VMs created from a single custom image are identical.
VMs created from a single custom image are identical.
Cons of using custom images:
![]() If you need to update any aspect of the custom image, the image must be recreated.
If you need to update any aspect of the custom image, the image must be recreated.
There are several ways to create a custom image in Azure DevTest Labs. You can create an image from an existing VM, or create on from a VHD, using either the Azure portal or PowerShell. Before creating a custom image from a VHD, the VHD needs to be uploaded to the storage account associated with the lab in which you are creating the custom image.
To create a custom image from a provisioned VM, following these steps:
Navigate to the blade of your DevTest Labs instance.
On your lab’s blade, select All virtual machines (Figure 1-53).
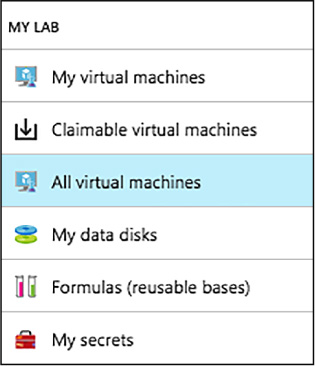
FIGURE 1-53 List of VMs in the Lab
On the All virtual machines blade, select the VM from which you want to create the custom image.
On the VM’s blade, select Create custom image (Figure 1-54).

FIGURE 1-54 Custom image from a VM
On the Custom image blade (Figure 1-55), enter a name and description for your custom image. This information is displayed in the list of bases when you create a VM.
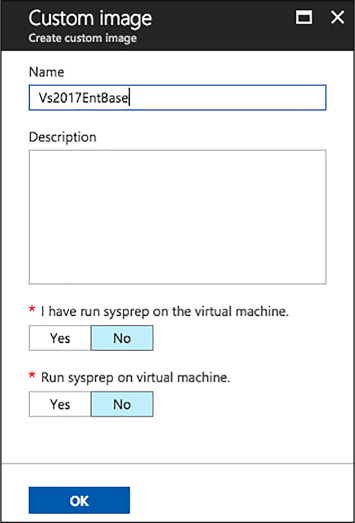
FIGURE 1-55 Custom Image
Select whether sysprep was run on the VM. If the sysprep was not run on the VM, specify whether you want sysprep run when a VM is created from this custom image.
Select OK when finished to create the custom image.
To create a custom image from a VHD using the Azure portal, complete the following steps:
Navigate to the blade of your DevTest Labs instance.
From your lab’s Configuration and policies blade, select Custom images (Figure 1-56).
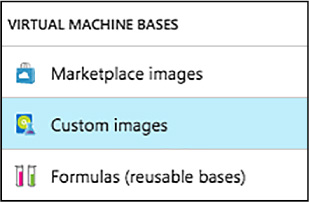
FIGURE 1-56 Custom images in the Lab
On the Custom images blade, select +Add (Figure 1-57).
![]()
FIGURE 1-57 New Custom image
Enter the name of the custom image. This will be displayed in the list of base images when creating a VM.
Enter a description for the custom image. This will be displayed in the list base images.
Select an OS Type – Windows or Linux.
If Windows is selected as the OS Type, select whether sysprep has been run on the VHD image.
Select a VHD image.
Select OK to create the custom image (Figure 1-58).
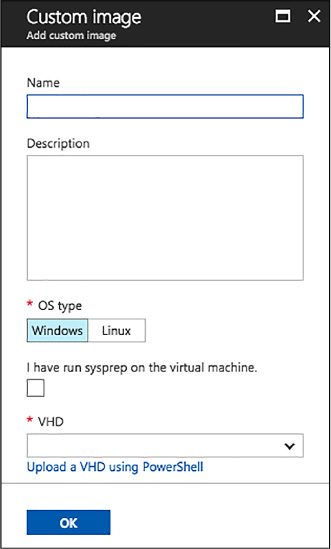
FIGURE 1-58 Custom VHD image
To create a custom image from a VHD using PowerShell, complete these steps:
At a PowerShell prompt, log into your Azure account with the following call to the Login-AzureRmAccount cmdlet.
Login-AzureRmAccount
Select the desired Azure subscription by calling the Select-AzureRmSubscription cmdlet. Replace the placeholder for $subscriptionId variable with a valid Azure subscription ID.
$subscriptionId = '<Specify your subscription ID here>'
Select-AzureRmSubscription -SubscriptionId $subscriptionId
Get the lab object by calling the Get-AzureRmResource cmdlet. Replace the following placeholders for the $labRg and $labName variables with the appropriate values for your environment.
$labRg = '<Specify your lab resource group name here>'
$labName = '<Specify your lab name here>'
$lab = Get-AzureRmResource -ResourceId ('/subscriptions/' + $subscriptionId +
'/resourceGroups/' + $labRg + '/providers/Microsoft.DevTestLab/labs/' + $labName)
Get the lab storage account and lab storage account key values from the lab object.
$labStorageAccount = Get-AzureRmResource -ResourceId
$lab.Properties.defaultStorageAccount
$labStorageAccountKey = (Get-AzureRmStorageAccountKey -ResourceGroupName
$labStorageAccount.ResourceGroupName -Name
$labStorageAccount.ResourceName)[0].Value
Replace the following placeholder for the $vhdUri variable with the URI to your uploaded VHD file. You can get the VHD file’s URI from the storage account’s blob blade in the Azure portal.
$vhdUri = '<Specify the VHD URI here>'
Create the custom image using the New-AzureRmResourceGroupDeployment cmdlet. Replace the following placeholders for the $customImageName and $customImageDescription variables to meaningful names for your environment.
$customImageName = '<Specify the custom image name>'
$customImageDescription = '<Specify the custom image description>'
$parameters = @{existingLabName="$($lab.Name)"; existingVhdUri=$vhdUri;
imageOsType='windows'; isVhdSysPrepped=$false; imageName=$customImageName;
imageDescription=$customImageDescription}
New-AzureRmResourceGroupDeployment -ResourceGroupName $lab.ResourceGroupName
-Name CreateCustomImage -TemplateUri 'https://raw.githubusercontent.com/
Azure/azure-devtestlab/master/Samples/201-dtl-create-customimage-from
-vhd/azuredeploy.json' -TemplateParameterObject $parameters
You may find that there are times when an image is no longer needed, and should be removed from your lab. To delete a custom image, complete the following steps:
Navigate to the blade of your DevTest Labs instance.
On the lab’s Overview blade, select Custom images.
On the Custom images blade, select the ellipsis to the right of the custom image you wish to delete, then select Delete on the context menu (Figure 1-59).

FIGURE 1-59 Deleting an image
Select Yes to the deletion confirmation dialog.
Formulas are lists of default property values, providing a dynamic way to create VMs from a desired configuration. When creating a VM from a formula, the default values can be used as-is, or modified. Like custom and Marketplace images, formulas provide a mechanism for fast VM provisioning. Like custom images, they enable you to create a base image from a VHD file. The base image can then be used to provision a new VM.
Pros of using formulas
![]() Changes in the environment can be captured on the fly via artifacts. For example, if you want a VM installed with the latest bits from your release pipeline, you can specify an artifact that deploys the latest bits or enlists the latest code in the formula together with a target base image. Whenever this formula is used to create VMs, the latest bits/code are deployed/enlisted to the VM.
Changes in the environment can be captured on the fly via artifacts. For example, if you want a VM installed with the latest bits from your release pipeline, you can specify an artifact that deploys the latest bits or enlists the latest code in the formula together with a target base image. Whenever this formula is used to create VMs, the latest bits/code are deployed/enlisted to the VM.
![]() Formulas can define default settings that custom images cannot provide.
Formulas can define default settings that custom images cannot provide.
![]() The settings saved in a formula are default values, and can be modified when the VM is created.
The settings saved in a formula are default values, and can be modified when the VM is created.
Cons of using formulas
![]() Creating a VM from a formula can take more time than creating a VM from a custom image.
Creating a VM from a formula can take more time than creating a VM from a custom image.
Anyone in the DevTest Labs User role can create VMs using a formula as a base. There are two ways to create formulas:
![]() From a base (custom image, Marketplace image, or another formula)—Use when you want to define all the characteristics of the formula.
From a base (custom image, Marketplace image, or another formula)—Use when you want to define all the characteristics of the formula.
![]() From an existing lab VM—Use when you want to create a formula based on the settings of an existing VM.
From an existing lab VM—Use when you want to create a formula based on the settings of an existing VM.
The following steps outline the process of creating a formula for a custom image, Marketplace image, or another formula.
Navigate to the blade of your DevTest Labs instance.
From your lab’s blade, select Configuration and policies (Figure 1-60).
On the Configuration and policies blade, select Formulas (reusable bases).
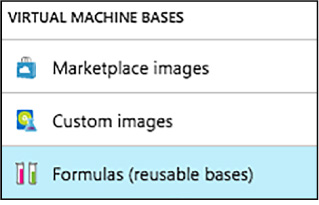
FIGURE 1-60 Navigating to formulas
Select +Add on the Configuration and policies – Formulas (reusable bases) blade (Figure 1-61).
![]()
FIGURE 1-61 Add new formula
On the Choose a base blade, select an image to use for the formula.
On the Create formula blade:
Enter a name for the formula into the Formula name text box. This value is displayed in the list of base images when you create a VM.
Enter a description for the formula. This value is available from the formula’s context menu when you create a VM.
Enter a User name, which will have administrative privileges on the VM.
Enter a password.
Specify either HDD (hard-disk drive) or SSD (solid-state drive) to indicate which storage disk type is allowed for the virtual machines provisioned using this base image.
Select one of the predefined items that specify the processor cores, RAM size, and the hard drive size of the VM to create.
Select to open the Add artifacts blade, in which you select and configure the artifacts that you want to add to the base image.
Select to open the Advanced blade where you configure the following settings:
![]() Virtual network - Specify the desired virtual network.
Virtual network - Specify the desired virtual network.
![]() Subnet - Specify the desired subnet.
Subnet - Specify the desired subnet.
![]() IP address configuration - Specify if you want the Public, Private, or Shared IP addresses. For more information about shared IP addresses, see Understand shared IP addresses in Azure DevTest Labs.
IP address configuration - Specify if you want the Public, Private, or Shared IP addresses. For more information about shared IP addresses, see Understand shared IP addresses in Azure DevTest Labs.
![]() Make this machine claimable - Making a machine “claimable” means that it will not be assigned ownership at the time of creation. Instead lab users will be able to take ownership (“claim”) the machine in the lab’s blade.
Make this machine claimable - Making a machine “claimable” means that it will not be assigned ownership at the time of creation. Instead lab users will be able to take ownership (“claim”) the machine in the lab’s blade.
Select Create to create the formula (Figure 1-62).
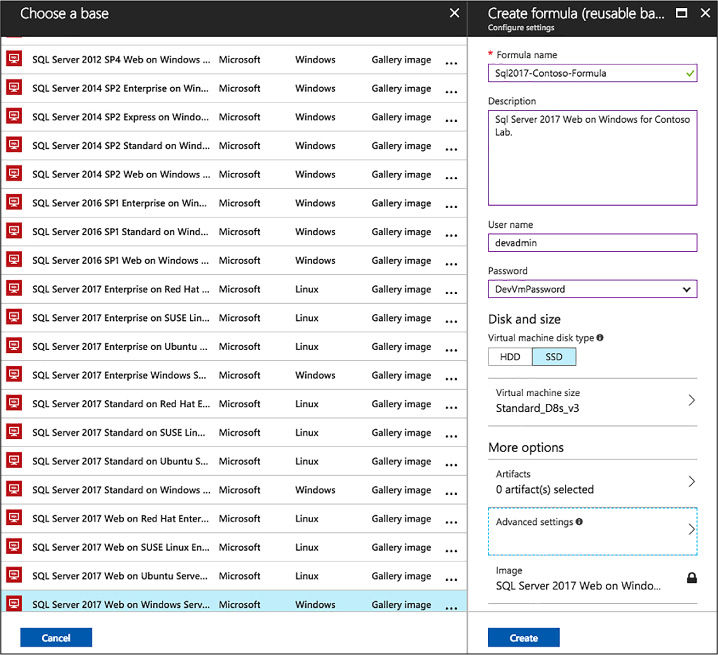
FIGURE 1-62 Choose a base
To create a formula based on an existing VM, complete the following steps:
Navigate to the blade of your DevTest Labs instance.
From your lab’s Overview blade, select the VM from which you wish to create the formula (Figure 1-63).

FIGURE 1-63 Claimable Virtual Machines
On the VM’s blade (Figure 1-64), select Create formula (reusable base).
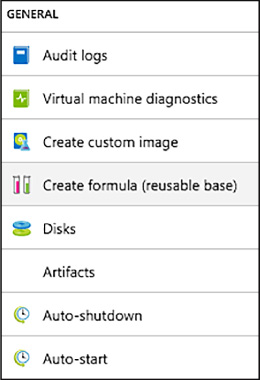
FIGURE 1-64 Custom image for a VM
On the Create formula blade, enter a Name and Description for your new formula (Figure 1-65).
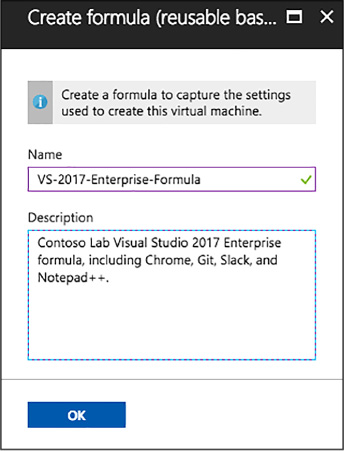
FIGURE 1-65 Create a new formula (reusable base)
Select OK to create the formula.
After creating a formula, it is possible to modify the properties of that formula. To modify an existing formula, follow these steps:
Navigate to the blade of your DevTest Labs instance.
On your lab’s Overview blade (Figure 1-66), select Formulas (reusable bases).
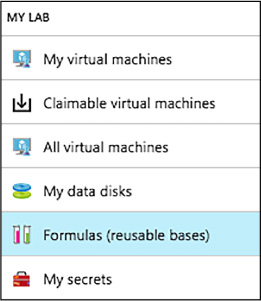
FIGURE 1-66 Navigating Formulas
On the Lab formulas blade, select the formula you wish to modify (Figure 1-67).

FIGURE 1-67 Modify the list of available formulas in Lab
On the Update formula blade, make the desired edits, and select Update (Figure 1-68).

FIGURE 1-68 Update Formula
To delete a formula, complete the steps below:
Navigate to the blade of your DevTest Labs instance.
On your lab’s Overview blade, select Formulas (reusable bases).
On the Lab formulas blade, select the ellipsis to the right of the formula you wish to delete, then select Delete on the context menu (Figure 1-69).

FIGURE 1-69 Deleting from the context menu
Select Yes to the deletion confirmation dialog.
In Azure DevTest Labs, a lab is defined as the infrastructure that encompasses a group of resources, such as VMs. Labs enable you to better manage those resources by specifying limits and quotas. For each lab you create, you can control cost and minimize waste by managing policies (settings).
The policy for setting the allowed VM sizes helps to minimize lab waste by enabling you to specify which VM sizes are allowed in the lab. If this policy is activated, only VM sizes from this list can be used to create VMs, allowing you to be very specific about what size VMs can be deployed into your lab environment. To configure the virtual machine sizes allowed in your lab, complete the following steps:
Navigate to the blade of your DevTest Labs instance.
On your lab’s Overview blade, select Configuration and policies, under Settings (Figure 1-70).
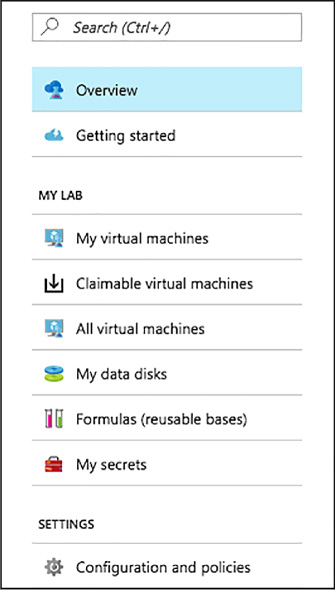
FIGURE 1-70 The Configuration and Policies blade
Select Allowed virtual machine sizes under Settings, on the Configuration and policies blade (Figure 1-71).
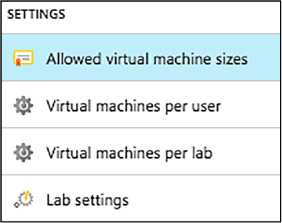
FIGURE 1-71 Allowed Virtual Machine Sizes
Select On to enable this policy, and Off to disable it (Figure 1-72).
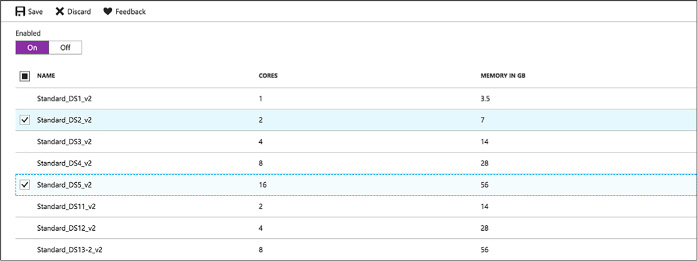
FIGURE 1-72 The allowed VM sizes policy
If enabled, select one or more VM sizes that you want to be allowed the creation of in your lab.
Select Save.
The Virtual machines per user policy allows you to specify the maximum number of VMs that can be created or claimed by an individual user. You can also specify limits on the number of VMs using premium OS disks. Should a user attempt to create or claim a VM when their user limit has been met, an error message indicating that the VM cannot be created/claimed will be displayed. To manage the virtual machines per user policy, follow the steps below:
Navigate to the blade of your DevTest Labs instance.
On your lab’s blade, select Configuration and policies.
On the Configuration and policies blade, select Virtual machines per user (Figure 1-73).
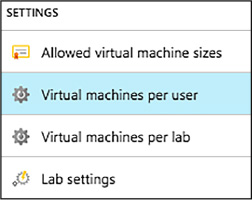
FIGURE 1-73 Virtual Machines Per User
Select Yes to enable limiting the number of virtual machines per user, and No to disable limits.
If yes is selected, enter a numeric value indicating the maximum number of VMs that can be created or claimed by a user (Figure 1-74).
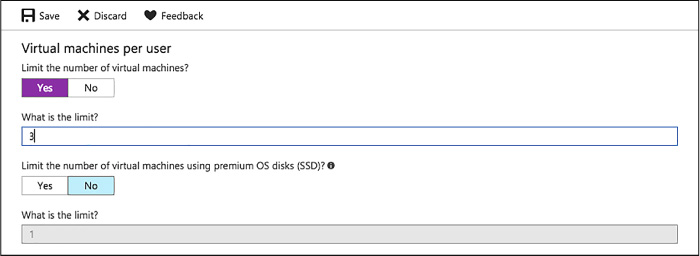
FIGURE 1-74 The VMs per user policy
Select Yes to enable limiting the number of VMs using premium OS disks (SSD), and No to remove limits on premium disk utilization.
If Yes is selected, enter a numeric value to specify the limit of VMs that can be created using SSDs.
Select Save to save your policy settings.
The policy for Virtual machines per lab allows you to specify the maximum number of VMs that can be created for the current lab, setting a limitation on the overall lab itself. Like the Virtual machines per user policy, you can also set limitations on the use of premium OS disks. If any user attempts to create a VM when the lab limit has been met, an error message indicates that the VM cannot be created. The virtual machines per lab policy can be configured by completing the following steps:
Navigate to the blade of your DevTest Labs instance.
On the lab’s blade, select Configuration and policies.
On the Configuration and policies menu, select Virtual machines per user (Figure 1-75).
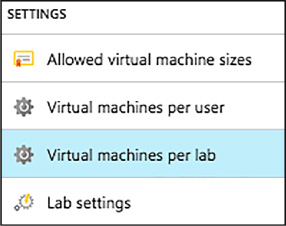
FIGURE 1-75 Virtual Machines per lab
Select Yes to enable limiting the number of virtual machines per user, and No to disable limits.
If Yes is selected, enter a numeric value indicating the maximum number of VMs that can be created in the lab (Figure 1-76).

FIGURE 1-76 The VMs per user policy
Select Yes to enable limiting the number of virtual machines using premium OD disks (SSD), and No to disable limits on premium disk utilization.
If Yes is selected, enter a numeric value to specify the limit.
Select Save to save your policy settings.
The auto-shutdown policy in Azure DevTest Labs is one of the most important policies for helping you to minimize lab waste and control cost, allowing you to specify a time that the lab’s VMs will automatically shut down. This helps to prevent incurring costs when the VMs are not in use, and ensures VMs are shut down, even when you forget to do it at the end of a work day. To configure the auto-shutdown policy, follow the below steps:
Navigate to the blade of your DevTest Labs instance.
On the lab’s Configuration and policies blade, select Auto-shutdown (Figure 1-77).
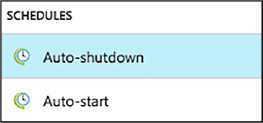
FIGURE 1-77 Auto-Shutdown policies
Select On to enable this policy, and Off to disable it (Figure 1-78).
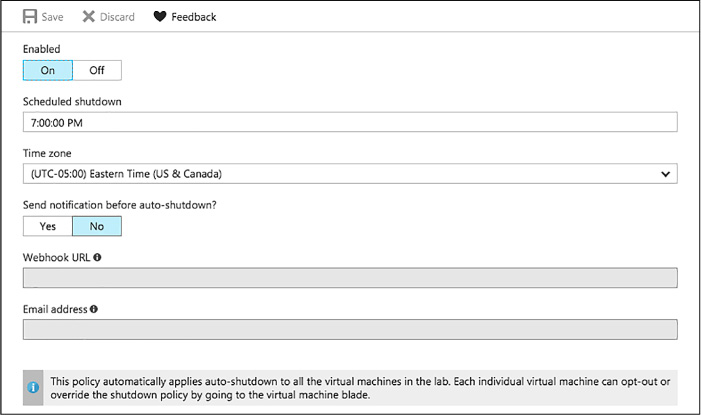
FIGURE 1-78 The Auto-Shutdown Policy
If you enable this policy, specify the time and time zone to shut down all VMs in the current lab.
Specify Yes or No for the option to send a notification before auto-shutdown. Notifications will be sent 15 minutes prior to the specified auto-shutdown time. If you specified Yes, enter either a Webhook URL endpoint or an email address to receive the notifications.
Select Save.
By default, once enabled, the auto-shutdown policy applies to all VMs in the current lab. This policy can be overridden on each individual VM in the lab, enabling more fine-tuned management of the policy. To alter this setting for a specific VM, complete the steps below:
Open the target VM’s blade.
Select the Auto-shutdown tile on the VM’s blade (Figure 1-79).
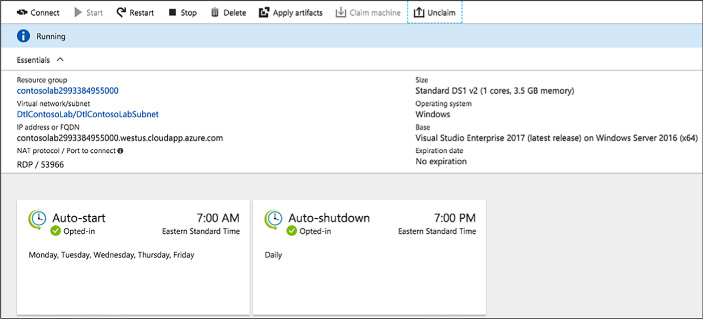
FIGURE 1-79 Auto-Shutdown Tile
On the Auto-shutdown blade, select On to enable the policy, or Off to disable it. If On is selected, enter a scheduled shutdown time, and time zone, and specify if notifications should be sent before auto-shutdown. If notifications are to be sent, provide a Webhook URL or email address to send notifications (Figure 1-80).

FIGURE 1-80 Configuring Aut0-Shutdown policy
Azure DevTest Labs’ auto-start policy lets you specify when the VMs in the current lab should be automatically started, allowing all VMs to be started at a specific day and time. For example, if you want all your VMs to start at 7:00 AM each weekday, you can set up the policy to accommodate that configuration. Complete the following steps to configure the auto-start policy:
Navigate to the blade of your DevTest Labs instance.
On your lab’s Configuration and policies blade, select Auto-start (Figure 1-81).
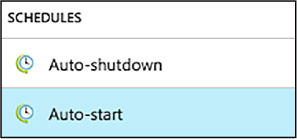
FIGURE 1-81 Auto-Start Policy settings
Select On to enable this policy, and Off to disable it (Figure 1-82).
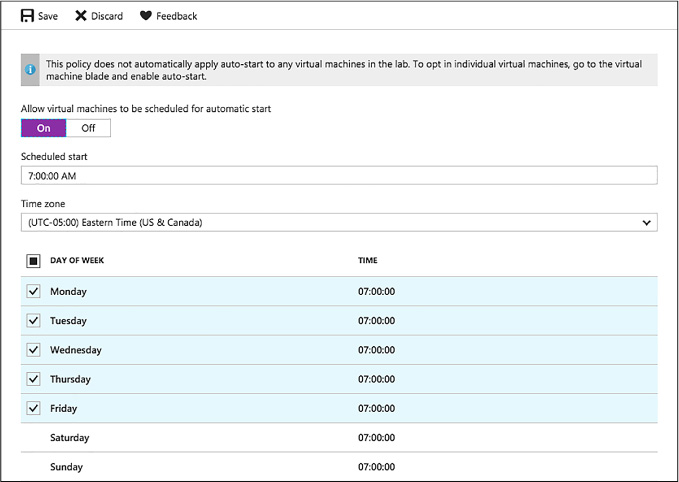
FIGURE 1-82 Configuring the Autto-Start policy
If you enable this policy, specify the scheduled start time, time zone, and the days of the week for which the time applies.
Select Save.
Like the auto-shutdown policy, the auto-start policy applies to all VMs in the current lab, once enabled. The steps to modify this policy for an individual VM are similar to those for the auto-shutdown policy, but you will select the Auto-start tile on the VM’s blade, and modify the policy from there.
Another option for managing the life of a VM is the ability to set an expiration date for the VM. This option is available when creating a new VM, and could be used if you want to ensure the VM is automatically deleted at a specified date and time. To set the expiration date for a VM:
During the VM creation process, select Advanced settings on the Virtual machine blade.
Choose the calendar icon to specify a date and time on which the VM will be automatically deleted. By default, VMs never expire.
Select OK on the Advanced settings blade (Figure 1-83).
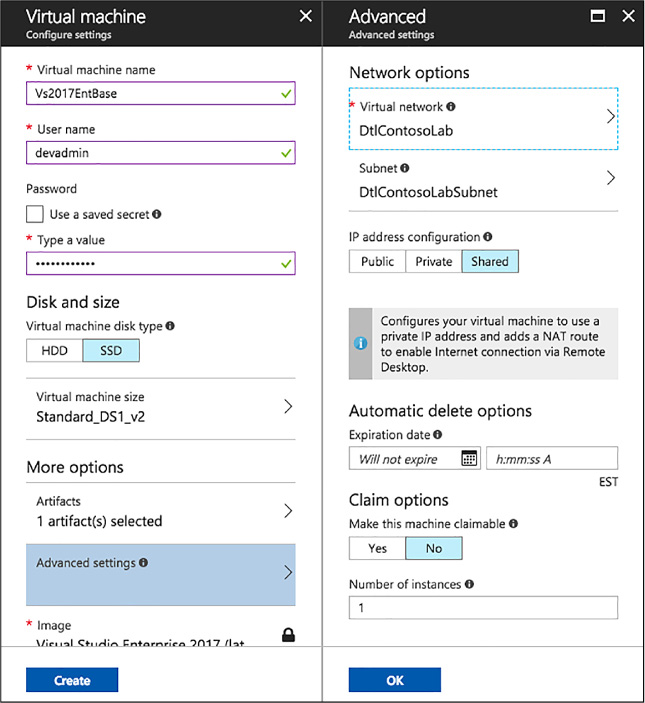
FIGURE 1-83 Auto-Delete options