There is more to managing your VM storage than attaching data disks. In this skill, you explore multiple considerations that are critical to your VM storage strategy.
This skill covers how to:
![]() Plan for storage capacity
Plan for storage capacity
![]() Configure storage pools
Configure storage pools
![]() Configure disk caching
Configure disk caching
![]() Configure geo-replication
Configure geo-replication
![]() Configure shared storage using Azure File storage
Configure shared storage using Azure File storage
![]() Implement ARM VMs with Standard and Premium Storage
Implement ARM VMs with Standard and Premium Storage
![]() Implement Azure Disk Encryption for Windows and Linux ARM VMs
Implement Azure Disk Encryption for Windows and Linux ARM VMs
VMs leverage a local disk provided by the host machine for the temp drive (D: on Windows and /dev/sdb1 on Linux) and Azure Storage for the operating system and data disks (collectively referred to as virtual machine disks), wherein each disk is a VHD stored as a blob in Blob storage. The temp drive, however, uses a local disk provided by the host machine. The physical disk underlying this temp drive may be shared among all the VMs running on the host and, therefore, may be subject to a noisy neighbor that competes with your VM instance for read/write IOPS and bandwidth.
For the operating system and data disks, use of Azure Storage blobs means that the storage capacity of your VM in terms of both performance (for example, IOPS and read/write throughput MB/s) and size (such as in GBs) is governed by the capacity of a single blob in Blob storage.
When it comes to storage performance and capacity of your disks there are two big factors:
Is the disk standard or premium?
Is the disk unmanaged or managed?
When you provision a VM (either in the portal or via PowerShell or the Azure CLI), it will ask for the disk type, which is either HDD (backed by magnetic disks with physical spindles) or SSD (backed by solid state drives). Standard disks are stored in a standard Azure Storage Account backed by the HDD disk type. Premium disks are stored in a premium Azure Storage Account backed by the SSD disk type.
When provisioning a VM, you will also need to choose between using unmanaged disks or managed disks. Unmanaged disks require the creation of an Azure Storage Account in your subscription that will be used to store all of the disks required by the VM. Managed disks simplify the disk management because they manage the associated Storage Account for you, and you are only responsible for managing the disk resource. In other words, you only need to specify the size and type of disk and Azure takes care of the rest for you. The primary benefit to using managed disks over unmanaged disks is that you are no longer limited by Storage Account limits. In particular, the limit of 20,000 IOPS per Storage Account means that you would need to carefully manage the creation of unmanaged disks in Azure Storage, limiting the number of disks typically to 20-40 disks per Storage Account. When you need more disks, you need to create additional Storage Accounts to support the next batch of 20-40 disks.
The following summarizes the differences between standard and premium disks in both unmanaged and managed scenarios, shown in Table 1-1.
TABLE 1-1 Comparing Standard and Premium disks
|
Feature |
Standard (unmanaged) |
STANDARD (MANAGED) |
Premium (UNMANGED) |
PREMIUM (MANAGED) |
|
Max IOPS for storage account |
20k IOPS |
N/A |
60k -127.5k IOPS |
N/A |
|
Max bandwidth for storage account |
N/A |
N/A |
50 Gbps |
N/A |
|
Max storage capacity per storage account |
500 TB |
N/A |
35 TB |
N/A |
|
Max IOPS per VM |
Depends on VM Size |
Depends on VM Size |
Depends on VM Size |
Depends on VM Size |
|
Max throughput per VM |
Depends on VM Size |
Depends on VM Size |
Depends on VM Size |
Depends on VM Size |
|
Max disk size |
4TB |
32GB - 4TB |
32GB - 4TB |
32GB - 4TB |
|
Max 8 KB IOPS per disk |
300 - 500 IOPS |
500 IOPS |
500 - 7,500 IOPS |
120 - 7,500 IOPS |
|
Max throughput per disk |
60 MB/s |
60 MB/s |
100 MB/s - 250 MB/s |
25 MB/s - 250 MB/s |
More Info: IOPS
An IOPS is a unit of measure counting the number of input/output operations per second and serves as a useful measure for the number of read, write, or read/write operations that can be completed in a period of time for data sets of a certain size (usually 8 KB). To learn more, you can read about IOPS at http://en.wikipedia.org/wiki/IOPS.
Given the scalability targets, how can you configure a VM that has an IOPS capacity greater than 500 IOPS or 60 MB/s throughput, or provides more than one terabyte of storage? One approach is to use multiple blobs, which means using multiple disks striped into a single volume (in Windows Server 2012 and later VMs, the approach is to use Storage Spaces and create a storage pool across all of the disks). Another option is to use premium disks at the P20 size or higher.
More Info: Storage Scalability Targets
For a detailed breakdown of the capabilities by storage type, disk type and size, see: https://docs.microsoft.com/azure/storage/storage-scalability-targets.
For Azure VMs, the general rule governing the number of disks you can attach is twice the number of CPU cores. For example, an A4-sized VM instance has 8 cores and can mount 16 disks. Currently, there are only a few exceptions to this rule such as the A9 instances, which map on one times the number of cores (so an A9 has 16 cores and can mount 16 disks). Expect such exceptions to change over time as the VM configurations evolve. Also, the maximum number of disks that can currently be mounted to a VM is 64 and the maximum IOPS is 80,000 IOPS (when using a Standard GS5).
More Info: How Many Disks can you Mount?
As the list of VM sizes grows and changes over time, you should review the following web page that details the number of disks you can mount by VM size and tier: http://msdn.microsoft.com/library/azure/dn197896.aspx.
Storage Spaces enables you to group together a set of disks and then create a volume from the available aggregate capacity. Assuming you have created your VM and attached all of the empty disks you want to it, the following steps explain how to create a storage pool from those disks. You next create a storage space in that pool, and from that storage space, mount a volume you can access with a drive letter.
Launch Remote Desktop and connect to the VM on which you want to configure the storage space.
If Server Manager (Figure 1-14) does not appear by default, run it from the Start screen.
Click the File And Storage Services tile near the middle of the window.

FIGURE 1-14 The Server Manager
In the navigation pane, click Storage Pools (Figure 1-15).
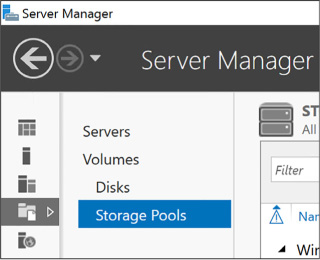
FIGURE 1-15 Storage Pools in the Server Manager
In the Storage Pools area, click the Tasks drop-down list and select New Storage Pool (Figure 1-16).
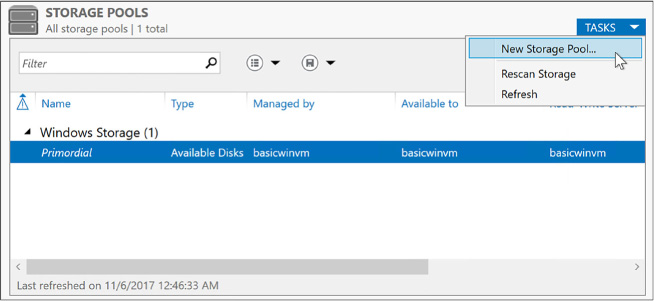
FIGURE 1-16 New Storage Pools in Server Manager
In the New Storage Pool Wizard, click Next on the first page.
Provide a name for the new storage pool, and click Next.
Select all the disks you want to include in your storage pool, and click Next (Figure 1-17).
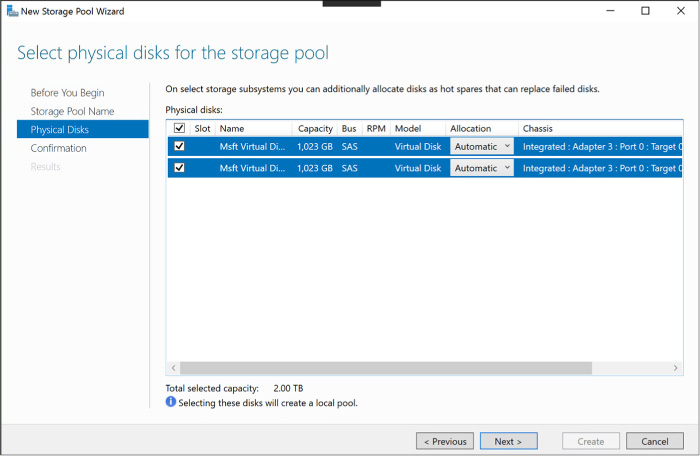
FIGURE 1-17 Select Physical Disks For The Storage Pool
Click Create, and then click Close to create the storage pool.
After you create a storage pool, create a new virtual disk that uses it by completing the following steps:
In Server Manager, in the Storage Pools dialog box, right-click your newly created storage pool and select New Virtual Disk (Figure 1-18).
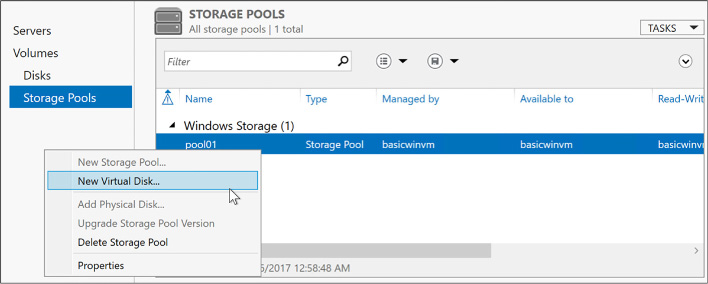
FIGURE 1-18 Create a New Virtual Disk in Storage Pools
Select your storage pool, and select OK (Figure 1-19).
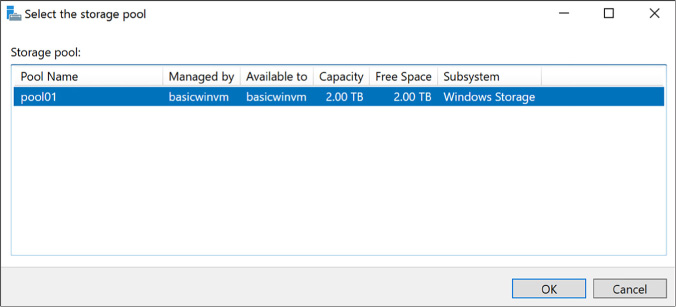
FIGURE 1-19 The Select The Storage Pool dialog
Click Next on the first page of the wizard.
Provide a name for the new virtual disk, and click Next.
On the Specify enclosure resiliency page, click Next.
Select the simple storage layout (because your VHDs are already triple replicated by Azure Storage, you do not need additional redundancy), and click Next (Figure 1-20).

FIGURE 1-20 The New Virtual Disk Wizard with the Select The Storage Layout page
For the provisioning type, leave the selection as Fixed. Click Next (Figure 1-21).

FIGURE 1-21 Specify The Provisioning Type page in the New Virtual Disk Wizard
For the size of the volume, select Maximum (Figure 1-22) so that the new virtual disk uses the complete capacity of the storage pool. Click Next.

FIGURE 1-22 The Specify The Size Of The Virtual Disk page in the New Virtual Disk Wizard
On the Summary page, click Create.
Click Close when the process completes.
When the New Virtual Disk Wizard closes, the New Volume Wizard appears. Follow these steps to create a volume:
Click Next to skip past the first page of the wizard.
On the Server And Disk Selection page, select the disk you just created (Figure 1-23). Click Next.
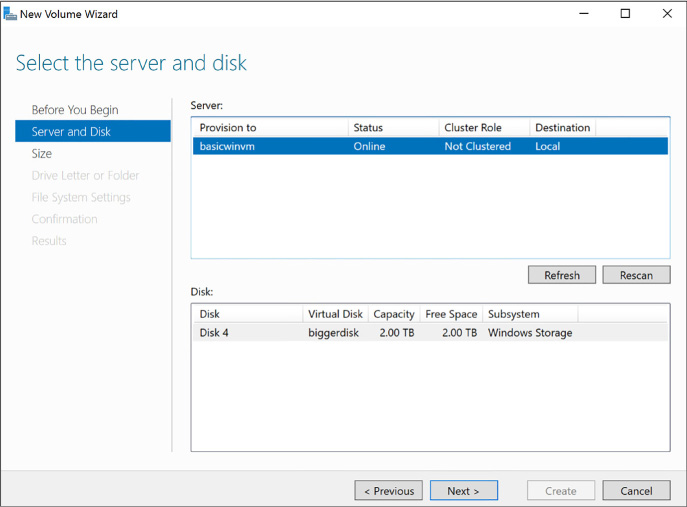
FIGURE 1-23 The Select The Server And Disk page in the New Volume Wizard
Leave the volume size set to the maximum value and click Next (Figure 1-24).
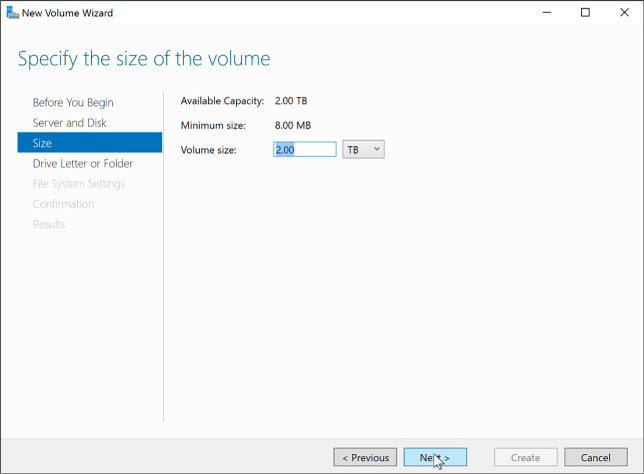
FIGURE 1-24 The Specify The Size Of The Volume page in the New Volume Wizard
Leave Assign A Drive Letter selected and select a drive letter to use for your new drive. Click Next (Figure 1-25).

FIGURE 1-25 The Assign To A Drive Letter Or Folder in the New Volume Wizard
Provide a name for the new volume, and click Next (Figure 1-26).

FIGURE 1-26 The Select File System Settings in the New Volume Wizard
Click Create.
When the process completes, click Close.
Open Windows Explorer to see your new drive listed.
Applications running within your VM can use the new drive and benefit from the increased IOPS and total storage capacity that results from having multiple blobs backing your multiple VHDs grouping in a storage pool.
More Info: Configuring Striped Logical Volumes in Linux VMS
Linux Virtual Machines can use the Logical Volume Manager (LVM) to create volumes that span multiple attached data disks, for step by step instructions on doing this for Linux VMs in Azure, see: https://docs.microsoft.com/en-us/azure/virtual-machines/linux/configure-lvm.
Each disk you attach to a VM has a host cache preference setting for managing a local cache used for read or read/write operations that can improve performance (and even reduce storage transaction costs) in certain situations by averting a read or write to Azure Storage. This local cache does not live within your VM instance; it is external to the VM and resides on the machine hosting your VM. The local cache uses a combination of memory and disk on the host (outside of your control). There are three cache options:
![]() None No caching is performed.
None No caching is performed.
![]() Read Only Assuming an empty cache or the desired data is not found in the local cache, reads read from Azure Storage and are then cached in local cache. Writes go directly to Azure Storage.
Read Only Assuming an empty cache or the desired data is not found in the local cache, reads read from Azure Storage and are then cached in local cache. Writes go directly to Azure Storage.
![]() Read/Write Assuming an empty cache or the desired data is not found in the local cache, reads read from Azure Storage and are then cached in local cache. Writes go to the local cache and at some later point (determined by algorithms of the local cache) to Azure Storage.
Read/Write Assuming an empty cache or the desired data is not found in the local cache, reads read from Azure Storage and are then cached in local cache. Writes go to the local cache and at some later point (determined by algorithms of the local cache) to Azure Storage.
When you create a new VM, the default is set to Read/Write for operating system disks and Read-only for data disks. Operating system disks are limited to read only or read/write, data disks can disable caching using the None option. The reasoning for this is that Azure Storage can provide a higher rate of random I/Os than the local disk used for caching. For predominantly random I/O workloads, therefore, it is best to set the cache to None and let Azure Storage handle the load directly. Because most applications will have predominantly random I/O workloads, the host cache preference is set to None by default for the data disks that would be supporting the applications.
For sequential I/O workloads, however, the local cache will provide some performance improvement and also minimize transaction costs (because the request to storage is averted). Operating system startup sequences are great examples of highly sequential I/O workloads and why the host cache preference is enabled for the operating system disks.
You can configure the host cache preference when you create and attach an empty disk to a VM or change it after the fact.
To configure disk caching using the portal, complete the following steps:
Navigate to the blade for your VM in the portal accessed via https://portal.azure.com.
From the menu, select Disks (Figure 1-27).

FIGURE 1-27 The Disks option from the VM menu
On the Disks blade, select Edit from the command bar.
Select the Host Caching drop down for the row representing the disk whose setting you want to alter and select the new value (Figure 1-28).

FIGURE 1-28 Data disk dropdown
Select Save in the command bar to apply your changes.
With Azure Storage, you can leverage geo-replication for blobs to maintain replicated copies of your VHD blobs in multiple regions around the world in addition to three copies that are maintained within the datacenter. Note that geo-replication is not synchronized across blob files and, therefore, VHD disks. This means writes for a file that is spread across multiple disks, as happens when you use storage pools in Windows VMs or striped logical volumes in Linux VMs, could be replicated out of order. As a result, if you mount the replicated copies to a VM, the disks will almost certainly be corrupt. To avoid this problem, configure the disks to use locally redundant replication, which does not add any additional availability and reduces costs (since geo-replicated storage is more expensive).
If you have ever used a local network on-premises to access files on a remote machine through a Universal Naming Convention (UNC) path like \\server\share, or if you have mapped a drive letter to a network share, you will find Azure File storage familiar.
Azure File storage enables your VMs to access files using a share located within the same region as your VMs. It does not matter if your VMs’ data disks are located in a different storage account or even if your share uses a storage account that is within a different Azure subscription than your VMs. As long as your shares are created within the same region as your VMs, those VMs will have access.
Azure File storage provides support for most of the Server Message Block (SMB) 2.1 and 3.0 protocols, which means it supports the common scenarios you might encounter accessing files across the network:
![]() Supporting applications that rely on file shares for access to data
Supporting applications that rely on file shares for access to data
![]() Providing access to shared application settings
Providing access to shared application settings
![]() Centralizing storage of logs, metrics, and crash dumps
Centralizing storage of logs, metrics, and crash dumps
![]() Storing common tools and utilities needed for development, administration, or setup
Storing common tools and utilities needed for development, administration, or setup
Azure File storage is built upon the same underlying infrastructure as Azure Storage, inheriting the same availability, durability, and scalability characteristics.
More Info: Unsupported SMB Features
Azure File storage supports a subset of SMB. Depending on your application needs, some features may preclude your usage of Azure File storage. Notable unsupported features include named pipes and short file names (in the legacy 8.3 alias format, like myfilen~1.txt).
For the complete list of features not supported by Azure File storage, see: http://msdn.microsoft.com/en-us/library/azure/dn744326.aspx.
Azure File storage requires an Azure Storage account. Access is controlled with the storage account name and key; therefore, as long as your VMs are in the same region, they can access the share using your storage credentials. Also, while Azure Storage provides support for read-only secondary access to your blobs, this does not enable you to access your shares from the secondary region.
More Info: Naming Requirements
Interestingly, while Blob storage is case sensitive, share, directory, and file names are case insensitive but will preserve the case you use. For more information, see: http://msdn.microsoft.com/en-us/library/azure/dn167011.aspx.
Within each Azure Storage account, you can define one or more shares. Each share is an SMB file share. All directories and files must be created within this share, and it can contain an unlimited number of files and directories (limited in depth by the length of the path name and a maximum depth of 250 subdirectories). Note that you cannot create a share below another share. Within the share or any directory below it, each file can be up to one terabyte (the maximum size of a single file in Blob storage), and the maximum capacity of a share is five terabytes. In terms of performance, a share has a maximum of 1,000 IOPS (when measured using 8-KB operations and a throughput of 60 MB/s).
A unique feature of Azure File storage is that you can manage shares, such as to create or delete shares, list shares, get share ETag and LastModified properties, get or set user-defined share metadata key and value pairs. You can get share content, for example list directories and files, create directories and files, get a file, delete a file, get file properties, get or set user-defined metadata, and get or set ranges of bytes within a file. This is accomplished using REST APIs available through endpoints namedhttps://<accountName>.file.core.windows.net/<shareName> and through the SMB protocol. In contrast to Azure Storage, Azure File storage only allows you to use a REST API to manage the files. This can prove beneficial to certain application scenarios. For example, it can be helpful if you have a web application (perhaps running in an Azure website) receiving uploads from the browser. Your web application can upload the files through the REST API to the share, but your back-end applications running on a VM can process those files by accessing them using a network share. In situations like this, the REST API will respect any file locks placed on files by clients using the SMB protocol.
More Info: File Lock Interaction Between SMB and Rest
If you are curious about how file locking is managed between SMB and REST endpoints for clients interacting with the same file at the same time, the following is a good resource for more information: https://docs.microsoft.com/en-us/rest/api/storageservices/Managing-File-Locks.
The following cmdlet first creates an Azure Storage context, which encapsulates your Storage account name and key, and then uses that context to create the share with the name of your choosing:
$ctx = New-AzureStorageContext <Storage-AccountName> <Storage-AccountKey>
New-AzureStorageShare <ShareName> -Context $ctx
With a share in place, you can access it from any VM that is in the same region as your share.
To access the share within a VM, you mount it to your VM. You can mount a share to a VM so that it will remain available indefinitely to the VM, regardless of restarts. The following steps show you how to accomplish this, assuming you are using a Windows Server guest operating system within your VM.
Launch Remote Desktop to connect to the VM where you want to mount the share.
Open a Windows PowerShell prompt or the command prompt within the VM.
So they are available across restarts, add your Azure Storage account credentials to the Windows Credentials Manager using the following command:
cmdkey /add:<Storage-AccountName>.file.core.windows.net /user:<Storage-
AccountName> /pass:<Storage-AccountKey>
Mount the file share using the stored credentials by using the following command (which you can issue from the Windows PowerShell prompt or a command prompt). Note that you can use any available drive letter (drive Z is typically used).
net use z: \\<Storage-AccountName>.file.core.windows.net\<ShareName>
The previous command mounts the share to drive Z, but if the VM is restarted, this share may disappear if net use was not configured for persistent connections (it is enabled for persistent connection by default, but that can be changed). To ensure a persistent share that will survive a restart, use the following command that adds the persistent switch with a value of yes.
net use z: \\<Storage-AccountName>.file.core.windows.net\<ShareName>
/Persistent: YES
To verify that your network share was added (or continues to exist) at any time, run the following command:
net use
After you mount the share, you can work with its contents as you would work with the contents of any other network drive. Drive Z will show a five-terabyte drive mounted in Windows Explorer.
With a share mounted within a VM, you may next consider how to get your files and folders into that share. There are multiple approaches to this, and you should choose the approach that makes the most sense in your scenario.
![]() Remote Desktop (RDP) If you are running a Windows guest operating system, you can remote desktop into a VM that has access to the share. As a part of configuring your RDP session, you can mount the drives from your local machine so that they are visible using Windows Explorer in the remote session. Then you can copy and paste files between the drives using Windows Explorer in the remote desktop session. Alternately, you can copy files using Windows Explorer on your local machine and then paste them into the share within Windows Explorer running in the RDP session.
Remote Desktop (RDP) If you are running a Windows guest operating system, you can remote desktop into a VM that has access to the share. As a part of configuring your RDP session, you can mount the drives from your local machine so that they are visible using Windows Explorer in the remote session. Then you can copy and paste files between the drives using Windows Explorer in the remote desktop session. Alternately, you can copy files using Windows Explorer on your local machine and then paste them into the share within Windows Explorer running in the RDP session.
![]() AZCopy Using AZCopy, you can recursively upload directories and files to a share from your local machine to the remote share, as well as download from the share to your local machine. For examples of how to do this, see:http://blogs.msdn.com/b/windowsazurestorage/archive/2014/05/12/introducing-microsoft-azure-file-service.aspx.
AZCopy Using AZCopy, you can recursively upload directories and files to a share from your local machine to the remote share, as well as download from the share to your local machine. For examples of how to do this, see:http://blogs.msdn.com/b/windowsazurestorage/archive/2014/05/12/introducing-microsoft-azure-file-service.aspx.
![]() Azure PowerShell You can use the Azure PowerShell cmdlets to upload or download a single file at a time. You use Set-AzureStorageFileContent (https://docs.microsoft.com/powershell/module/azure.storage/set-azurestoragefilecontent) and Get-AzureStorageFileContent (https://docs.microsoft.com/powershell/module/azure.storage/get-azurestoragefilecontent) to upload and download, respectively.
Azure PowerShell You can use the Azure PowerShell cmdlets to upload or download a single file at a time. You use Set-AzureStorageFileContent (https://docs.microsoft.com/powershell/module/azure.storage/set-azurestoragefilecontent) and Get-AzureStorageFileContent (https://docs.microsoft.com/powershell/module/azure.storage/get-azurestoragefilecontent) to upload and download, respectively.
![]() Storage Client Library If you are writing an application in .NET, you can use the Azure Storage Client Library, which provides a convenience layer atop the REST APIs. You will find all the classes you need below theMicrosoft.WindowsAzure.Storage.File namespace, primarily using the CloudFileDirectory and CloudFile classes to access directories and file content within the share. For an example of using these classes seehttps://docs.microsoft.com/azure/storage/storage-dotnet-how-to-use-files.
Storage Client Library If you are writing an application in .NET, you can use the Azure Storage Client Library, which provides a convenience layer atop the REST APIs. You will find all the classes you need below theMicrosoft.WindowsAzure.Storage.File namespace, primarily using the CloudFileDirectory and CloudFile classes to access directories and file content within the share. For an example of using these classes seehttps://docs.microsoft.com/azure/storage/storage-dotnet-how-to-use-files.
![]() REST APIs If you prefer to communicate directly using any client that can perform REST style requests, you can use REST API. The reference documentation for REST APIs is available at https://docs.microsoft.com/en-us/rest/api/storageservices/File-Service-REST-API.
REST APIs If you prefer to communicate directly using any client that can perform REST style requests, you can use REST API. The reference documentation for REST APIs is available at https://docs.microsoft.com/en-us/rest/api/storageservices/File-Service-REST-API.
As previously introduced, you can create ARM VMs that use either Standard or Premium Storage.
The following steps describe how to create a Windows Server based Virtual Machine using the Portal and configure it to use either Standard or Premium disks (the steps are similar for a Linux based VM):
Navigate to the portal accessed via https://manage.windowsazure.com.
Select New on the command bar.
Within the Marketplace list, select the Compute option.
On the Compute blade, select the image for the version of Windows Server you want for your VM (such as Windows Server 2016).
On the Basics blade, provide a name for your VM.
Select the VM disk type- a VM disk type of SSD will use Premium Storage and a type of HDD will use Standard Storage.
Provide a user name and password, and choose the subscription, resource group and location into which you want to deploy.
Select OK.
On the Choose a size blade, select the desired tier and size for your VM.
Choose select.
On the Settings blade, leave the settings at their defaults and select OK.
On the Purchase blade, review the summary and select Purchase to deploy the VM.
Azure supports two different kinds of encryption that can be applied to the disks attached to a Windows or Linux VM. The first kind of encryption is Azure Storage Service Encryption (SSE) which transparently encrypts data on write to Azure Storage, and decrypts data on read from Azure Storage. The storage service itself performs the encryption/decryption using keys that are managed by Microsoft. The second kind of encryption is Azure Disk Encryption (ADE). With ADE, Windows drives are encrypted with using BitLocker and Linux drives are encrypted with DM-Crypt. The primary benefit of ADE is that the keys used for encryption are under your control, and managed by an instance of Azure Key Vault that only you have access to.
Currently, the only way to enable Azure Disk Encryption is by using PowerShell and targeting your deployed VM. To enable ADE on your Windows or Linux ARM VM, follow these steps:
Deploy an instance of Azure Key Vault, if you do not have one already. Key Vault must be deployed in the same region as the VMs you will encrypt. For instructions on deploying and configuring your Key Vault, see: https://docs.microsoft.com/azure/key-vault/key-vault-get-started.
Create an Azure Active Directory application that has permissions to write secrets to the Key Vault, and acquire the Client ID and Client Secret for that application. For detailed instructions on this, see: https://docs.microsoft.com/en-us/azure/key-vault/key-vault-get-started#register.
With your VM deployed, Key Vault deployed and Client ID and Secret in hand, you are ready to encrypt your VM by running the following PowerShell.
# Login to your subscription
Login-AzureRmAccount
# Select the subscription to work within
Select-AzureRmSubscription -SubscriptionName "<subscription name>"
# Identify the VM you want to encrypt by name and resource group name
$rgName = '<resourceGroupName>';
$vmName = '<vmname>';
# Provide the Client ID and Client Secret
$aadClientID = <aad-client-id>;
$aadClientSecret = <aad-client-secret>;
# Get a reference to your Key Vault and capture its URL and Resource ID
$KeyVaultName = '<keyVaultName>';
$KeyVault = Get-AzureRmKeyVault -VaultName $KeyVaultName -ResourceGroupName
$rgname;
$diskEncryptionKeyVaultUrl = $KeyVault.VaultUri;
$KeyVaultResourceId = $KeyVault.ResourceId;
# Enable Azure to access the secrets in your Key Vault to boot the encrypted VM.
Set-AzureRmKeyVaultAccessPolicy -VaultName $KeyVaultName -ResourceGroupName
$rgname –
EnabledForDiskEncryption
# Encrypt the VM
Set-AzureRmVMDiskEncryptionExtension -ResourceGroupName $rgname -VMName $vmName -
AadClientID $aadClientID -AadClientSecret $aadClientSecret -
DiskEncryptionKeyVaultUrl
$diskEncryptionKeyVaultUrl -DiskEncryptionKeyVaultId $KeyVaultResourceId;
You can later verify the encryption status by running:
Get-AzureRmVmDiskEncryptionStatus -ResourceGroupName $rgname -VMName $vmName
The output “OsVolumeEncrypted: True” means the OS disk was encrypted and “DataVolumesEncrypted: True” means the data disks were encrypted.
More Info: Enabling Encryption with the Azure CLI
For a step by step guide on enabling encryption using the Azure CLI https://docs.microsoft.com/azure/security/azure-security-disk-encryption#disk-encryption-deployment-scenarios-and-user-experiences.