A number of configuration management tools are available for provisioning, configuring, and managing your VMs. In this section, you learn how to use Windows PowerShell Desired State Configuration (DSC) and the VM Agent (via custom script extensions) to perform configuration management tasks, including automating the process of provisioning VMs, deploying applications to those VMs, and automating configuration of those applications based on the environment, such as development, test, or production.
This skill covers how to:
![]() Automate configuration management by using PowerShell Desired State Configuration (DSC) and the VM Agent (using custom script extensions)
Automate configuration management by using PowerShell Desired State Configuration (DSC) and the VM Agent (using custom script extensions)
![]() Configure VMs with Custom Script Extension
Configure VMs with Custom Script Extension
![]() Use PowerShell DSC
Use PowerShell DSC
![]() Configure VMs with DSC
Configure VMs with DSC
![]() Enable remote debugging
Enable remote debugging
Before describing the details of using PowerShell DSC and the Custom Script Extension, this section provides some background on the relationship between these tools and the relevance of the Azure Virtual Machine Agent (VM Agent) and Azure virtual machine extensions (VM extensions).
When you create a new VM in the portal, the VM Agent is installed by default. The VM Agent is a lightweight process used for bootstrapping additional tools on the VM by way of installing, configuring, and managing VM extensions. VM extensions can be added through the portal, but they are also commonly installed with Windows PowerShell cmdlets or through the Azure Cross Platform Command Line Interface (Azure CLI).
More Info: Azure CLI
Azure CLI is an open source project providing the same functionality as the portal via the command line. It is written in JavaScript and requires Node.js and enables management of Azure resources in a cross-platform fashion (from macOS, Windows and Linux). For more details, see https://docs.microsoft.com/cli/azure/overview.
With the VM Agent installed, you can add VM extensions. Popular VM extensions include the following:
![]() PowerShell Desired State Configuration (for Windows VMs)
PowerShell Desired State Configuration (for Windows VMs)
![]() Custom Script Extension (for Windows or Linux)
Custom Script Extension (for Windows or Linux)
![]() Team Services Agent (for Windows or Linux VMs)
Team Services Agent (for Windows or Linux VMs)
![]() Microsoft Antimalware Agent (for Windows VMs)
Microsoft Antimalware Agent (for Windows VMs)
![]() Network Watcher Agent (for Windows or Linux VMs)
Network Watcher Agent (for Windows or Linux VMs)
![]() Octopus Deploy Tentacle Agent (for Windows VMs)
Octopus Deploy Tentacle Agent (for Windows VMs)
![]() Docker extension (for Linux VMs)
Docker extension (for Linux VMs)
![]() Puppet Agent (for Windows VMs)
Puppet Agent (for Windows VMs)
![]() Chef extension (for Windows or Linux)
Chef extension (for Windows or Linux)
You can add VM extensions as you create the VM through the portal, as well as run them using the Azure CLI, PowerShell and Azure Resource Manager templates.
More Info: Additional Extensions
There are additional extensions for deployment, debugging, security, and more. For more details, see https://docs.microsoft.com/en-us/azure/virtual-machines/windows/extensions-features#common-vm-extensions-reference.
Custom Script Extension makes it possible to automatically download files from Azure Storage and run Windows PowerShell (on Windows VMs) or Shell scripts (on Linux VMs) to copy files and otherwise configure the VM. This can be done when the VM is being created or when it is already running. You can do this from the portal or from a Windows PowerShell command line interface, the Azure CLI, or by using ARM templates.
Create a Windows Server VM following the steps presented in the earlier section, “Creating a Windows Server VM.” After creating the VM, complete the following steps to set up the Custom Script Extension:
Navigate to the blade for your VM in the portal accessed via https://portal.azure.com.
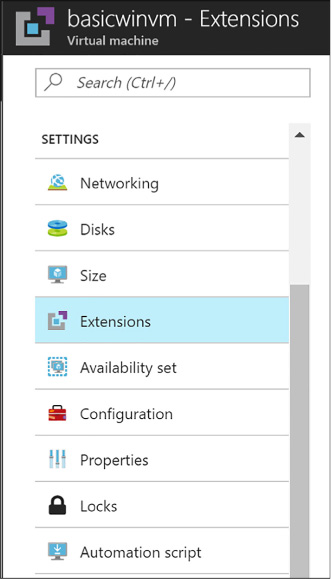
From the menu, scroll down to the Settings section, and select Extensions (Figure 1-4).

FIGURE 1-4 The Extensions option
On the Extensions blade, select Add on the command bar.
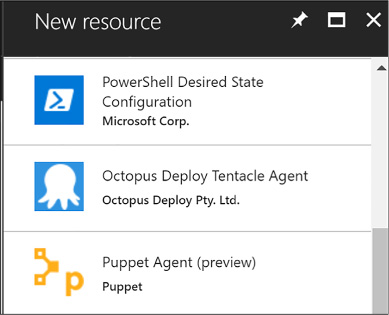
From the New Resource blade, select Custom Script Extension (Figure 1-5).

FIGURE 1-5 The New Resource blade
On the Custom Script blade, select Create.
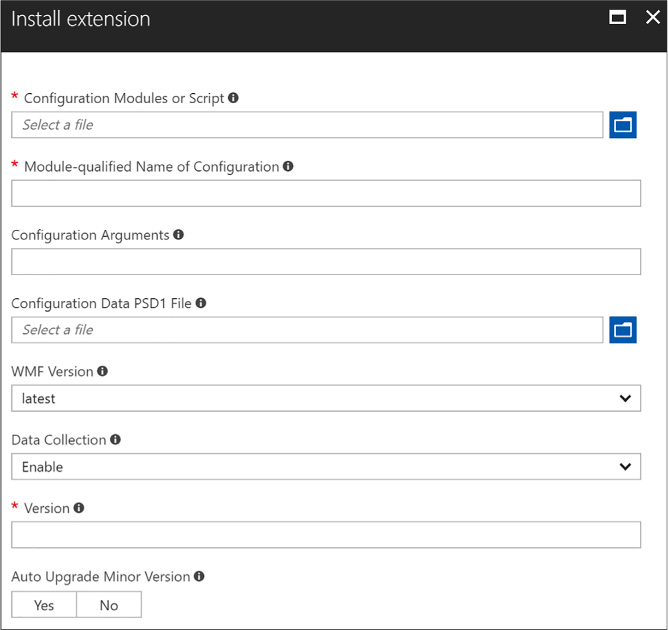
On the Install Extension blade (Figure 1-6), select the Folder button and choose the .ps1 file containing the script you want to run when the VM starts. Optionally, provide arguments. The Version of DSC is required, for example 2.21.

FIGURE 1-6 The Install Extenson blade
Select OK.
More Info: Configuring the Custom Script Extension
You can also configure the Custom Script Extension using the Set-AzureRmVMCustomScriptExtension Windows PowerShell cmdlet (see https://docs.microsoft.com/en-us/azure/virtual-machines/windows/extensions-customscript#powershell-deployment) or via the “az vm extension set” Azure CLI command (see https://docs.microsoft.com/en-us/azure/virtual-machines/linux/extensions-customscript#azure-cli).
PowerShell Desired State Configuration (DSC) is a management platform introduced with Windows PowerShell 4.0, available as a Windows feature on Windows Server 2012 R2. PowerShell DSC is implemented using Windows PowerShell. You can use it to configure a set of servers (or nodes) declaratively, providing a description of the desired state for each node in the system topology. You can describe which application resources to add, remove, or update based on the current state of a server node. The easy, declarative syntax simplifies configuration management tasks.
With PowerShell DSC, you can instruct a VM to self-provision to a desired state on first deployment and then have it automatically update if there is “configuration drift.” Configuration drift happens when the desired state of the node no longer matches what is described by DSC.
Resources are core building blocks for DSC. A script can describe the target state of one or more resources, such as a Windows feature, the Registry, the file system, and other services. For example, a DSC script can describe the following intentions:
![]() Manage server roles and Windows features
Manage server roles and Windows features
![]() Manage registry keys
Manage registry keys
![]() Copy files and folders
Copy files and folders
![]() Deploy software
Deploy software
![]() Run Windows PowerShell scripts
Run Windows PowerShell scripts
More Info: DSC Built-in Resources
For a more extensive list of DSC resources for both Windows and Linux, see: https://msdn.microsoft.com/en-us/powershell/dsc/resources.
DSC extends Windows PowerShell 4.0 with a Configuration keyword used to express the desired state of one or more target nodes. For example, the following configuration indicates that a server should have IIS enabled during provisioning:
Configuration EnableIIS
{
Node WebServer
{
WindowsFeature IIS {
Ensure = "Present",
Name = "Web-Server"
}
}
}
The Configuration keyword can wrap one or more Node elements, each describing the desired configuration state of one or more resources on the node. In the preceding example, the server node is named WebServer, the contents of which indicate that the Windows Feature “IIS” should be configured, and that the Web-Server component of IIS should be confirmed present or installed if absent.

Exam Tip
After the DSC runs, a Managed Object Format (MOF) file is created, which is a standard endorsed by the Distributed Management Task Force (DTMF). See: http://www.dmtf.org/education/mof.
Many resources are predefined and exposed to DSC; however, you may also require extended capabilities that warrant creating a custom resource for DSC configuration. You can implement custom resources by creating a Windows PowerShell module. The module includes a MOF schema, a script module, and a module manifest.
More Info: Custom DSC Resources
For more information on building custom DSC resources, see https://msdn.microsoft.com/en-us/powershell/dsc/authoringResource.
More Info: DSC Resources in the Powershell Gallery
The Windows PowerShell team released a number of DSC resources to simplify working with Active Directory, SQL Server, and IIS. See the PowerShell Gallery at http://www.powershellgallery.com/items and search for items in the DSC Resource category.
Local Configuration Manager is the engine of DSC, which runs on all target nodes and enables the following scenarios for DSC:
![]() Pushing configurations to bootstrap a target node
Pushing configurations to bootstrap a target node
![]() Pulling configuration from a specified location to bootstrap or update a target node
Pulling configuration from a specified location to bootstrap or update a target node
![]() Applying the configuration defined in the MOF file to the target node, either during the bootstrapping stage or to repair configuration drift
Applying the configuration defined in the MOF file to the target node, either during the bootstrapping stage or to repair configuration drift
Local Configuration Manager runs invoke the configuration specified by your DSC configuration file. You can optionally configure Local Configuration Manager to apply new configurations only, to report differences resulting from configuration drift, or to automatically correct configuration drift.
More Info: Local Configuration Manager
For additional details on the configuration settings available for Local Configuration Manager, see https://msdn.microsoft.com/en-us/powershell/dsc/metaConfig.
To configure a VM using DSC, first create a Windows PowerShell script that describes the desired configuration state. As discussed earlier, this involves selecting resources to configure and providing the appropriate settings. When you have a configuration script, you can use one of a number of methods to initialize a VM to run the script on startup.
Use any text editor to create a Windows PowerShell file. Include a collection of resources to configure, for one or more nodes, in the file. If you are copying files as part of the node configuration, they should be available in the specified source path, and a target path should also be specified. For example, the following script ensures IIS is enabled and copies a single file to the default website:
configuration DeployWebPage
{
node ("localhost")
{
WindowsFeature IIS
{
Ensure = "Present"
Name = "Web-Server"
}
File WebPage
{
Ensure = "Present"
DestinationPath = "C:\inetpub\wwwroot\index.html"
Force = $true
Type = "File"
Contents = '<html><body><h1>Hello Web Page!</h1></body></html>'
}
}
}
After creating your configuration script and allocating any resources it requires, you need to produce a compressed zip file containing the configuration script in the root, along with any resources needed by the script. You create the zip and copy it up to Azure Storage in one command using Publish-AzureRMVmDscConfiguration using Windows PowerShell and then apply the configuration with SetAzureRmVmDscExtension.
Assume you have the following configuration script in the file iisInstall.ps1 on your local machine:
configuration IISInstall
{
node "localhost"
{
WindowsFeature IIS
{
Ensure = "Present"
Name = "Web-Server"
}
}
}
You would then run the following PowerShell cmdlets to upload and apply the configuration:
#Load the Azure PowerShell cmdlets
Import-Module Azure
#Login to your Azure Account and select your subscription (if your account has multiple
subscriptions)
Login-AzureRmAccount
Set-AzureRmContext -SubscriptionId <YourSubscriptionId>
$resourceGroup = "dscdemogroup"
$vmName = "myVM"
$storageName = "demostorage"
#Publish the configuration script into Azure storage
Publish-AzureRmVMDscConfiguration -ConfigurationPath .\iisInstall.ps1
-ResourceGroupName $resourceGroup -StorageAccountName $storageName -force
#Configure the VM to run the DSC configuration
Set-AzureRmVmDscExtension -Version 2.21
-ResourceGroupName $resourceGroup -VMName $vmName
-ArchiveStorageAccountName $storageName
-ArchiveBlobName iisInstall.ps1.zip -AutoUpdate:$true -ConfigurationName
"IISInstall"
Before configuring an existing VM using the Azure Portal, you will need to create a ZIP package around your PowerShell script. To do so, run the Publish-AzureVMDscConfiguration cmdlet providing the path to your PowerShell script and the name of that destination zip file to create, for example:
Publish-AzureVMDscConfiguration .\iisInstall.ps1 -ConfigurationArchivePath .\iisInstall.
ps1.zip
Then you can proceed in the Azure Portal. To configure an existing VM in the portal, complete the following steps:
Navigate to the blade for your VM in the portal accessed via https://portal.azure.com.
From the menu, scroll down to the Settings section, and select Extensions.
On the Extensions blade, select Add on the command bar.
From the New Resource blade, select PowerShell Desired State Configuration.
On the PowerShell Desired State Configuration blade, select Create.
On the Install Extension blade, select the folder button and choose the zip file containing the DSC configuration.
Provide the module-qualified name of the configuration in your .ps1 that you want to apply. This value is constructed from the name of your .ps1 file including the extension, a slash (\) and the name of the configuration as it appears within the .ps1 file. For example, if your file is iisInstall.ps1 and you have a configuration named IISInstall, you would set this to “iisInstall.ps1\IISInstall”.
Optionally provide any Data PSD1 file and configuration arguments required by your script.
Specify the version of the DSC extension (Figure 1-7) you want to install (e.g., 2.21).

FIGURE 1-7 Using the Install Extension
Select OK.
You can use remote debugging to debug applications running on your Windows VMs. Server Explorer in Visual Studio shows your VMs in a list, and from there you can enable remote debugging and attach to a process following these steps:
In Visual Studio, open Cloud Explorer.
Expand the node of the subscription containing your VM, and then expand the Virtual Machines node.
Right-click the VM you want to debug and select Enable Debugging. Click Yes in the dialog box to confirm.
This installs a remote debugging extension to the VM so that you can debug remotely. The progress will be shown in the Microsoft Azure Activity Log. After the debugging extension is installed, you can continue.
Right-click the virtual machine again and select Attach Debugger. This presents a list of processes in the Attach To Process dialog box.
Select the processes you want to debug on the VM and click Attach. To debug a web application, select w3wp.exe, for example.
More Info: Debugging Processes in Visual Studio
For additional information about debugging processes in Visual Studio, see this reference: https://docs.microsoft.com/en-us/visualstudio/debugger/debug-multiple-processes.