Users Online
· Members Online: 0
· Total Members: 188
· Newest Member: meenachowdary055
Forum Threads
Latest Articles
Articles Hierarchy
SAP BI Part 2
SAP InfoSet Tutorial: What is, Create, Joins
Infoset is a special kind of Infoprovider which does not store data physically. In other words, Infoset are InfoProviders that logically join data and provide this data for BI queries. Infoset collects data from the tables of InfoProviders used to build it. Infoset describes data sources that are defined as a rule of join on Datastore objects, Info-objects or standard InfoCubes.
When to Use Infosets?
- To join required data from basic InfoProviders
- To allow BEx Reporting on a DataStore object without turning the BEx Reporting indicator on
- To evaluate time dependencies
- To create self joins and left outer joins
What are InfoSet Joins ?
DSO ( Data Store Objects) and/or InfoObjects (characteristics with master data) are connected in the InfoSet using join conditions. The joined data from the InfoSets are available for access from Business Explorer Queries. InfoSets allows you to report on several Info-Providers (Infocubes, Data Store objects, master data InfoObjects), but they contain no data. With activated Infosets , you can define queries in the BI suite.
Joins are classified into four categories:
- Inner Join
- Left Outer Join
- Temporal Join
- Self Join
Inner Join:A record can only be in the selected result set if there are entries in both joined tables.
If table 2 has corresponding records of table 1, by comparing a key field (EMPNO in the below example), only those records would be part of the result set. The result set would have the fields of table 1 and table 2 filled in from the corresponding fields.
Example:
Left Table(Table 1)
| EMPNO | LASTNAME |
| 000020 | THOMPSON |
| 000250 | SMITH |
| 000100 | SPENSER |
Right Table(Table 2)
| EMPNO | PROJNO |
| 000020 | AD3112 |
| 000100 | OP2010 |
| 000150 | PL2100 |
Inner Join Result
| EMPNO | LASTNAME | PROJNO |
| 000020 | THOMPSON | AD3112 |
| 000100 | SPENSER | OP2010 |
Left Outer Join: If table 2 has corresponding records of table 1, by comparing a key field (EMPNO in the below example), those records would be part of the result set. The result set would have the fields of table 1 and table 2 filled in from the corresponding fields.
If table 2 has no corresponding record when compared with table 1, those records of table 1 is also part of the result set (fields belonging to table 2 will have initial values). This is shown in the example below.
Left Table(Table 1)
| EMPNO | LASTNAME |
| 000020 | THOMPSON |
| 000250 | SMITH |
| 000100 | SPENSER |
Right Table(Table 2)
| EMPNO | PROJNO |
| 000020 | AD3112 |
| 000100 | OP2010 |
| 000150 | PL2100 |
Left Outer Join Result
| EMPNO | LASTNAME | PROJNO |
| 000020 | THOMPSON | AD3112 |
| 000250 | SMITH | |
| 000100 | SPENSER | OP2010 |
Temporal Join: A join is called temporal if at least one member is time-dependent.
Self Join: The same object is joined together.
How to Create Infoset?
Step 1)
- Go to Transaction Code RSA1
- Click the “Ok” button
Step 2)
- Browse to the tab “InfoProvider”
- Right-Click on the infoarea and choose the option “Create Infoset” from the context menu.
Transaction RSISET can also directly be used to create InfoSet.
When the Info Set Builder is called for the first time, the below two display mode options as
- Network (Dataflow Control)
- Tree (Tree Control).
The network display is clearer.
The tree display can be read by the Screen Reader and is suitable for visually-impaired users.
You can change this setting at any time using the menu path Settings -> Display.
Step 3)
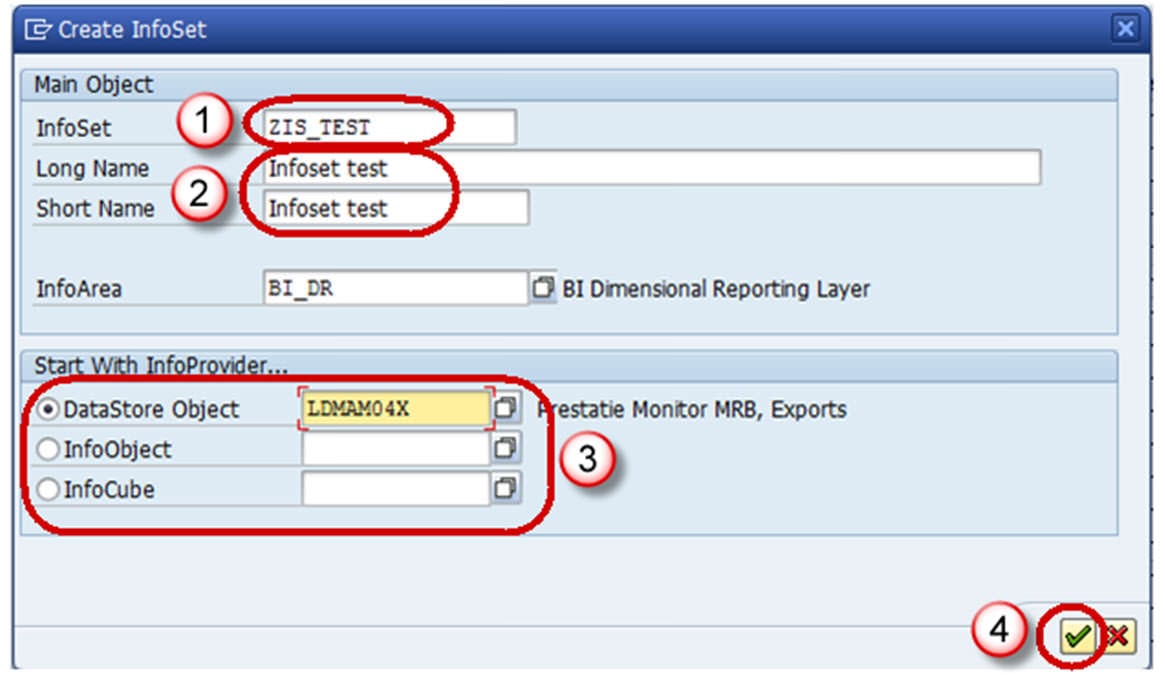
- Enter the Technical Name
- Description
- In the Start with Info Provider section, you determine which Info Provider you want to use to start defining the Info Set. Select one of the object types that the system offers you:
- Data Store object
- Info Object
- Standard Info Cube
- Choose an object.
If you want to choose an Info Object, it must be a characteristic with master data. The system provides you with the corresponding input help.
- Choose Continue button.
Step 4)
The Change Info Set screen appears.
Step 5)
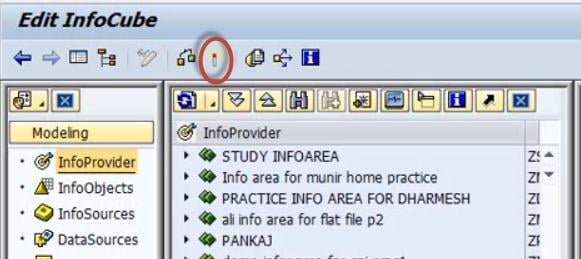
Select the insert Info provider button shown below, to choose the infoprovider with which data is to be joined.
Step 6)
- Enter the name of the DSO.
- Click Continue button.
The below screen appears with the 2 info providers selected.
Step 7)
Activate the Info set by clicking on the activate button.
What Is an Infocube in SAP BI/BW? How To Create One?
What is Infocube?
Infocube is data storage area in which we maintain data which we are extracting from source system physically. An InfoCube can function as both a data target and an InfoProvider. From a reporting point of view, an Infocube can be described as a self-contained dataset.
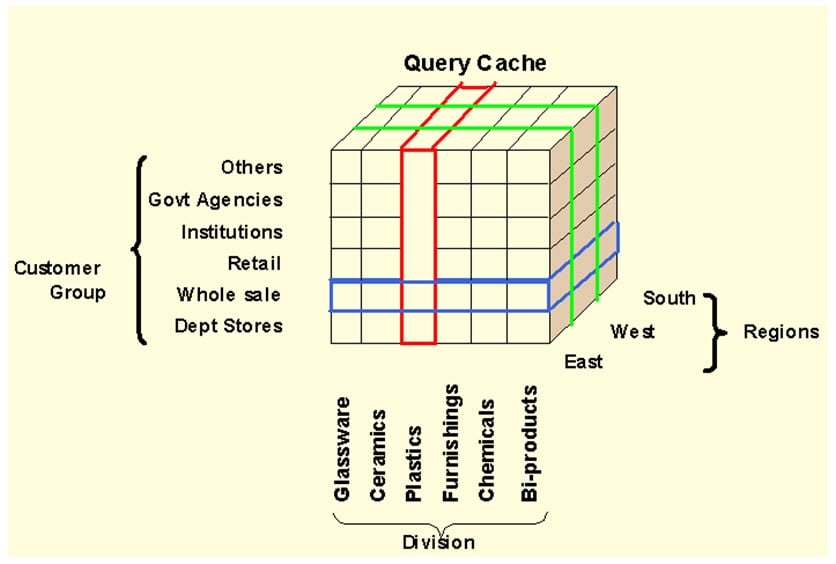
For example, a Sales Amount Infocube which has dimensions like MONTH – PRODUCT-CUSTOMER-REGION, can be viewed by any of the axes, for example total sales by region or by customer. The dimensions of an Info-Cube are entities or hierarchies.
BIW ( Business Intelligence Warehouse) provides facility to define 16 dimensions, out of which 3 are pre-defined.
The above cube demonstrates a simple 3 dimensional cube. Each dimension can hold 248 characteristics for analysis. One square in the cube above, represents the relative value for the corresponding customer/region/division combination.
InfoCube Structure:
- An Infocube follows the Extended Star Schema.
- It has Fact table at the center and is surrounded by 16 dimension tables with Master data lying outside the cube.
- Infocubes are the central multidimensional data model in BI.
- It is a self-enclosed data set encompassing one or more related business processes. A reporting user can define or execute queries against an info cube.
- It is used to store summarized / aggregated data for long periods of time. Infocubes consist of precisely one fact table surrounded by dimensional tables.
- SAP delivered Infocubes begins with a number usually 0. Your own Infocube should begin with a letter from A to Z and that it should be 3 to 9 characters in length.
Type of InfoCube
Infocube is classified in to three types based on the way of maintaining and distributing the data.
- Standard Infocube:Used to maintain the data physically in the cube. Read only is possible.
- Virtual Infocube: It does not maintain data physically in the cube .During the query execution it brings the data from respective source system.
- Real Time Infocube: Stores the data physically in the cube.Read and Write are possible. It is significantly used in planning the data.
How To Create Standard Infocube
Step 1)
Create InfoCube
- Go to transaction code RSA1
- Click the OK button.
Step 2)
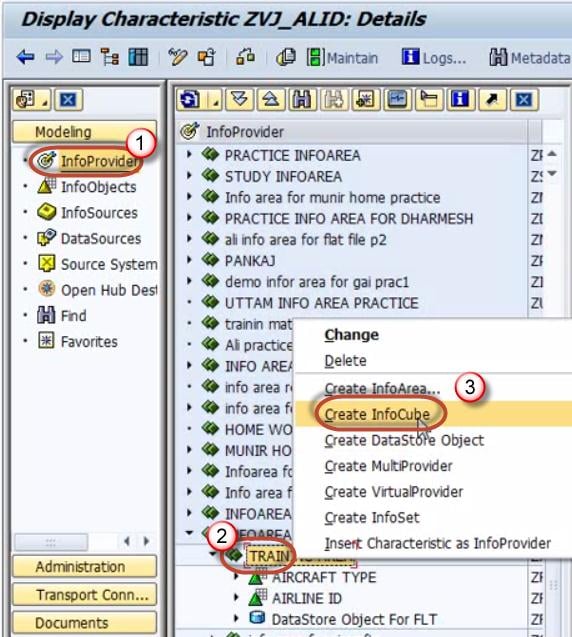
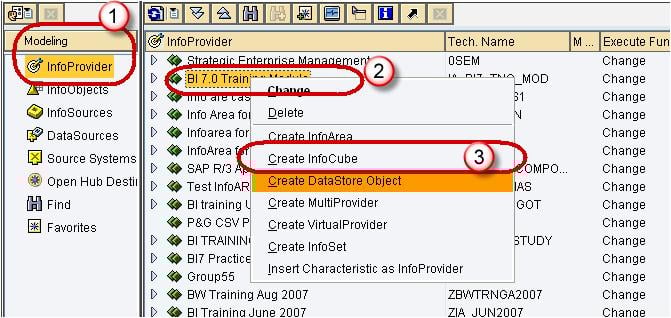
- Navigate to Modeling tab->InfoProvider.
- Right click on InfoArea.
- Click on “Create InfoCube” from the context menu.
Step 3)
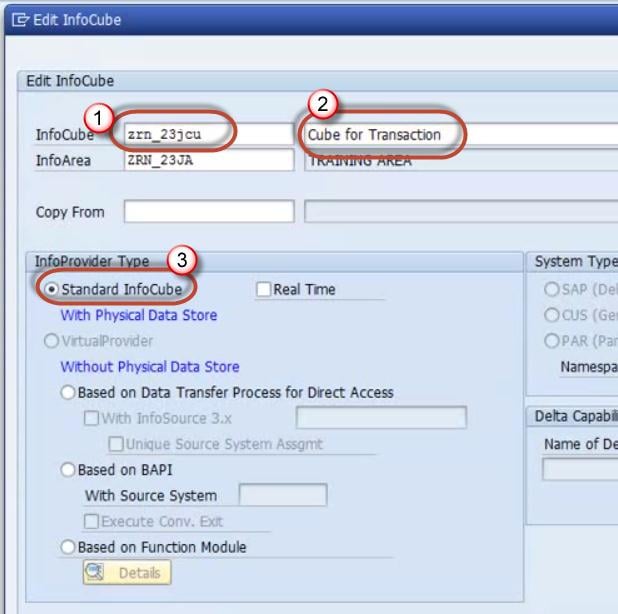
- Enter the Technical Name.
- Enter the Description.
- Choose the option button “Standard InfoCube”.
Click the create button
Step 4)
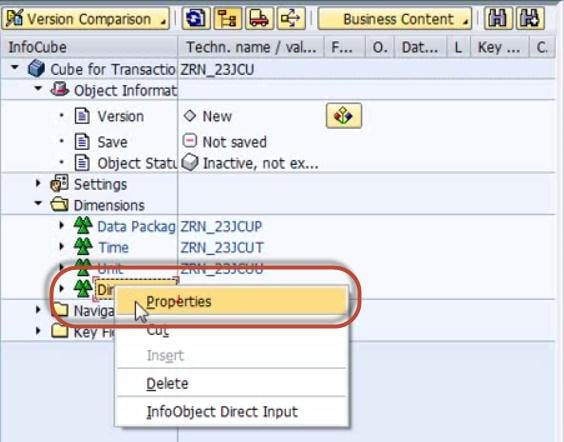
Right Click on Dimension 1 -> Properties.
Step 5)
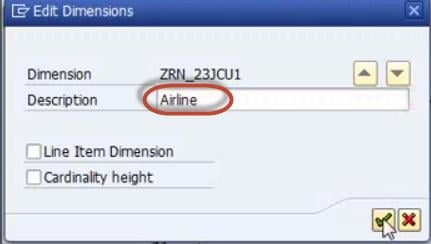
Rename the Dimension as per Info object information.
Step 6)
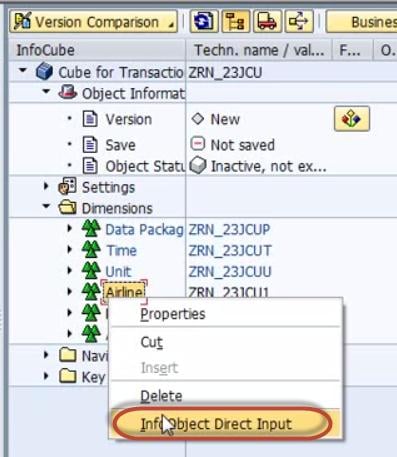
Right click on the Dimension ->InfoObject Direct Input to Insert InfoObjects into the Dimension.
Step 7)
Select Characteristics.
Step 8) Select Airline ID in characteristics
Drag and drop it into Dimension
Step 9)
Similarly create new dimensions and follow the steps 4-8 to add the InfoObjects.
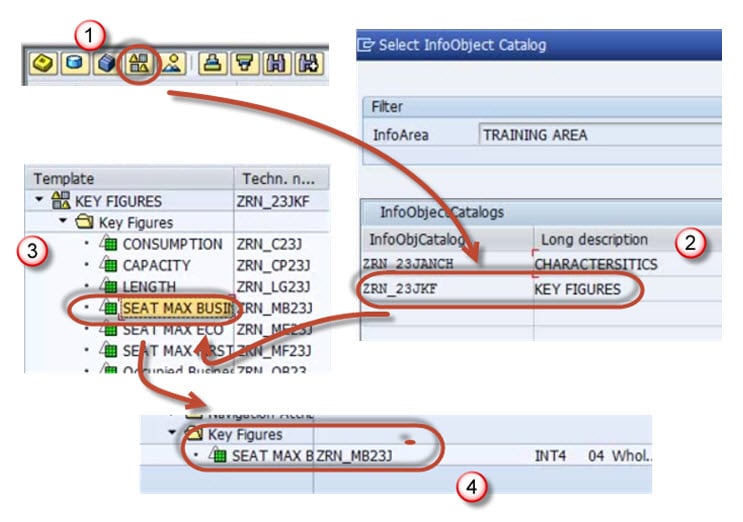
Step 10)
Adding Key figureInfoObjects in the Infocube
Step 11)
Follow the proesses above to add more Key Figures
Step 12)
Activate the Infocube.
Infocube Additional Points:
The technical name of the dimensional table is assigned by the system, using the pattern /BIC/ “D<your Infocube>#”, where the first # will be a1, the second a 2, and so on.
If it is a sap delivered cube, then it would begin as /BI0/D
Characteristics Infoobjects can be freely added to customer-created dimensions.
Dimension Tables should be used optimally.
Ensure optimum cardinality while adding characteristics infoobject to dimensions.E.g. A departmental store has 10,000 customers and 1000 different materials. The cardinality is m:n, which means each customer can buy many materials. Such kind of cardinality should not be maintained in the same dimension table.
Thumbrule : Avoid m:n within a dimension.
Dos
- Navigate to Modeling tab->InfoProvider.
- Right click on InfoArea.
- Click on “Create InfoCube” from the context menu.
- Enter the Technical Name.
- Enter the Description.
- Choose the option button “Standard InfoCube”.
Don’ts
- Standard Infocube can be used if user:
- Wants to facilitate multi-dimensional analysis.
- Wants to store summarized / aggregated information with large volume of data.
- Use line item dimension if only one object is placed in a dimension table.
- Maintain high granularity of records.
- Group M: N cardinality within the same dimension.
- Give more attention on bring the character information through navigational attribute.
- Maintain high cardinality information in dimensional table.
How To Load Master Data From Flat File in SAP BI/BW
We will learn the load with the help of a scenario -
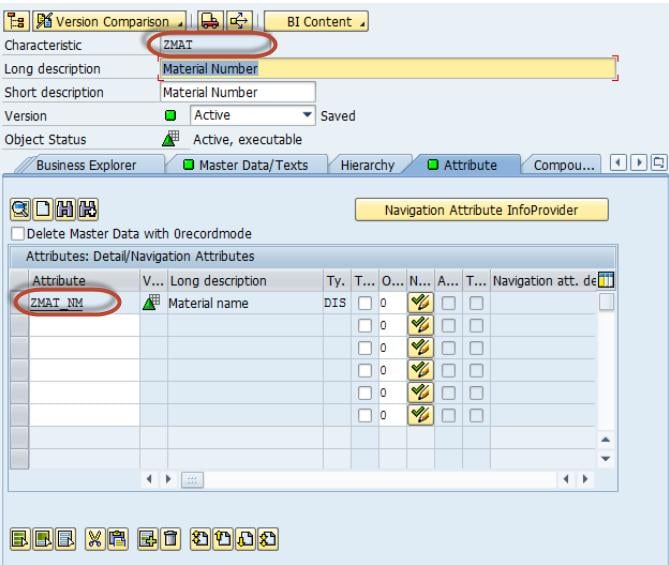
Load Master data to InfoObject ZMAT (Material Number) which has the attribute, ZMAT_NM (Material Name. Below are detailed Steps to Load data to Master data Infoobject from Flat file
Step 1) Create source system for flat file.
- Go to transaction code RSA1
- Click the OK button.
In the next screen,
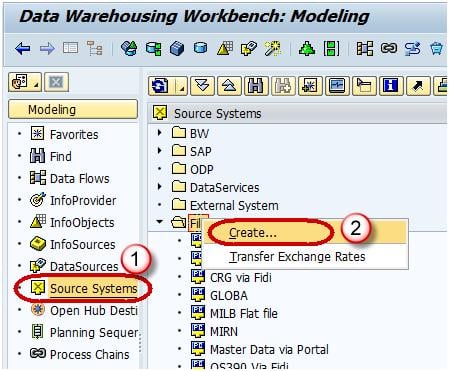
- Navigate to Modeling tab->Source Systems.
- Right click on the folder named FILE and choose “Create” from the context menu.
In the next screen,
- Enter the Logical System Name.
- Enter the Description.
- Click Continue Button.
Step 2) Create Application component.
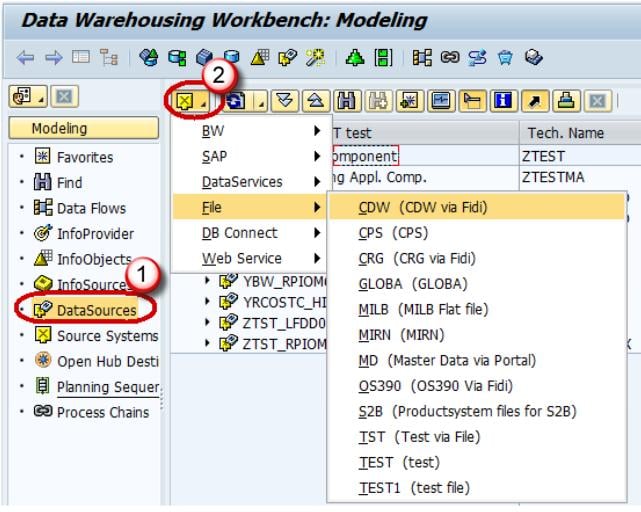
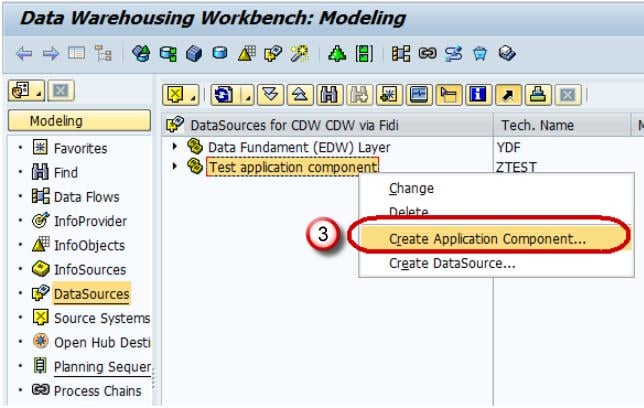
- Navigate to Modeling tab->Data Sources.
- Choose the Source System.
- Right click -> Create Application Component.
- Enter the Technical Name.
- Enter the Description.
- Click Continue.
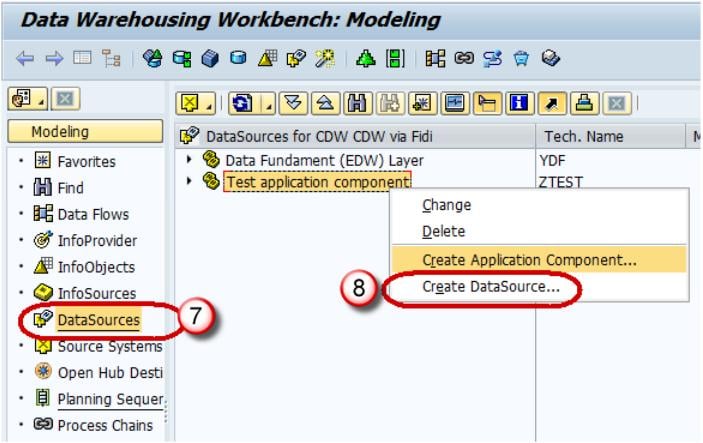
- Navigate to Modeling tab->Data Sources.
- Right click -> Create Data Source
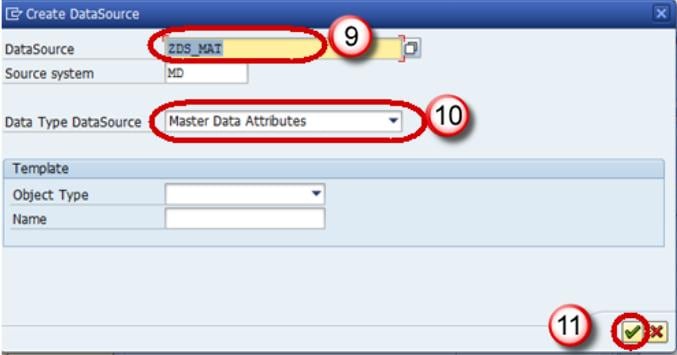
- Enter Technical Name.
- Choose the DataType DataSource.
- Click Continue.
- Enter the Fields shown below. This Structure should be the same as the DSO to which transaction data is to be loaded.
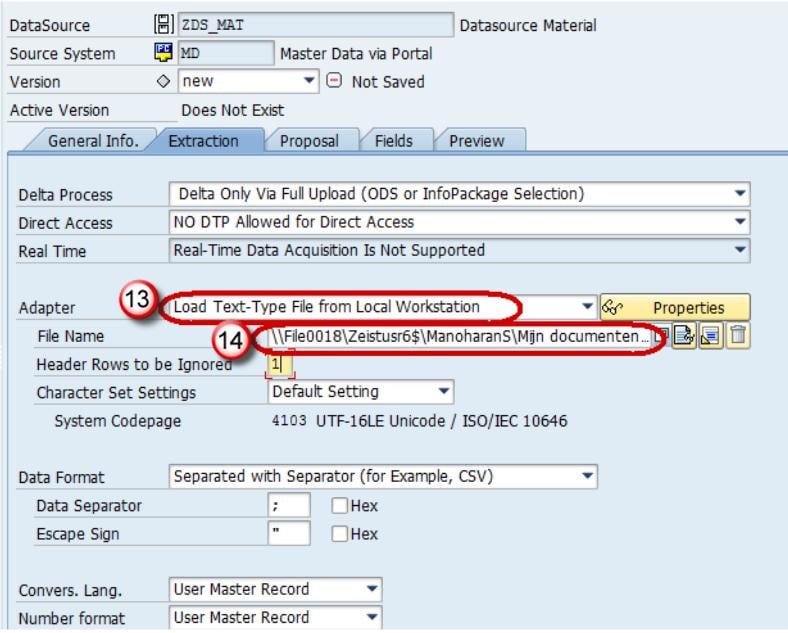
- In the Extraction tab, choose the Adapter as “Load Text-Type File from Local Workstation”.
- Choose the file path where the flat file to be loaded is placed in the system and activate data source.
Click Save.
Step 3) Create transformation between Data Source(Source) and InfoObject Attribute(Target).
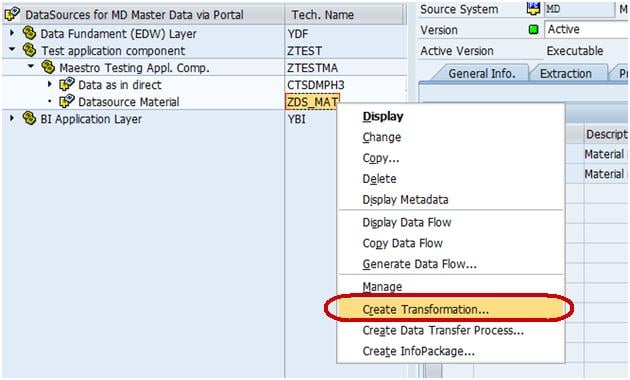
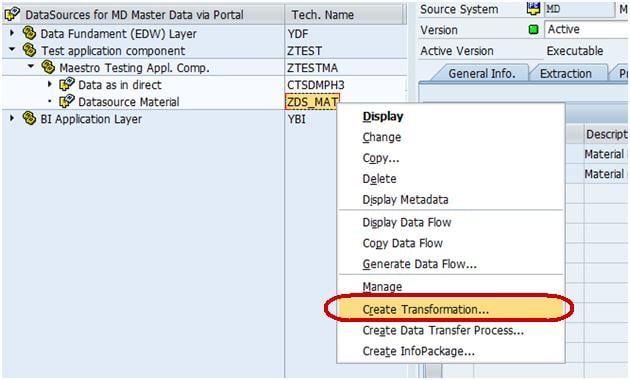
Right click on the DataSource -> Create Transformation
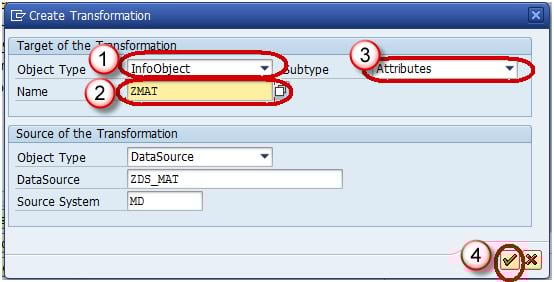
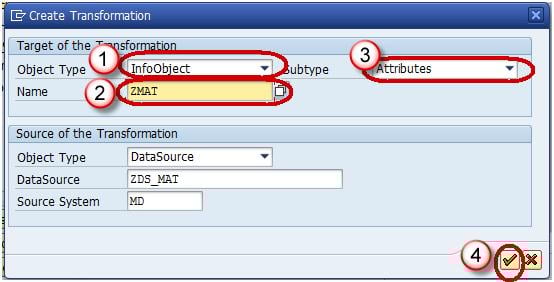
In the next screen,
- Enter Target Object Type.
- Enter Target Object Name.
- Enter the SubType
- Click Continue.
The transformation would be created with automatic mapping of the Source fields to the Target fields.
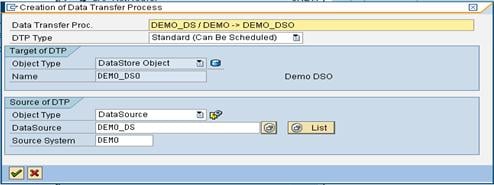
Right-Click on DTP folder and choose the option “Create Data Transfer Process” from the context menu.
Below screen shows the DTP created.
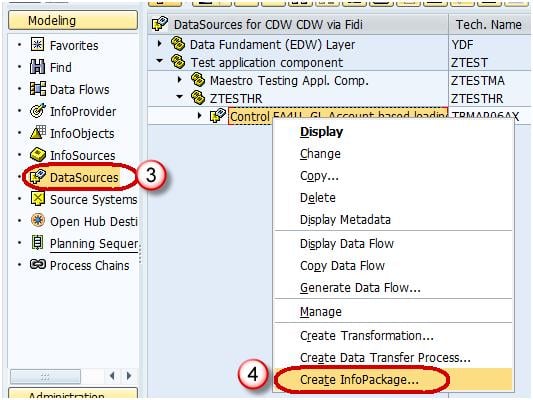
Step 4) Create Infopackage and Schedule dataload to the DataSource(PSA).
- Enter RSA1 in command prompt
- Hit Enter
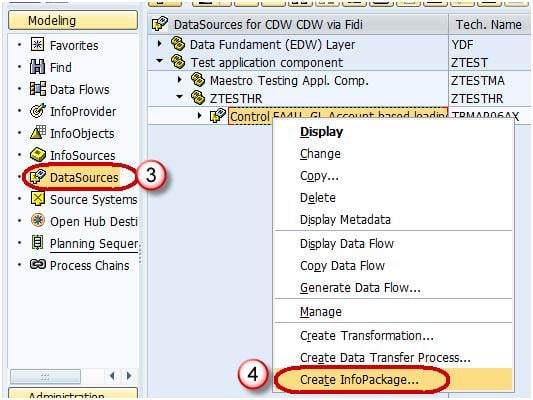
- Navigate to Modeling tab->DataSources.
- Right click on the DataSource -> Create InfoPackage.
- Enter the InfoPackage Description
- Click Save.
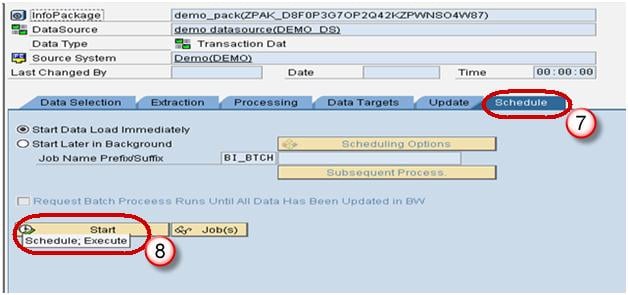
- Click on Schedule tab.
- Click Start button to start the load from the flat file to the Data Source.
Step 5) Load data to the DSO.
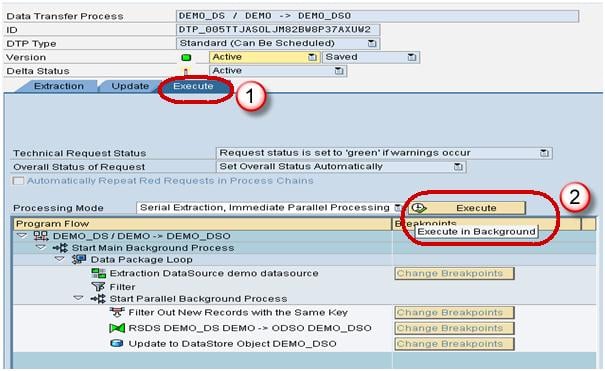
- Click Execute tab in the DTP.
- Click the Execute Button to start data load from the DataSource(PSA) to the DSO.
How to Load Transaction Data from Flat File in SAP BI/BW
We will learn how to load transactional data from a Flat File with the help of a scenario.
Scenario: Load data to the DSO named “DEMO_DSO”. The DSO has the following fields.
Key Fields:
ZCUST - Customer
ZMAT – Material
Data Fields:
ZPRICE – Material Price
ZQTY - Quantity
Lets look into the Steps to Load data to DSO from Flat file
Step 1) Create source system for flat file.
- Go to transaction code RSA1
- Click the OK button.
In the next screen,
- Navigate to Modeling tab->Source Systems.
- Right click on the folder named FILE and choose “Create” from the context menu.
In the next screen,
- Enter the Logical System Name.
- Enter the Description.Click Continue Button.
Step 2) Create Application component.
- Go to transaction code RSA1
- Click the OK button.
- Navigate to Modeling tab->Data Sources.
- Choose the Source System.
- Right click -> Create Application Component.
- Enter the Technical Name.
- Enter the Description.
- Click Continue.
Step 3) Create Data Source.
- Go to transaction code RSA1
- Click the OK button.
- Navigate to Modeling tab->Data Sources.
- Right click -> Create Data Source.
- Enter Technical Name.
- Choose the DataType DataSource.
- Click Continue.
- Enter the Fields shown below. This Structure should be the same as the DSO to which transaction data is to be loaded.
- In the Extraction tab, choose the Adapter as “Load Text-Type File from Local Workstation”.
- Choose the file path where the flat file to be loaded is placed in the system and activate data source.
Step 4) Create transformation between Data Source(Source) and DSO(Target).
- Go to transaction code RSA1.
- Click the OK button.
- Navigate to Modeling tab->InfoProvider.
- Create Transformation.
- Enter Target Object Type.
- Enter Target Object Name.
- Enter Source Object Type.
- Enter Source Object Name.
- Enter the Source System.
- Click Continue.
Below screen shows the transformation created with automatic mapping of the Source fields to the Target fields.
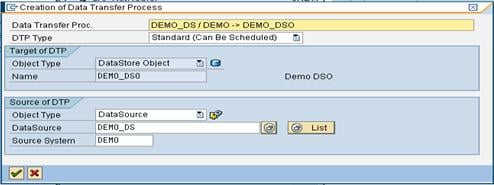
Step 5) Create Data Transfer Process.
Right-Click on DTP folder and choose the option “Create Data Transfer Process” from the context menu.
Below screen shows the DTP created.
Step 6) Create Infopackage and Schedule dataload to the DataSource(PSA).
- Go to transaction code RSA1.
- Click the OK button.
- Navigate to Modeling tab->DataSources.
- Right click on the DataSource -> Create InfoPackage.
- Enter the InfoPackage Description.
- Click Save.
- Click on Schedule tab.
- Click Start button to start the load from the flat file to the Data Source.
Step 7) Load data to the DSO.
- Click Execute tab in the DTP.
- Click the Execute Button to start data load from the DataSource(PSA) to the DSO.
How to Load Master Data From ECC in SAP BI/BW
Step 1) Creating a Generic Data Source for Text InfoObject
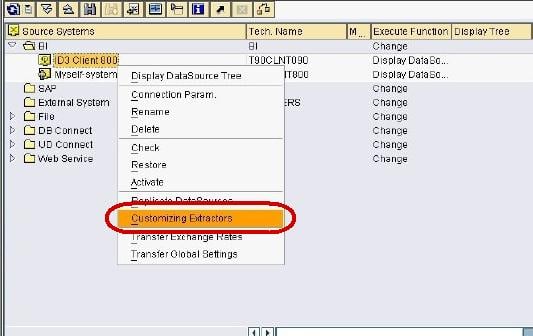
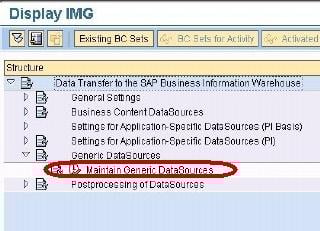
Right click on the BI Source System -> Customizing Extractors.
In next screen, click on Maintain Generic DataSources.
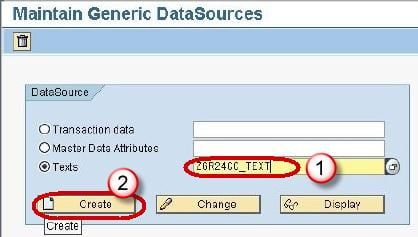
In next screen,
- Type a Technical name for the Text.
- Click Create Button.
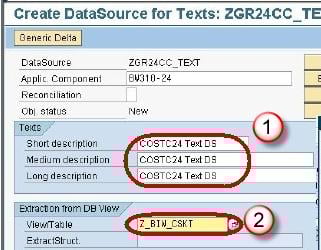
In next screen,
- Enter the Short, Medium and Long Description.
- Enter the View/Table name.
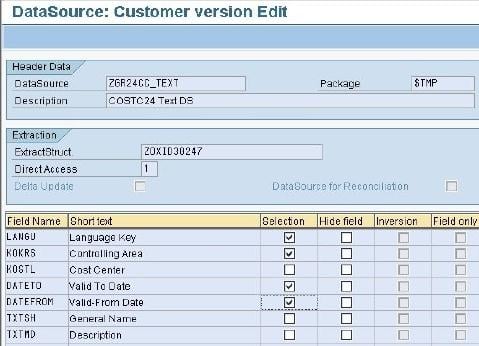
Press the Enter button. The below screen is displayed.
Now,
- Go to transaction code RSA1
- Click the OK button.
In next screen,
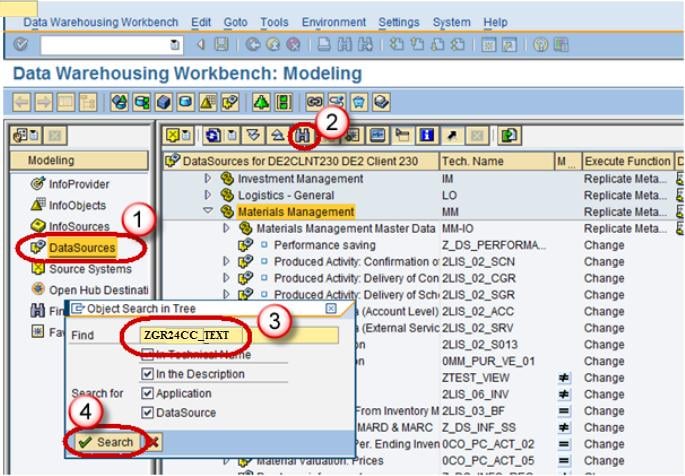
- Go to the Datasource tab
- Click Find
- Type the datasource technical name.
- Click Search button.
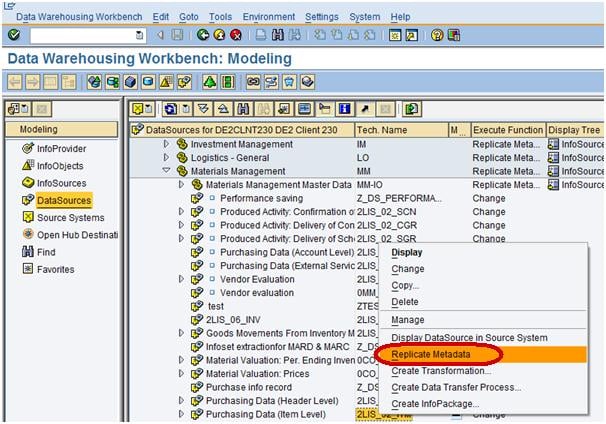
Next, from the datasource ZGR24CC_TEXT, right click Replicate Metadata as shown below. Activate the DataSource.
Step 2) Create transformation between Data Source(Source) and InfoObject Text(Target).
- Go to transaction code RSA1
- Click the OK button.
In next screen, right click on the DataSource -> Create Transformation
In next screen,
- Enter Target Object Type.
- Enter Target Object Name.
- Enter the SubType. Choose Text.
- Click Continue.
The transformation would be created with automatic mapping of the Source fields to the Target fields.
Step 3) Create Infopackage and Schedule Dataload to the DataSource(PSA).
- Go to transaction code RSA1
- Click the OK button.
- Navigate to Modeling tab->DataSources.
- Right click on the DataSource -> Create InfoPackage.
- Enter the InfoPackage Description
- Click Save.
- Click on Schedule tab.
- Click Start button to start the load from the flat file to the Data Source.
Step 4) Create Data Transfer Process.
Right-Click on DTP folder and choose the option “Create Data Transfer Process” from the context menu.
The below shows the DTP created.
Step 5) Load Data to the InfoObject Text.
- Click Execute tab in the DTP.
- Click the Execute Button to start data load from the DataSource(PSA) to the InfoObject Text.
How to Load Transaction Data from ECC: SAP RSA5
Following are the steps to perform the data extraction from ECC into BW systems. We will take Logistics (Purchasing application module) in our example.
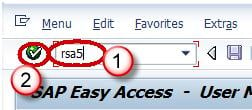
Step 1)
Login into ERP system
- Input the T code- RSA5.
- Click Continue button.
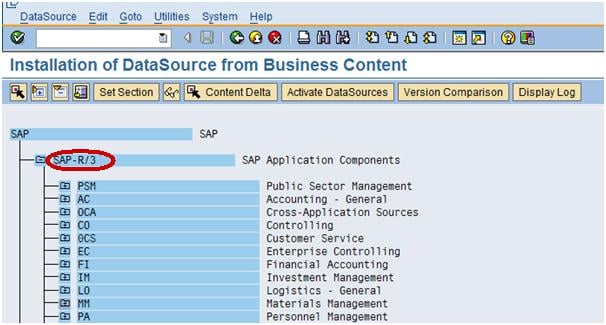
Step 2)
Click on the folder SAP R/3 as shown below screenshot
Step 3)
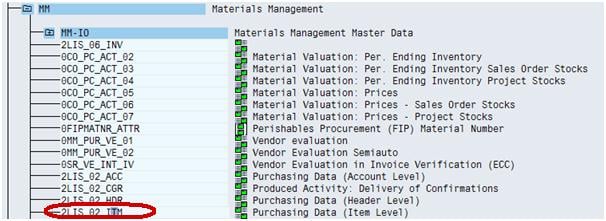
Go to the Folder MM (Materials Management)—MM-IO as shown below in screenshot in Box.
Step 4)
Choose the datasource 2LIS_02_ITM, which is purchasing data at Item level.
Step 5)
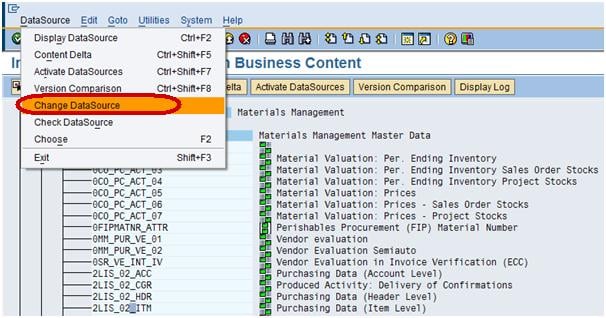
Choose the datasource 2LIS_02_ITM and go to the Datasource tab and click Change the datasource as shown in screenshot.
Note: This step is used when we need to add additional fields, to push into BW. Similarly, we can do the same steps (Step1-5) for of fields which we don’t wish to populate in BW.
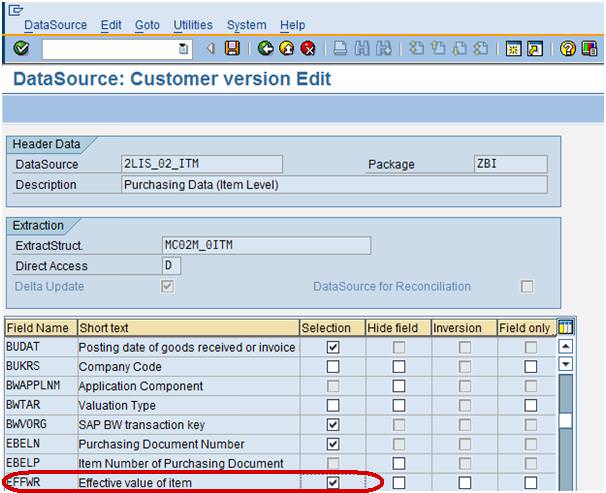
After choosing the Change datasource tab, you can see all the fields associated with this datasource as shown below.
Step 6)
Now, as per the above screenshot the Field EFFWR –Effective value item is unchecked in selection field which means that it is not available in BW. To populate the Field EFFWR in BW, we will have to check mark in selection field as shown below.
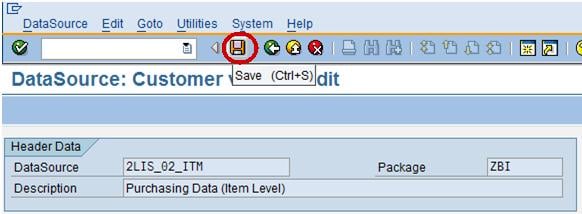
Step 7)
After checking the field EFFWR in selection save the datasource as shown below.
Step 8)
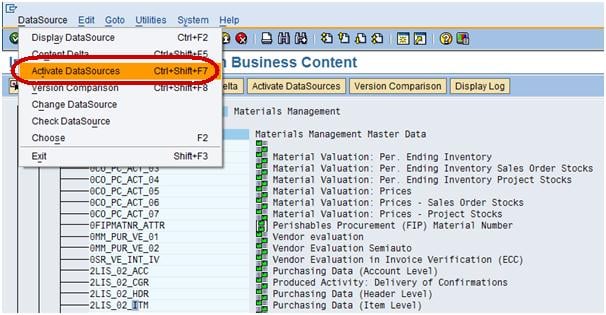
Activate the datasource as shown below.
Now we are ready to push the changed datasource 2LIS_02_ITM after selecting the Field EFFWR into BW.
Step 9)
- Log into BW system, go to the Datasource tab
- Click Find to search.
- Type the datasource technical name.
- Click Search button.
Step 10)
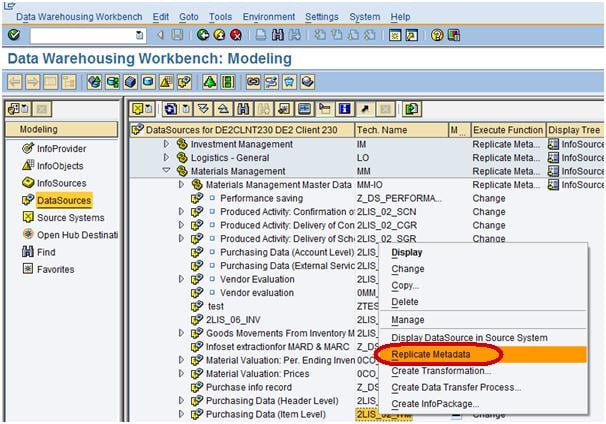
From the datasource 2LIS_02_ITM, right click Replicate Metadata as shown below.
After sucessfull replication of datasource, the Filed EFFWR will be available in BW
Step 11)
Load the data from ECC into BW to populate the filed EFFWR with some data.
- Go to transaction code RSA1
- Click the OK button.
- Navigate to Modeling tab->DataSources.
- Right Click on DataSource -> Create Infopackage.
This Infopackage is used to load the data from ECC into BW system at PSA level which is intermediate level.
- Enter the InfoPackage Description.
- Click Save.
- In order to trigger the data load from ECC into BW, go to the Infopackage, Click on Schedule tab.
- Click Start button to start the load from the flat file to the Data Source.
All About Star Schema & Extended Star Schema in SAP BI/BW
What is Schema ?
In database management system (DBMS), the schema represents relational database. It defines the tables, the fields in each table and the relationship between fields and tables. In other words schema is a collection of database objects, including tables, views, indexes and synonyms. Schemas are generally stored in a data dictionary.
What is Classical Star Schema?
A classical star schema is a multidimensional data model.It is based on a central fact table surrounded by several dimension tables in the shape of a star (hence the name).
An InfoCube consists of several Info-Objects (Characteristics and Key figures) and is structured according to the star schema. This means that there is a large fact table with key figures for the InfoCube, as well as many dimension table surround it structure which appears like star.
The benefits of star schema are slicing down, easy understanding of data and performance increase.
What is Extended Star Schema?
In extended star schema, “fact table” and “master data table” is connected through SID (Surrogate ID) table. In extended star schema , fact table and dimension table will be inside the cube. It has analyzing capacity of 16*248 (SID Table). Fact table is small and dimension table is huge contrary to Star Schema model. Under the extended star schema model, the dimension table do not contain master data
Following are the different components of an Extended Star Schema.
- Attribute table holds the attribute of master data.
- SID table creates the unique SID for (Surrogate Id) every master data records.
- Dimension table creates the DimId for every unique combination of SID(Max 248 SID(characters) can accommodate in DIM table).
- Text table hold description of master data.
- Fact table contains unique combination of DIM ID and key figures (Max 233 key figures (measurable quantity) can accommodate in fact table).
Below is an example of how a fact table of an Infocube looks like.
Below are the Dimension and SID tables.
Below shown are the Info object master data and text table.
Infocube : Sample Extended Star Schema:
The below is an example of Infocube showing the Extended Star Schema.
Steps explaining the Extended Star Schema of an Infocube:
- The Fact table of the InfoCube has a value 3.
- The value of the fact table (i.e “3”) is mapped in the Dimension table.
- The Dimension ID “3” has an SID mapped in the SID table.
- The SID value is mapped with the Text and Master data table.
SAP BI Process Chain: Create, Check, Activate, Assign, Monitor
What is Process Chain?
- A process chain is a sequence of processes that wait in the background for an event.
- Some of these processes trigger a separate event that can start other processes in turn.
- It provides various connectors that allow alternative and parallel execution of process.
- For example, a retail store receives a customer order, this will trigger a sequence of events like checking material in stockàordering the product from Warehouseàorder to manufacture the product and so on.
- Process chains provide graphical scheduling & monitoring features to help in automation, visualization & monitoring of tasks / processes.
- Process chains are integrated into portal based BI administration cockpit.
- Process Chains can be thought of as flowcharts which are scheduled to wait in background & triggered for an event by another process.
Process Chain involves three main steps
- Start Process: It describes when the process will start (immediately, scheduled job, metaprocess, API)
- Connector: It is a linking process, and can choose options of starting next process
- Variant: The object on which we are supposed to execute the process is called as Variant. It is a set of parameters passed to the process like name of the InfoPackage or Info-Objects
In this tutorial you will learn –
Steps to create a process chain.
Steps to check consistency of process chain.
Steps to activate a process chain.
Steps to assign Process Chain to application component.
Steps to activate a Process Chain.
How to Monitor Process Chains.
Steps To Create a Process Chain
RSPC is the whole and sole transaction used for Process Chain Maintenance. In this screen, existing process chains are sorted by “ApplicationComponents”.
There are two views available:
- Check View
- Planning View.
The default mode is Planning View.
Step 1)
Creating a Process Chain:
Click the “Create” icon.
Step 2)
- Enter the Technical name of the Process Chain.
- Enter a meaningful description for the Process Chain.
Click Check Mark
Step 3)
A new window pops-up. Click on “New” icon to create a new “Start Process”.
Step 4)
- Enter the Technical name of the Start Process.
- Enter a meaningful description for the Start Process and click the Enter button.
Step 5)
The subsequent screen is used to assign time-based or event based trigger for the process chain.
- Click on the option “Direct Schedule” to schedule the process chain for a specific time.
- Click on the button “Change Selections” to enter the details for Scheduling the Process chain for execution.
Step 6)
Steps for Scheduling a Process Chain:
- Click on the “Date/Time” button. Specify the Scheduled Start date/time,end date/time.
- To set frequency, click on the check box “Periodic Job”.
- Click the button “PeriodValues”.
- In next screen, select required frequency (Hourly/Daily/Weekly/Monthly/Other Period). Click on Save icons and back button to go back to previous RSPC screen.
Click save
Step 7)
Add Info Package:
Click on icon for “Process Types” to proceed.
Step 8)
As discussed earlier, data load can be triggered via an InfoPackage or a DTP.
- If the dataload is to be done via an InfoPackage, use the Process type “Execute InfoPackage”
- If the dataload is to be done via a DTP, use the Process type “Data Transfer Process”
Step 9)
A new pop-up window appears. Here you can choose the required InfoPackage.
Step 10)
Connect both the Start Variant and the InfoPackage:
There are 2 ways to do this – Right click on first step. Click on “Connect With” ->“Load Data”
Another way is to select the “Start Variant” and keep the left mouse button pressed. Then move mouse button to the target step. An arrow should follow your movement. Stop pressing the mouse button and new connection is created. From the start process to every second step there is a black line.
The Process chain appears as below after a Connection between the Start variant and Infopackage is created.
For any subsequent step, we can choose if the successor step shall be executed only if the predecessor.
- Was successful: typically used in normal processing
- Ended with errors: Typically used to send failure messages
- Execute irrespective of success or failure of previous step
Steps To Check Consistency of Process Chain
- Select the menu “Goto”
- Choose “Checking view”.
SAP will verify if all steps are connected and have at least one predecessor. Logical errors are not detected. If we get warnings or “Chain is OK”message, we can activate it. If the check identifies some errors , we have to remove the errors first.
Steps To Activate a Process Chain
- Click on the menu “Process Chain”
- Select “Activate”.
- Or select the “Activate” button
Steps To Assign Process Chain To Application Component
By default, the Process Chain is created under application component “Not Assigned”.
- Choose “ApplicationComponent” button
- Select the required component and Re-Activate the chain.
Steps To Activate a Process Chain
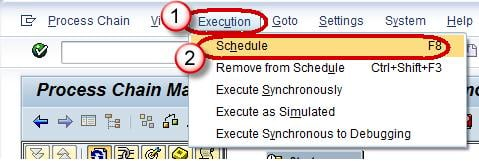
- Click on the menu “Execution”.
- Choose “Schedule”.
Alternatively press the button “Schedule”.
The chain will be scheduled as background job and can be viewed in SM37 transaction code. You will find a job named “BI_PROCESS_TRIGGER”. All the Process chains are scheduled with same job name.
How to Monitor Process Chains
- There are a number of work environments available for monitoring process chain runs:
- Navigate to Administration tab from DatawarehouseWorkBench(RSA1)
- BI Monitor in the Computing Center Management System (CCMS)
- Monitoring of Daily Process Chains (Transaction RSPCM)
- Log view for runs of a process chain in process chain maintenance (transaction RSPC)
SAP BI Content: Installation, Activation
BI Content:
BI Content provides selected roles within a company with the information that they need to carry out their tasks. SAP NetWeaver Business Warehouse delivers pre-configured authorization objects under the collective term BI content. To understand this we take an example of a sales manager, who wants all the information like sales, market share, product quality, sales and service cost etc… to enable him to make effective decision. A BI content role will bring all this data together in the form of workbooks and queries carrying exactly the information the sales manager needs. No sensitive & confidential information from the HR department are shown to him
Benefits of BI Content:
Below mentioned are the benefits of using BI Content.
- Be used in particular industries without being modified
- Be modified, meaning you can customize it to any degree of detail
- Serve


