Users Online
· Members Online: 0
· Total Members: 188
· Newest Member: meenachowdary055
Forum Threads
Latest Articles
Articles Hierarchy
#3_04 Home Hidroneumatic Controlled by ESP8266 + MQTT + Web App
Home Hidroneumatic Controlled by ESP8266 + MQTT + Web App
Overview
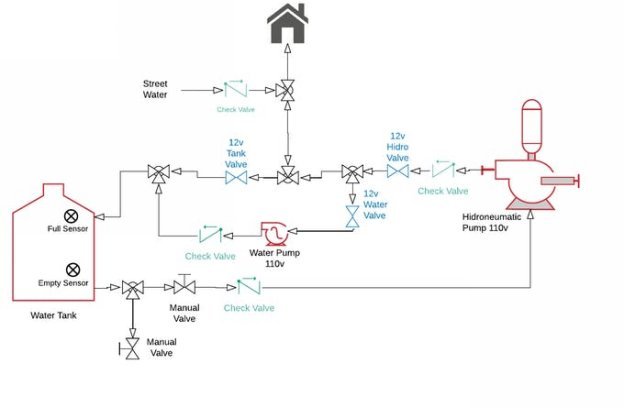
Motivated by the constant lack of water supply in my city I have been forced to install a water tank that feeds a hidroneumatic so as to have water with enough pressure for the whole house.
Additional needs to install a pump for the rapid filling of the main tank at times when the water arrives with very little pressure. This project allows controlling:
-
Turn On/Off hidroneumatic pump.
-
Fill water tank using a litle pump until full sensor detects full tank and stop pump.
-
Fill water tank with water came from street when the pressure helps, until full sensor detects full tank and close the solenoid valve.
-
When the water tank is close to emptying empty sensor activate the buzzer alarm and stop all pumps.
-
Deactivate all devices.
-
Turn on/off pumps room light.
-
Detect movement and turn on pumps room light and turn off after 15 seconds.
-
See all display info at an LCD display or remotely in LCD Status at web page.
All activities executed with help of :
-
3 solenoid valves (blue color)
-
Full sensor
-
Empty sensor
-
Water pump (red color)
-
Hidroneumatic Pump (red color)
Block Diagram
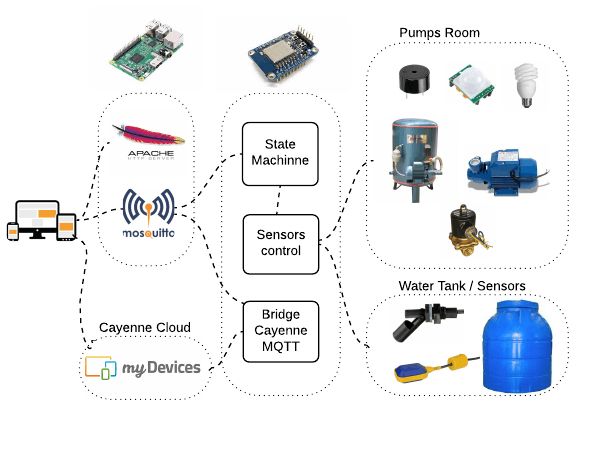
In the block diagram picture we can see the four main components of this project:
1.-Clients
-
Pc or mobile connected with web browser
-
Pc connected with browser to Cayenne cloud
-
Cayenne mobile app for IOS or Android
-
Future project will include Apple HomeKit and Amazon Alexa Echo Dot (red color)
2.- Web Server and MQTT Broker running at Raspberry PI v3
-
Apache Web Server
-
Mosquitto MQTT Broker Server
-
Future project will include Homekit Accessory Server (red color)
3.- Control server running at ESP8266
-
Bridge Cayenne to MQTT Broker Server
-
State machine
-
Sensors control
-
LCD display all commands and messages
-
Future project will includes Bridge Alexa MQTT Broker Project (red color)
4.- Devices like pumps, valves, light, sensors and LCD display controlled by ESP8266 + MCP23008

Install all software needed and connect all devices
Step 1 - Configure Raspberry PI v3
Make sure Raspberry PI was updated
sudo apt-get update
sudo apt-get upgrade
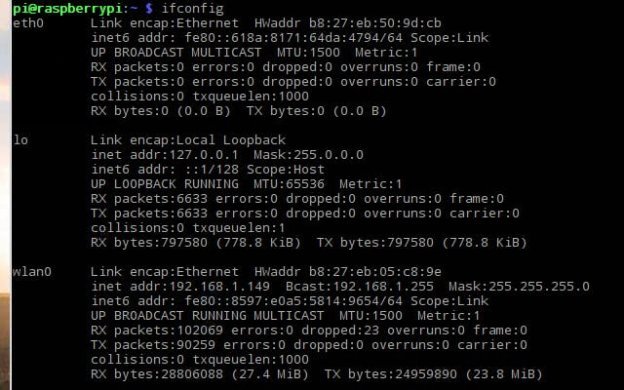
Check your ip address with the command
ifconfig
See ip address at eth0 or wlan0
Install Apache Web Server
-
Check this tutorial at Raspberry PI org.
-
Edit file hidro.html and change line 20 with ip address of your Raspberry PI
-
Copy file hidro.html and script directory, included at source code, to /var/www/html Raspberry PI folder.
-
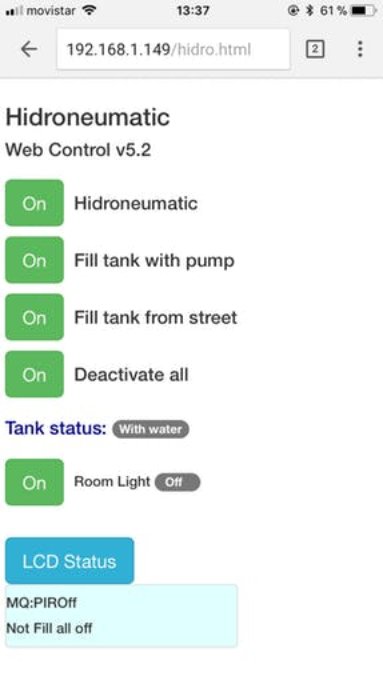
Test web server from a browser client http://rpi_ip_address/hidro.html, you must see this page :
Install Mosquitto MQTT Broker Server
cd /
wget http://repo.mosquitto.org/debian/mosquitto-repo.gpg.key
sudo apt-key add mosquitto-repo.gpg.key
cd /etc/apt/sources.list.d/
sudo wget
or
sudo wget
sudo apt-get update
sudo apt-get install mosquitto
sudo nano /etc/mosquitto/mosquitto.conf
# add this two lines for websocket support
listener 1884
protocol websockets
systemctl start mosquitto
systemctl enable mosquitto
Step 2 - Configure your device and project at Cayenne Cloud.
-
Go to https://mydevices.com/ site.
-
Sign in or Sign up if you don't have an account it is free.
-
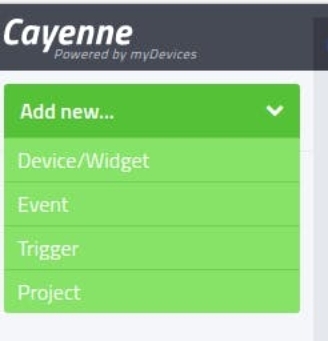
Click at Add new.. and select Device/Widget
-
Click at Generic ESP8266 to create a device
-
You will see a page with all information to connect a client or device to Cayenne Cloud.
-
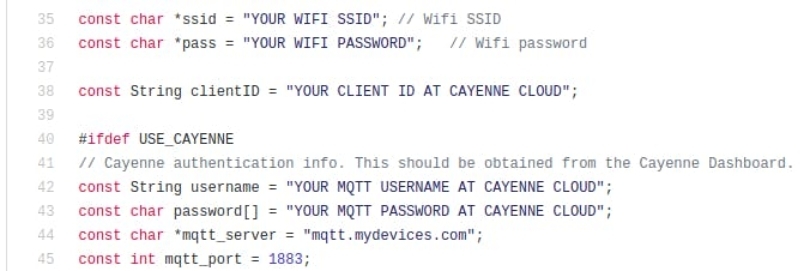
You must store MQTT USERNAME, MQTT PASSWORD, CLIENT ID, MQTT SERVER and MQTT PORT parameters because you need update its in HidroNeumaticControl.ino file lines 42, 43, 38, 44 and 45
-
Don't close your browser because it waits by ESP8266 connect
Step 3 - Programming ESP8266 and connect it to Cayenne Cloud
-
Change your Raspberry PI ip address obtains at step 1 at line 123

-
Remove // at line 32 to let use of Cayenne Cloud bridge.

-
When upload is completed press reset button at your ESP8266 device and you see at waiting browser Cayenne device page that it go to Create App page. Your ESP8266 device was successfully connected to Cayenne Cloud.
Step 4 - Create your device widgets at Cayenne Cloud Dashboard
-
Click at Generic ESP826 at Cayenne Create App page
-
At this point you will create all widgets, to do that press Add new.. and Device/Widget again and scroll down to Custom Widgets option and click it, you see all type of custom widgets.
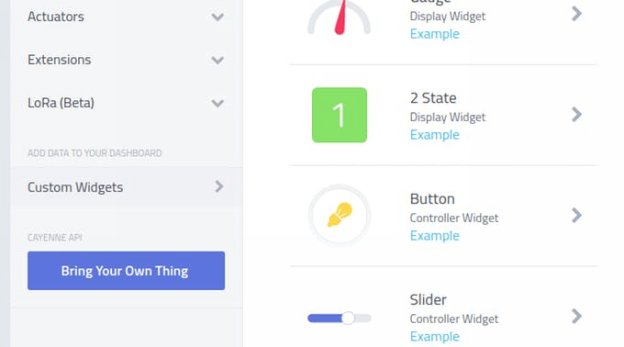
Press Button controller widget for create a new button to activate Hidroneumatic.
-
Name : Hidroneumatic
-
Device select "Generic ESP8266"
-
Data select "Data Actuator"
-
Unit "Digital 0/1"
-
Channel : 1 (special attention with this number)
-
Choose Icon : Tank
-
Press Add Widget and the widget appears at your DashBoard
Press Button controller widget for create a new button to activate Pump that fill tank with water.
-
Name : Fill with pump
-
Device select "Generic ESP8266"
-
Data select "Data Actuator"
-
Unit "Digital 0/1"
-
Channel : 2 (special attention with this number)
-
Choose Icon : Motor
-
Press Add Widget and the widget appears at your DashBoard
Press 2 State display widget for create a new status indicator that tank is fill from water street.
-
Name : Fill with pump
-
Device select "Generic ESP8266"
-
Data select "Digital Sensor"
-
Unit "Digital 0/1"
-
Channel : 3 (special attention with this number)
-
Choose Icon : Digital 2 State
-
Press Add Widget and the widget appears at your DashBoard
Press Button controller widget for create a new button Deactivate all devices.
-
Name : Deactivate all
-
Device select "Generic ESP8266"
-
Data select "Data Actuator"
-
Unit "Digital 0/1"
-
Channel : 4 (special attention with this number)
-
Choose Icon : Toggle/Switch
-
Press Add Widget and the widget appears at your DashBoard
Press Button controller widget for create a new button Room light to turn on/off pumps room light.
-
Name : Room light
-
Device select "Generic ESP8266"
-
Data select "Data Actuator"
-
Unit "Digital 0/1"
-
Channel : 5 (special attention with this number)
-
Choose Icon : Light
-
Press Add Widget and the widget appears at your DashBoard
Press 2 State display widget for create a new motion detector for pumps room.
-
Name : Fill with pump
-
Device select "Generic ESP8266"
-
Data select "Motion"
-
Unit "Digital 0/1"
-
Channel : 6 (special attention with this number)
-
Choose Icon : Motion
-
Press Add Widget and the widget appears at your DashBoard
Step 5 - Create a Project "Hidroneumatic Control"
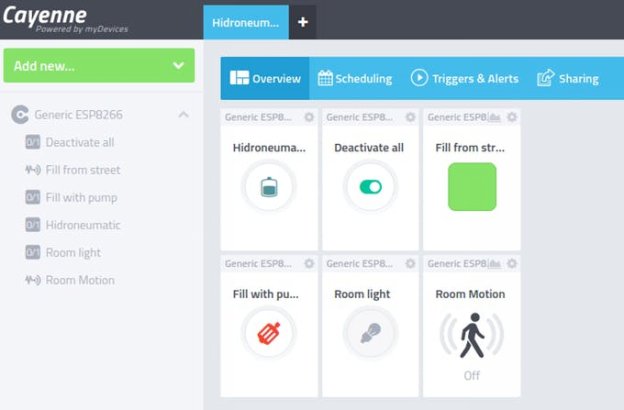
At this point you will create a Cayenne project "Hidroneumatic Control" to do that press Add new.. and Project option.
Now drag and drop all created widgets from left bar to project dashboard to create a new Cayenne browser project to control our devices.
Step 6 - Install Cayenne mobile client from Apple Store or Android Store
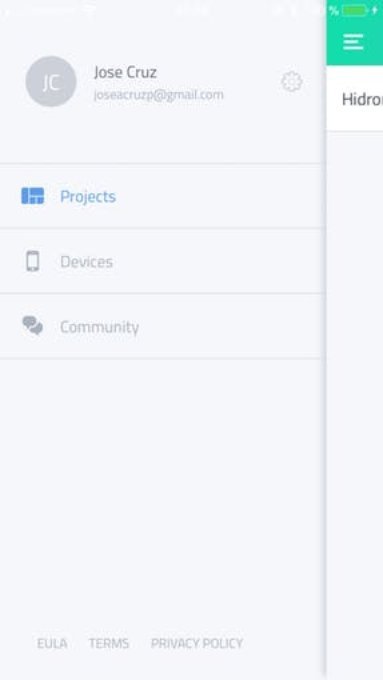
After installs your Cayenne mobile app login and select Projects and Hidroneumatic Control and go to dashboard and you will see all widgets.
Step 7 - Software is ok now proceed with Hardware, the control board
-
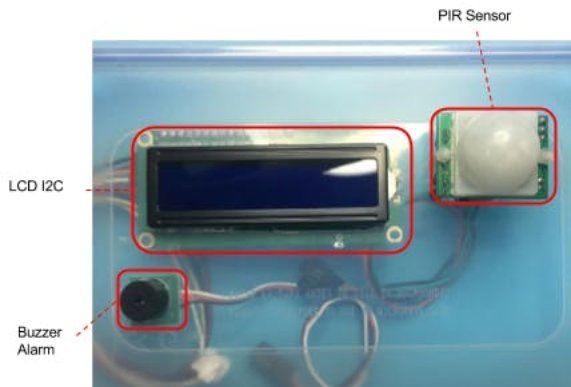
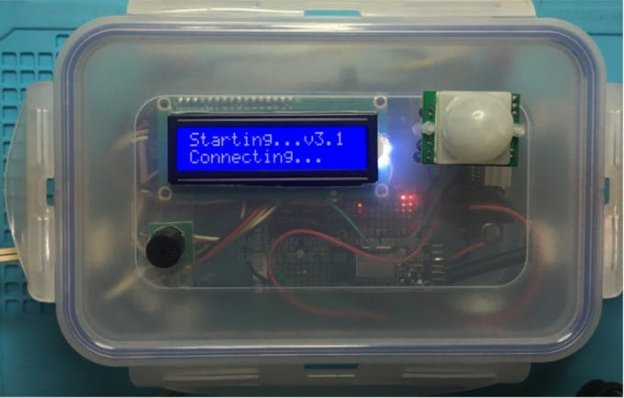
Install the LCD I2C, the buzzer alarm and PIR Sensor on the plastic topbox with all female connectors.
-
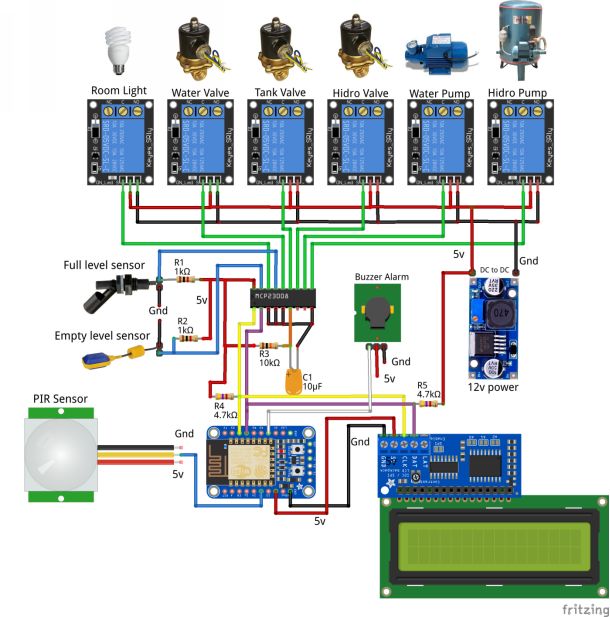
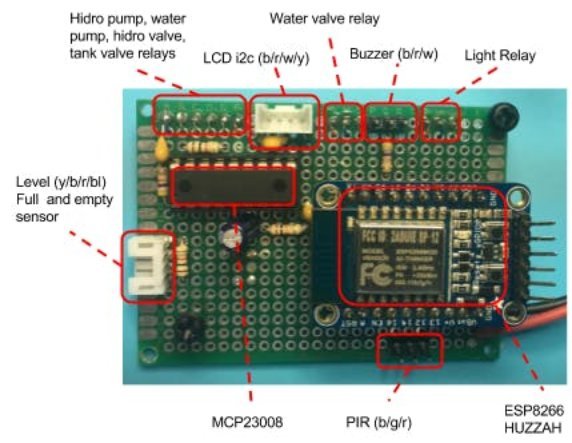
Based on schematic diagram make a control board with breadboard and some wrapping wired
-
Put the relay board and control board inside plastic box and organize all connections based in schematic.
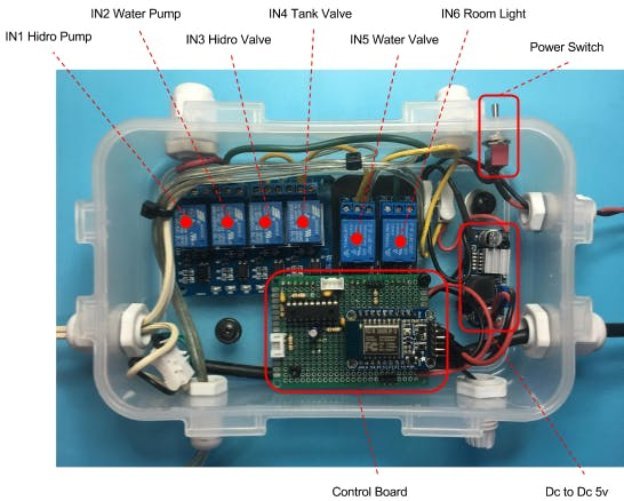
-
Connect the buzzer alarm, LCD and PIR sensor from topbox to control board and power on with 12 volts power supply and you will see all information at LCD display panel.
Software details
This project uses two files:
hidro.html : is a responsive web application client written in Bootstrap, Jquery and using a Paho Javascript Client, an MQTT browser-based client library written in Javascript that uses WebSockets to connect to an MQTT Broker.
Must be installed at Apache Web Server together with script folder.
It is a Publisher and Subscriber to MQTT Broker topic "HidroControl" it send and receive messages.
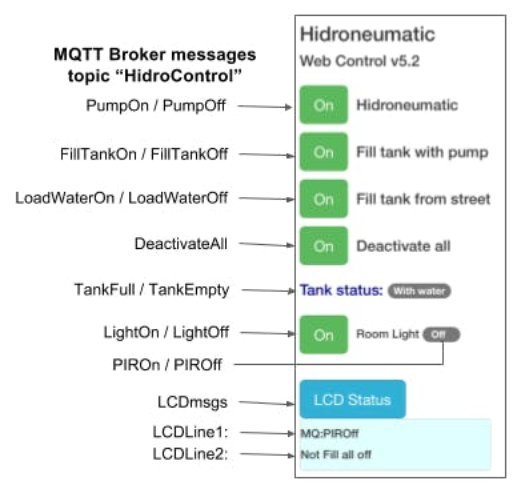
Each button On/Off send a message to MQTT Broker and change on to off and off to no status.
If tank is empty or begin fill and is full you will receive the status at Tank Status label.
If a movement is detected by a PIR sensor the pumps room light turn on and you will receive the status at Room Light label.
If you want remote connect to LCD you only have to click at LCD Status and you receive the last two lines messages that is displayed at LCD.
HidroNeumaticControl.ino : is a firmware to ESP8266.
Have a state machine to control all devices, depends from message receive from MQTT Broker calls each function.
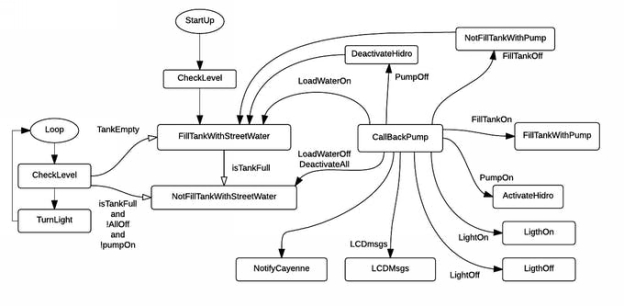
It is a Publisher and Subscriber to MQTT Broker topic "HidroControl" to send and receive messages.
It implements a Cayenne to MQTT Broker bridge.
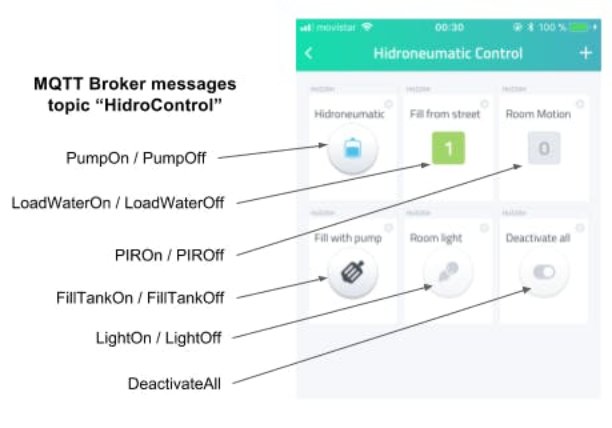
It implements a I2C communication with LCD display and MCP23008.
Turn on/off pumps room light when PIR sensor detects movement.
Hardware details
The brain of control board is a ESP8266, I use an Adafruit HUZZAH implementation but you can use any other for example Sparkfun ESP8266 Thing.
-
With I2C interface from pines 4 (SDA) and 5 (SCL) it communicates with I2C devices like LCD I2C display and MCP23008.
-
GPIO 15 controls the buzzer alarm.
-
GPIO 12 controls PIR sensor.
MCP23008 is an 8-Bit I/O Expander and controls the other devices and sensors.
-
GPIO0 : Hidroneumatic pump
-
GPIO1: Water pump
-
GPIO2: Hidro solenoid valve
-
GPIO3: Tank solenoid valve
-
GPIO4: Water from street solenoid valve
-
GPIO5: Water tank full sensor
-
GPIO6: Pumps room Light
-
GPIO7: Water tank empty sensor
Use 12v / 30A power supply because all solenoids valves, and a Dc to DC converter to generate 5v needs for all circuit.
Pumps room light, water pump and hidroneumatic pump using 110v controlled by each relay, be attention when connects them.
You can test the control board and MQTT Broker connection loading in the web browser the web app client, press some buttons and see all messages send and all status at LCD display, check that all relays are activated like the next table.

Schematics
