Users Online
· Members Online: 0
· Total Members: 188
· Newest Member: meenachowdary055
Forum Threads
Latest Articles
Articles Hierarchy
#01_04 A Smart Digital Advertising Dashboard
A Smart Digital Advertising Dashboard
Every product and service should be marketed in order to get maximum sales. In this chapter, we'll learn to explore digital signage systems, including smart systems. We'll starting with reviewing existing digital signage platforms and go on to designing a smart digital advertising system and adding sensor devices to it.
We'll learn the following topics:
-
Introducing smart digital advertising dashboards
-
Exploring digital signage platforms
-
Designing a smart digital advertising system
-
Detecting human presence
-
Displaying and delivering ad content
-
Building a smart digital advertising dashboard
Let's get started!
Introducing smart digital advertising dashboards
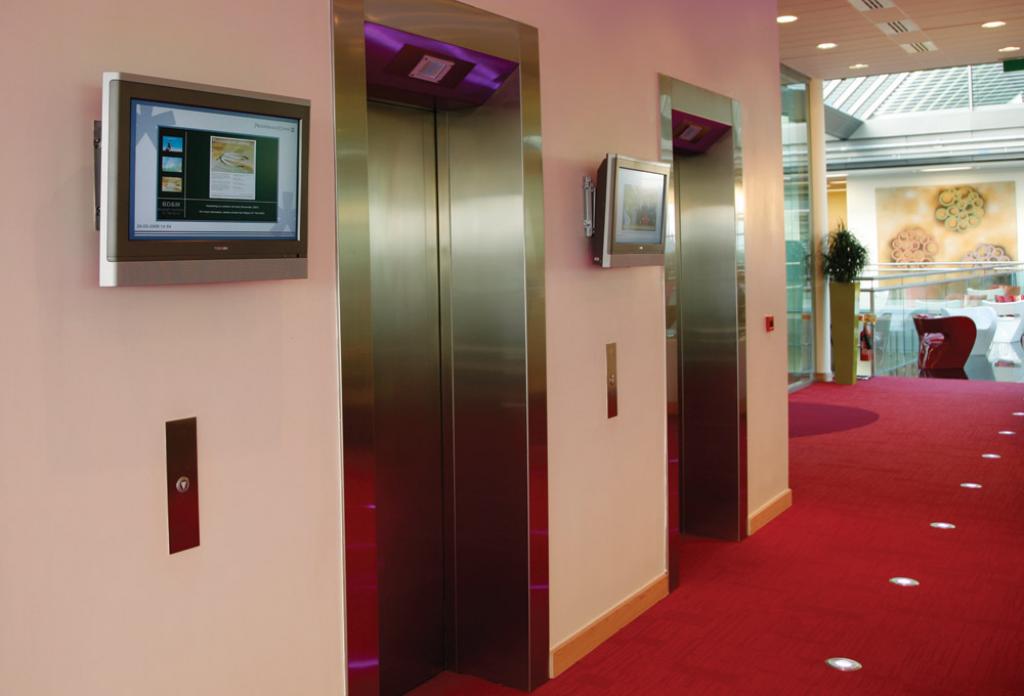
While staying in a hotel or working in an office building, you may see a monitor with information. The content could be information about the building or advertising content such as product information.
For instance, look at the monitor with advertising content near the lift in the following image. You may see one in your office or mall building.
Source image: https://onelan.com/case-studies/corporate/pwc-a-communication-tool-to-reach-2000-employees.html
Another example you may see is the advertising monitors in airports on the walls:

Source image: http://www.digitalsignage.com.au/dsn/markets/airports.php
Products and services need to be marketed so people can know about them. It's important because if people need stuff or services that we are selling, they will contact us to get further information. It's an opportunity!
In this chapter, we'll learn to explore digital signage platforms to deliver ad content such as text, image, and video. We'll add features to the digital signage platform with specific intelligence to get optimized marketing programs.
Exploring digital signage platforms
Building a digital signage system for advertising needs more knowledge in implementing the system. Some companies and communities have built good digital signage platforms. In this section, we will review some platforms that can be deployed on the Raspberry Pi.
1Play
1Play is a digital signage system based on the Raspberry Pi (Pi Zero and Pi 1,2, and 3). It supports images, videos, RTSP video streaming, and HTML5 content. The content is pushed from a cloud server. You can also manage all content from a system. This platform is not free but you can try 1Play with a 30-day free trial. If you're interested, you can visit the official website at https://1play.tv/.
Screenly
Screenly is a digital signage platform-based web application. They provide commercial and open source editions. All ad content such as image, video, and links can be managed easily. Their official website is https://www.screenly.io. For the open source edition, you can read the installation instructions on https://www.screenly.io/ose/.
With respect to the Screenly open source edition, you can deploy it with a custom image that is provided by Screenly. You can download it from https://github.com/screenly/screenly-ose/releases. If you have a Raspberry Pi with Raspbian Jessie, you can install it directly into your Raspberry Pi. Just open terminal and type this command:
$ bash <(curl -sL https://www.screenly.io/install-ose.sh)
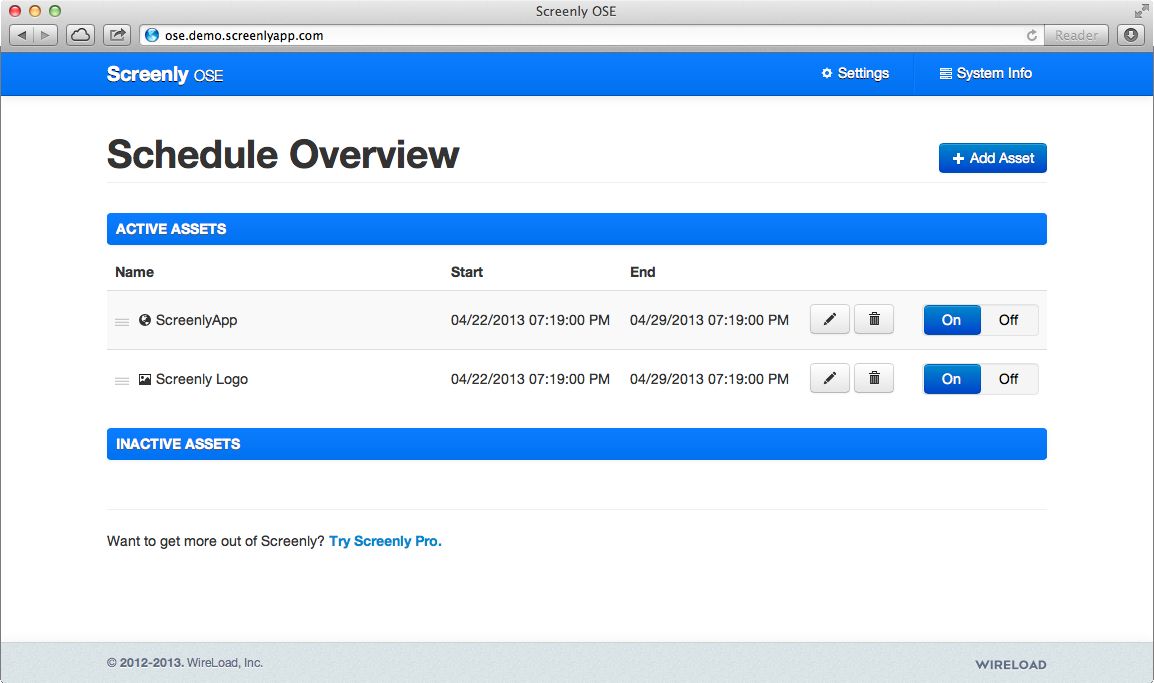
After it's installed and rebooted, you can see the Screenly dashboard. You can manage ad content by calling the URL http://<server>:8080 on your remote web server. Don't run the web browser on your local Raspberry Pi. You can see the Screenly management page here:
Source image: https://www.screenly.io/ose/
Screenly is built using Python and runs on a web server called nginx. You can modify it for your use case. For further information about Screenly's open source edition, go to https://github.com/screenly/screenly-ose.
Xibo
Xibo is an open source digital signage system. It provides ad content such as videos, images, RSS, text, clocks, tabular data, and so on. You can manage a schedule for ad content via a CMS portal. Xibo uses a PHP web application to deliver content and MySQL as database storage. For further information about Xibo, you can download and install it on http://xibo.org.uk.
Concerto
Concerto is a web-based digital signage system. Using Concerto, we can build digital signage systems to deliver ad content on the Raspberry Pi. It uses MySQL, SQLite, and Postgres for database options. It also provides a CMS system to manage your ad content. The official website of Concerto can be found at http://www.concerto-signage.org.
Designing a smart digital advertising system
A key part of building a smart digital advertising system is to deliver ad content and get insight. In general, we can build a digital advertising dashboard or digital signage system using a desktop or web application. This application will act as content host to deliver ad content. You can see a simple architecture of a digital signage system here:

The Ads System can be a desktop or web application. There is a local database to store ad content. The application will show ad content periodically.
In some cases, we can deploy multiple ad servers at several locations. We'll build a central database so ad content can be pushed to each local ad server. We also can design to deliver ad content based on location. It means each local ad server has a different ad location. In general, we can build a hybrid centralization and decentralization model as shown in this figure:
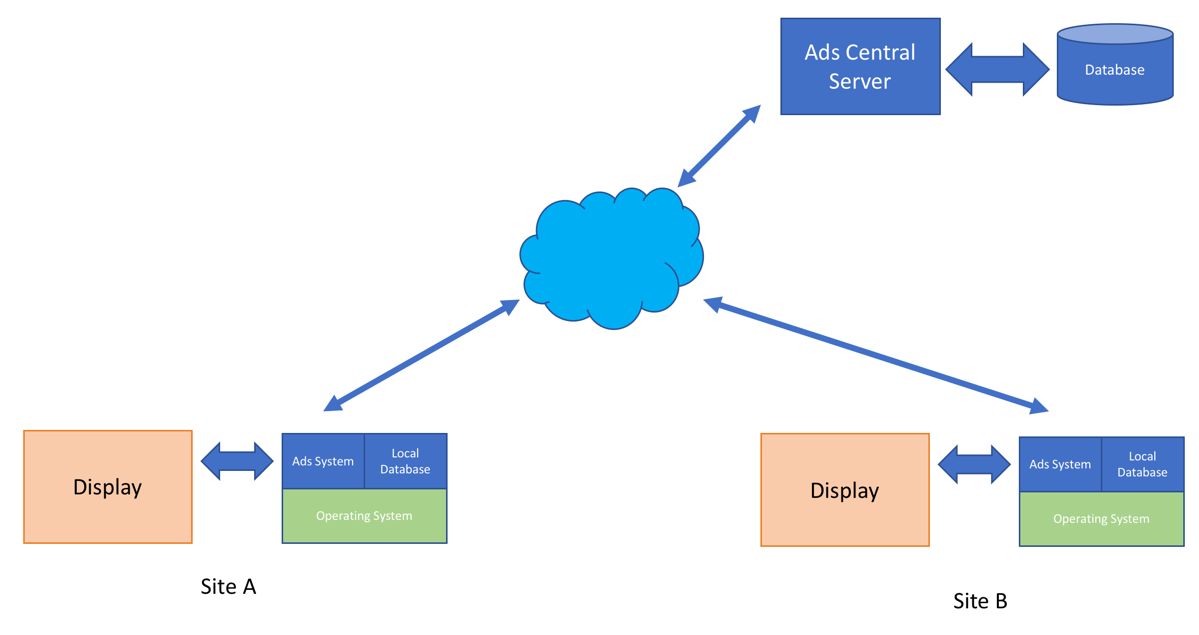
You can see from this figure that we need internet to connect between the server and local ad servers. Depending on your ad content type and size, we should estimate network bandwidth capacity in order to deliver ad content well. Ads content can be pushed to the local server at certain periods.
To make our digital signage system smarter, we can add intelligence features, for instance, detecting human presence while ad content is showing. The system should record that information and store it into a local server.
Getting information about the number of people watching ad content is necessary. We can record this information into a database. From that, we can get insight in order to determine the peak season for showing ad content.
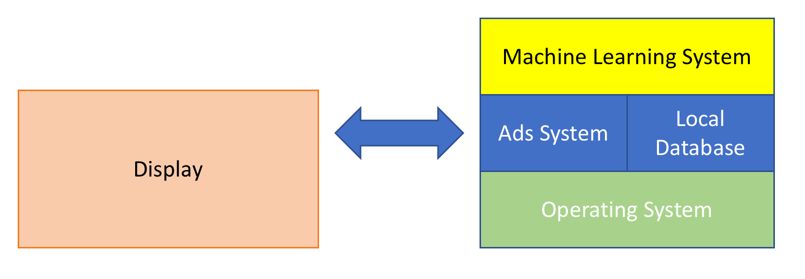
In general, we can add a machine learning algorithm into the sensor device to obtain the density of human presence. You can see this in the following figure of a general architecture:
In a real-life implementation, we can use any sensor, including optical sensors like cameras, to detect human presence. We will discuss this in the next section.
Detecting human presence
In this section, we will explore some methods of detecting human presence. It's useful to deliver optimized ad content with information about the number of people watching a monitor. We can configure TV/monitor to go to sleep when there are no people in the area.
PIR motion sensor
A Passive Infrared Detection (PIR) motion sensor is used to detect object movement. We can use this sensor to detect human presence. You can find PIR sensors at SeeedStudio (https://www.seeedstudio.com/PIR-Motion-Sensor-Large-Lens-version-p-1976.html), Adafruit (https://www.adafruit.com/product/189), and SparkFun (https://www.sparkfun.com/products/13285). A PIR motion sensor usually has three pins: VCC, GND, and OUT. The OUT pin is the digital output; if we get value 1, it means motion is detected.
You can see the PIR sensor from SeeedStudio here:
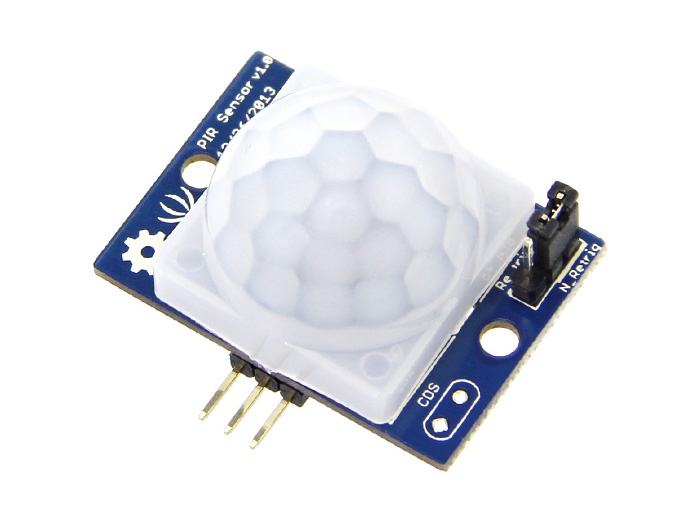
There's another PIR motion sensor from SparkFun, the SparkFun OpenPIR: https://www.sparkfun.com/products/13968. This sensor provides analog output so that we can adjust the motion-detection value. Here's how it looks:
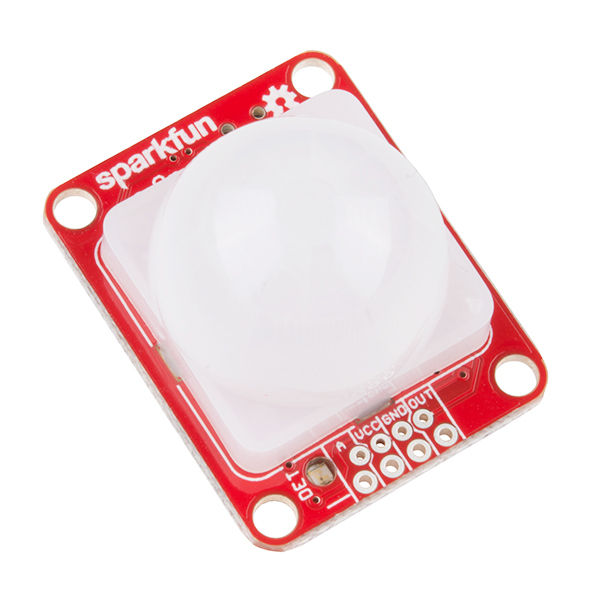
We learned how to use this sensor in Chapter 2, A Smart Parking System. You can try using it to detect human presence.
Ultrasonic sensor - HC-SR04
The HC-SR04 is a cheap ultrasonic sensor. It is used to measure the range between itself and an object. Each HC-SR04 module includes an ultrasonic transmitter, a receiver, and a control circuit. You can use this sensor to detect human presence in a range of 2 cm to 5 cm, depending on sensor accuracy.
In general, the HC-SR04 module has four pins: GND, VCC, Trigger, and Echo. You can see the HC-SR04 from SparkFun (https://www.sparkfun.com/products/13959) in the following image. You can also find this sensor on SeeedStudio: https://www.seeedstudio.com/Ultra-Sonic-range-measurement-module-p-626.html. To save costs, you can buy the HC-SR04 sensor from Aliexpress. To learn how to use this sensor, refer to Chapter 2, A Smart Parking System.

Thermal sensor
Humans can be detected by the surface temperature of their bodies. One sensor device that can be used to detect human presence based on temperature is the D6T MEMS thermal sensor: https://www.omron.com/ecb/products/sensor/11/d6t.html.
You can connect this sensor to an Arduino board or Raspberry Pi. It delivers sensor output through the I2C protocol. Here's how it looks:
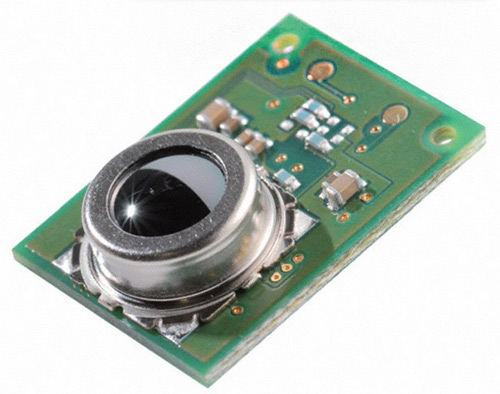
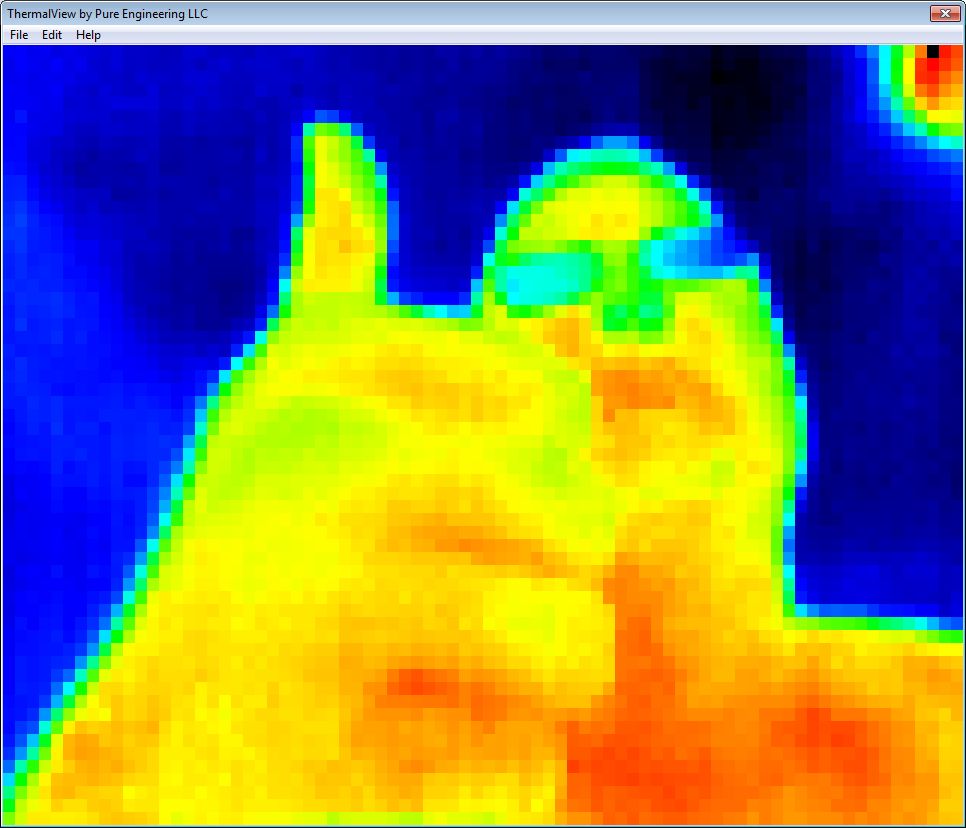
The FLiR Dev Kit is a thermal imaging sensor from Pure Engineering that can be attached to Arduino and Raspberry Pi boards. The product can be reviewed at http://www.pureengineering.com/projects/lepton and is shown in the next image. You can also find it on SparkFun: https://www.sparkfun.com/products/13233:
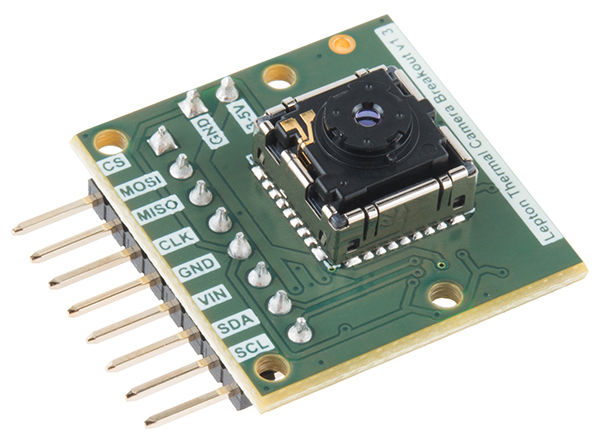
Technically, this sensor will a generate thermal imaging photo. If you see red pixels in the photo, it means that area has a high temperature:
Source image: http://www.pureengineering.com/projects/lepton
Optical sensor
A camera can be used as an optical sensor to capture what's happening in a certain area. Every camera has different features. You should choose the appropriate camera for your use case. By adding artificial intelligence (AI) program with your camera, you can use it to detect human presence.
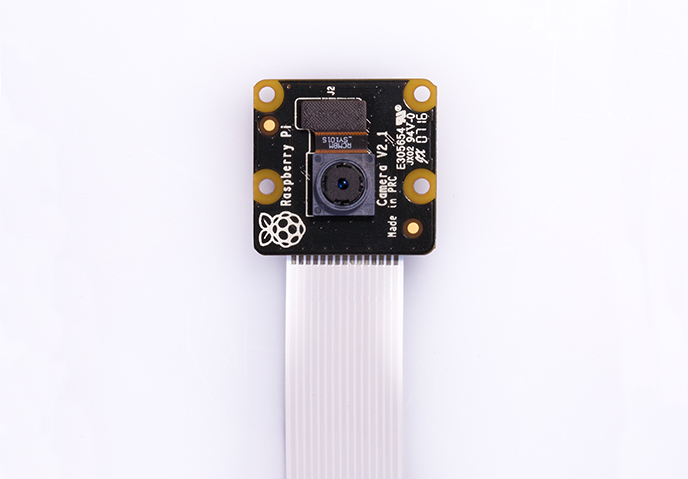
The Raspberry Pi Foundation provides the official camera for the Raspberry Pi. Currently, the recommended camera is the camera module version 2. You can read about and buy it at https://www.raspberrypi.org/products/camera-module-v2/. The Raspberry Pi foundation also has the Pi Camera Noire V2. This camera can work in low light. You can find this product at https://www.raspberrypi.org/products/pi-noir-camera-v2/. You can see it here:
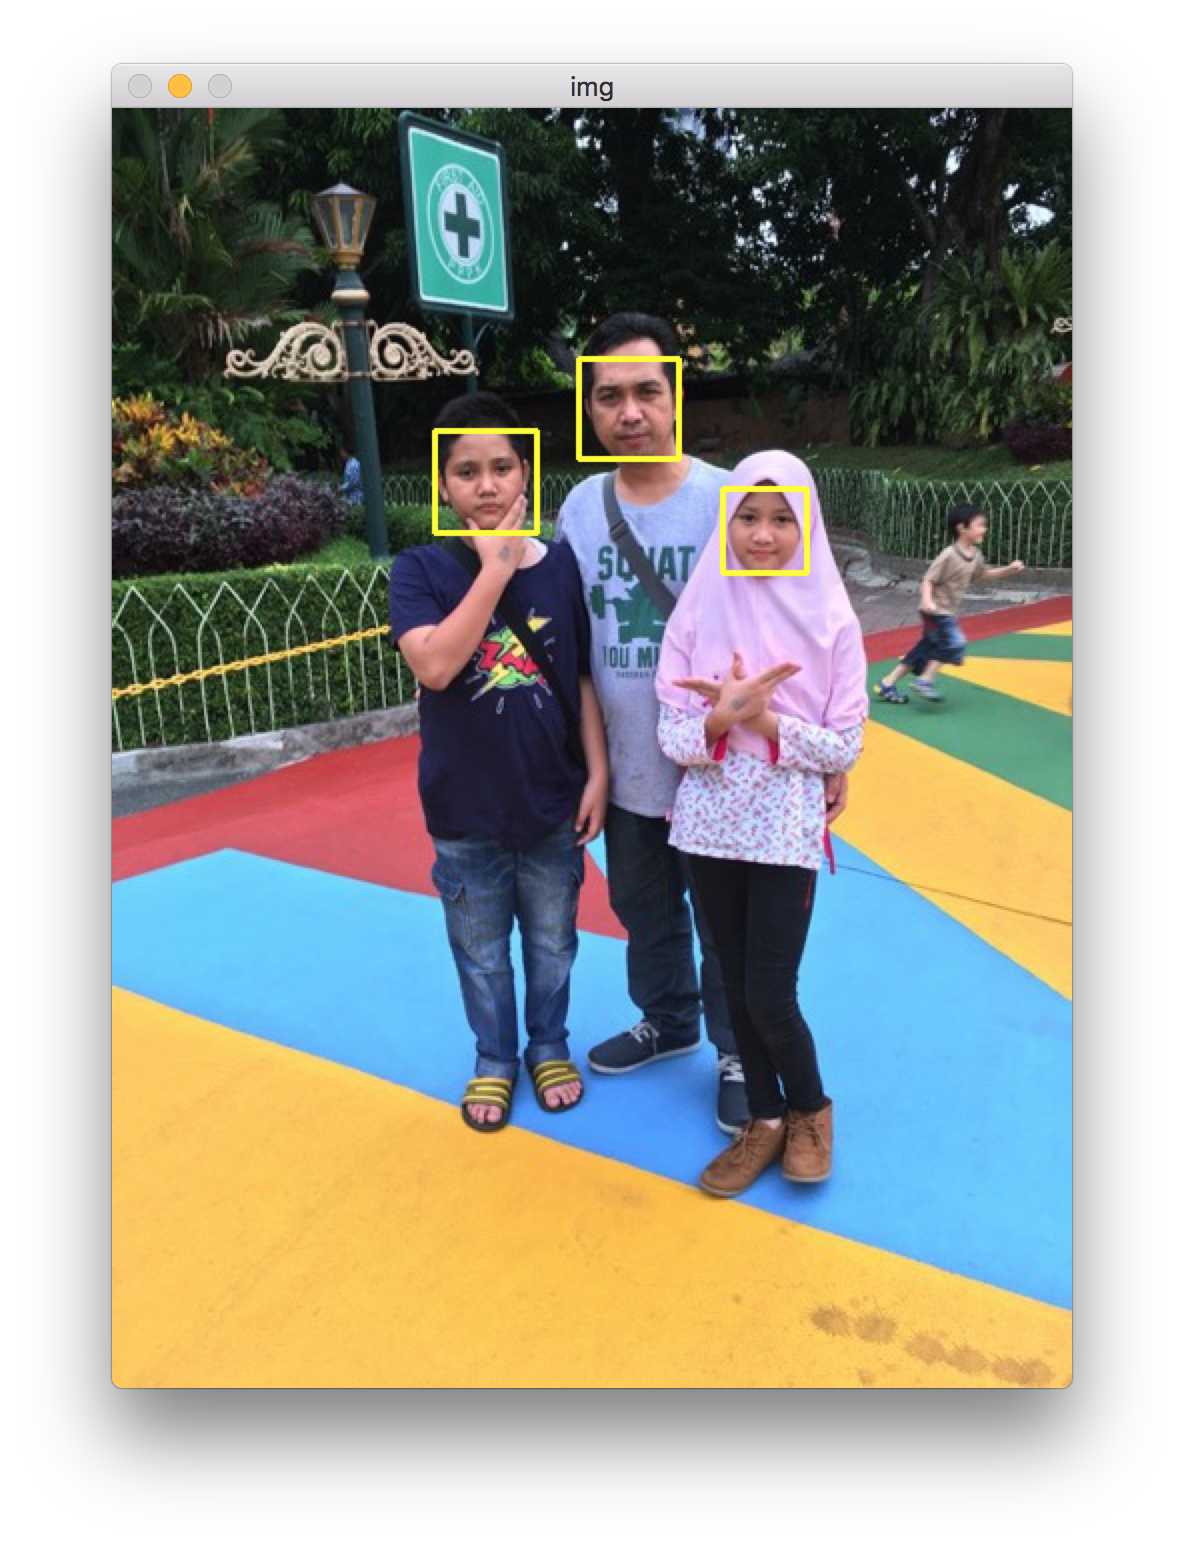
A simple method to detect human presence is to use a face detection algorithm. When we connect a camera to an ad monitor, we can assume that if people are watching the monitor, their faces will be seen.
We can use OpenCV to implement face detection. For instance, we can detect a face in a picture file using Haar Cascade. You can use this program:
import numpy as np
import cv2
face_cascade = cv2.CascadeClassifier('haarcascade_frontalface_alt.xml')
img = cv2.imread('IMG_FACE.JPG')
gray = cv2.cvtColor(img, cv2.COLOR_BGR2GRAY)
faces = face_cascade.detectMultiScale(gray, 1.3, 5)
for (x, y, w, h) in faces:
img = cv2.rectangle(img, (x, y), (x+w, y+h), (0, 255, 255), 2)
print "Number of faces detected: " + str(faces.shape[0])
cv2.imshow('img', img)
cv2.waitKey(0)
cv2.destroyAllWindows()
You should change the image file with your test picture file. Save this program as ch04_faces.py.
Now you can run the program on a Terminal. Type this command:
$ python ch04_faces.py
You can see rectangles on the picture if there is a human face. Take a look at the test picture here:
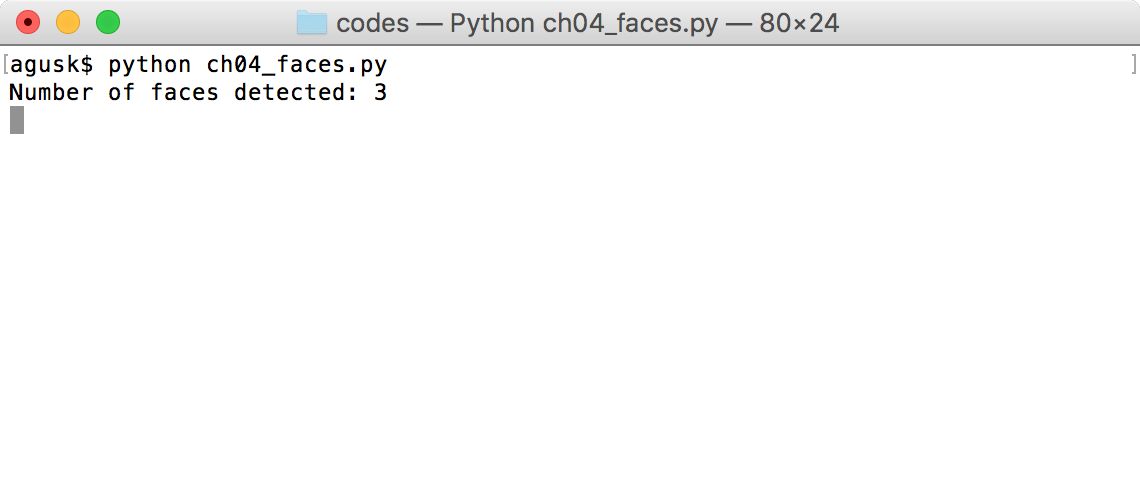
In a terminal, the program will display a message that shows the number of detected faces. You can see it here:
Displaying and delivering ad content
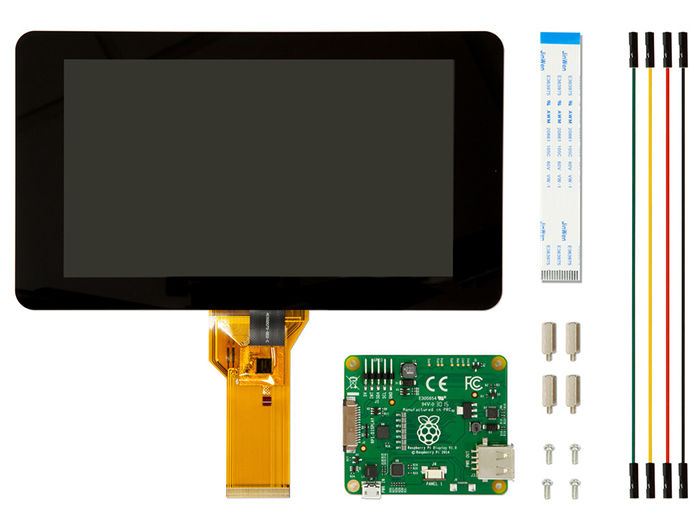
If you design advertising with a standalone model, you should have a display such as a monitor or a tablet in order to show ad contents. The Raspberry Pi has an official display of 7 inches, shown in the following image. This display can be attached to a particular box or wall.
You can also use a normal monitor to display ad contents. It's easier to attach to a Raspberry Pi through HDMI.
In this section, we'll review various backend technologies to deliver ad content. We'll focus on the backend technology stack with the Python platform. We'll explore web frameworks for Python that we can use to implement an ad server.
Flask
Flask is a simple web framework based on Werkzeug. It's easy to build HTTP GET/POST requests. If you have a scenario where you want to develop a RESTful server, Flask can solve your problem fast. The official website of Flask is http://flask.pocoo.org. You can install Flask using pip. Type this command:
$ pip install Flask
For testing, we can create a simple-to-handle HTTP GET request. Create a Python file, called ch04_flask.py. Write the following program:
from flask import Flask
app = Flask(__name__)
@app.route("/")
def hello():
return "Hello,Flask!"
@app.route('/ads/<int:ads_id>')
def show_post(ads_id):
return 'Adversiting id %d' % ads_id
This program will handle HTTP GET requests: / and /ads/<id>.
To run the program, you can type this command:
$ FLASK_APP=ch04_flask.py flask run
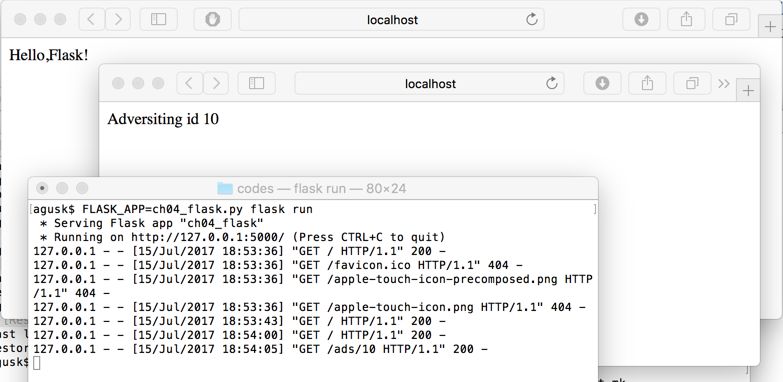
It shows a running web server on a specific port, by default 5000. Now you can open a browser and navigate to http://localhost:5000 and try again to navigate to http://localhost:5000/ads/10. You can see the sample browser and program output here:
For further information about Flask development, I recommend you read the Flask documentation at http://flask.pocoo.org/docs/. Some program samples are provided to help you get started.
Pyramid
Pyramid is a web framework to build web applications based on Python. It's easier to use and to handle HTTP requests. You can install pyramid by typing this command:
$ pip install "pyramid==1.9.1"
It will install pyramid version 1.9.1. You can change it.
For testing, we'll build a simple web application to handle the / request. Use the following code:
from wsgiref.simple_server import make_server
from pyramid.config import Configurator
from pyramid.response import Response
def hello_world(request):
return Response('Hello World!')
if __name__ == '__main__':
with Configurator() as config:
config.add_route('hello', '/')
config.add_view(hello_world, route_name='hello')
app = config.make_wsgi_app()
print('server is running')
server = make_server('0.0.0.0', 8099, app)
server.serve_forever()
Save this program to a file called ch04_pyramid.py.
Now you can run it. Type this command on the terminal.
$ python ch04_pyramid.py
The program will run on port 8099. Open a browser and navigate to http://localhost:8099. You should get a response saying Hello World! in the browser:

On the terminal side, you can see the running program here:

Django
Django is a popular web framework for building web applications. You can use it to deliver ad content. Django provides a complete API to build a web application, including database access.
You can install it officially via pip. Type this command:
$ pip install Django
For testing, we'll build a simple web application. We can create a new web project using django-admin. For instance, we'll create a project called mysite. You can type this command:
$ django-admin startproject mysite
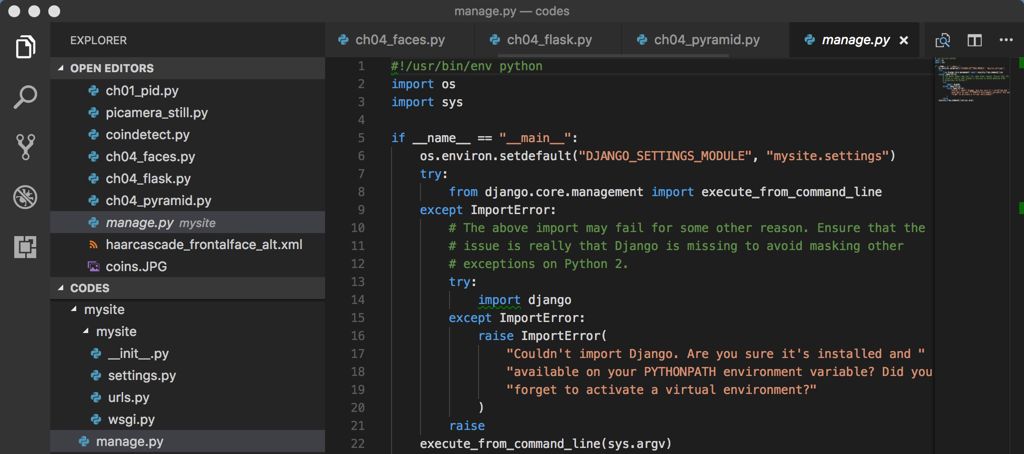
It will generate a web application with a default template. The program will create the <project_name> folder. You can see the project structure here:
We can run this program by typing the following commands:
$ cd mysite/
$ python manage.py runserver
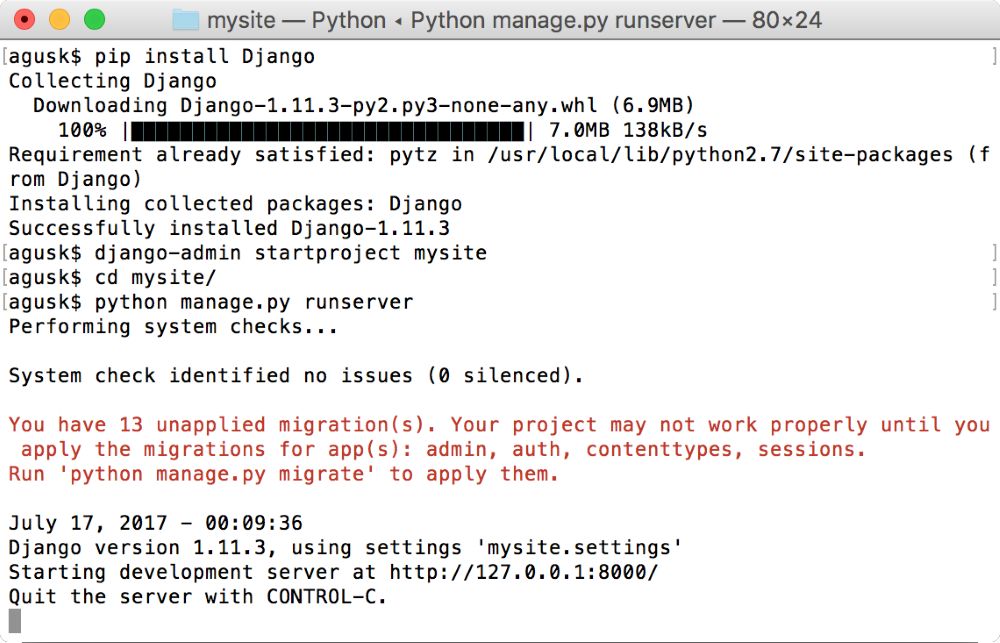
If you succeeded, you should see the following response message from the program:
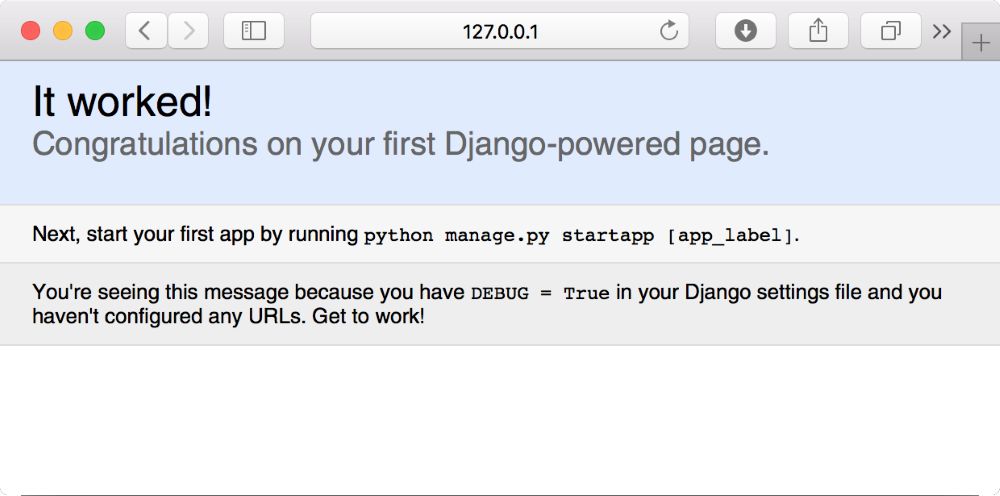
By default, Django runs on port 8000. Now you can open a browser and navigate to http://localhost:8000. If successful, you should see a simple web application:
Building a smart digital advertising dashboard
Basically, building a smart digital advertising dashboard is the same as building a digital signage system. We use existing signage system platforms that fit your case. Depending on your requirements, we can implement digital advertising using Raspberry Pi with HDMI monitor.
To make our digital signage system smart, we need added values. One of them is to add a sensor to detect human presence that we learned on previous section.
With respect to data, we should design a database model that covers our sensor data. For instance, we can add information about the number of viewers in a certain time period. For a database design sample, you can see the following figure:
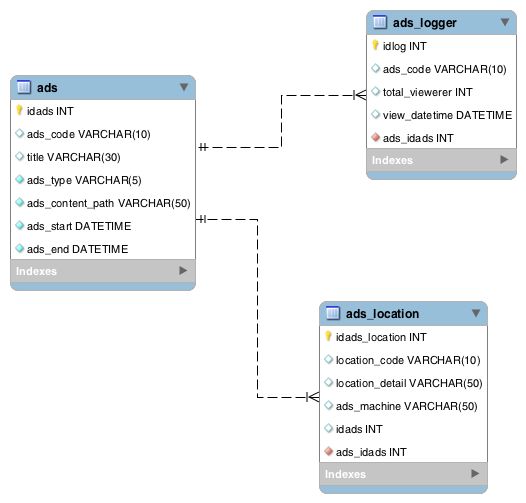
You can see from this database design that the number of viewers is represented as total_viewer in the ads_logger table. Each ad content should be defined by how and when the content will be shown. In the ads table, we set the ads_type for the ad content type. It can be text, image, or video. We also define ads_start and ads_end in the ads table to define the ad display period.
This is a sample database design. You can extend it with additional features, such as a billing system. Consider you can implement charging model for companies that want to apply ads. This charging model can use showing time and location.
Summary
In this chapter, we learned how to create a digital signage system with Artificial Intelligence with implementing human presence. Various human presence methods were also explored to provide added value to our digital signage system.
In the next chapter, we will explore a smart speaker machine and the technology that is used to build such a system

