Users Online
· Members Online: 0
· Total Members: 188
· Newest Member: meenachowdary055
Forum Threads
Latest Articles
Articles Hierarchy
#0012 Angularjs CUSTOM Directive Example [ng-transclude]
Angularjs CUSTOM Directive Example [ng-transclude]
What is Custom Directive?
A custom directive in Angular Js is a user-defined directive with your desired functionality. Even though AngularJS has a lot of powerful directives out of the box, sometime custom directives are required.
In this tutorial, you will learn-
- How to Create a Custom Directive?
- AngularJs Directives and Scopes
- Using controllers with directives
- How to create reusable directives
- AngularJS Directives and components - ng-transclude
- Nested directives
- Handling events in a directive
How to Create a Custom Directive?
Let's take a look at an example of how we can create a custom directive.
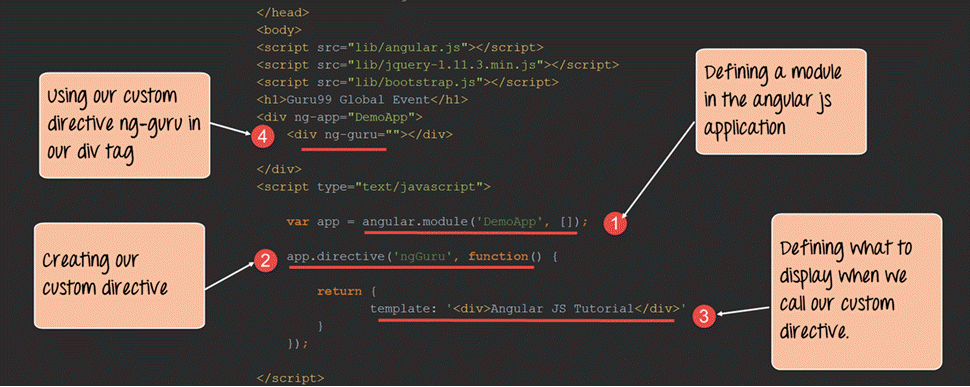
The custom directive in our case is simply going to inject a div tag which has the text "AngularJS Tutorial" in our page when the directive is called.
<!DOCTYPE html>
<html>
<head>
    <meta chrset="UTF 8">
    <title>Event Registration</title>
</head>
<body>

<script src="https://code.angularjs.org/1.6.9/angular-route.js"></script>
<script src="https://code.angularjs.org/1.6.9/angular.js"></script>
<script src="https://code.angularjs.org/1.6.9/angular.min.js"></script>
<script src="https://code.jquery.com/jquery-3.3.1.min.js"></script>

<h1> Guru99 Global Event</h1>

<div ng-app="DemoApp">
    <div ng-guru=""></div>

</div>

<script type="text/javascript">
    var app = angular.module('DemoApp',[]);
    app.directive('ngGuru',function(){

    return {
        template: '<div>Angular JS Tutorial</div>'
    }
    });

</script>

</body>
</html>
Code Explanation:
- We are first creating a module for our angular application. This is required to create a custom directive because the directive will be created using this module.
- We are now creating a custom directive called "ngGuru" and defining a function which will have custom code for our directive.
Note:-
Note that when defining the directive, we have defined it as ngGuru with the letter 'G' as capital. And when we access it from our div tag as a directive we are accessing it as ng-guru. This is how angular understands custom directives defined in an application. Firstly the name of the custom directive should start with the letters 'ng'. Secondly the hyphen symbol '-' should only be mentioned when calling the directive. And thirdly the first letter following the letters 'ng' when defining the directive can be either lower or uppercase.
- We are using the template parameter which a parameter defined by Angular for custom directives. In this, we are defining that whenever this directive is used, then just use the value of the template and inject it in the calling code.
- Here we are now making use of our custom created "ng-guru" directive. When we do this, the value we defined for our template "<div>Angular JS Tutorial</div>" will now be injected here.
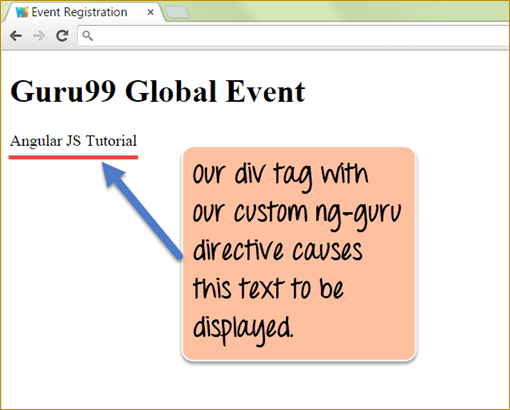
If the code is executed successfully, the following Output will be shown when you run your code in the browser.
Output:
- The above output clearly shows that our custom ng-guru directive, which has the template defined for showing a custom text gets displayed in the browser.
AngularJs Directives and Scopes
The scope is defined as the glue which binds the controller to the view by managing the data between the view and the controller.
When creating custom AngularJs directives, they by default will have access to the scope object in the parent controller.
In this way, it becomes easy for the custom directive to make use of the data being passed to the main controller.
Let's look at an example of how we can use the scope of a parent controller in our custom directive.
<!DOCTYPE html>
<html>
<head>
    <meta chrset="UTF 8">
    <title>Event Registration</title>
</head>
<body>

<script src="https://code.angularjs.org/1.6.9/angular-route.js"></script>
<script src="https://code.angularjs.org/1.6.9/angular.js"></script>
<script src="https://code.angularjs.org/1.6.9/angular.min.js"></script>
<script src="https://code.jquery.com/jquery-3.3.1.min.js"></script>

<h1> Guru99 Global Event</h1>

<div ng-app="DemoApp" ng-controller="DemoController">
    <div ng-guru=""></div>

</div>

<script type="text/javascript">

    var app = angular.module('DemoApp',[]);

    app.controller('DemoController',function($scope) {
        $scope.tutorialName = "Angular JS";

    });

        app.directive('ngGuru',function(){
        return {
         template: '<div>{{tutorialName}}</div>'
     }
    });

</script>

</body>
</html>
Code Explanation:
- We first create a controller called, "DemoController". In this, we defining a variable called tutorialName and attaching it to the scope object in one statement - $scope.tutorialName = "AngularJS".
- In our custom directive, we can call the variable "tutorialName" by using an expression. This variable would be accessible because it is defined in the controller "DemoController", which would become the parent for this directive.
- We reference the controller in a div tag, which will act as our parent div tag. Note that this needs to be done first in order for our custom directive to access the tutorialName variable.
- We finally just attach our custom directive "ng-guru" to our div tag.
If the code is executed successfully, the following Output will be shown when you run your code in the browser.
Output:
- The above output clearly shows that our custom directive "ng-guru" makes use of the scope variable tutorialName in the parent controller.
Using controllers with directives
Angular gives the facility to access the controller's member variable directly from custom directives without the need of the scope object.
This becomes necessary at times because in an application you may have multiple scope objects belonging to multiple controllers.
So there is a high chance that you could make the mistake of accessing the scope object of the wrong controller.
In such scenario's there is a way to specifically mention saying "I want to access this specific controller" from my directive.
Let's take a look at an example of how we can achieve this.
<!DOCTYPE html>
<html>
<head>
    <meta chrset="UTF 8">
    <title>Event Registration</title>
</head>
<body>

<script src="https://code.angularjs.org/1.6.9/angular-route.js"></script>
<script src="https://code.angularjs.org/1.6.9/angular.js"></script>
<script src="https://code.angularjs.org/1.6.9/angular.min.js"></script>
<script src="https://code.jquery.com/jquery-3.3.1.min.js"></script>

<h1> Guru99 Global Event</h1>

<div ng-app="DemoApp" ng-controller="DemoController">
    <div ng-guru99=""></div>

</div>

<script type="text/javascript">

    var app = angular.module('DemoApp',[]);

    app.controller('DemoController',function() {
        this.tutorialName = "Angular";

    });

     app.directive('ngGuru99',function(){
        return {
         controller: 'DemoController',

          controllerAs: 'ctrl',

          template: '{{ctrl.tutorialName}}'
     };
    });

</script>

</body>
</html>
Code Explanation:
- We first create a controller called, "DemoController". In this we will define a variable called "tutorialName" and this time instead of attaching it to the scope object, we will attach it directly to the controller.
- In our custom directive, we are specifically mentioning that we want to use the controller "DemoController" by using the controller parameter keyword.
- We create a reference to the controller using the "controllerAs" parameter. This is defined by Angular and is the way to reference the controller as a reference.
Note: -It is possible to access multiple controllers in a directive by specifying respective blocks of the controller, controllerAs and template statements.
- Finally, in our template, we are using the reference created in step 3 and using the member variable that was attached directly to the controller in Step 1.
If the code is executed successfully, the following Output will be shown when you run your code in the browser.
Output:
The output clearly shows that the custom directive is especially accessing the DemoController and the member variable tutorialName attached to it and displays the text "Angular".
How to create reusable directives
We already saw the power of custom directives, but we can take that to the next level by building our own re-usable directives.
Let's say, for example, that we wanted to inject code that would always show the below HTML tags across multiple screens, which is basically just an input for the "Name" and "age" of the user.
To reuse this function on multiple screens without coding each time, we create a master control or directive in angular to hold these controls ("Name" and "age" of the user).
So now, instead of entering the same code for the below screen every time, we can actually embed this code in a directive and embed that directive at any point in time.
Let' see an example of how we can achieve this.
<!DOCTYPE html>
<html>
<head>
<meta chrset="UTF 8">
<title>Event Registration</title>
</head>
<body>
<script src="https://code.angularjs.org/1.6.9/angular-route.js"></script>
<script src="https://code.angularjs.org/1.6.9/angular.js"></script>
<script src="https://code.angularjs.org/1.6.9/angular.min.js"></script>
<script src="https://code.jquery.com/jquery-3.3.1.min.js"></script>
<h1> Guru99 Global Event</h1>
<div ng-app="DemoApp">
<div ng-guru=""></div>
</div>
<script type="text/javascript">
var app = angular.module('DemoApp',[]);
app.directive('ngGuru',function(){
return {
template: ' Name <input type="text"><br><br> Age<input type="text">'
};
});
</script>
</body>
</html>
Code Explanation:
- In our code snippet for a custom directive, what changes is just the value which is given to the template parameter of our custom directive.
Instead of a plan five tag or text, we are actually entering the entire fragment of 2 input controls for the "Name" and "age" which needs to be shown on our page.
If the code is executed successfully, the following Output will be shown when you run your code in the browser.
Output:
From the above output, we can see that the code snippet from the template of the custom directive gets added to the page.
AngularJS Directives and components - ng-transclude
As we mentioned quite earlier, Angular is meant to extend the functionality of HTML. And we have already seen how we can have code injection by using custom re-usable directives.
But in the modern web application development, there is also a concept of developing web components. Which basically means creating our own HTML tags that can be used as components in our code.
Hence angular provides another level of power to extending HTML tags by giving the ability to inject attributes into the HTML tags itself.
This is done by the "ng-transclude" tag, which is a kind of setting to tell angular to capture everything that is put inside the directive in the markup.
Let's take an example of how we can achieve this.
<!DOCTYPE html>
<html>
<head>
    <meta chrset="UTF 8">
    <title>Event Registration</title>
</head>
<body>

<script src="https://code.angularjs.org/1.6.9/angular-route.js"></script>
<script src="https://code.angularjs.org/1.6.9/angular.js"></script>
<script src="https://code.angularjs.org/1.6.9/angular.min.js"></script>
<script src="https://code.jquery.com/jquery-3.3.1.min.js"></script>

<h1> Guru99 Global Event</h1>

<div ng-app="DemoApp">
    <pane title="{{title}}">Angular JS</pane>

</div>

<script type="text/javascript">

    var app = angular.module('DemoApp',[]);

    app.directive('pane',function(){
        return {

            transclude:true,
            scope :{title:'@'},
            template: '<div style="border: 1px solid black;"> '+
                        '<ng-transclude></ng-transclude>'+
                            '</div>'
        };
    });

</script>

</body>
</html>
Code Explanation:
- We are using the directive to define a custom HTML tag called 'pane' and adding a function which will put some custom code for this tag. In the output, our custom pane tag is going to display the text "AngularJS" in a rectangle with a solid black border.
- The "transclude" attribute has to be mentioned as true, which is required by angular to inject this tag into our DOM.
- In the scope, we are defining a title attribute. Attributes are normally defined as name/value pairs like: name="value". In our case, the name of the attribute in our pane HTML tag is "title". The "@" symbol is the requirement from angular. This is done so that when the line title={{title}} is executed in Step 5, the custom code for the title attribute gets added to the pane HTML tag.
- The custom code for the title attributes which just draws a solid black border for our control.
- Finally, we are calling our custom HTML tag along with the title attribute which was defined.
If the code is executed successfully, the following Output will be shown when you run your code in the browser.
Output:
- The output clearly shows that the title attribute of the pane html5 tag has been set to the custom value of "Angular.JS".
Nested directives
Directives in angular can be nested. Like just inner modules or functions in any programming language, you may need to embed directives within each other.
You can get a better understanding of this by seeing the below example.
In this example, we are creating 2 directives called "outer" and "inner".
- The inner directive displays a text called "Inner".
- While the outer directive actually makes a call to the inner directive to display the text called "Inner".
</head>
<body>

<script src="https://code.angularjs.org/1.6.9/angular-route.js"></script>
<script src="https://code.angularjs.org/1.6.9/angular.js"></script>
<script src="https://code.angularjs.org/1.6.9/angular.min.js"></script>
<script src="https://code.jquery.com/jquery-3.3.1.min.js"></script>

<h1> Guru99 Global Event</h1>

<div ng-app="DemoApp">
    <outer></outer>
</div>

<script type="text/javascript">

    var app = angular.module('DemoApp',[]);

    app.directive('outer',function(){
        return {

            restrict:'E',
            template: '<div><h1>Outer</h1><inner></inner></div>',
        }});

    app.directive('inner',function(){
        return {

            restrict:'E',
            template: '<div><h1>Inner</h1></div>',
        }
    });
</script>

</body>
</html>
Code Explanation:
- We are creating a directive called "outer" which will behave as our parent directive. This directive will then make a call to the "inner" directive.
- The restrict:'E' is required by angular to ensure that the data from the inner directive is available to the outer directive. The letter 'E' is the short form of the word 'Element'.
- Here we are creating the inner directive which displays the text "Inner" in a div tag.
- In the template for the outer directive (step#4), we are calling the inner directive. So over here we are injecting the template from the inner directive to the outer directive.
- Finally, we are directly calling out the outer directive.
If the code is executed successfully, the following Output will be shown when you run your code in the browser.
Output:
From the output,
- It can be seen that both the outer and inner directives have been called, and the text in both div tags are displayed.
Handling events in a directive
Events such mouse clicks or button clicks can be handled from within directives itself. This is done using the link function. The link function is what allows the directive to attach itself to the DOM elements in an HTML page.
Syntax:
The syntax of the link element is as shown below
ng-repeat
link: function ($scope, element, attrs)
The link function normally accepts 3 parameters including the scope, the element that the directive is associated with, and the attributes of the target element.
Let's look at an example of how we can accomplish this.
<!DOCTYPE html>
<html>
<head>
    <meta chrset="UTF 8">
    <title>Event Registration</title>
</head>
<body>

<script src="https://code.angularjs.org/1.6.9/angular-route.js"></script>
<script src="https://code.angularjs.org/1.6.9/angular.js"></script>
<script src="https://code.angularjs.org/1.6.9/angular.min.js"></script>
<script src="https://code.jquery.com/jquery-3.3.1.min.js"></script>

<h1> Guru99 Global Event</h1>

<div ng-app="DemoApp">
    <div ng-guru="">Click Me</div>
</div>

<script type="text/javascript">

    var app = angular.module('DemoApp',[]);

    app.directive('ngGuru',function(){
        return {

            link:function($scope,element,attrs) {
                element.bind('click',function () {
                    element.html('You clicked me');
                });}
        }});
</script>

</body>
</html>
Code Explanation:
- We are using the link function as defined in angular to give the ability of the directives to access events in the HTML DOM.
- We are using the 'element' keyword because we want to respond to an event for an HTML DOM element, which is in our case will be the "div" element. We are then using the "bind" function and saying that we want to add custom functionality to the click event of the element. The 'click' word is the keyword, which is used to denote the click event of any HTML control. For example, the HTML button control has the click event. Since, in our example, we want to add a custom code to the click event of our "dev" tag, we use the 'click' keyword.
- Here we are saying that we want to substitute the inner HTML of the element (in our case the div element) with the text 'You clicked me!'.
- Here we are defining our div tag to use the ng-guru custom directive.
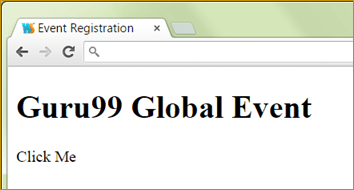
If the code is executed successfully, the following Output will be shown when you run your code in the browser.
Output:
- Initially the text 'Click Me' will be shown to the user because this is what has been initially defined in the div tag. When you actually click on the div tag, the below output will be shown
Summary
- One can also create a custom directive which can be used to inject code in the main angular application.
- Custom directives can be made to call members defined in the scope object in a certain controller by using the 'Controller', 'controllerAs' and 'template' keywords.
- Directives can also be nested to provide embedded functionality which may be required depending on the need of the application.
- Directives can also be made re-usable so that they can be used to inject common code that could be required across various web applications.
- Directives can also be used to create custom HTML tags which would have their own functionality defined as per the business requirement.
- Events can also be handled from within directives to handle DOM events such as button and mouse clicks.


