
Introduction to Angular Bootstrap Datepicker
The bootstrap has many advanced components and classes to make application user friendly. The angular make reduces the size of code in a one-page format to make web application lightweight. The combination of angular and bootstrap for date picker is useful and easy for users and developers. The angular bootstrap datepicker is an advanced feature for picking the date in web applications. It is choosing the date, month, and year as per user’s requirements. We can able to pick the date range from start to end dates. It allows choosing the local language in datepicker and change the color of the calendar. It is supported by the manual trigger of datepicker and position of datepicker.
Syntax
The angular bootstrap datepicker used angular and bootstrap technology.
The basic angular bootstrap datepicker syntax is below.
Bootstrap syntax is below:
<div class= "container">
Date: <input type="text"  placeholder="Datepicker"
class="form-control" bsDatepicker><br>
</div>
Component.ts syntax is below:
import {Component} from '@angular/core';
@Component({
selector : ' basic-demo-datepicker ',
templateUrl : ' ./datepickerdeo.html '
})
export class BasicDemoDatepickerComponent {
title = 'datepickerApp';
}
How does Bootstrap Datepicker works?
Given below is the working:
Step 1: Two methods to install bootstrap in angular
Given below are the two methods to install bootstrap in angular:
Method 1: This method is using NPM.
- The ngx-bootstrap installs through the npm.
Code:
npm install ngx-bootstrap --save- The bootstrap CSS stylesheet adds to the HTML page. We can use bootstrap3 or bootstrap4 stylesheet.
<link href=https://maxcdn.bootstrapcdn.com/bootstrap/3.3.7/css/bootstrap.min.css
rel="stylesheet">
Method 2: This method is using Angular CLI.
- The ngx-bootstrap dependencies add using Angular CLI.
ng addngx-bootstrap- The ngx-bootstrap component dependencies add using Angular CLI.
ng addngx-bootstrap --component component_name- The angular bootstrap datepicker component is below.
ng addngx-bootstrap --component datepickerStep 2: Two methods to install CSS in angular
Given below are the two methods to install CSS in angular:
Method 1: The CDN bootstrap datepicker file load in HTML file.
<link rel="stylesheet" href="https://unpkg.com/ngx-bootstrap/datepicker/bs-datepicker.css">Method 2: Load the file in the angular node_module folder like angular CLI.
node_modules/ngx-bootstrap/datepicker/bs-datepicker.css
Step 3: The filename.html code
Code:
<div class = "container">
Date: <input type="text"  placeholder="Datepicker"
class="form-control" bsDatepicker><br>
</div>
Step 4: There component file code
Code:
import {Component} from ' @angular/core ';
@Component({
selector : ' basic-demo-datepicker ',
templateUrl : ' ./filename.html '
})
export class BasicDemoDatepickerComponent {
title = 'datepickerApp';
}
Examples
Given below are the examples mentioned:
Example #1
Html file (filename.html)
Code:
<!doctypehtml>
<html>
<head>
<meta charset ="utf-8">
<title> Angular Bootstrap Datepicker tutorial </title>
<base href="/">
<meta name ="viewport" content ="width=device-width, initial-scale=1">
<link rel ="icon" type ="image/x-icon" href ="favicon.ico">
<link rel ="stylesheet" href ="https://unpkg.com/ngx-bootstrap/datepicker/bs-datepicker.css">
<link href = https://maxcdn.bootstrapcdn.com/bootstrap/3.3.7/css/bootstrap.min.css rel ="stylesheet">
</head>
<body>
<div class ="container">
<div class ="form-group">
<input type ="text" placeholder ="DatePicker" class = "form-control" bsDatepicker>
</div>
</div>
</body>
</html>
Component file (app.component.ts)
Code:
import {Component} from ' @angular/core ';
@Component({
selector : ' basic-demo-datepicker ',
templateUrl : ' ./filename.html '
})
export class BasicDemoDatepickerComponent {
title = 'datepickerApp';
}
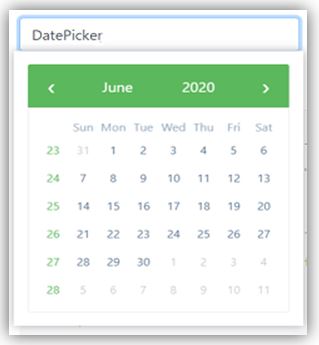
Output:
Example #2
The Basic Angular Bootstrap Daterangepicker example and output are below.
Html file (filename.html)
Code:
<!doctypehtml>
<html>
<head>
<meta charset ="utf-8">
<title> Angular Bootstrap Datepicker tutorial </title>
<base href="/">
<meta name ="viewport" content ="width=device-width, initial-scale=1">
<link rel ="icon" type ="image/x-icon" href ="favicon.ico">
<link rel ="stylesheet" href ="https://unpkg.com/ngx-bootstrap/datepicker/bs-datepicker.css">
<link href = https://maxcdn.bootstrapcdn.com/bootstrap/3.3.7/css/bootstrap.min.css rel ="stylesheet">
</head>
<body>
<div class ="container">
<div class ="form-group">
<input type ="text" placeholder ="DatePicker" class = "form-control"bsDaterangepicker>
</div>
</div>
</body>
</html>
Component file (app.component.ts)
Code:
import {Component} from ' @angular/core ';
@Component({
selector : ' basic-demo-datepicker ',
templateUrl : ' ./filename.html '
})
export class BasicDemoDatepickerComponent {
title = 'datepickerApp';
}
Output:

Example #3
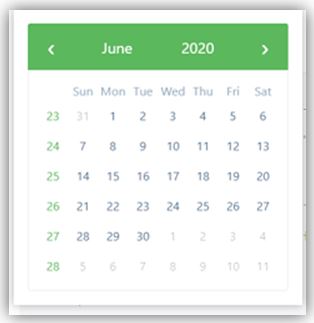
Used bsInlineValue property for set calendar default.
Html file (filename. html)
Code:
<!doctype html>
<html>
<head>
<meta charset ="utf-8">
<title> Angular Bootstrap Datepicker tutorial </title>
<base href="/">
<meta name ="viewport" content ="width=device-width, initial-scale=1">
<link rel ="icon" type ="image/x-icon" href ="favicon.ico">
<link rel ="stylesheet" href ="https://unpkg.com/ngx-bootstrap/datepicker/bs-datepicker.css">
<link href = https://maxcdn.bootstrapcdn.com/bootstrap/3.3.7/css/bootstrap.min.css rel ="stylesheet">
</head>
<body>
<div class ="container">
<bs-datepicker-inline [bsValue]="bsInlineValue">
</bs-datepicker-inline>
</div>
</body>
</html>
Component file (app.component.ts)
Code:
import {Component} from ' @angular/core ';
@Component({
selector : ' inline-demo-datepicker ',
templateUrl : ' ./filename.component.html '
})
export class InlineDemoDatepickerComponent {
title = 'datepickerApp';
bsInlineValue = new Date();
bsInlineRangeValue: Date[];
maxDate = new Date();
constructor() {
this.maxDate.setDate(this.maxDate.getDate() + 7);
this.bsInlineRangeValue = [this.bsInlineValue, this.maxDate];
}
}
Output:
Example #4
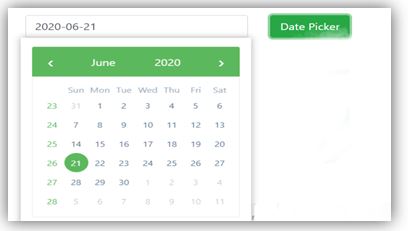
The date format set by angular bootstrap datepicker.
Html file (filename. html)
Code:
<!doctypehtml>
<html>
<head>
<meta charset ="utf-8">
<title> Angular Bootstrap Datepicker tutorial </title>
<base href="/">
<meta name ="viewport" content ="width=device-width, initial-scale=1">
<link rel ="icon" type ="image/x-icon" href ="favicon.ico">
<link rel ="stylesheet" href ="https://unpkg.com/ngx-bootstrap/datepicker/bs-datepicker.css">
<link href = https://maxcdn.bootstrapcdn.com/bootstrap/3.3.7/css/bootstrap.min.css rel ="stylesheet">
</head>
<body>
<div class ="container">
<form [formGroup]="form">
<div class="row">
<div class=" form-group">
<input
Class="form-control"
#datepickerYMD="bsDatepicker"
bsDatepicker
formControlName="dateYMD"
[bsConfig]="{ dateInputFormat: 'YYYY-MM-DD' }">
</div>
<div class=" form-group">
<button class="btnbtn-success" (click)="datepickerYMD.toggle()" [attr.aria-expanded]="datepickerYMD.isOpen" type="button">Date Picker</button>
</div>
</div>
<br>
<div class="row">
<div class=" form-group">
<input
Class="form-control"
#datepickerMDY="bsDatepicker"
bsDatepicker
formControlName="dateMDY"
[bsConfig]="{ dateInputFormat: 'MM/DD/YYYY' }">
</div>
<div class=" form-group">
<button class="btnbtn-success"
(click)="datepickerFull.toggle()" [attr.aria-expanded]="datepickerFull.isOpen" type="button">Date Picker</button>
</div>
</div>
</form>
</div>
</body>
</html>Component file (app.component.ts)
Code:
import {Component} from ' @angular/core ';
import { FormControl, FormGroup } from '@angular/forms';
@Component({
selector : ' format-demo-datepicker ',
templateUrl : ' ./filename.html '
})
export class FormatDemoDatepickerComponent {
title = 'datepickerApp';
currentDate = new Date();
form = new FormGroup({
dateYMD: new FormControl(new Date()),
dateFull: new FormControl(new Date()),
dateMDY: new FormControl(new Date()),
dateRange: new FormControl([
new Date(),
new Date(this.currentDate.setDate(this.currentDate.getDate() + 7))
])
});}
Output:

Example #5
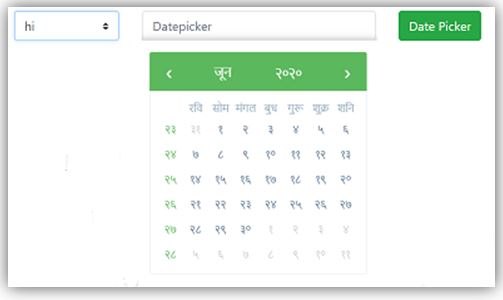
The local language select for displaying the date picker using angular and bootstrap.
Html file (filename.html)
Code:
<!doctypehtml>
<html>
<head>
<meta charset ="utf-8">
<title> Angular Bootstrap Datepicker tutorial </title>
<base href="/">
<meta name ="viewport" content ="width=device-width, initial-scale=1">
<link rel ="icon" type ="image/x-icon" href ="favicon.ico">
<link rel ="stylesheet" href ="https://unpkg.com/ngx-bootstrap/datepicker/bs-datepicker.css">
<link href = https://maxcdn.bootstrapcdn.com/bootstrap/3.3.7/css/bootstrap.min.css rel ="stylesheet">
</head>
<body>
<div class ="container">
<div class ="form-group">
<select
Class = "custom-select form-control "
[(ngModel)] = "locale" (ngModelChange) = "applyLocale(dp);">
<option *ngFor = "let loc of locales" [value] = "loc">      {{ loc }} </option>
</select>
</div>
<div class= " form-group">
<input placeholder= "Datepicker" type= "text" class= "form-control" bsDatepicker #dp= "bsDatepicker">
</div>
<div class= " form-group">
<button class= "btnbtn-success" (click)= "dp.show()" [attr.aria-expanded]= "dp.isOpen" type= "button">
Date Picker </button>
</div>
</div>
</div>
</body>
</html>
Component file (app.component.ts)
Code:
import {Component} from ' @angular/core ';
import { BsLocaleService } from 'ngx-bootstrap/datepicker';
import { listLocales } from 'ngx-bootstrap/chronos';
@Component({
selector : ' basic-demo-datepicker ',
templateUrl : ' ./filename.html '
})
export class BasicDemoDatepickerComponent {
title = 'datepickerApp';
locale = 'hi';
locales = listLocales();
constructor(private localeService: BsLocaleService) {}
applyLocale(pop: any) {
this.localeService.use(this.locale);
pop.hide();
pop.show();
}
}
Output:
Conclusion
The angular bootstrap datepicker reduces coding size and makes it easy for the coder. It is light weighed due to a one-page script application. It is advance, user friendly, and attractive web application component.

