Users Online
· Guests Online: 32
· Members Online: 0
· Total Members: 188
· Newest Member: meenachowdary055
· Members Online: 0
· Total Members: 188
· Newest Member: meenachowdary055
Forum Threads
Newest Threads
No Threads created
Hottest Threads
No Threads created
Latest Articles
Articles Hierarchy
032 Java Android Program to Demonstrate an Adapter
Java Android Program to Demonstrate an Adapter
This Android Java Program lets you create an Adapter in an Application.
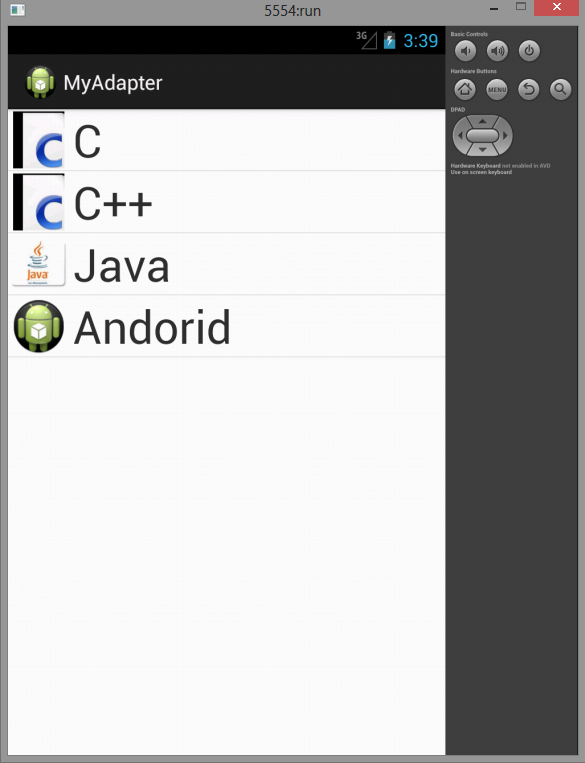
Here is source code of the Program to create an Adapter in an Application. The program is successfully compiled and run on a Windows system using Eclipse Ide. The program output is also shown below.
Adapter

Adapters are used to bind data to View Groups that extend the AdapterView class (such as List
View or Gallery). Adapters are responsible for creating child Views that represent the underlying
data within the bound parent View.(Reto Meier)
Adapters are generally used in providing data to the ListView object. The adapter also defines how each row is the ListView is displayed.
An Adapter can be assigned to a listview via the setAdapter method call on the listview object.
Android provides some standard adapters, the most important are ArrayAdapter and SimpleCursorAdapter.
1.ArrayAdapter — The Array Adapter uses generics to bind an Adapter View to an array of objects of the specified class. By default, the Array Adapter uses the toString value of each object in the array to create and populate Text Views. Alternative constructors enable you to use more complex layouts, or you can extend the class (as shown in the next section) to bind data to more complicated layouts.
2.SimpleCursorAdapter — The Simple Cursor Adapter enables you to bind the Views within a layout to specifi c columns contained within a Cursor (typically returned from a Content Provider query). You specify an XML layout to infl ate and populate to display each child, and then bind each column in the Cursor to a particular View within that layout. The adapter will create a new View for each Cursor entry and inflate the layout
into it, populating each View within the layout using the Cursor’s corresponding column value.
This class focuses on the ArrayAdapter part.
You can either use the pre-defined custom Adapter in android or u can Override/extend the ArrayAdapter class to create your own adapter.
While creating your own adapter u need to extend the ArrayAdapter class and override the getView method , note this is the method where all magic happens.
The getView method is used to construct, inflate, and populate the View that will be added to the parent Adapter View class (e.g., List View), which is being bound to the underlying array using this Adapter.
The getView method receives parameters that describe the position of the item to be displayed, the View being updated (or null), and the View Group into which this new View will be placed. A call to getItem will return the value stored at the specified index in the underlying array.
Now here is an implementation of Adapter in android.
Main Activity
package com.example.myadapter;
import android.os.Bundle;
import android.app.Activity;
import android.app.ListActivity;
import android.view.Menu;
public class MainActivity extends ListActivity {
@Override
protected void onCreate(Bundle savedInstanceState) {
// TODO Auto-generated method stub
super.onCreate(savedInstanceState);
String str[] = new String[] { "C", "C++", "Java", "Andorid" };
MyAdapter adapter = new MyAdapter(this, str);
setListAdapter(adapter);
}
}
MyAdapter
package com.example.myadapter;
import android.content.Context;
import android.view.LayoutInflater;
import android.view.View;
import android.view.ViewGroup;
import android.widget.ArrayAdapter;
import android.widget.ImageView;
import android.widget.TextView;
public class MyAdapter extends ArrayAdapter {
private final Context context;
private final String[] var;
public MyAdapter(Context context, String[] var) {
super(context, R.layout.rowlayout, var);
// TODO Auto-generated constructor stub
this.context = context;
this.var = var;
}
@Override
public View getView(int position, View convertView, ViewGroup parent) {
// TODO Auto-generated method stub
LayoutInflater li = (LayoutInflater) context
.getSystemService(Context.LAYOUT_INFLATER_SERVICE);
View row = li.inflate(R.layout.rowlayout, parent, false);
TextView text = (TextView) row.findViewById(R.id.label);
ImageView img = (ImageView) row.findViewById(R.id.icon);
text.setText(var[position]);
String s = var[position];
if (s.startsWith("C")) {
img.setImageResource(R.drawable.c_pic);
}
else if(s.startsWith("Java")){
img.setImageResource(R.drawable.java);
}
else if(s.startsWith("Android")){
img.setImageResource(R.drawable.ic_launcher);
}
else{
//c++
img.setImageResource(R.drawable.c_prog);
}
return row;
}
}
RowLayout.xml
<?xml version="1.0" encoding="utf-8"?>
<LinearLayout xmlns:android="http://schemas.android.com/apk/res/android"
android:layout_width="wrap_content"
android:layout_height="wrap_content" >
<ImageView
android:id="@+id/icon"
android:layout_width="100px"
android:layout_height="100px"
android:layout_marginLeft="4px"
android:layout_marginRight="10px"
android:layout_marginTop="4px"
android:src="@drawable/ic_launcher" >
</ImageView>
<TextView
android:id="@+id/label"
android:layout_width="wrap_content"
android:layout_height="wrap_content"
android:text="@+id/label"
android:textSize="80px" >
</TextView>
</LinearLayout>

This Android Java Program lets you create an Adapter in an Application.
Here is source code of the Program to create an Adapter in an Application. The program is successfully compiled and run on a Windows system using Eclipse Ide. The program output is also shown below.
Adapter

Adapters are used to bind data to View Groups that extend the AdapterView class (such as List
View or Gallery). Adapters are responsible for creating child Views that represent the underlying
data within the bound parent View.(Reto Meier)
Adapters are generally used in providing data to the ListView object. The adapter also defines how each row is the ListView is displayed.
An Adapter can be assigned to a listview via the setAdapter method call on the listview object.
Android provides some standard adapters, the most important are ArrayAdapter and SimpleCursorAdapter.
1.ArrayAdapter — The Array Adapter uses generics to bind an Adapter View to an array of objects of the specified class. By default, the Array Adapter uses the toString value of each object in the array to create and populate Text Views. Alternative constructors enable you to use more complex layouts, or you can extend the class (as shown in the next section) to bind data to more complicated layouts.
2.SimpleCursorAdapter — The Simple Cursor Adapter enables you to bind the Views within a layout to specifi c columns contained within a Cursor (typically returned from a Content Provider query). You specify an XML layout to infl ate and populate to display each child, and then bind each column in the Cursor to a particular View within that layout. The adapter will create a new View for each Cursor entry and inflate the layout
into it, populating each View within the layout using the Cursor’s corresponding column value.
This class focuses on the ArrayAdapter part.
You can either use the pre-defined custom Adapter in android or u can Override/extend the ArrayAdapter class to create your own adapter.
While creating your own adapter u need to extend the ArrayAdapter class and override the getView method , note this is the method where all magic happens.
The getView method is used to construct, inflate, and populate the View that will be added to the parent Adapter View class (e.g., List View), which is being bound to the underlying array using this Adapter.
The getView method receives parameters that describe the position of the item to be displayed, the View being updated (or null), and the View Group into which this new View will be placed. A call to getItem will return the value stored at the specified index in the underlying array.
Now here is an implementation of Adapter in android.
Main Activity
package com.example.myadapter;
import android.os.Bundle;
import android.app.Activity;
import android.app.ListActivity;
import android.view.Menu;
public class MainActivity extends ListActivity {
@Override
protected void onCreate(Bundle savedInstanceState) {
// TODO Auto-generated method stub
super.onCreate(savedInstanceState);
String str[] = new String[] { "C", "C++", "Java", "Andorid" };
MyAdapter adapter = new MyAdapter(this, str);
setListAdapter(adapter);
}
}
MyAdapter
package com.example.myadapter;
import android.content.Context;
import android.view.LayoutInflater;
import android.view.View;
import android.view.ViewGroup;
import android.widget.ArrayAdapter;
import android.widget.ImageView;
import android.widget.TextView;
public class MyAdapter extends ArrayAdapter
private final Context context;
private final String[] var;
public MyAdapter(Context context, String[] var) {
super(context, R.layout.rowlayout, var);
// TODO Auto-generated constructor stub
this.context = context;
this.var = var;
}
@Override
public View getView(int position, View convertView, ViewGroup parent) {
// TODO Auto-generated method stub
LayoutInflater li = (LayoutInflater) context
.getSystemService(Context.LAYOUT_INFLATER_SERVICE);
View row = li.inflate(R.layout.rowlayout, parent, false);
TextView text = (TextView) row.findViewById(R.id.label);
ImageView img = (ImageView) row.findViewById(R.id.icon);
text.setText(var[position]);
String s = var[position];
if (s.startsWith("C")) {
img.setImageResource(R.drawable.c_pic);
}
else if(s.startsWith("Java")){
img.setImageResource(R.drawable.java);
}
else if(s.startsWith("Android")){
img.setImageResource(R.drawable.ic_launcher);
}
else{
//c++
img.setImageResource(R.drawable.c_prog);
}
return row;
}
}
RowLayout.xml
<?xml version="1.0" encoding="utf-8"?>
<LinearLayout xmlns:android="http://schemas.android.com/apk/res/android"
android:layout_width="wrap_content"
android:layout_height="wrap_content" >
<ImageView
android:id="@+id/icon"
android:layout_width="100px"
android:layout_height="100px"
android:layout_marginLeft="4px"
android:layout_marginRight="10px"
android:layout_marginTop="4px"
android:src="@drawable/ic_launcher" >
</ImageView>
<TextView
android:id="@+id/label"
android:layout_width="wrap_content"
android:layout_height="wrap_content"
android:text="@+id/label"
android:textSize="80px" >
</TextView>
</LinearLayout>

Comments
No Comments have been Posted.
Post Comment
Please Login to Post a Comment.

