
Introduction to Bootstrap Drag and Drop
The drag and drop in bootstrap also known as a draggable plugin. It is a graphical user interface. The drag and drop point the web element and move on the web application page using a pointer. The drag and drop need card class and draggable method in JavaScript. Drag and drop are animated content parts of web applications for attractive design purposes. The web element moves the required position of web pages using a mouse or pointer.
Syntax
The drag and drop syntax not only depends on bootstrap but also JavaScript. There is a way of getting drag and drop elements using three methods.
- For dragging the element, we are using the below tags and classes.
draggable ="true"
ondragstart = "dragStart (event)"- For dropping the element, we are using the below tags and classes.
ondrop ="dragDrop(event)" .
ondragover ="allowDrop(event)".- In JavaScript below methods are used for drag and drop elements.
function allowDrop (ev){..}
function dragStart (ev) {..}
function dragDrop (ev) {..}
How Does Drag and Drop Work in Bootstrap?
In JavaScript drag, drop methods used which are below. There are three methods used in javaScript.
- function allowDrop (ev){..} – This is used to allow the position to drop the elements.
- function dragStart (ev) {..} – This is used to choose the element for grabbing or dragging.
- function dragDrop (ev) {..} – This is used to set the position to drop the elements.
<script>
function allowDrop (ev) {
ev.preventDefault();
}
function dragStart (ev) {
ev.dataTransfer.setData ("text",  ev.target.id);
}
function dragDrop (ev) {
ev.preventDefault ();
var data =  ev.dataTransfer.getData ("text");
ev.target.appendChild (document.getElementById(data));
}
</script>- In bootstrap, we are using draggable tags and other classes.
- There are two parts: one is drag element and the second is drop element.
- The draggable tag must be true.
- The ondragstart tag used for dragging the elements. The dragStart(event) helps to set data for dragging.
- The ondrop is used to drop the elements in this position.
- The ondragover elements used to set the endpoint or position of dragging elements.
<div id= "colm2" draggable = "true" ondragstart = "dragStart (event)">
</div>
<div id= "colm3" ondrop = "dragDrop(event)" ondragover = "allowDrop(event)">
</div>
Examples
Here are the following examples mentioned below.
Example #1
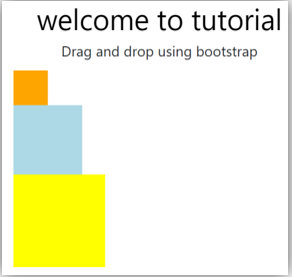
The smaller boxes drag and drop in larger boxes using bootstrap, javascript, and CSS.
Code:
<!DOCTYPE html>
<html>
<head>
<title> Bootstrap Drag and drop Example </title>
<meta charset ="utf-8">
<meta name ="viewport" content ="width=device-width, initial-scale=1">
<link rel ="stylesheet" href= "https://maxcdn.bootstrapcdn.com/bootstrap/4.4.1/css/bootstrap.min.css">
<script src= "https://ajax.googleapis.com/ajax/libs/jquery/3.4.1/jquery.min.js">
</script>
<script src= "https://cdnjs.cloudflare.com/ajax/libs/popper.js/1.16.0/umd/popper.min.js">
</script>
<script src= "https://maxcdn.bootstrapcdn.com/bootstrap/4.4.1/js/bootstrap.min.js">
</script>
<script>
function allowDrop (ev) {
ev.preventDefault();
}
function dragStart (ev) {
ev.dataTransfer.setData ("text",  ev.target.id);
}
function dragDrop (ev) {
ev.preventDefault ();
var data =  ev.dataTransfer.getData ("text");
ev.target.appendChild (document.getElementById(data));
}
</script>
<style>
#colm1 {
width: 60px;
height: 60px;
background-color: orange;
}
#colm2 {
width: 120px;
height: 120px;
background-color: lightblue;
}
#colm3 {
width: 160px;
height: 160px;
background-color: yellow;
}
p {
font-size:25px;
text-align:center;
}
.main {
font-size:50px;
color:black;
text-align:center;
}
</style>
</head>
<body>
<div class= "container">
<div class = "main"> welcome to tutorial </div>
<p> Drag and drop using bootstrap </p>
<div id = "colm">
<div id="colm1" draggable ="true"  ondragstart = "dragStart (event)">
</div>
<div id= "colm2" draggable = "true" ondragstart = "dragStart (event)">
</div>
<div id= "colm3" ondrop = "dragDrop(event)" ondragover = "allowDrop(event)">
</div>
</div>
</div>
</body>
</html>
Output Before Drag and Drop
Output After Drag and Drop

Example #2
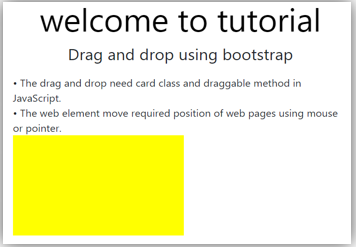
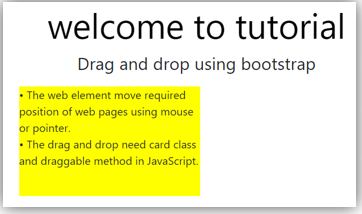
The simple text drag and drop into the yellow box.
Code:
<!DOCTYPE html>
<html>
<head>
<title> Bootstrap Drag and drop Example </title>
<meta charset ="utf-8">
<meta name ="viewport" content= "width=device-width, initial-scale=1">
<link rel=  "stylesheet" href= "https://maxcdn.bootstrapcdn.com/bootstrap/4.4.1/css/bootstrap.min.css">
<script src= "https://ajax.googleapis.com/ajax/libs/jquery/3.4.1/jquery.min.js">
</script>
<script src= "https://cdnjs.cloudflare.com/ajax/libs/popper.js/1.16.0/umd/popper.min.js">
</script>
<script src= "https://maxcdn.bootstrapcdn.com/bootstrap/4.4.1/js/bootstrap.min.js">
</script>
<script>
function allowDrop (ev) {
ev.preventDefault();
}
function dragStart (ev) {
ev.dataTransfer.setData ("text", ev.target.id);
}
function dragDrop (ev) {
ev.preventDefault ();
var data = ev.dataTransfer.getData ("text");
ev.target.appendChild(document.getElementById(data));
}
</script>
<style>
#colm3 {
width: 260px;
height: 160px;
background-color:  yellow;
}
p {
font-size:25px;
text-align:center;
}
.main {
font-size: 50px;
color: black;
text-align: center;
}
</style>
</head>
<body>
<div class="container">
<div class = "main"> welcome to tutorial </div>
<p> Drag and drop using bootstrap </p>
<div id = "colm">
<div id="colm1" draggable ="true" ondragstart ="dragStart(event)"> •       The drag and drop need card class and draggable method in JavaScript.  </div>
<div id="colm2" draggable ="true" ondragstart ="dragStart(event)"> •       The web element move required position of web pages using mouse or pointer.
</div>
<div id="colm3" ondrop ="dragDrop(event)" ondragover ="allowDrop(event)">
</div>
</div>
</div>
</body>
</html>
Output Before Drag and Drop
Output After Drag and Drop
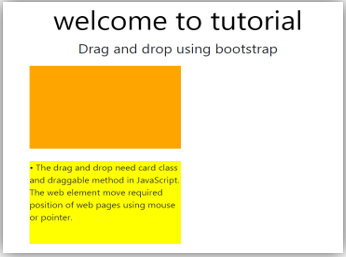
Example #3
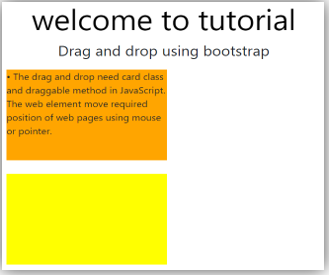
The content drag from one orange box and drop in the yellow box.
Code:
<!DOCTYPE html>
<html>
<head>
<title> Bootstrap Drag and drop Example </title>
<meta charset ="utf-8">
<meta name ="viewport" content= "width=device-width, initial-scale=1">
<link rel=  "stylesheet" href= "https://maxcdn.bootstrapcdn.com/bootstrap/4.4.1/css/bootstrap.min.css">
<script src= "https://ajax.googleapis.com/ajax/libs/jquery/3.4.1/jquery.min.js">
</script>
<script src= "https://cdnjs.cloudflare.com/ajax/libs/popper.js/1.16.0/umd/popper.min.js">
</script>
<script src= "https://maxcdn.bootstrapcdn.com/bootstrap/4.4.1/js/bootstrap.min.js">
</script>
<script>
function allowDrop (ev) {
ev.preventDefault();
}
function dragStart (ev) {
ev.dataTransfer.setData ("text", ev.target.id);
}
function dragDrop (ev) {
ev.preventDefault ();
var data = ev.dataTransfer.getData ("text");
ev.target.appendChild(document.getElementById(data));
}
</script>
<style>
#colmm {
width: 260px;
height: 160px;
background-color:  orange;
}
#colm3 {
width: 260px;
height: 160px;
background-color:  yellow;
}
p {
font-size:25px;
text-align:center;
}
.main {
font-size: 50px;
color: black;
text-align: center;
}
</style>
</head>
<body>
<div class="container">
<div class = "main"> welcome to tutorial </div>
<p> Drag and drop using bootstrap </p>
<div id = "colm">
<div id = "colmm">
<div id="colm1" draggable ="true" ondragstart ="dragStart(event)"> •            The drag and drop need card class and draggable method in JavaScript.
The web element move required position of web pages using mouse or pointer.
</div>
</div> <br>
<div id="colm3" ondrop ="dragDrop(event)" ondragover ="allowDrop(event)">
</div>
</div>
</div>
</body>
</html>
Output Before Drag and Drop
Output After Drag and Drop
Conclusion
- The drag and drop in bootstrap is one of the animated parts of web applications.
- This is used for listing and sorting the many content part according to requirements.
- It makes web application more attractive and interesting for web applications.

