Users Online
· Members Online: 0
· Total Members: 188
· Newest Member: meenachowdary055
Forum Threads
Latest Articles
Articles Hierarchy
How you can use WebSockets with Flutter
How you can use WebSockets with Flutter
WebSockets are clearly taking the industry by storm. With Google's Flutter framework on the rise too, it would give you a big boost knowing how to integrate both of these technologies.
What are WebSockets
WebSockets represent a long-awaited evolution in the client/server web technology. It defines a fully duplex bi-directional communication channel between the client and server.
In simple words, once after the initial handshake where the server and the client agree to upgrade to WebSockets, (from HTTP) the client and the server can talk in real time without having to continuously make requests (like loading the page again and again).
Only the client-side problems of developing a dependable WebSocket-based solution for realtime Flutter apps are discussed in this article. On the server side, you must determine which solution you wish to utilise. You can use an open-source library like Socket.IO if you haven't already.
How to connect to a WebSocket server with Flutter
web_socket_channel package
We will use this package to acquire the tools we need to connect to a WebSocket server.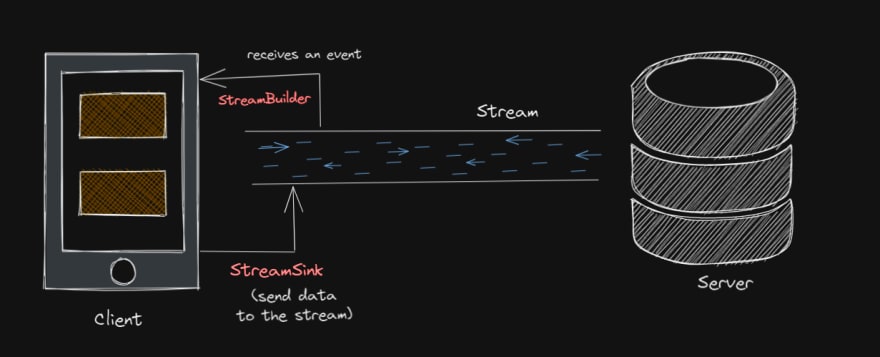
- The
web_socket_channelbasically works with the StreamChannel class, which is an abstract class representing a two-way communication channel (as in the case for WebSockets) - Each
StreamChannelexposes aStreamfor receiving data. AStreamis like a pipe, you put a value on the one end and if there’s a listener on the other end that listener will receive that value. - It also exposes
StreamSinkused to push messages to the server.
In short words, the package allows you to both listen for messages from the server and push messages to the server i.e fully duplex bi-directional communication channel.
Installation
Follow the installation given here:
https://pub.dev/packages/web_socket_channel/install
Basic Idea
-
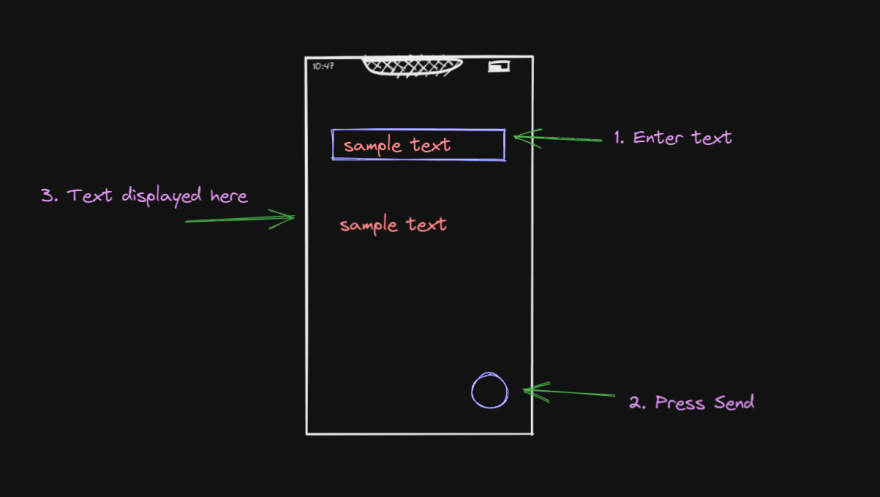
We'd have a textfield in our app where the user could type a message. The data that we input would be displayed on the screen after pressing a button.
-
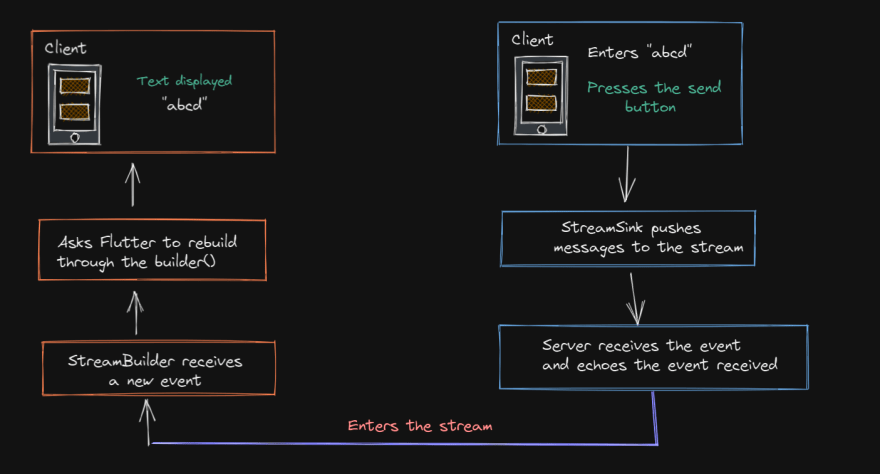
The data displayed comes from the server response, which is an echo server in this case, meaning it sends back what it receives. These servers are used to determine whether or not a connection to a server is successful. Here we would be using them to maintain simplicity for this example.
Here is the boiler plate we will be using:
| import 'package:flutter/material.dart'; | |
| import 'package:web_socket_channel/web_socket_channel.dart'; | |
| import 'package:web_socket_channel/io.dart'; | |
| void main() => runApp(new MyApp()); | |
| class MyApp extends StatelessWidget { | |
| @override | |
| Widget build(BuildContext context) { | |
| return MaterialApp( | |
| home: MyHomePage(), | |
| ); | |
| } | |
| } | |
| class MyHomePage extends StatefulWidget { | |
| @override | |
| MyHomePageState createState() { | |
| return MyHomePageState(); | |
| } | |
| } | |
| class MyHomePageState extends State<MyHomePage> { | |
| TextEditingController _controller = TextEditingController(); | |
| @override | |
| Widget build(BuildContext context) { | |
| return Scaffold( | |
| appBar: AppBar( | |
| title: Text("WebSocket Example"), | |
| ), | |
| body: Padding( | |
| padding: const EdgeInsets.all(20.0), | |
| child: Column( | |
| crossAxisAlignment: CrossAxisAlignment.start, | |
| children: <Widget>[ | |
| Form( | |
| child: TextFormField( | |
| decoration: InputDecoration(labelText: "Send message to the server"), | |
| controller: _controller, | |
| ), | |
| ), | |
| ], | |
| ), | |
| ), | |
| floatingActionButton: FloatingActionButton( | |
| child: Icon(Icons.send), | |
| onPressed: sendData, | |
| ), | |
| ); | |
| } | |
| } |
How to connect to server
First let us connect to a WebSocket server. As discussed above we will be using an echo webSocket server.
WebSocketChannel channel = IOWebSocketChannel.connect("wss://ws.ifelse.io/");
WebSocketChannel: A StreamChannel (class representing a two-way communication) that communicates over a WebSocket.IOWebSocketChannel: A WebSocketChannel that communicates using adart:ioWebSocket.IOWebSocketChannel.connect: Creates a new WebSocket connection and connects tourlusing WebSocket.connect and returns a channel that can be used to communicate over the resulting socket.- Here
wss://ws.ifelse.io/is an echo WebSocket server. Please note that the mostly used echo serverws://echo.websocket.orgis no longer in service.
| class MyHomePage extends StatefulWidget { | |
| WebSocketChannel channel = IOWebSocketChannel.connect("wss://ws.ifelse.io/"); | |
| @override | |
| MyHomePageState createState() { | |
| return MyHomePageState(); | |
| } | |
| } | |
| class MyHomePageState extends State<MyHomePage> { | |
| TextEditingController _controller = TextEditingController(); | |
| @override | |
| Widget build(BuildContext context) { | |
| //.....same code as gist (1) |
How to listen to the server
- Now that we’ve established a connection, let us listen to messages from the server.
- After sending a message to the test server, it sends the same message back (echo).
- We will use a
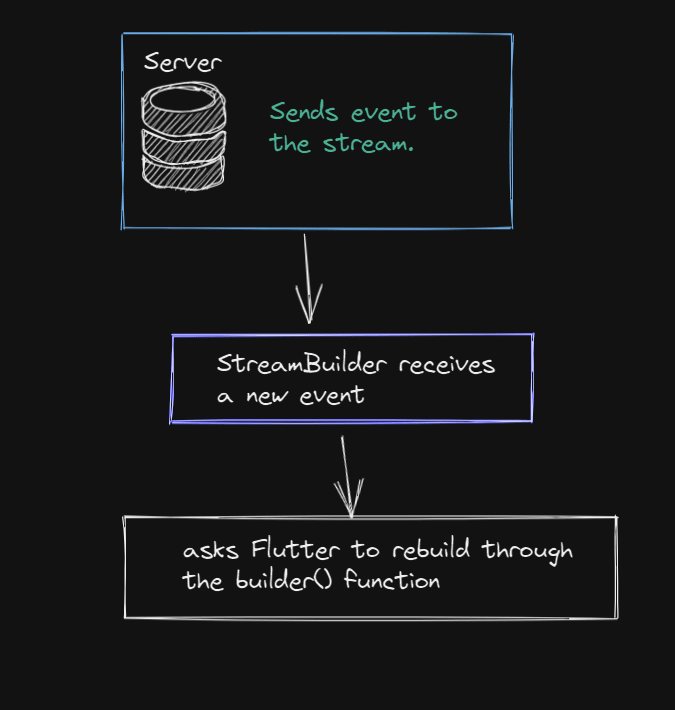
StreamBuilderwidget to listen for new messages, and aTextwidget to display them. - A StreamBuilder:
- Can listen to exposed streams.
- Return widgets
- Catch snapshots of got stream information.
StreamBuilder(
  stream: widget.channel.stream,
  builder: (context, snapshot) {
    return Padding(
      padding: const EdgeInsets.all(20.0),
  child: Text(snapshot.hasData ? '${snapshot.data}' : ''),
  );
  },
)
Watch this video to get a better idea about StreamBuilder:
How to Send data to the server
We will add a function sendData() responsible for sending data to the stream whenever the floating button is pressed.
void sendData() {
  if (_controller.text.isNotEmpty) {
    widget.channel.sink.add(_controller.text);
  }
}
channel.sink.add(): for sending values to the other endpoint of the stream (i.e the server) using the sink property of the WebSocketChannel.- To make sure we are printing not empty data we add a
How to close the connection?
Using the close method we can disconnect from the server.
void dispose() {
  widget.channel.sink.close();
 super.dispose();
}
Final Code
| import 'package:flutter/material.dart'; | |
| import 'package:web_socket_channel/web_socket_channel.dart'; | |
| import 'package:web_socket_channel/io.dart'; | |
| void main() => runApp(new MyApp()); | |
| class MyApp extends StatelessWidget { | |
| @override | |
| Widget build(BuildContext context) { | |
| return MaterialApp( | |
| home: MyHomePage(), | |
| ); | |
| } | |
| } | |
| class MyHomePage extends StatefulWidget { | |
| WebSocketChannel channel = IOWebSocketChannel.connect("wss://ws.ifelse.io/"); | |
| @override | |
| MyHomePageState createState() { | |
| return MyHomePageState(); | |
| } | |
| } | |
| class MyHomePageState extends State<MyHomePage> { | |
| TextEditingController _controller = TextEditingController(); | |
| @override | |
| Widget build(BuildContext context) { | |
| return Scaffold( | |
| appBar: AppBar( | |
| title: Text("Web Socket"), | |
| ), | |
| body: Padding( | |
| padding: const EdgeInsets.all(20.0), | |
| child: Column( | |
| crossAxisAlignment: CrossAxisAlignment.start, | |
| children: <Widget>[ | |
| Form( | |
| child: TextFormField( | |
| decoration: InputDecoration(labelText: "Send any message to the server"), | |
| controller: _controller, | |
| ), | |
| ), | |
| StreamBuilder( | |
| stream: widget.channel.stream, | |
| builder: (context, snapshot) { | |
| return Padding( | |
| padding: const EdgeInsets.all(20.0), | |
| child: Text(snapshot.hasData ? '${snapshot.data}' : ''), | |
| ); | |
| }, | |
| ) | |
| ], | |
| ), | |
| ), | |
| floatingActionButton: FloatingActionButton( | |
| child: Icon(Icons.send), | |
| onPressed: sendData, | |
| ), | |
| ); | |
| } | |
| void sendData() { | |
| if (_controller.text.isNotEmpty) { | |
| widget.channel.sink.add(_controller.text); | |
| } | |
| } | |
| @override | |
| void dispose() { | |
| widget.channel.sink.close(); | |
| super.dispose(); | |
| } | |
| } |
If you successfully connected to the server then you would see this on the emulator.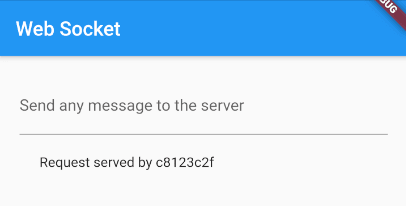
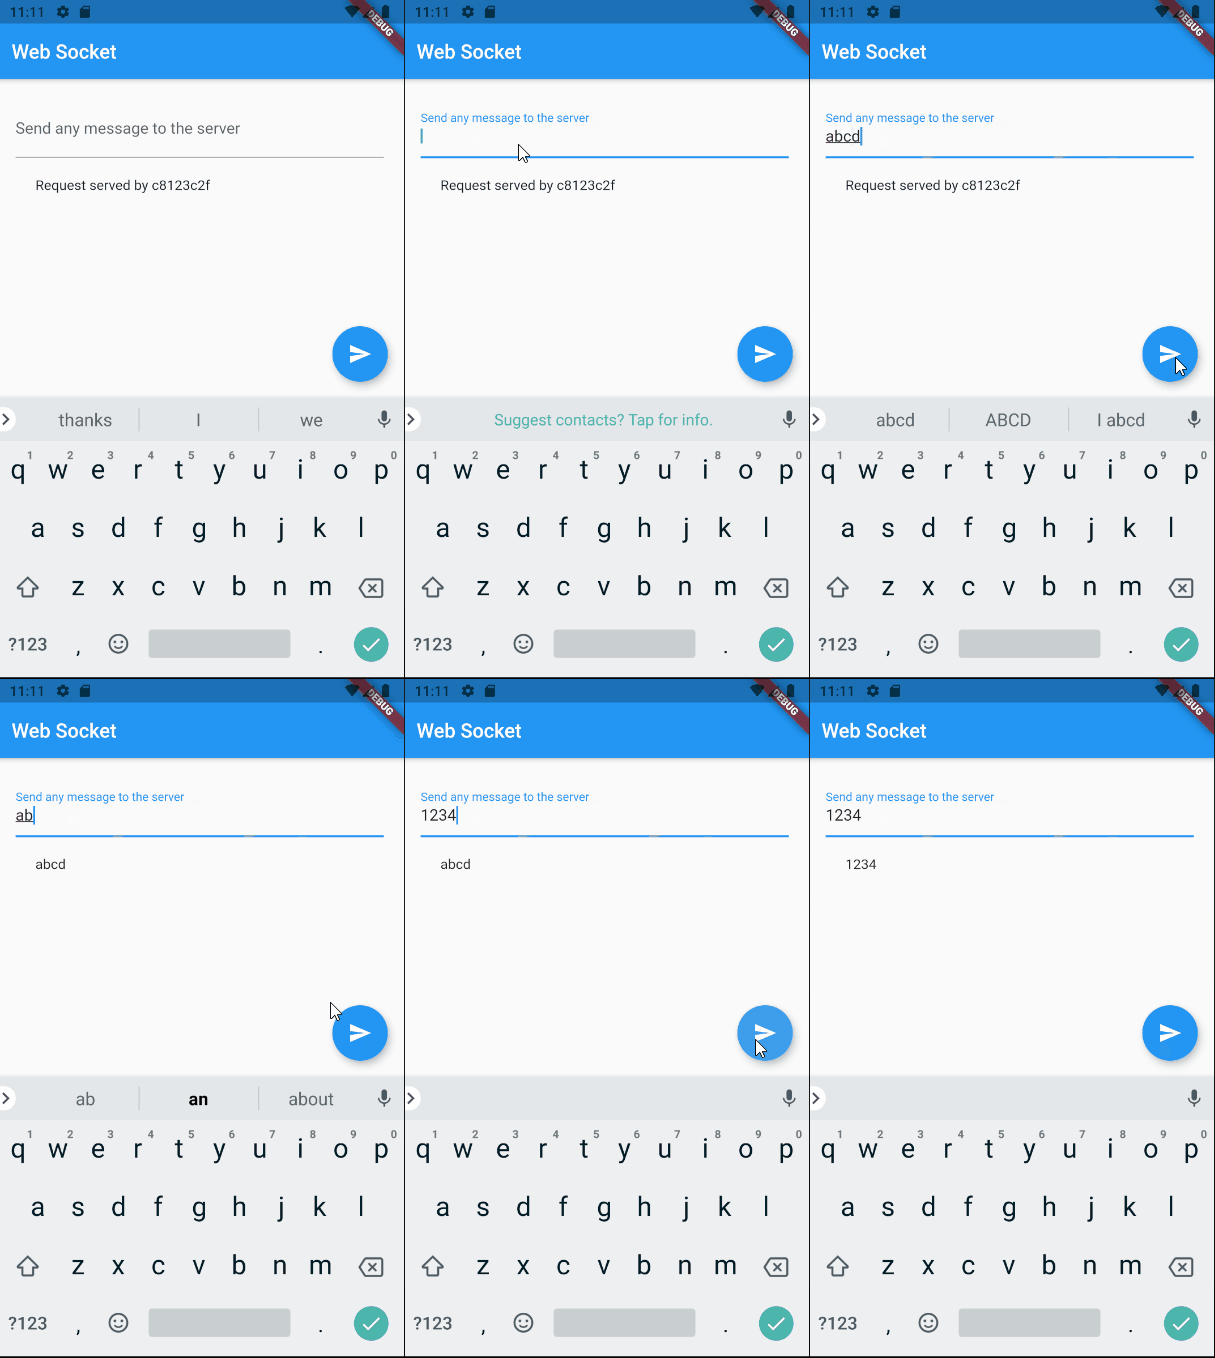
This is how your app should look at the end:
Where can you use it?
The realtime web existed before WebSockets, but it was difficult to accomplish, often slower, and based on hacking web technologies that weren't built for realtime applications. The WebSocket protocol paved the path for a genuinely real-time web and expanded the possibilities of Internet communication.
USE CASES:
- Web-based games
- Chatting Applications


