Users Online
· Members Online: 0
· Total Members: 188
· Newest Member: meenachowdary055
Forum Threads
Latest Articles
Articles Hierarchy
Internet-Controlled PowerSwitch
Internet-Controlled PowerSwitch
For many years, people physically interacted with electrical appliances using hardware switches. Now that things have changed, thanks to the advances in technology and hardware, controlling a switch over the Internet without any form of physical interaction has become possible.
In this chapter, we will incrementally build a web server-enabled smart power switch that can be controlled through the Internet with a wired Internet connection. Let's move to Arduino's IoT (Internet of Things).
In this chapter, you will do the following:
-
Learn about Arduino UNO and Arduino Ethernet Shield basics
-
Learn how to connect a PowerSwitch Tail with Arduino UNO
-
Build a simple web server to handle client requests and control the PowerSwitch accordingly
-
Build a simple mains electricity (general purpose alternating current) sensor with 5V DC wall power supply
-
Develop a user friendly UI (User Interface) with HTML (Hyper Text Markup Language) and Metro UI CSS (Cascade Style Sheet)
Getting started
This project consists of a DC (Direct Current) activated relay switch with an embedded web server that can be controlled and monitored through the Internet and the integrated mains electricity sensor that can be used to get the status of the availability of mains electricity. The possible applications are:
-
Controlling electrical devices such as lamp posts, water pumps, gates, doors, and so on, in remote locations
-
Sensing the availability of mains electricity in houses, offices, and factories remotely
-
Detecting whether a door, window, or gate is open or shut
Hardware and software requirements
All the hardware and software requirements are mentioned within each experiment. Most of the hardware used in this project are open source, which allows you to freely learn and hack them to make more creative projects based on the blueprints of this chapter.
Arduino Ethernet Shield
Arduino Ethernet Shield is used to connect your Arduino UNO board to the Internet. It is an open source piece of hardware and is exactly the same size as the Arduino UNO board. The latest version of the Arduino Ethernet Shield is R3 (Revision 3). The official Arduino Ethernet Shield is currently manufactured in Italy and can be ordered through the official Arduino website (https://store.arduino.cc). Also, there are many Arduino Ethernet Shield clones manufactured around the world that may be cheaper than the official Arduino Ethernet Shield. This project is fully tested with a clone of Arduino Ethernet Shield manufactured in China.
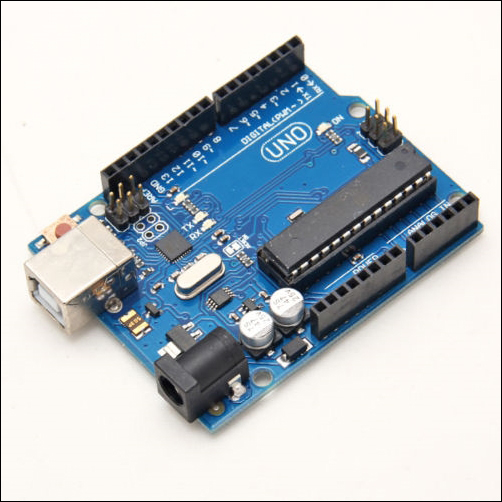
Arduino UNO R3 (Front View)
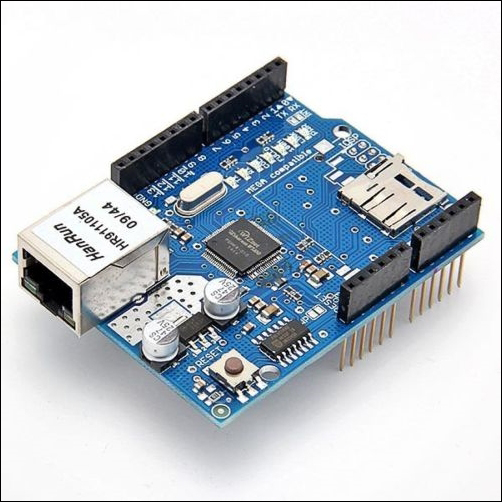
Arduino Ethernet Shield R3 (Front View)
Plug your Arduino Ethernet Shield into your Arduino UNO board using wire wrap headers so that it's exactly intact with the pin layout of the Arduino UNO board. The following image shows a stacked Arduino UNO and Arduino Ethernet Shield together:
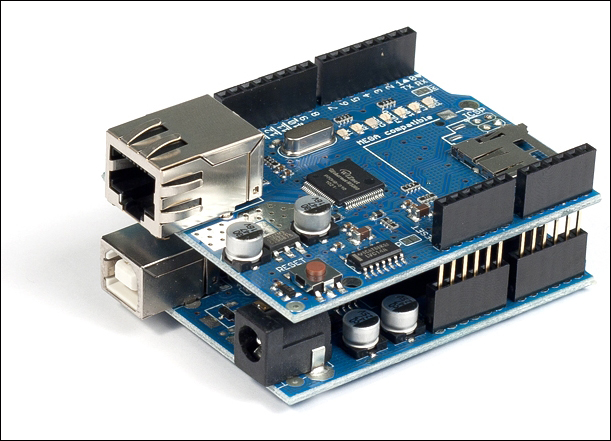
Arduino Ethernet Shield R3 (top) is stacked with Arduino UNO R3 (bottom) (Front View)
Arduino Ethernet Shield consists of an Ethernet controller chip—WIZnet W5100—the only proprietary hardware used with the shield. The WIZnet W5100 includes a fully hardwired TCP/IP stack, integrated Ethernet MAC (Media Access Control), and PHY (Physical Layer).
The hardwired TCP/IP stack supports the following protocols:
-
TCP (Transport Control Protocol)
-
UDP (User Datagram Protocol)
-
IPv4 (Internet Protocol Version 4)
-
ICMP (Internet Control Message Protocol)
-
ARP (Address Resolution Protocol)
-
IGMP (Internet Group Management Protocol)
-
PPPoE (Point-to-Point Protocol over Ethernet)
The WIZnet W5100 Ethernet controller chip also simplifies the Internet connectivity without using an operating system.
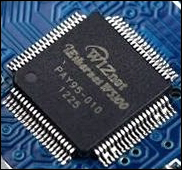
The WIZnet W5100 Ethernet controller (Top View)
Throughout this chapter, we will only work with TCP and IPv4 protocols.
The Arduino UNO board communicates with the Arduino Ethernet Shield using digital pins 10, 11, 12, and 13. Therefore, we will not use these pins in our projects to make any external connections. Also, digital pin 4 is used to select the SD card that is installed on the Arduino Ethernet Shield, and digital pin 10 is used to select the Ethernet controller chip. This is called SS (Slave Select) because the Arduino Ethernet Shield is acting as the slave and the Arduino UNO board is acting as the master.
However, if you want to disable the SD card and use digital pin 4, or disable the Ethernet controller chip and use digital pin 10 with your projects, use the following code snippets inside the setup() function:
-
To disable the SD card:
pinMode(4,OUTPUT);
digitalWrite(4, HIGH);
-
To disable the Ethernet Controller chip:
pinMode(10,OUTPUT);
digitalWrite(10, HIGH);
The Arduino Ethernet board
The Arduino Ethernet board is a new version of the Arduino development board with the WIZnet Ethernet controller built into the same board. The USB to serial driver is removed from the board to keep the board size the same as Arduino UNO and so that it can be stacked with any Arduino UNO compatible shields on it.
You need an FTDI cable compatible with 5V to connect and program your Arduino Ethernet board with a computer.
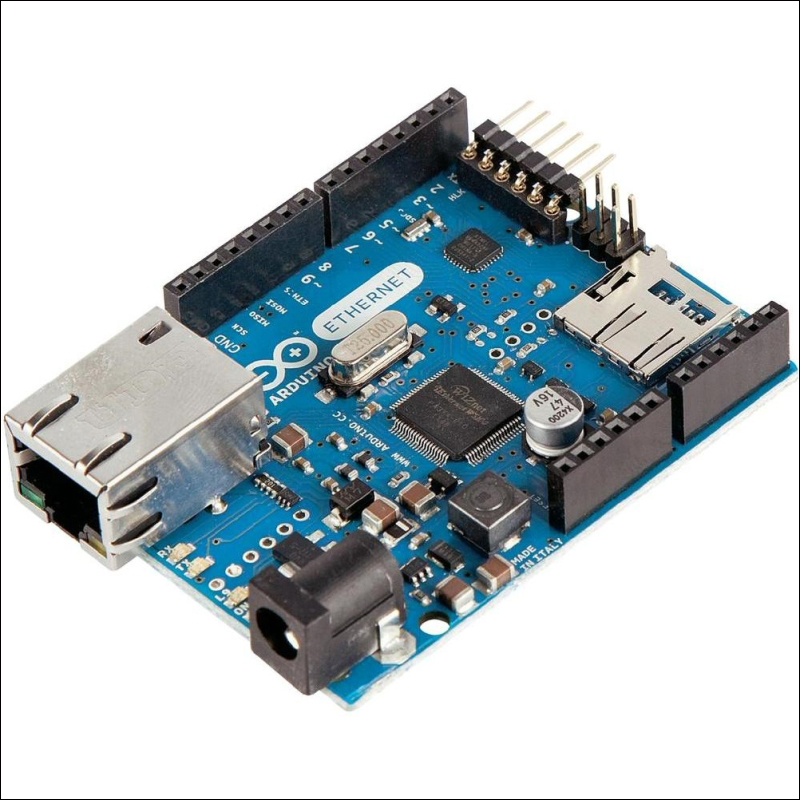
The Arduino Ethernet board (Front View)
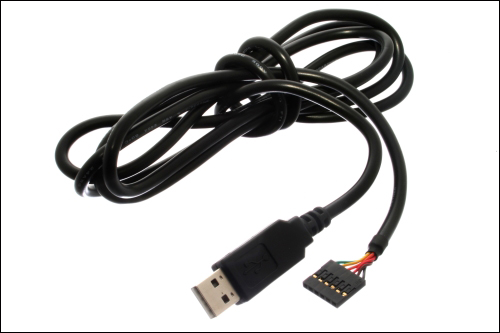
FTDI cable 5V (Source: https://commons.wikimedia.org/wiki/File:FTDI_Cable.jpg)
You can visit the following links to get more information about the Arduino Ethernet board and FTDI cable:
-
The Arduino Ethernet board (https://store.arduino.cc/product/A000068)
-
FTDI cable (https://www.sparkfun.com/products/9717)
You can build all the projects that are explained within this chapter and other chapters throughout the book with the Arduino Ethernet board using the same pin layout.
Connecting Arduino Ethernet Shield to the Internet
To connect your Ethernet shield to the Internet, you require the following hardware:
-
An Arduino UNO R3 board (https://store.arduino.cc/product/A000066)
-
A 9VDC 650mA wall adapter power supply. The barrel connector of the power supply should be center positive 5.5 x 2.1 mm. (Here is the link for a perfect fit: https://www.sparkfun.com/products/298)
-
A USB A-to-B male/male-type cable. These types of cables are usually used for printers (https://www.sparkfun.com/products/512)
-
A Category 6 Ethernet cable (https://www.sparkfun.com/products/8915)
-
A router or switch with an Internet connection
Use the following steps to make connections between each hardware component:
-
Plug your Ethernet shield into your Arduino board using soldered wire wrap headers:

Fritzing representation of Arduino and Ethernet shield stack
-
Get the Ethernet cable and connect one end to the Ethernet jack of the Arduino Ethernet Shield.
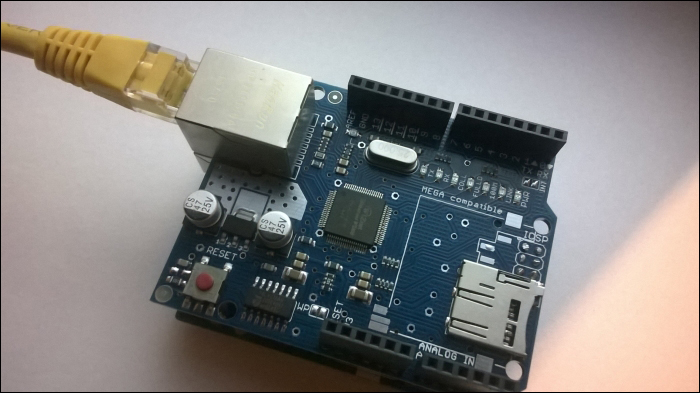
One end of the Ethernet cable is connected to the Arduino Ethernet board
-
Connect the other end of the Ethernet cable to the Ethernet jack of the network router or switch.
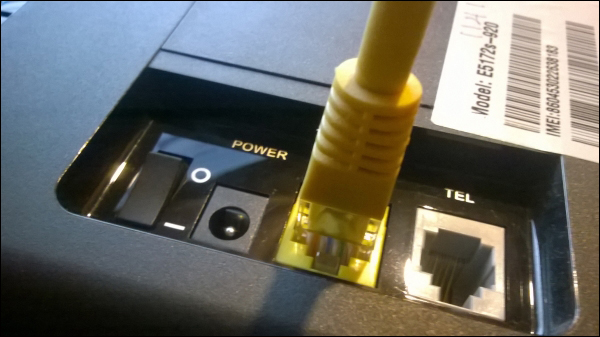
The other end of the Ethernet cable is connected to the router/switch
-
Connect the 9VDC wall adapter power supply to the DC barrel connector of the Arduino board.
-
Use the USB A-to-B cable to connect your Arduino board to the computer. Connect the type A plug end to the computer and the type B plug end to the Arduino board.
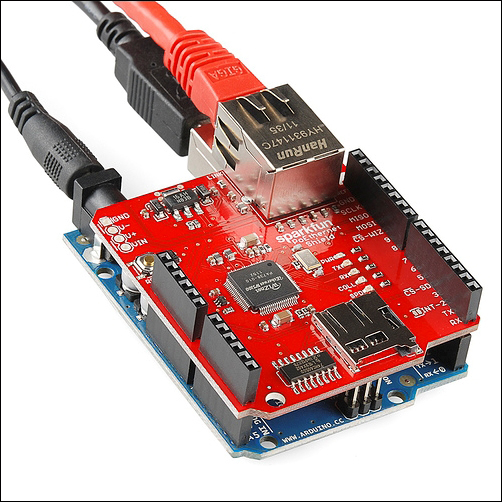
One end of the Ethernet cable is connected to the Ethernet shield (top) and the power connector and USB cable are connected to the Arduino board (bottom) Image courtesy of SparkFun Electronics (https://www.sparkfun.com)
Testing your Arduino Ethernet Shield
To test you Arduino Ethernet Shield, follow these steps:
-
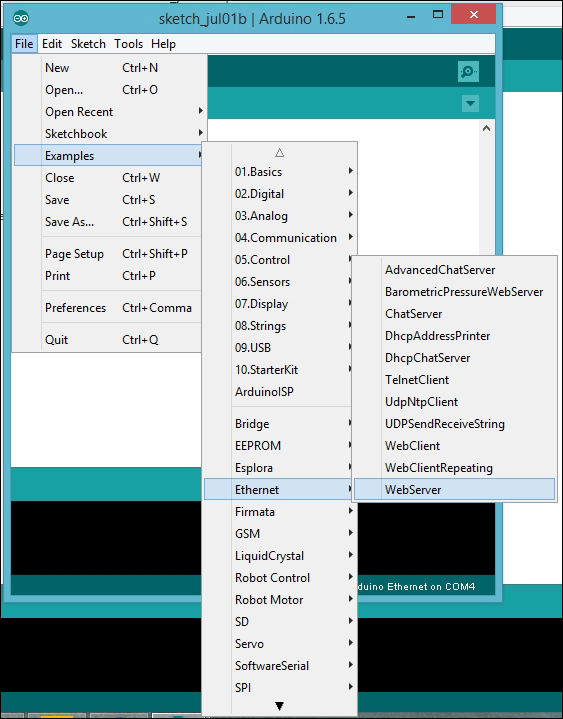
Open your Arduino IDE and navigate to File | Examples | Ethernet | WebServer:
-
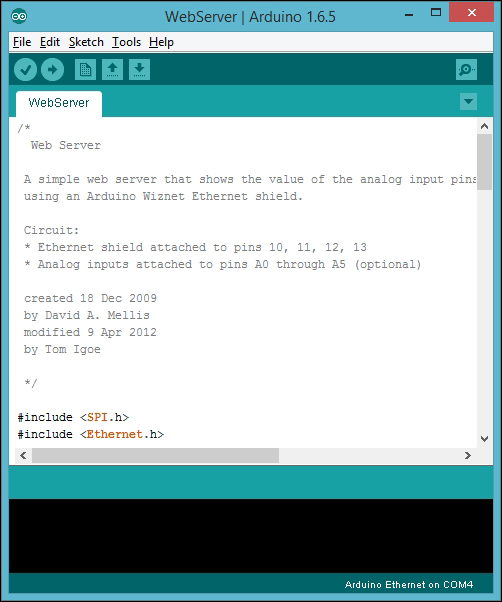
The sample sketch WebServer will open in a new Arduino IDE:
-
You can also paste the code from the sketch named B04844_01_01.ino from the code folder of this chapter. The following header files should be included for serial communication and Ethernet communication in the beginning of the sketch:
#include <SPI.h> //initiates Serial Peripheral Interface
#include <Ethernet.h> //initiates Arduino Ethernet library
-
Replace the MAC address with your Ethernet shield's MAC address if you know it. You can find the printed sticker of the MAC address affixed to the back of your Ethernet shield. (Some clones of Arduino Ethernet Shield don't ship with a MAC address affixed on them). If you don't know the MAC address of your Arduino Ethernet Shield, use the one mentioned in the sample code or replace it with a random one. But don't use network devices with the same MAC address on your network; it will cause conflicts and your Ethernet shield will not function correctly. (Read Finding the MAC address and obtaining a valid IP address for more information on MAC addresses).
byte mac[] = {0xDE, 0xAD, 0xBE, 0xEF, 0xFE, 0xED};
-
Replace the IP address with a static IP in your local network IP range. (Read the Finding the MAC address and obtaining a valid IP address section for selecting a valid IP address).
IPAddress ip(192, 168, 1, 177);
-
Then, create an instance of the Arduino Ethernet Server library and assign port number 80 to listen to incoming HTTP requests.
EthernetServer server(80);
-
Inside the setup() function, open the serial communications and wait for the port to open. The computer will communicate with Arduino at a speed of 9600 bps.
Serial.begin(9600);
-
The following code block will start the Ethernet connection by using the MAC address and IP address (we have assigned a static IP address) of the Arduino Ethernet Shield and start the server. Then it will print the IP address of the server on Arduino Serial Monitor usingEthernet.localIP():
Ethernet.begin(mac, ip);
server.begin();
Serial.print("server is at ");
Serial.println(Ethernet.localIP());
-
Inside the loop() function, the server will listen for incoming clients.
EthernetClient client = server.available();
-
If a client is available, the server will connect with the client and read the incoming HTTP request. Then, reply to the client by the standard HTTP response header. The output can be added to the response header using the EthernetClient class's println() method:
if (client) {
Serial.println("new client");
// an http request ends with a blank line
boolean currentLineIsBlank = true;
while (client.connected()) {
if (client.available()) {
char c = client.read();
Serial.write(c);
// if you've gotten to the end of the line (received a newline
// character) and the line is blank, the http request has ended,
// so you can send a reply
if (c == '\n' && currentLineIsBlank) {
// send a standard http response header
client.println("HTTP/1.1 200 OK");
client.println("Content-Type: text/html");
client.println("Connection: close"); // the connection will be closed after completion of the response
client.println("Refresh: 5"); // refresh the page automatically every 5 sec
client.println();
client.println("<!DOCTYPE HTML>");
client.println("<html>");
// output the value of each analog input pin
for (int analogChannel = 0; analogChannel < 6; analogChannel++) {
int sensorReading = analogRead(analogChannel);
client.print("analog input ");
client.print(analogChannel);
client.print(" is ");
client.print(sensorReading);
client.println("<br />");
}
client.println("</html>");
break;
}
if (c == '\n') {
// you're starting a new line
currentLineIsBlank = true;
}
else if (c != '\r') {
// you've gotten a character on the current line
currentLineIsBlank = false;
}
}
}
// give the web browser time to receive the data
delay(1);
-
Finally, close the connection from the client using the EthernetClient class's stop() method:
client.stop();
Serial.println("client disconnected");
-
Verify the sketch by clicking on the Verify button located in the toolbar.
-
On the menu bar, select the board by navigating to Tools | Board | Arduino UNO. If you are using an Arduino Ethernet board, select Tools | Board | Arduino Ethernet.
-
On the menu bar, select the COM port by navigating to Tools | Port and then selecting the port number.
-
Upload the sketch into your Arduino UNO board by clicking on the Upload button located in the toolbar.
-
Open your Internet browser (such as Google Chrome, Mozilla Firefox, or Microsoft Internet Explorer) and type the IP address (http://192.168.1.177/) assigned to your Arduino Ethernet Shield in the sketch (in Step 4), and hit the Enter key.
-
The web browser will display analog input values (impedance) of all the six analog input pins (A0-A5). The browser will refresh every 5 seconds with the new values. Use following code to change the automatic refresh time in seconds:
client.println("Refresh: 5");
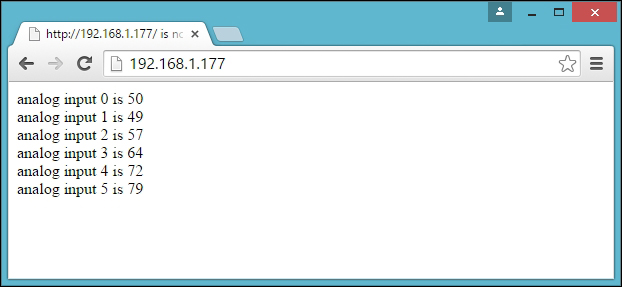
Output for Arduino Ethernet board: Analog input values are displaying on the Google Chrome browser, refreshing every 5 seconds
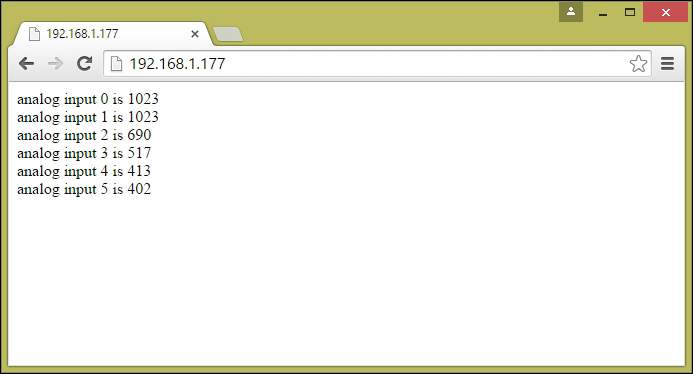
Output for Arduino UNO + Arduino Ethernet Shield: Analog input values are displaying on the Google Chrome browser, refreshing every 5 seconds
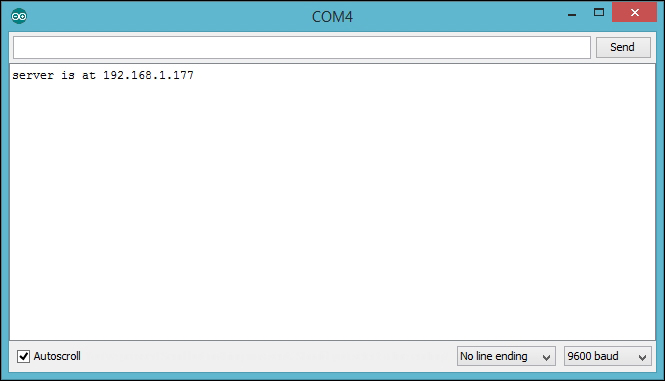
Arduino Serial Monitor prints the static IP address of Arduino Ethernet Shield
-
To make your sketch more stable and to ensure that it does not hang, you can do one of the following:
-
-
Remove the SD card from the slot.
-
Add the following two lines inside your setup() function:
-
-
pinMode(4,OUTPUT);
digitalWrite(4, HIGH);
Now you can be assured that your Arduino Ethernet Shield is working properly and can be accessed through the Internet.
Selecting a PowerSwitch Tail
PowerSwitch Tail has a built-in AC relay that is activated between 3-12 VDC. This is designed to easily integrate with many microcontroller platforms, such as Arduino, Raspberry Pi, BeagleBone, and so on. Usually, Arduino digital output provides 5VDC that allows it to activate the AC (Alternative Current) relay inside the PowerSwitch Tail. Using a PowerSwitch Tail with your microcontroller projects provides safety since it distinguishes between AC and DC circuitry by using an optocoupler which is an optically activated switch.
PowerSwitch Tail ships in several variants. At the time of writing this book, the product website lists various PowerSwitch Tails, assembled and in kit form, that can be used with this project.
To build this project, we will use a 240V AC PowerSwitch Tail that can be purchased as a kit and assembled.
PN PSSRKT-240
Refer to http://www.powerswitchtail.com/Pages/PowerSwitchTail240vackit.aspx.
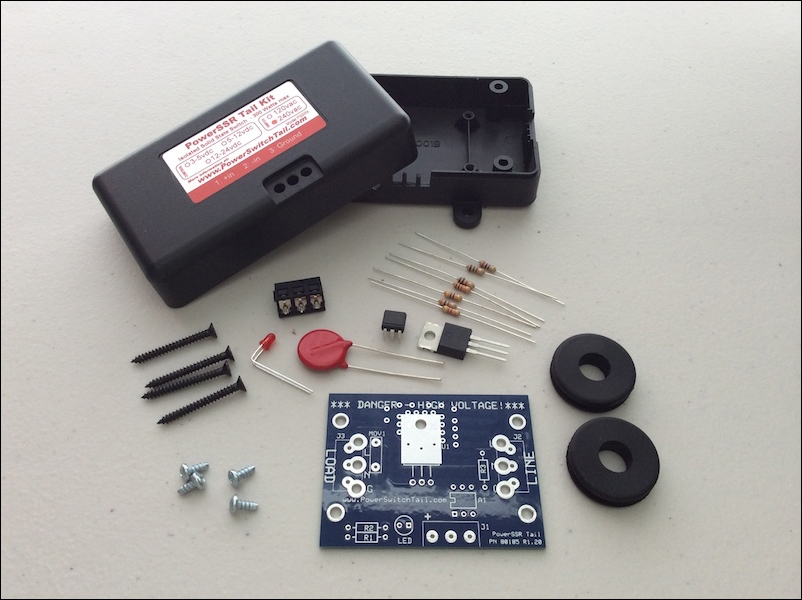
PN PSSRKT-240 Normally Open (NO) version—240V AC Image courtesy of PowerSwitchTail.com, LLC (http://www.powerswitchtail.com)
Here, we will not cover the assembly instructions about the PN PSSRKT-240 kit. However, you can find the assembly instructions at http://www.powerswitchtail.com/Documents/PSSRTK%20Instructions.pdf.
The following image shows an assembled PN PSSRKT-240 kit:
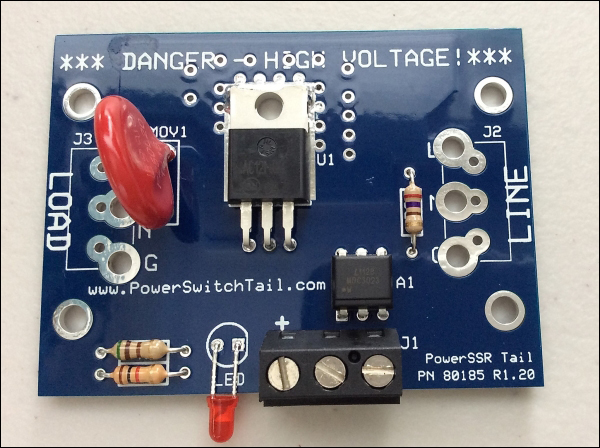
PN PSSRKT-240 Normally Open (NO) version—240V Image courtesy of PowerSwitchTail.com, LLC (http://www.powerswitchtail.com)
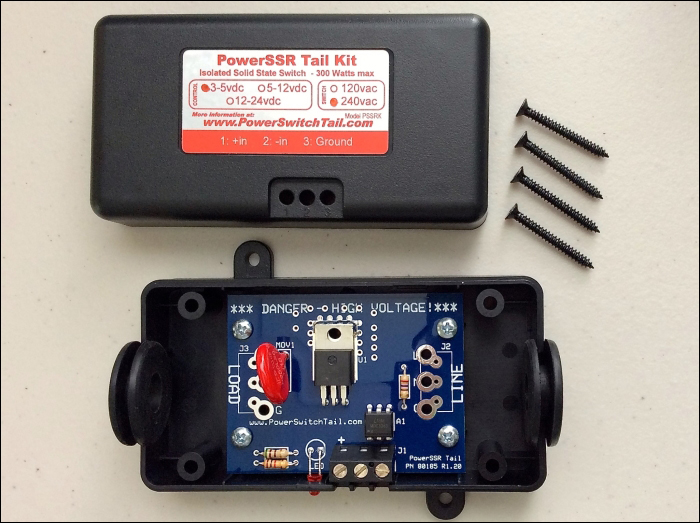
PN PSSRKT-240 Normally Open (NO) version—240V Image courtesy of PowerSwitchTail.com, LLC (http://www.powerswitchtail.com)
If you are in a country that has a 120V AC connection, you can purchase an assembled version of the PowerSwitch Tail.
PN80135
Refer to http://www.powerswitchtail.com/Pages/default.aspx.
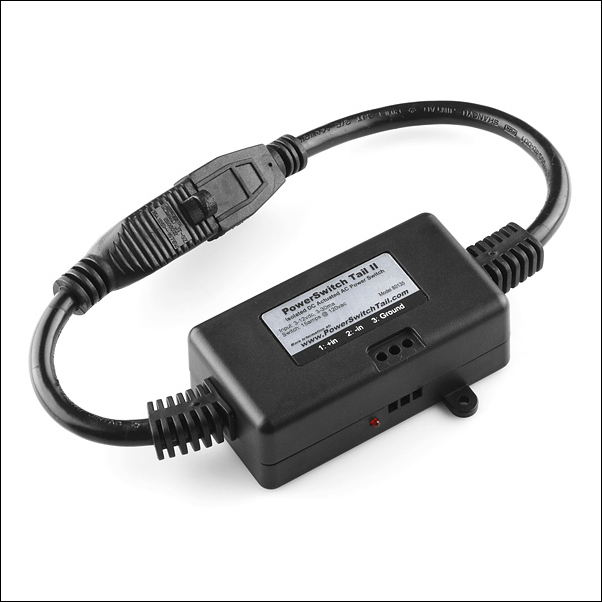
PN80135 Normally Open (NO) version—120V AC (left-hand side plug for LOAD and right-hand side plug for LINE) Image courtesy of SparkFun Electronics (https://www.sparkfun.com)
Wiring PowerSwitch Tail with Arduino Ethernet Shield
Wiring the PowerSwitch Tail with Arduino is very easy. Use any size of wire range between gauge #14-30 AWG to make the connection between Arduino and PowerSwitch Tail.
PowerSwitch Tail has a terminal block with three terminals. Use a small flat screwdriver and turn the screws CCW (Counter Clock Wise) to open the terminal contacts.
With the Arduino Ethernet Shield mounted on the Arduino UNO board, do the following:
-
Use the red hookup wire to connect the positive terminal of the PowerSwitch Tail to digital pin 5 on your Arduino.
-
Use the black hookup wire to connect the negative terminal of the PowerSwitch Tail to the GND pin on your Arduino.
-
Connect the wall adapter power supply (9V DC 650mA) to the DC power jack on your Arduino board. The ground terminal is connected internally to the AC-side electrical safety ground (the green conductor) and can be used if needed.
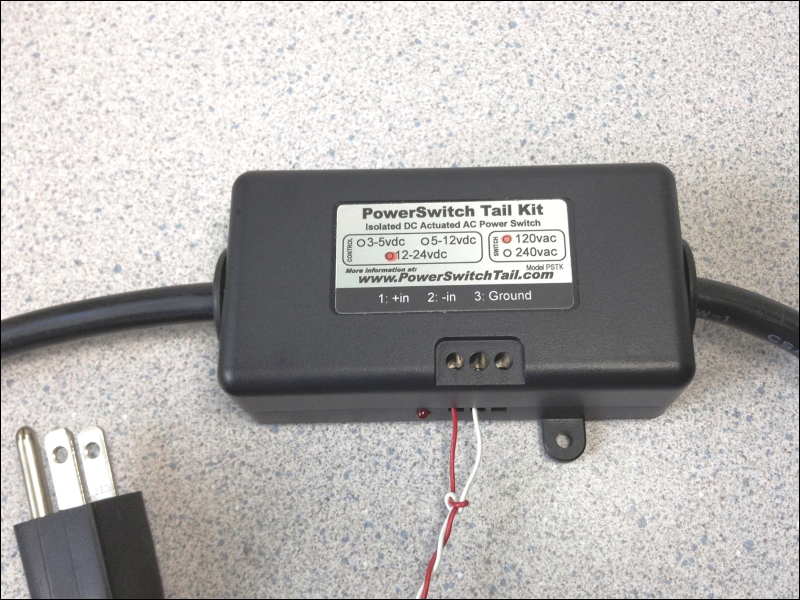
Two wires from Arduino connected to the PowerSwitch Tail Image courtesy of PowerSwitchTail.com, LLC (http://www.powerswitchtail.com)
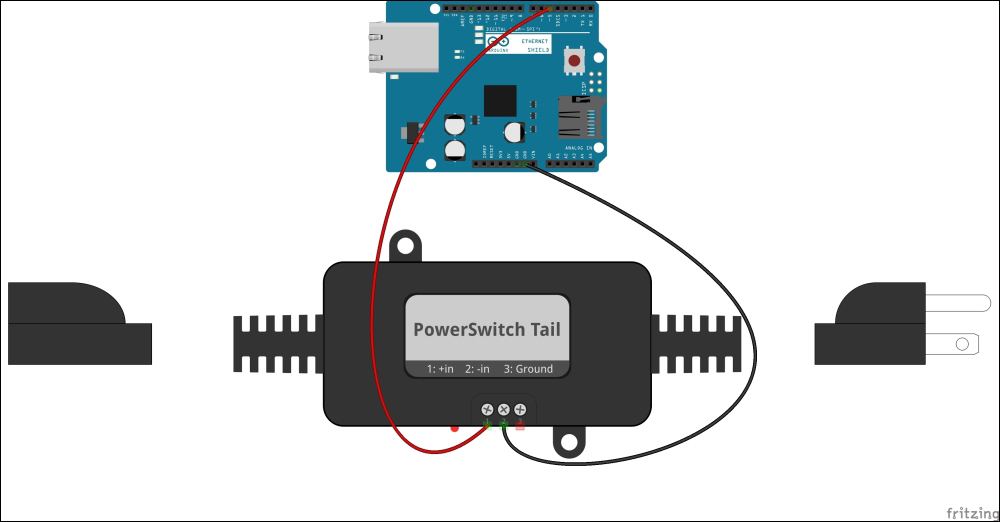
PowerSwitch Tail connected to the Ethernet Shield—Fritzing representation
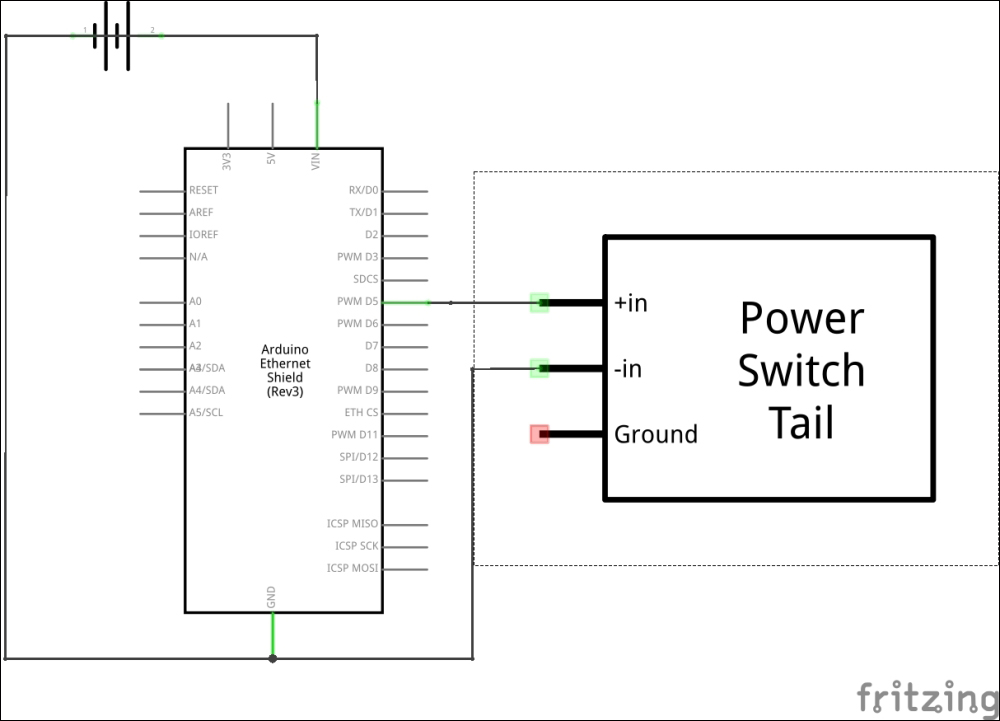
PowerSwitch Tail connected to the Ethernet Shield—Schematic
Turning PowerSwitch Tail into a simple web server
In this topic, we will look into how to convert our Arduino connected PowerSwitch Tail into a simple web server to handle client requests, such as the following:
-
Turn ON the PowerSwitch Tail
-
Turn OFF the PowerSwitch Tail
And other useful information such as:
-
Display the current status of the PowerSwitch Tail
-
Display the presence or absence of the main electrical power
What is a web server?
A web server is a piece of software which serves to connected clients. An Arduino web server uses HTTP on top of TCP and UDP. But remember, the Arduino web server can't be used as a replacement for any web server software running on a computer because of the lack of processing power and limited number of multiple client connectivity.
A step-by-step process for building a web-based control panel
In this section ,you will learn how to build a web-based control panel for controlling the PowerSwitch Tail through the Internet.
We will use the Arduino programming language and HTML that's running on the Arduino web server. Later, we will add HTML radio button controls to control the power switch.
Handling client requests by HTTP GET
Using the HTTP GET method, you can send a query string to the server along with the URL.
The query string consists of a name/value pair. The query string is appended to the end of the URL and the syntax is http://example.com?name1=value1.
Also, you can add more name/value pairs to the URL by separating them with the & character, as shown in the following example:
http://example.com?name1=value1&name2=value2.
So, our Arduino web server can actuate the PowerSwitch Tail using the following URLs:
-
To turn ON the PowerSwitch Tail: http://192.168.1.177/?switch=1
-
To turn OFF the PowerSwitch Tail: http://192.168.1.177/?switch=0
The following sketch can be used by the web server to read the incoming client requests, process them, and actuate the relay inside the PowerSwitch Tail:
-
Open your Arduino IDE and type or paste the code from the B04844_01_02.ino sketch.
-
In the sketch, replace the MAC address with your Arduino Ethernet Shield's MAC address:
byte mac[] = { 0x90, 0xA2, 0xDA, 0x0B, 0x00 and 0xDD };
-
Replace the IP address with an IP valid static IP address in the range of your local network:
IPAddress ip(192,168,1,177);
-
If you want the IP address dynamically assigned by the DHCP to the Arduino Ethernet Shield, do the following:
-
Comment the following line in the code:
-
//IPAddress ip(192,168,1,177);
-
-
-
Comment the following line in the code:
-
-
//Ethernet.begin(mac, ip);
-
-
-
Uncomment the following line in the code:
-
-
Ethernet.begin(mac);
-
The following two lines will read the incoming HTTP request from the client using the EthernetClient class's read() method and store it in a string variable http_Request:
char c = client.read();
http_Request += c;
-
The following code snippet will check whether the HTTP request string contains the query string that is sent to the URL. If found, it will turn on or off the PowerSwitch Tail according to the name/value pair logically checked inside the sketch.
The indexOf() function can be used to search for the string within another string. If it finds the string switch=1 inside the HTTP request string, the Arduino board will turn digital pin 5 to the HIGH state and turn on the PowerSwitch Tail. If it finds the text switch=0, the Arduino board will turn the digital pin 5 to the LOW state and turn off the PowerSwitch Tail.
if (httpRequest.indexOf("GET /?switch=0 HTTP/1.1") > -1) {
relayStatus = 0;
digitalWrite(5, LOW);
Serial.println("Switch is Off");
} else if (httpRequest.indexOf("GET /?switch=1 HTTP/1.1") > -1) {
relayStatus = 1;
digitalWrite(5, HIGH);
Serial.println("Switch is On");
}
-
Select the correct Arduino board and COM port from the menu bar.
-
Verify and upload the sketch into your Arduino UNO board (or the Arduino Ethernet board).
-
If you have to choose DHCP to assign an IP address to your Arduino Ethernet Shield, it will be displayed on the Arduino Serial Monitor. On the menu bar, go to Tools | Serial Monitor. The Arduino Serial Monitor window will be displayed with the IP address assigned by the DHCP.
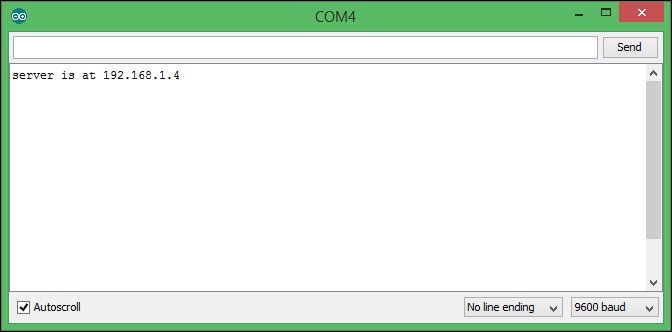
The IP address assigned by the DHCP
-
Plug the PowerSwitch Tail LINE side into the wall power socket and connect the lamp into the LOAD side of the PowerSwitch Tail. Make sure that the lamp switch is in the ON position and all the switches of the wall power socket are in the ON position.
-
Open your Internet browser and type the IP address of your Arduino Ethernet Shield with HTTP protocol. For our example it is http://192.168.1.177. Then hit the Enter key on your keyboard.
-
The web browser sends an HTTP request to the Arduino web server and the web server returns the processed web content to the web browser. The following screen capture displays the output in the web browser.
-
Type http://192.168.1.177/?switch=1 and hit the Enter key. The lamp will turn on.
-
Type http://192.168.1.177/?switch=0 and hit the Enter key. The lamp will turn off.
-
If you have connected your Arduino Ethernet Shield to your home wireless network, you can test your PowerSwitch Tail using your Wi-Fi connected smartphone as well. If you have the idea to add port forwarding to your router, you can then control your switch from anywhere in the world. Explaining about port forwarding is out of scope of this book.
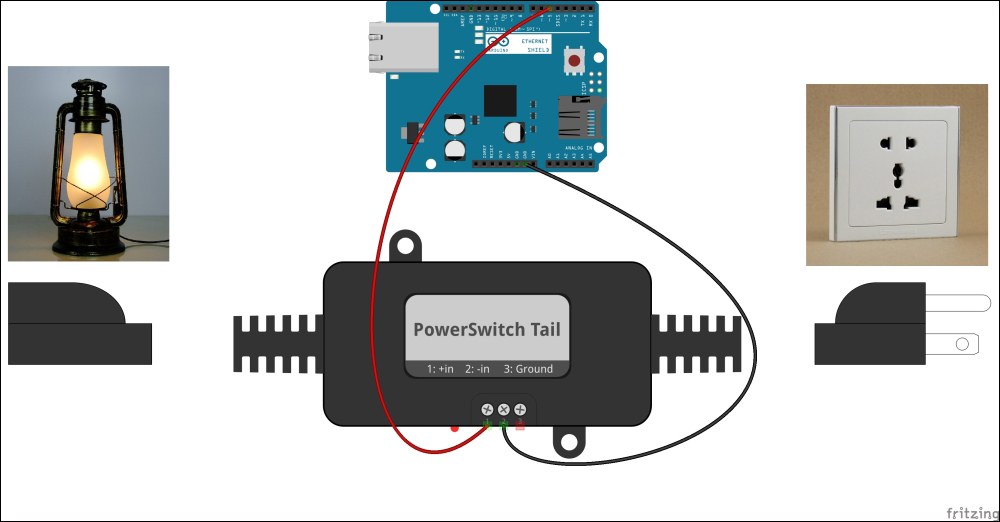
Electric lamp controlled by PowerSwitch Tail
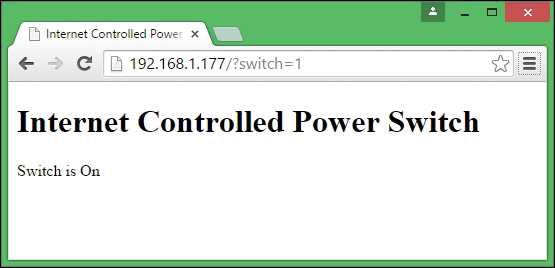
PowerSwitch Tail control panel accessed by Google Chrome browser
Sensing the availability of mains electricity
You can sense the availability of mains electricity in your home and read the status before actuating the PowerSwitch Tail.
You will need the following hardware to build the sensor:
-
A 5VDC 2A wall adapter power supply (https://www.sparkfun.com/products/12889)
-
A 10 kilo Ohm resistor (https://www.sparkfun.com/products/8374)
Follow the next steps to attach the sensor to the Arduino Ethernet Shield:
-
Connect the positive wire of the 5V DC wall adapter power supply to the Ethernet shield digital pin 2.
-
Connect the negative wire of the wall adapter power supply to the Ethernet shield GND pin.
-
Connect the 10 kilo ohm resistor between the Ethernet shield digital pin 2 and the GND pin.
-
Plug the wall adapter power supply into the wall.
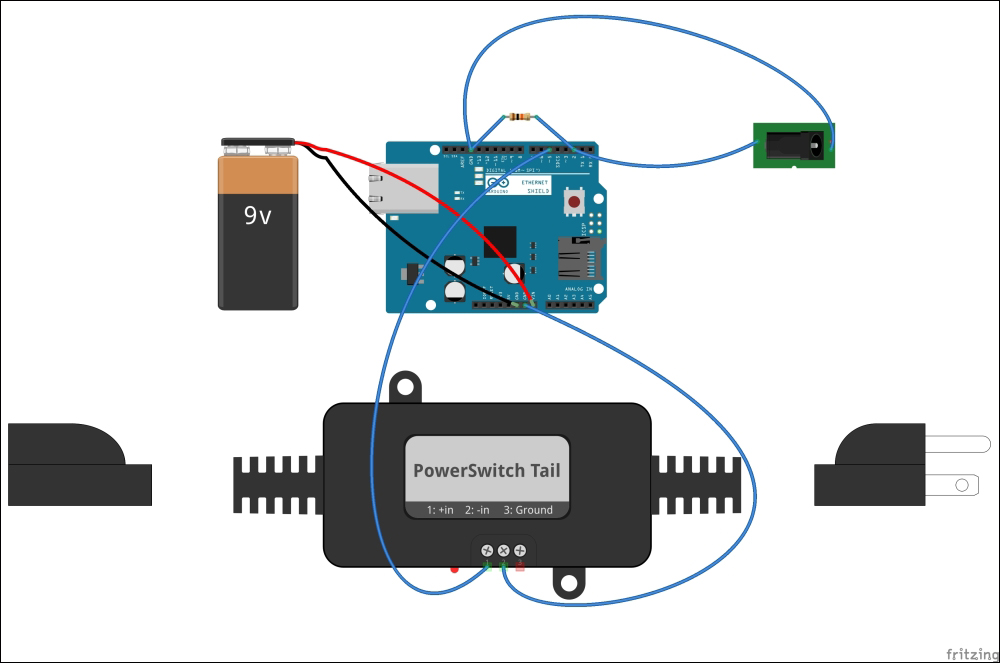
A wiring diagram
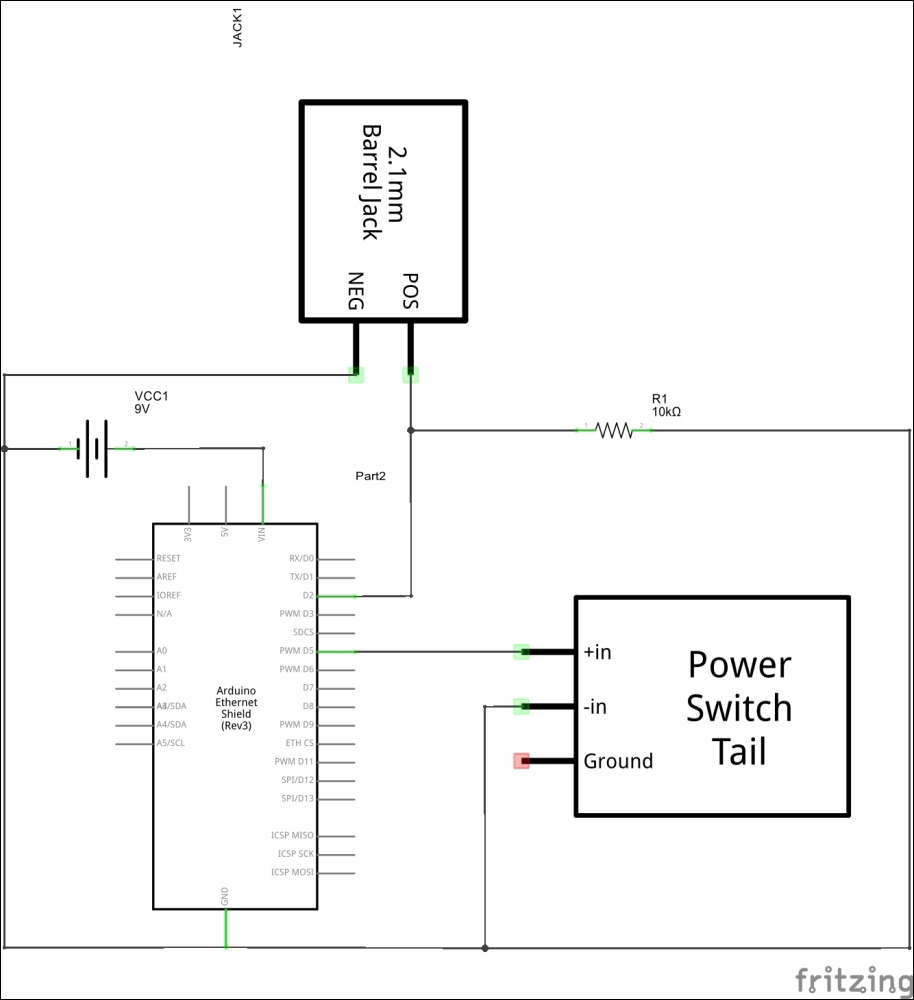
Schematic
Testing the mains electricity sensor
The previous sketch is modified to check the availability of the mains electricity and operate PowerSwitch Tail accordingly. The 5V DC wall adapter power supply plugged into the wall keeps the Arduino digital pin 2 in the HIGH state if mains electricity is available. If mains electricity is not available, the digital pin 2 switches to the LOW state.
-
Open your Arduino IDE and paste the code from the sketch named B04844_01_03.ino from the code folder of this chapter.
-
Power up your Arduino Ethernet Shield with 9V battery pack so that it will work even without mains electricity.
-
The Arduino digital pin 2 is in its HIGH state if mains electricity is available. The hasElectricity boolean variable holds the state of availability of the electricity.
-
If only the mains electricity is available, the PowerSwitch Tail can be turned ON. If not, the PowerSwitch Tail is already in its OFF state.
Building a user-friendly web user interface
The following Arduino sketch adds two radio buttons to the web page so the user can easily control the switch without typing the URL with the query string into the address bar of the web browser. The radio buttons will dynamically build the URL with the query string depending on the user selection and send it to the Arduino web server with the HTTP request.
-
Open your Arduino IDE and paste the code from the sketch named B04844_01_04.ino from the code folder of this chapter.
-
Replace the IP address with a new IP address in your local area network's IP address range.
IPAddress ip(192,168,1,177);
-
Verify and upload the sketch on your Arduino UNO board.
-
Open your web browser and type your Arduino Ethernet Shield's IP address into the address bar and hit the Enter key.
-
The following code snippet will submit your radio button selection to the Arduino web sever as an HTTP request using the HTTP GET method. The radio button group is rendered inside the <form method="get"></form> tags.
client.println("<form method=\"get\">");
if (httpRequest.indexOf("GET /?switch=0 HTTP/1.1") > -1) {
relayStatus = 0;
digitalWrite(9, LOW);
Serial.println("Off Clicked");
} else if (httpRequest.indexOf("GET /?switch=1 HTTP/1.1") > -1) {
relayStatus = 1;
digitalWrite(9, HIGH);
Serial.println("On Clicked");
}
if (relayStatus) {
client.println("<input type=\"radio\" name=\"switch\" value=\"1\" checked>ON");
client.println("<input type=\"radio\" name=\"switch\" value=\"0\" onclick=\"submit();\" >OFF");
}
else {
client.println("<input type=\"radio\" name=\"switch\" value=\"1\" onclick=\"submit();\" >ON");
client.println("<input type=\"radio\" name=\"switch\" value=\"0\" checked>OFF");
}
client.println("</form>");
Also, depending on the radio button selection, the browser will re-render the radio buttons using the server response to reflect the current status of the PowerSwitch Tail.
Adding a Cascade Style Sheet to the web user interface
Cascade Style Sheet (CSS) defines how HTML elements are to be displayed. Metro UI CSS (https://metroui.org.ua/) is a cascade style sheet that can be used to apply Windows 8-like style to your HTML elements.
The following Arduino sketch applies Windows 8-like style to the radio button group:
-
Open your Arduino IDE and paste the code from the sketch named B04844_01_05.ino from the code folder of this chapter.
-
Between the <head></head> tags we have first included the JQuery library which consists of a rich set of JavaScript functions:
client.println("<script src=\"https://metroui.org.ua/js/jquery-2.1.3.min.js\"></script>");
-
Then, we have included metro.js and metro.css from the https://metroui.org.ua website:
client.println("<script src=\"https://metroui.org.ua/js/metro.js\"></script>");
client.println("<link rel=\"stylesheet\" href=\"https://metroui.org.ua/css/metro.css\">");
Upload the sketch on your Arduino board and play with the new look and feel. You can modify the other HTML elements and even use the radio buttons by referring to the MetroUI CSS website documentation at https://metroui.org.ua/.
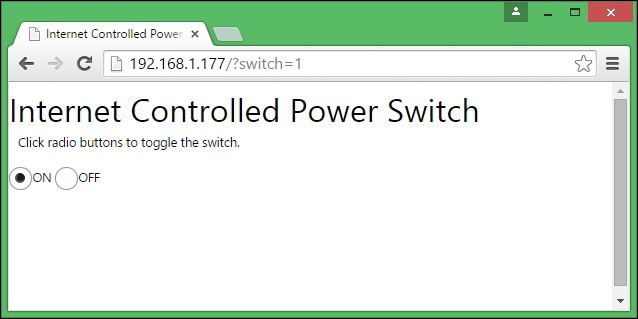
MetroUI CSS style applied to radio buttons
Finding the MAC address and obtaining a valid IP address
To work with this project, you must know your Arduino Ethernet Shield's MAC address and IP address to communicate properly over the Internet.
Finding the MAC address
Current Arduino Ethernet Shields come with a dedicated and uniquely assigned 48-bit MAC (Media Access Control) address which is printed on the sticker. Write down your Ethernet shield's MAC address so you can refer to it later. The following image shows an Ethernet shield with the MAC address of 90-A2-DA-0D-E2-CD:
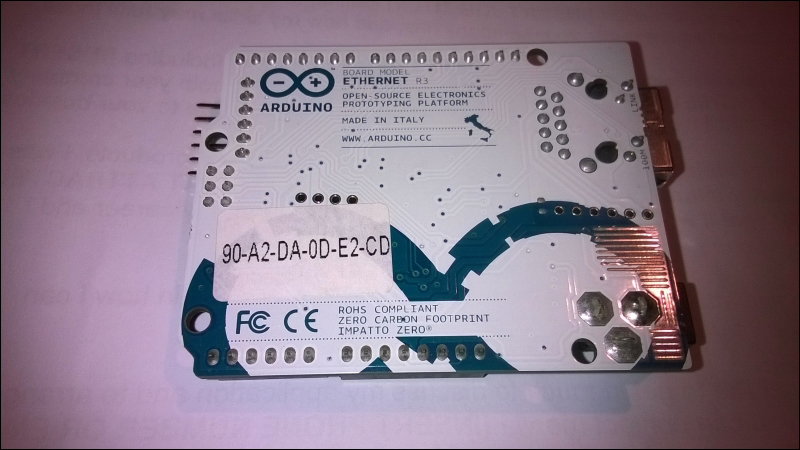
You can rewrite your Arduino Ethernet Shield's MAC address using hexadecimal notations, as in 0x90, 0xA2, 0xDA, 0x0D, 0xE2 and 0xCD, with the leading 0x notation recognized by C compilers (remember that the Arduino programming language is based on C) and assembly languages.
If not present, you can use one that does not conflict with your network. For example:
byte mac[] = { 0xDE, 0xAD, 0xBE, 0xEF, 0xFE, 0xED };
Obtaining an IP address
You can assign an IP address to your Arduino Ethernet Shield by one of the following methods:
-
Using the network router or switch to assign a static IP address to your Ethernet shield.
-
Using DHCP (Dynamic Host Configuration Protocol) to dynamically assign an IP address to your Ethernet shield. In this chapter, we will only discuss how to assign an IP address using DHCP.
The network devices we will use for this experiment are the following:
-
Huawei E517s-920 4G Wi-Fi Router
-
DELL computer with Windows 8.1 installed and Wi-Fi connected
-
Nokia Lumia phone with Windows 8.1 installed and Wi-Fi connected
-
Arduino Ethernet Shield connected to the Wi-Fi router's LAN port using an Ethernet cable
Assigning a static IP address
The following steps will explain how to determine your network IP address range with a Windows 8.1 installed computer, and select a valid static IP address.
-
Open Network and Sharing Center in Control Panel:
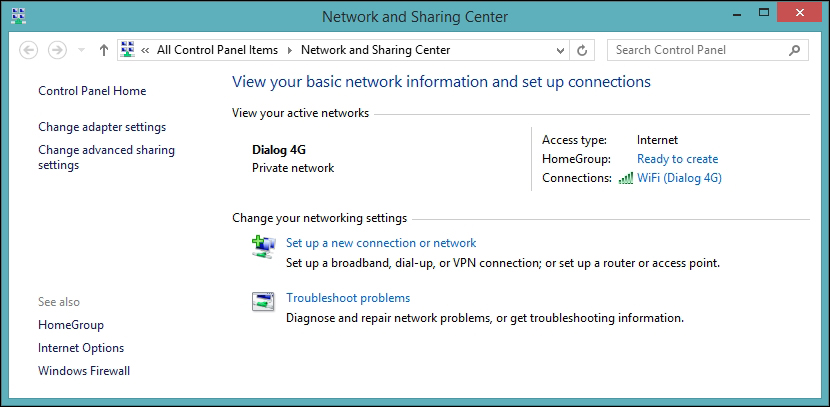
-
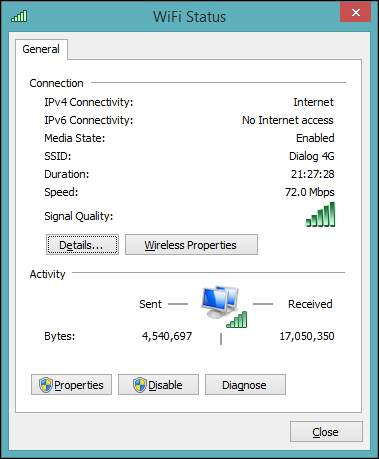
Click on Connections. The Connection Status dialog box will appear, as shown here:
-
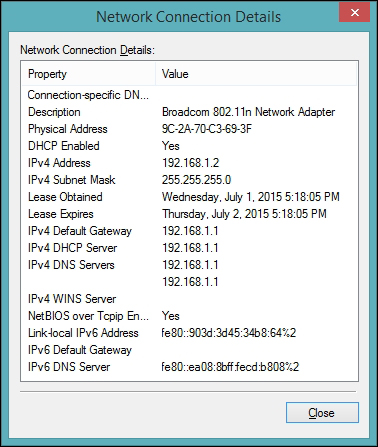
Click on the Details… button. The Network Connection Details dialog box will appear, as shown in the following screenshot:
-
The IPv4 address assigned to the Windows 8.1 computer by the Wireless router is 192.168.1.2. The IPv4 subnet mask is 255.255.255.0. So, the IP address range should be 192.168.1.0 to 192.168.1.255.
-
The Wi-Fi network used in this example currently has two devices connected, that is, a Windows 8.1 computer, and a Windows phone. After logging in to the wireless router product information page, under the device list, all the IP addresses currently assigned by the router to the connected devices can be seen, as shown here:

-
Now, we can choose any address except 192.168.1.1, 192.168.1.2, and 192.168.1.3.
-
Let's assign 192.168.1.177 to the Arduino Ethernet Shield as a static IP address using the following sketch. Upload the following sketch into your Arduino board and open the Serial Monitor to verify the static IP address assigned.
-
Open your Arduino IDE and type or paste the following code from the sketch named B04844_01_06.ino from the code folder of this chapter.
#include <SPI.h>
#include <Ethernet.h>
byte mac[] = { 0xDE, 0xAD, 0xBE, 0xEF, 0xFE, 0xED };
byte ip[] = { 192, 168, 1, 177 };
EthernetServer server(80);
void setup()
{
Serial.begin(9600);
Ethernet.begin(mac, ip);
server.begin();
Serial.print("IP Address: ");
Serial.println(Ethernet.localIP());
}
void loop () {}
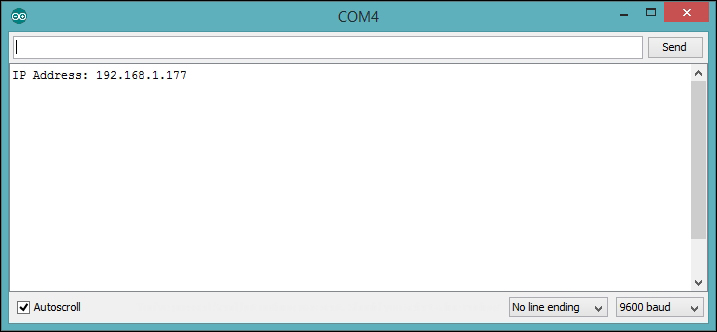
A static IP address
Obtaining an IP address using DHCP
The DHCP can be used to automatically assign a valid IP address to the Arduino Ethernet Shield. The only address you need is the MAC address of the Ethernet shield. Pass the MAC address as a parameter to the Ethernet.begin() method.
Upload the following Arduino sketch to your Arduino board, and open the Arduino Serial Monitor to see the auto-assigned IP address by the DHCP. Use this IP address to access your Ethernet shield through the Internet. Remember, this IP address may be changed at the next start up or reset.
Open your Arduino IDE and type or paste the following code from the sketch named B04844_01_07.ino from the code folder of this chapter:
#include <SPI.h>
#include <Ethernet.h>
byte mac[] = { 0xDE, 0xAD, 0xBE, 0xEF, 0xFE, 0xED };
EthernetServer server(80);
void setup()
{
Serial.begin(9600);
Ethernet.begin(mac);
server.begin();
Serial.print("IP Address: ");
Serial.println(Ethernet.localIP());
}
void loop () {}
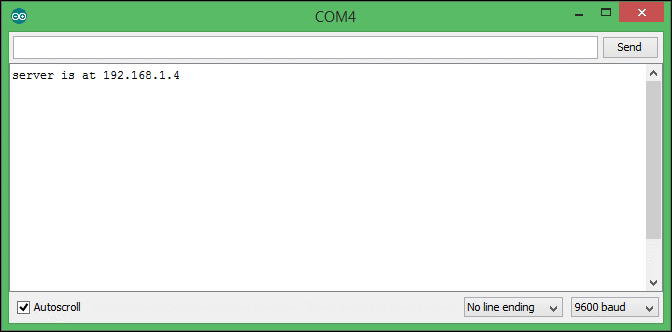
DHCP assigned IP address
Summary
In this chapter, you have gained a lot, and built your first Arduino Internet of Things (IoT) project, an internet controlled power switch, which is very smart. Using your creative knowledge, you can take this project to a more advanced level by adding many more functionalities, such as an LCD screen to the switch to display the current status and received user requests, or a feedback LED to show different statuses, and so on.

