Users Online
· Members Online: 0
· Total Members: 188
· Newest Member: meenachowdary055
Forum Threads
Latest Articles
Articles Hierarchy
How to Use the Find and Auto Completion Tools for Faster Model Setup
How to Use the Find and Auto Completion Tools for Faster Model Setup
 Amelia Halliday May 8, 2017
When making improvements to a model in the COMSOL Multiphysics® software, you are likely to add more parameters and variables. As the complexity of your model grows, it can become difficult to keep track of where these parameters are being used and defined, as well as to recall them for use in the settings of other nodes. In this blog post, we show you how to use the Auto Completion and Find tools for efficient model setup.
Tutorial Video: Using the Find and Auto Completion Tools in COMSOL Multiphysics®
Searching Within a Model Using the Find Tool
With the Find tool, we can search within a model for a parameter, variable, or even general text. To open this tool, we either click the respective Find button on the Quick Access Toolbar (or the Main Toolbar for the Linux® operating system and macOS) or use the Ctrl+F keys.

The Find button in the Windows® operating system version of the COMSOL Desktop®.
The Find tool searches the entire model for every instance that a search entry is used throughout the nodes of the model tree. We can search for all components and their sequence of operations, node names, identifiers, tags, and labels by using the Find tool.
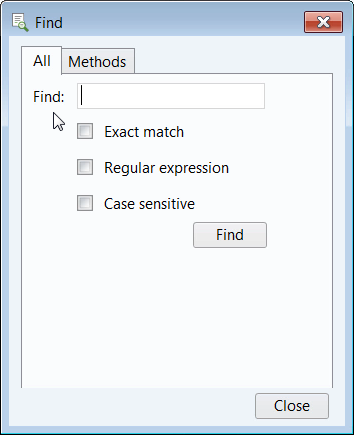
After opening the Find tool, we have several options with which we can conduct our search. Using the All tab enables us to search the model itself, while using the Methods tab lets us search within the Method Editor of the built-in Application Builder tool. There are also check boxes that we can use to obtain specific results, including:
- Exact matches
- A text string within a model, using the regular expression syntax
- Case-sensitive searches
In the tutorial video at the beginning of this blog post, you can get a detailed demonstration of how to search with the All tab. For more information on the other option for the Find tool — in the Methods section of the Application Builder — see the “Find and Replace” section of the Introduction to Application Builder documentation.

The Find tool.
After performing a search, a new tab appears in the Messages/Progress/Log window. This new Find Results tab is where we can find our search results in table form. The table lists every instance that the term or terms that we searched are used throughout the model. We can double-click any row within the table to automatically be redirected to the node and section in which the parameter or variable is being used.
In the tutorial video, we show how the Settings window and node selected in the Model Builder update as we toggle between several of the rows in the search results table. Additionally, each column within the table lists properties such as the node it is being used under, the context of how it is being used within the node, and the text with which it appears through the Node, Type, and Text columns, respectively. In the Text column, if we search some terms used in an expression, for example, the software provides the other text and characters that are a part of that same expression. If we search text that appears in the description for a parameter, the remaining text part of that description column also appears.
Every time we complete a new search, a new Find Results tab opens. This means that we can always refer back to previous search results in the designated tabs. Additionally, as we continue to work on and adjust a model, we can refresh the table to repopulate the search results.
How to Use the Auto Completion Tool
When you want to quickly recall and use parameters, variables, functions, and other definitions that you have created in your simulation, you can do so by using the Auto Completion tool.
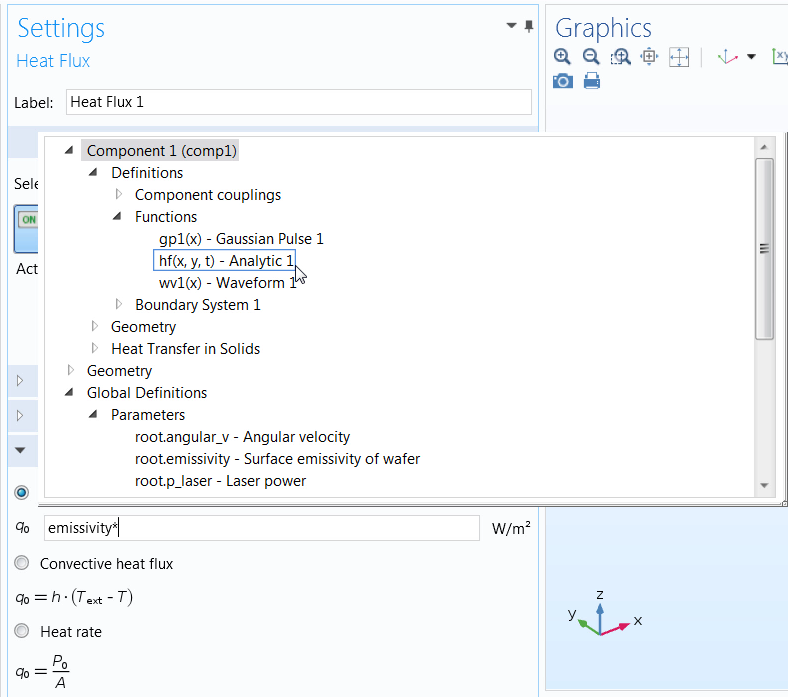
To open this tool, we hold down the Control key and press the space bar while in the Expressionfield of any window.

The Auto Completion tool, used to define a Heat Flux boundary condition.
When using a second input language, an alternative shortcut is to hold down the Controlkey and press the Forward Slash key.
When we create a model and progress through each step of the modeling workflow, it can become cumbersome to have to return to the node and window section where a definition such as a parameter, variable, or function is originally defined. This is especially the case when working with large or complex models that use numerous definitions.
The Auto Completion tool enables us to quickly and easily formulate expressions and fill in the settings for almost any node in the model tree, such as when defining a physics boundary condition. Almost anywhere we enter an expression in the software, we are able to use this functionality.
In the tutorial video, we demonstrate how to use the Auto Completion tool to define a parameter, review several categories of definitions and operators available when defining a variable, and show how to define a boundary condition in a model.
After prompting the Auto Completion window to open, we can access not only the parameters, variables, and functions that we’ve defined, but also several other categories — including math operators, physical constants, and other operators. Keep in mind that the categories available for selection will vary depending on the node under which we work. Different options will be available when we enter an expression within a geometry node versus a mesh or physics node. For example, if we use the Auto Completion tool to define a parameter, we can use other parameters defined previously in the Parameters table. If we used the Auto Completion tool to define a variable, we are able to implement other variables as well as parameters in our expression.
Streamline Your Modeling Workflow with the Find and Auto Completion Tools
No matter the simplicity or complexity of your simulation, the Find and Auto Completion tools are useful for your modeling workflow. Whether you are dealing with 5 or 50 parameters, being able to quickly and easily locate where a definition is used and access it to define other aspects of your simulation makes the process of setting up your model more efficient. To learn how to take further advantage of these features in COMSOL Multiphysics, watch the video at the top of this post.


