Users Online
· Members Online: 0
· Total Members: 188
· Newest Member: meenachowdary055
Forum Threads
Latest Articles
Articles Hierarchy
SAP HCM Features
SAP HCM Features
Welcome to the tutorial on SAP HCM Features. This tutorial is part of our free SAP HCM training course. Features are tools provided in SAP HCMwhich allow you to determine default values for different infotype fields as well as to control certain system processes. A feature is structured as a decision tree which returns a specific value by querying different fields.
Uses of SAP HCM Features
There are two main uses of features:
- To default the values of certain infotype fields
- To control screen modifications
This tutorial will focus on the first use. The second one will be covered separately in the tutorial on screen modifications.
Determining Default Values
SAP provides various Features to determine the default value of different infotype fields. Here we will cover five useful ones.
ABKRS
This SAP HCM feature enables you to define the default value for the payroll area in the Organizational Assignment infotype (Infotype 0001). You can query various fields like Country grouping, enterprise structure and personnel structure fields, and accordingly specify a return value. This return value is the payroll area that will be defaulted in the Organizational Assignment infotype (Infotype 0001).
For example, you can specify different default payroll areas based on Country grouping and Employee Subgroup. In this case, since the payroll area should be defaulted based on the Country grouping and Employee Subgroup, these are known as the fields for decision operation as shown in the screenshot in picture below.
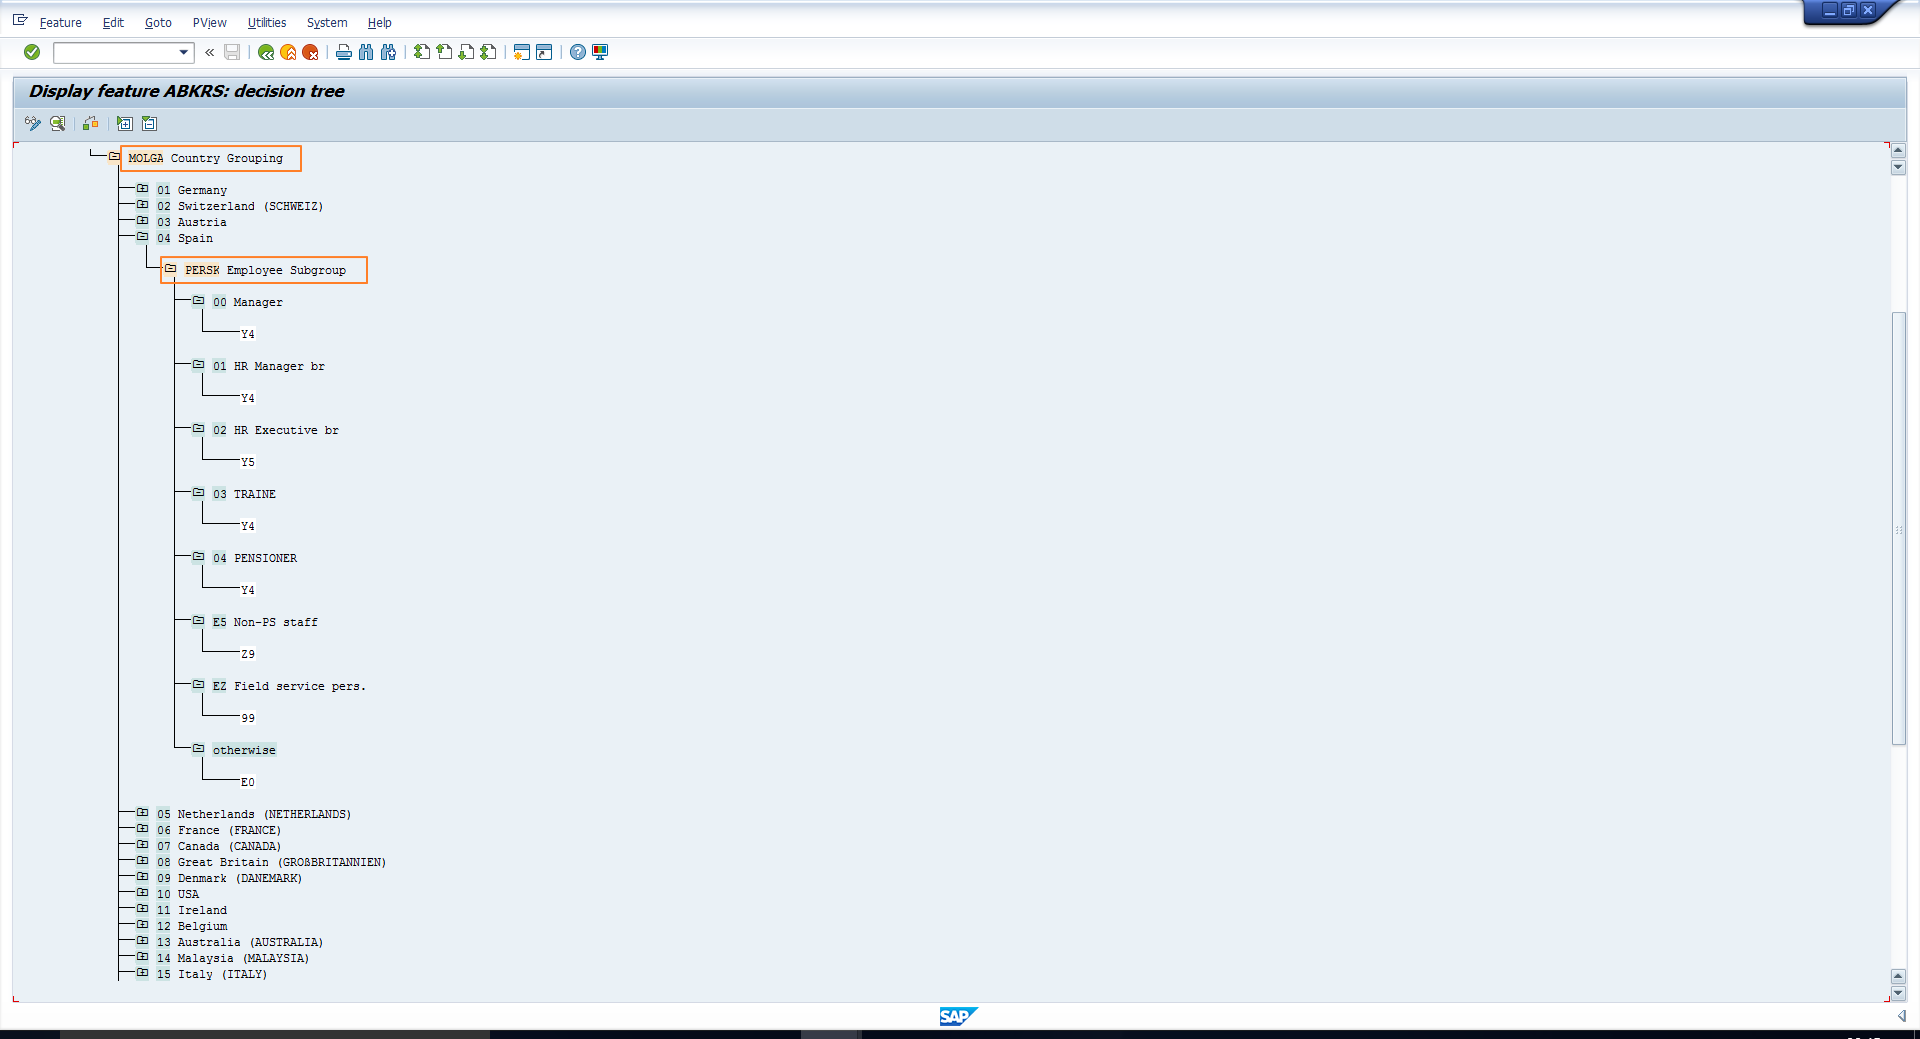 Transaction Code PE03 – ABKRS – Fields for Decision Operation
The next level of values corresponds to the decision field values as shown in the next picture.
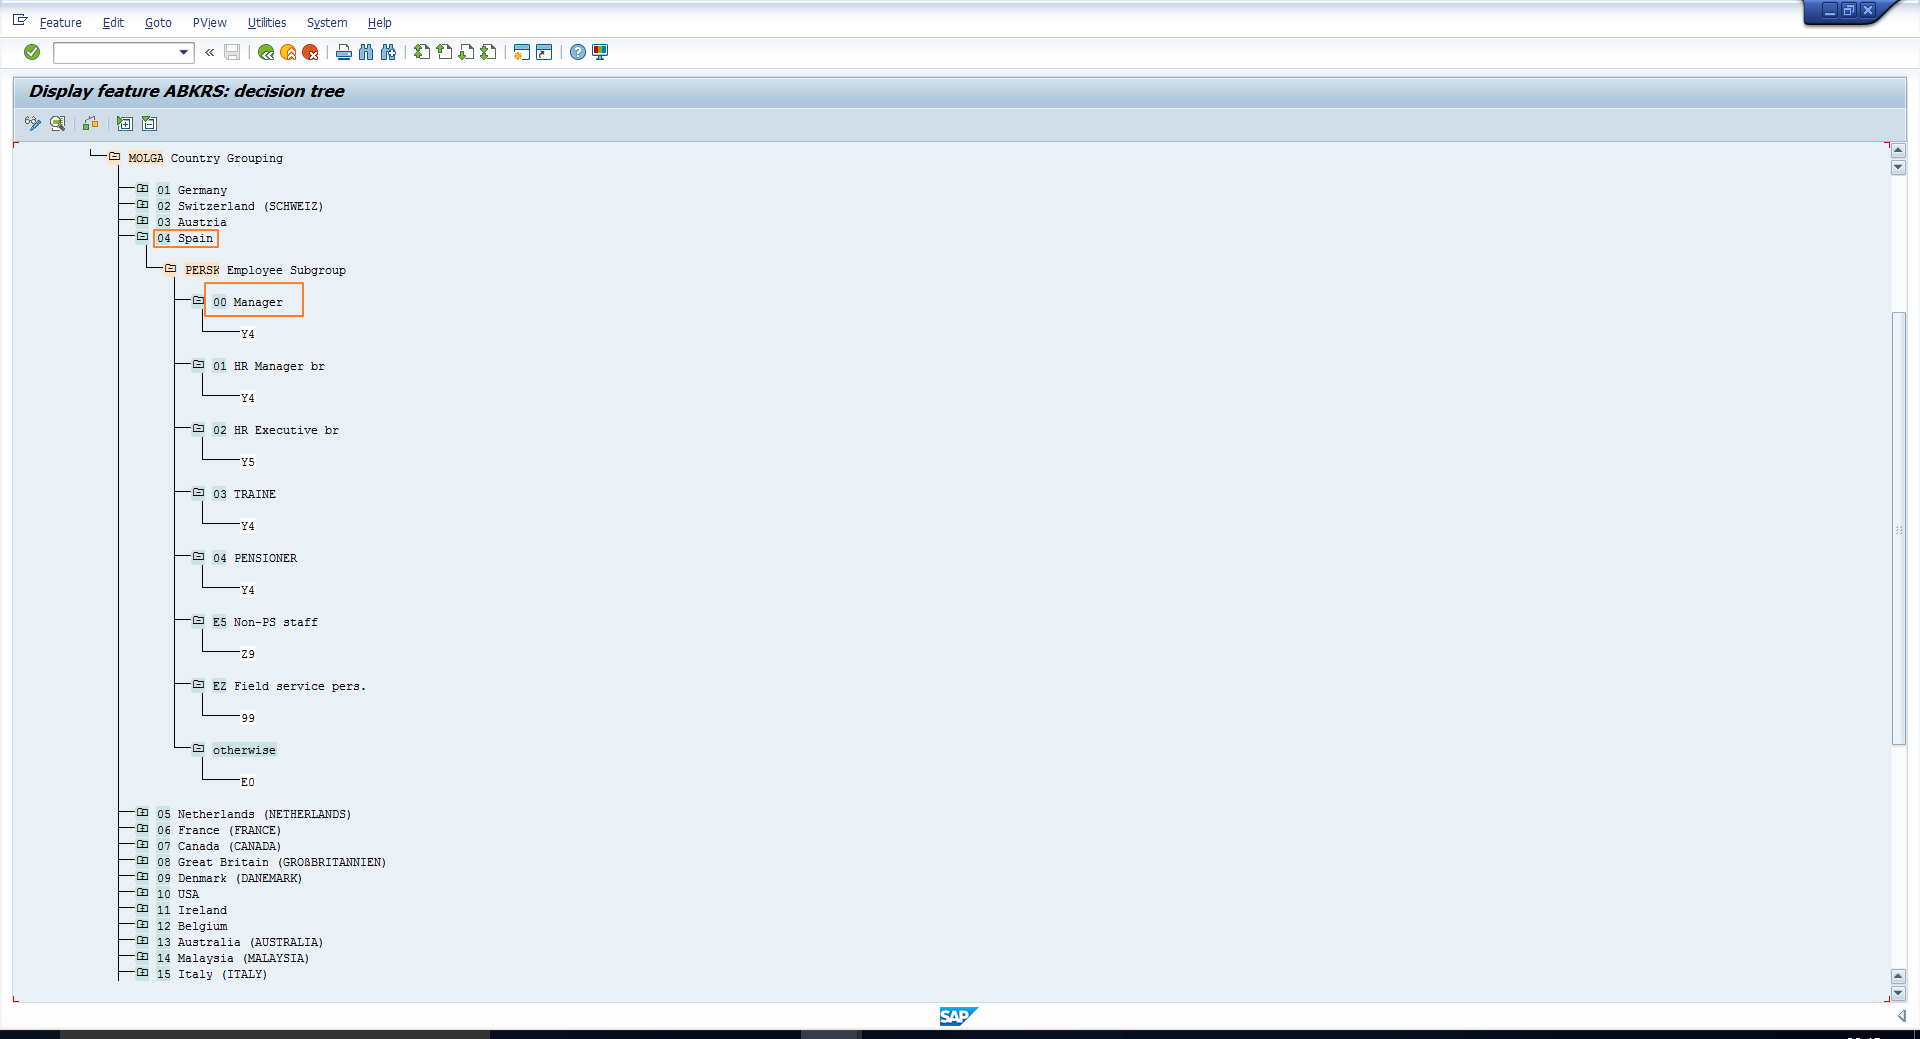 Transaction Code PE03 – ABKRS – Decision Field Values
The lowest level of the structure specifies the return value as shown below. This is the payroll area that will be defaulted in the Organizational assignment infotype.
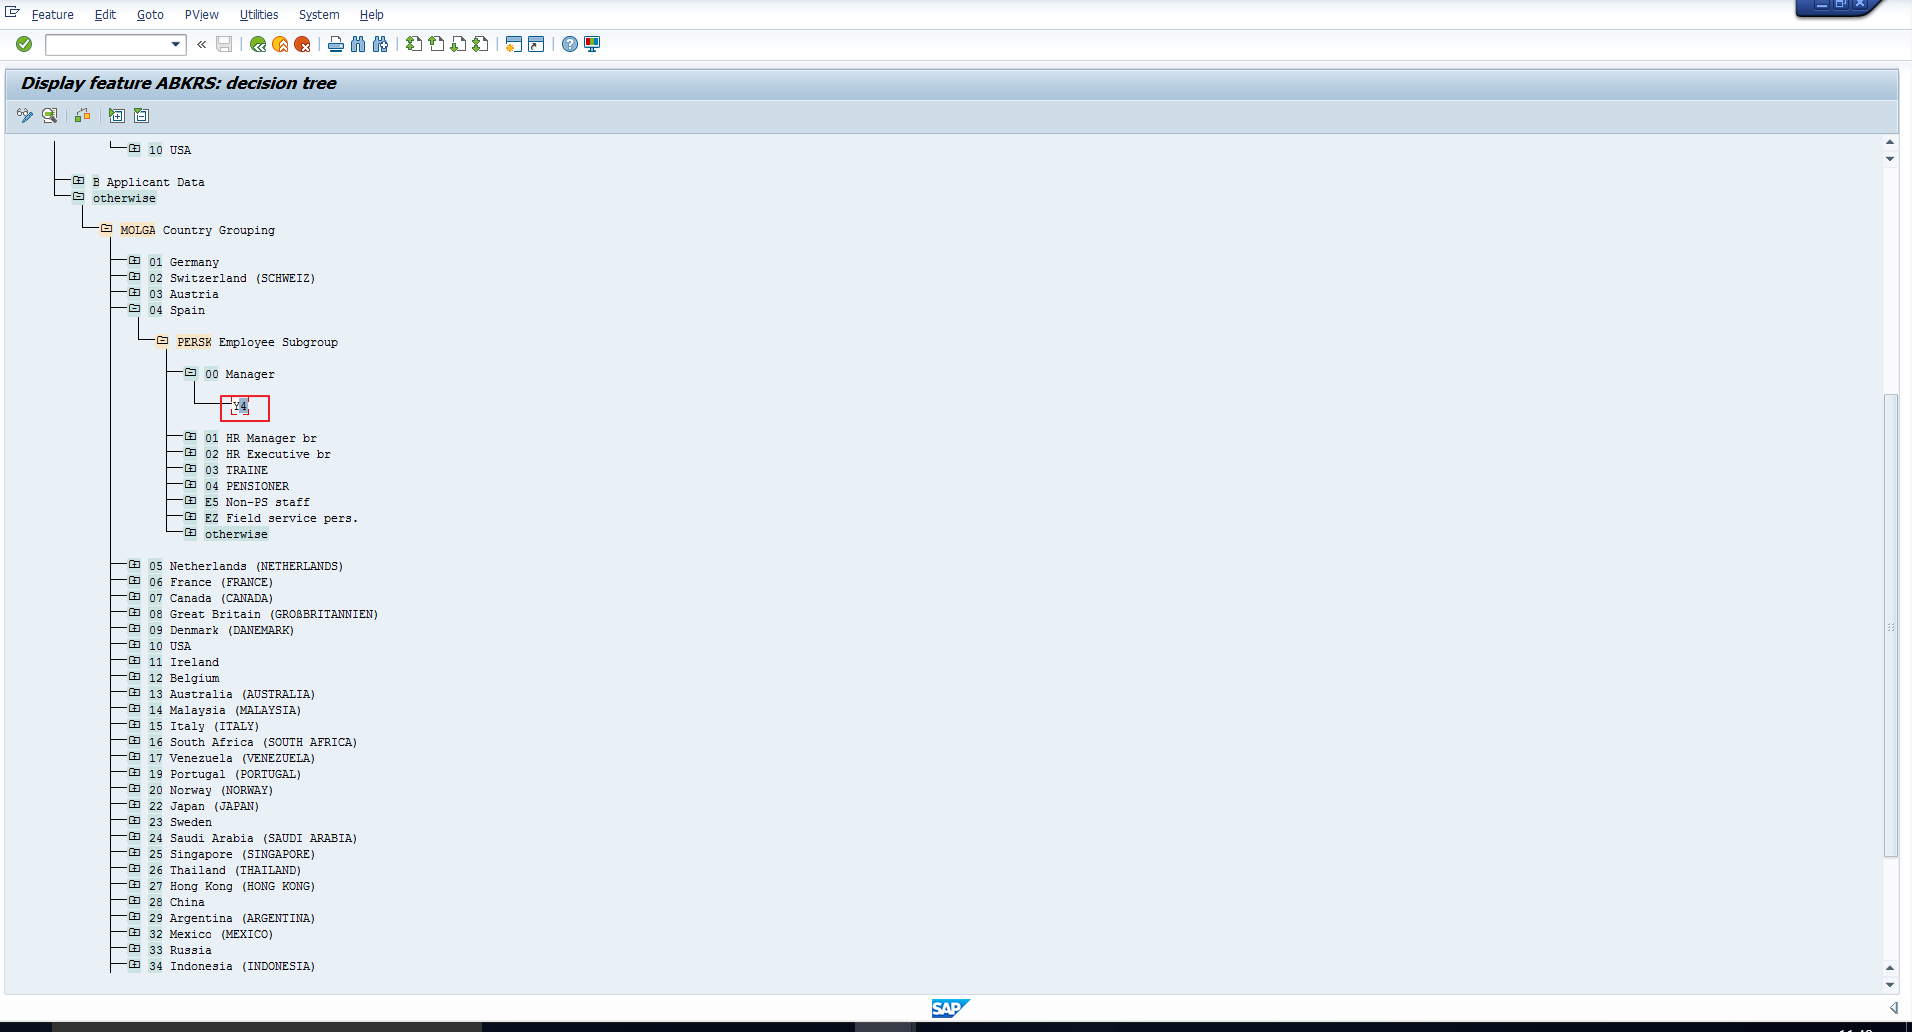 Transaction Code PE03 – ABKRS – Return Code (Default Payroll Area)
The three figures above suggest that, an employee belonging to Country grouping 04 (Spain) and Employee Subgroup 00 (Manager) will have Y4 defaulted as payroll area in the Organizational Assignment Infotype.
Let’s test this out by creating the Organizational assignment infotype for an employee with Country grouping Spain and Employee subgroup 00 (Manager).
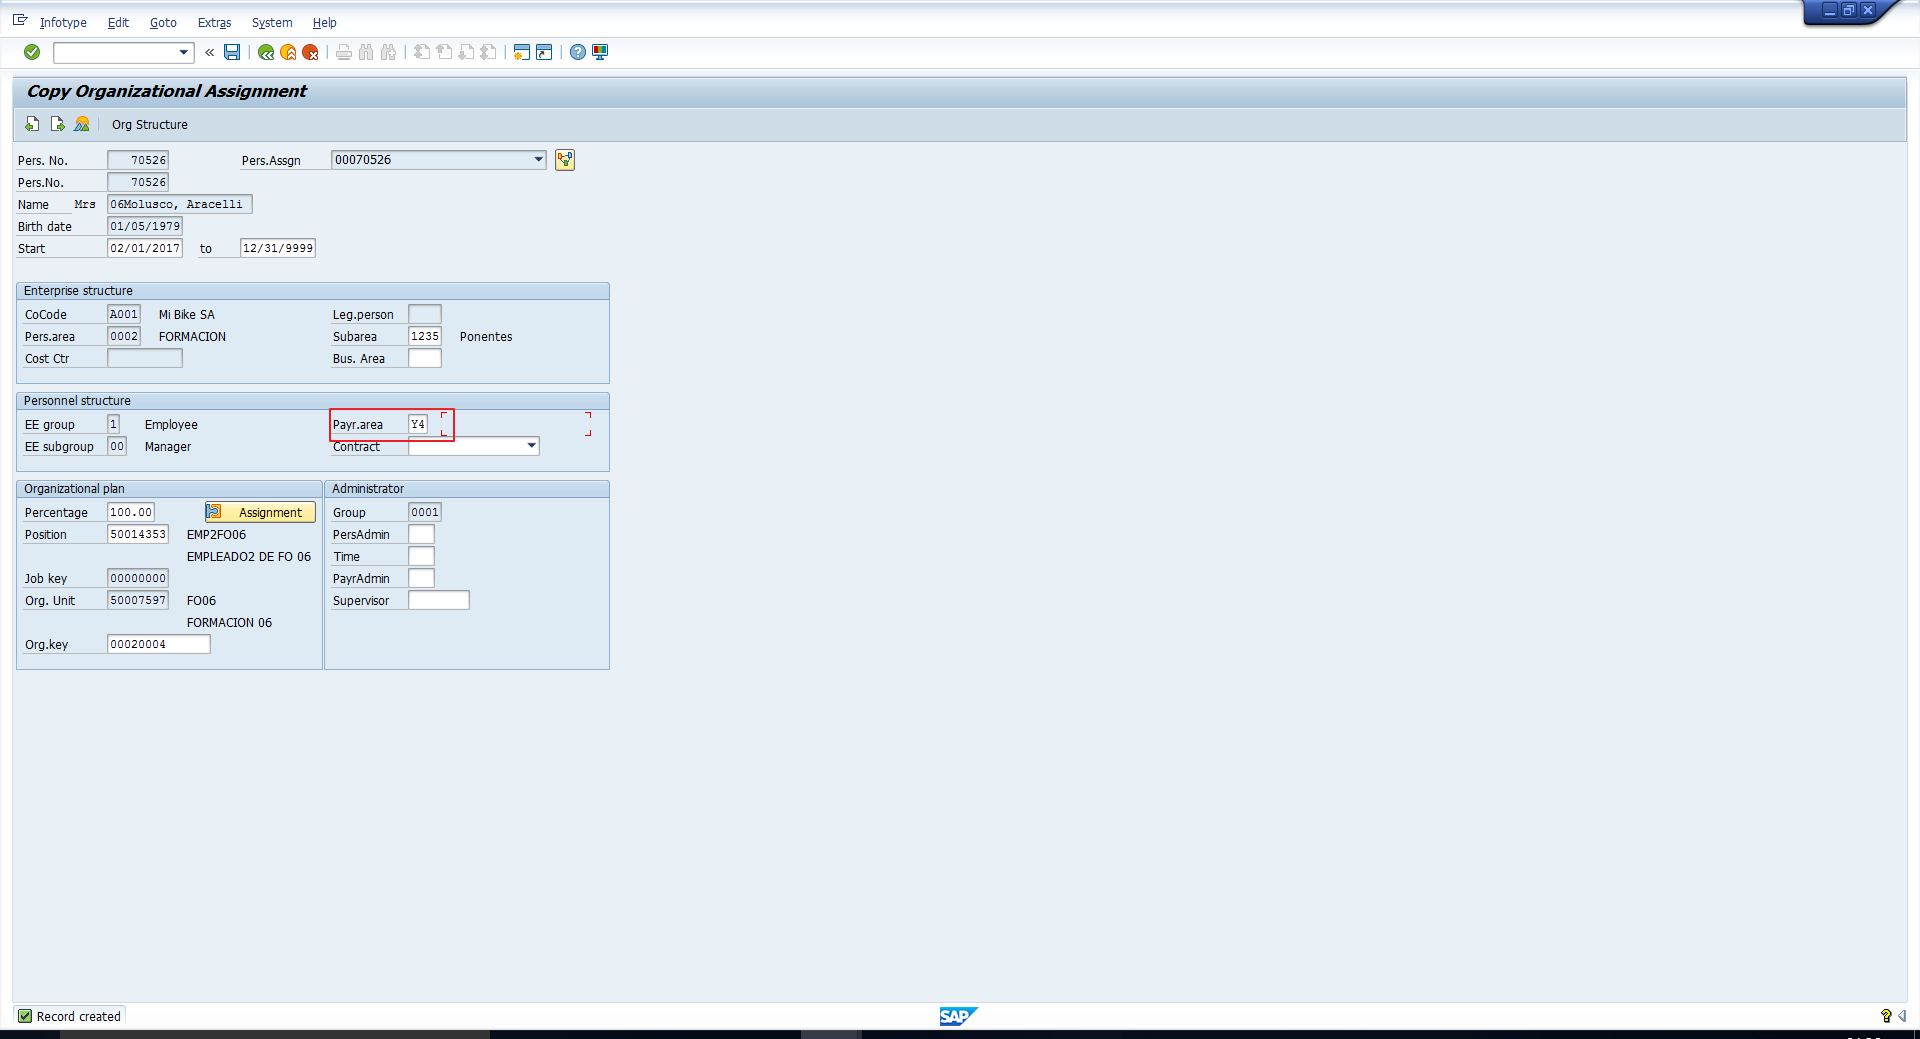 Transaction Code PA30 – Payroll Area Correctly Defaulted
We can see that Payroll area has been correctly defaulted to Y4 in the picture above.
PINCH
This SAP HCM feature enables you to define the default value for the Administrator group in the Organizational Assignment infotype (Infotype 0001). You can query various fields like country grouping, enterprise structure and personnel structure fields, and accordingly specify a return value. This return value is the Administrator group that will be defaulted in the Organizational Assignment infotype (Infotype 0001).
For example, you can specify different default administrator groups based on Personnel Area as depicted in the figure below. We can see from the below image that if the Personnel area is anything other than KFBY, then the Administrator group will be defaulted as 0001 in the Organizational Assignment infotype.
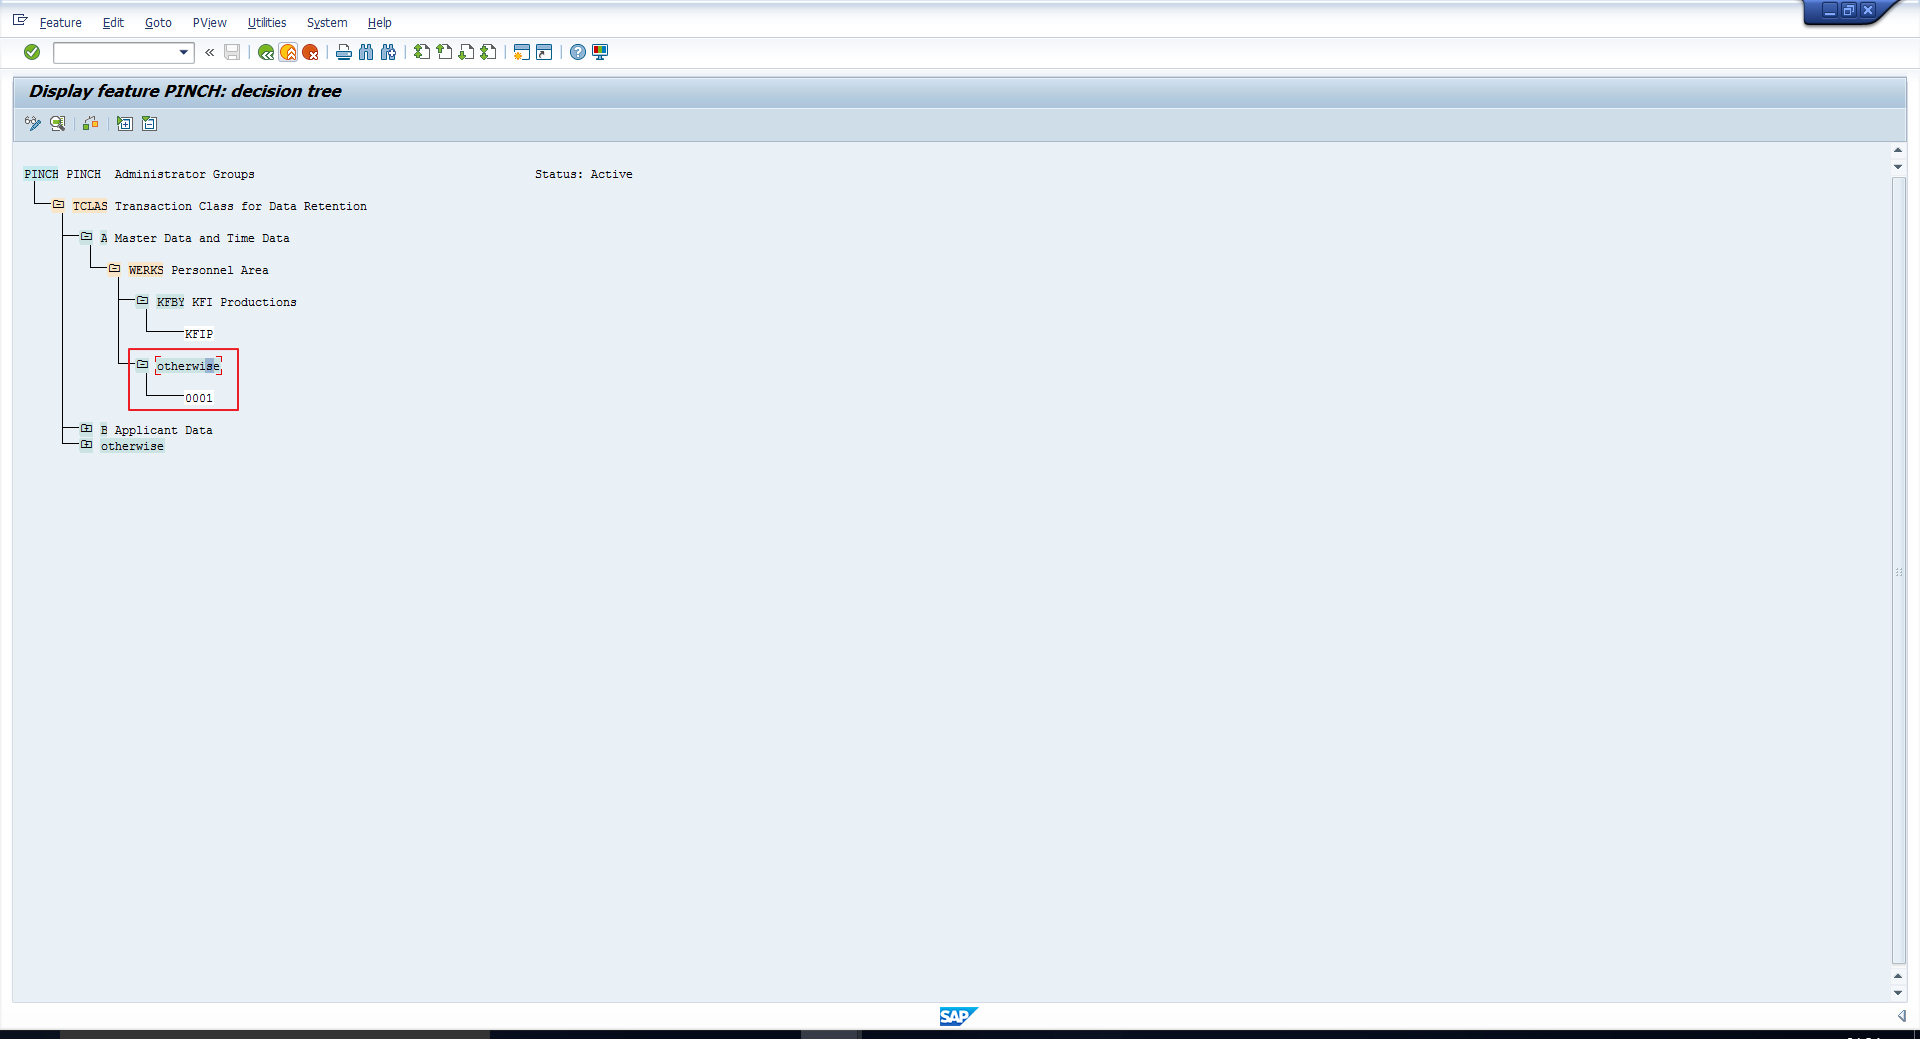 Transaction code PE03 – PINCH – Default Administrator Group
Let’s verify this by considering an employee with Personnel Area 0002. In the picture below, we can see that the Administrator group is 0001. This is in accordance with the feature.
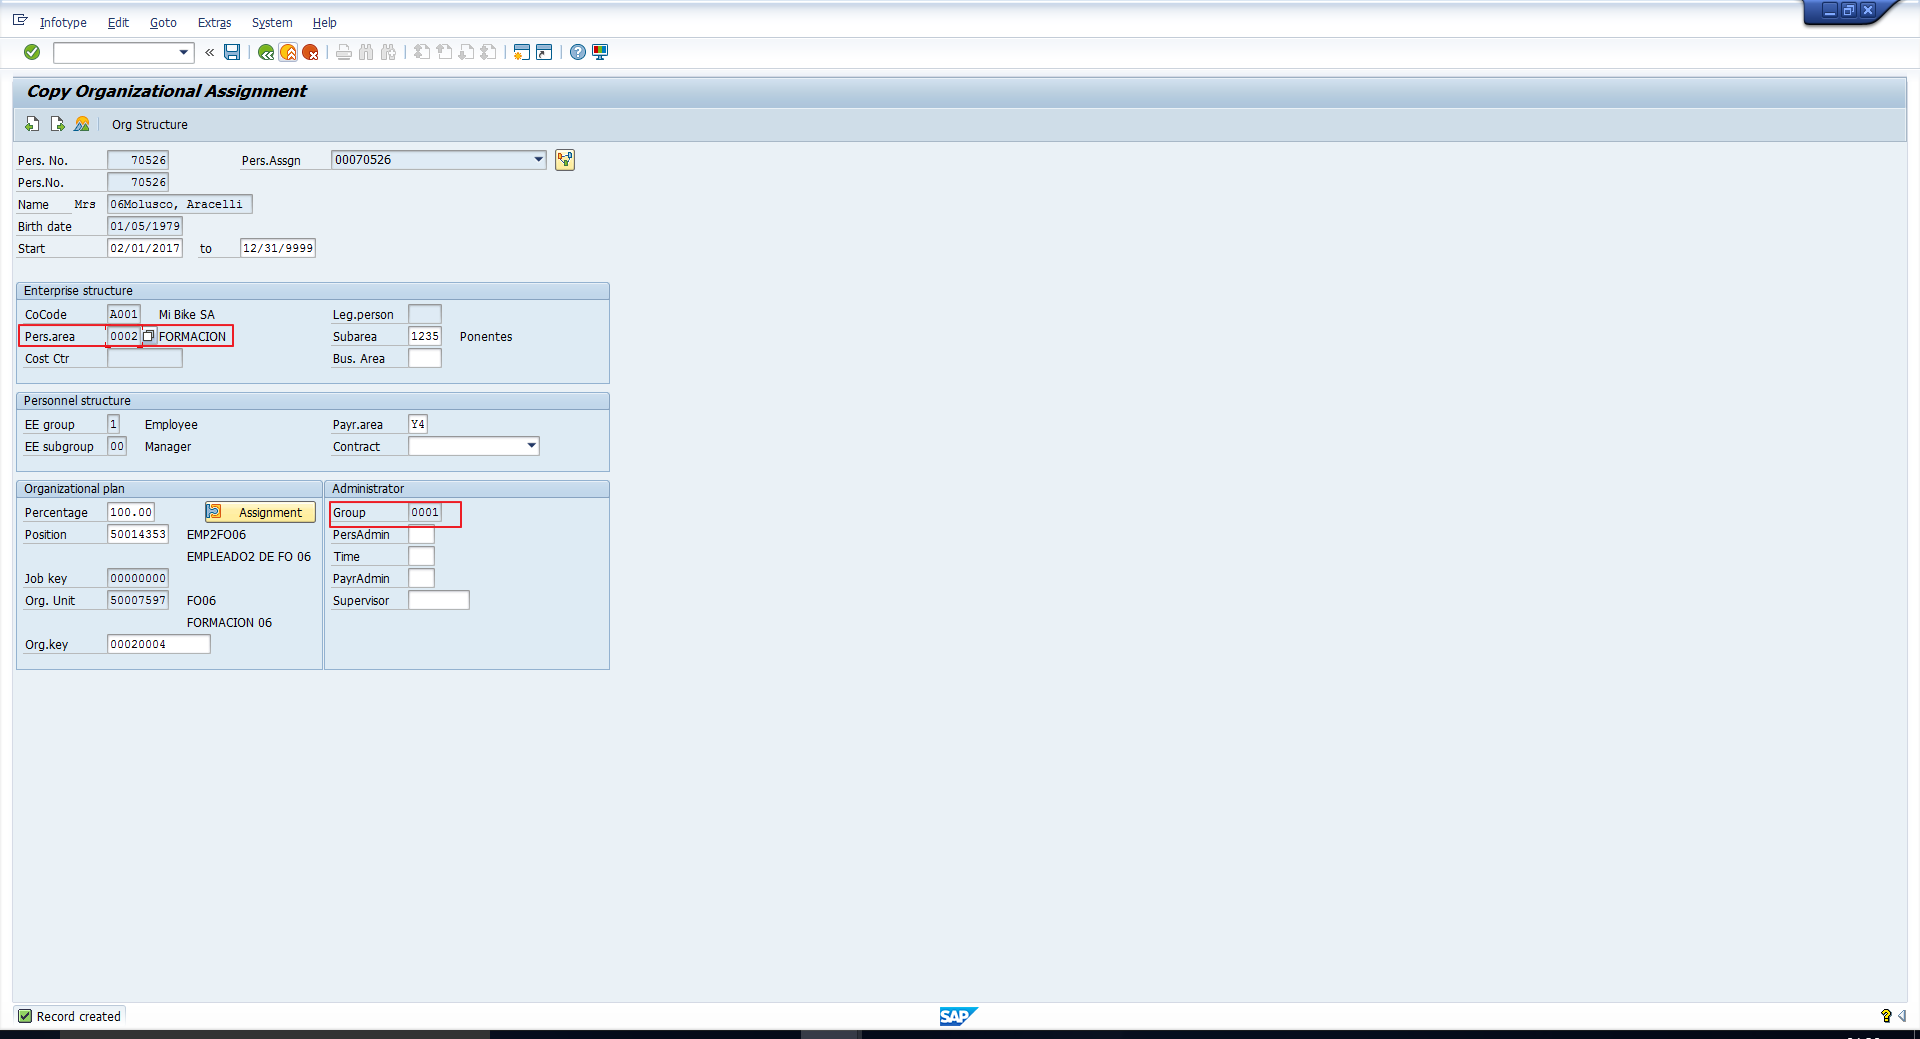 Transaction Code PA30 -Administrator Group Defaulted Correctly
SCHKZ
This SAP HCM feature enables you to define the default value for the Work schedule rule in the Planned Working Time infotype (Infotype 0007). You can query various fields like country grouping, enterprise structure and personnel structure fields, and accordingly specify a return value. This return value is the Work schedule rule that will be defaulted in the Planned Working Time infotype (Infotype 0007).
For example, you can specify different work schedule rules based on Employee Group as depicted in the picture below. We can see from the below image that if the Employee Group is 1 (Employee), then the Work schedule rule will be defaulted as RRRRWSR in the Planned Working Time infotype.
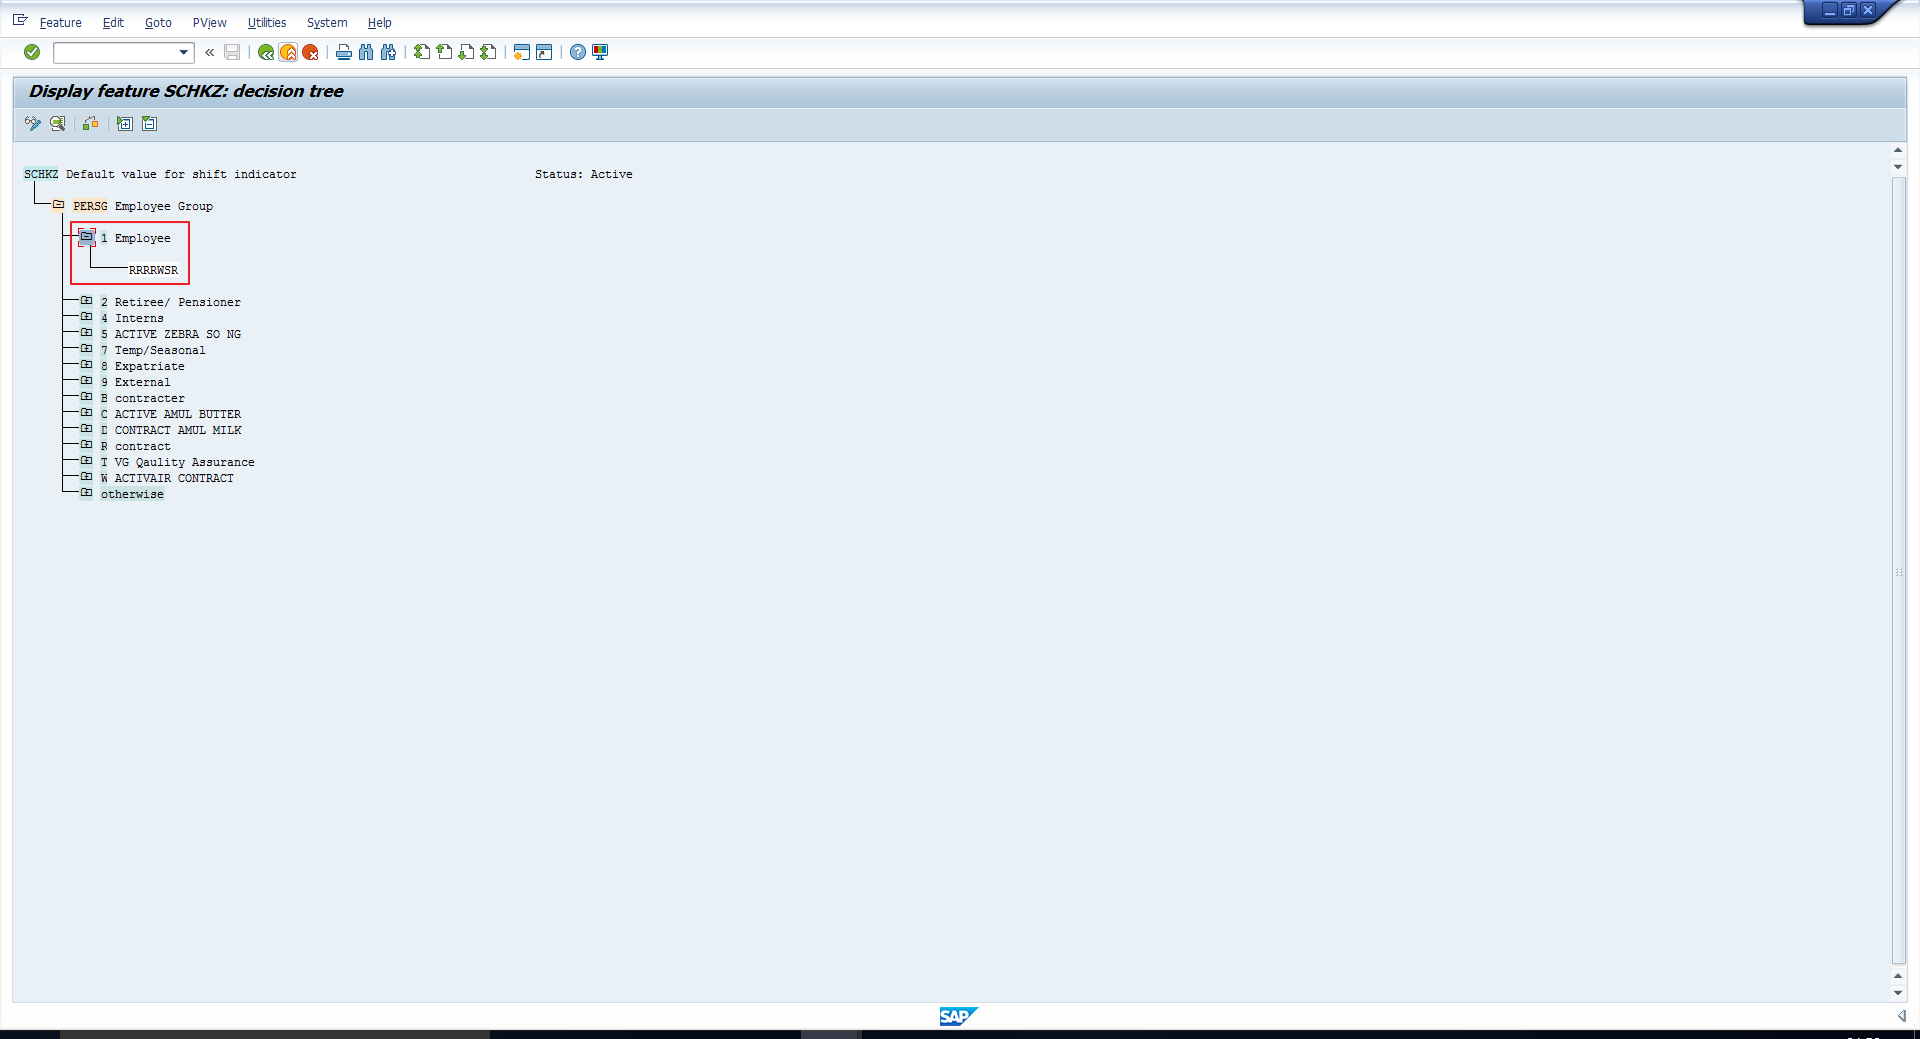 Transaction Code PE03 – Default Work Schedule Rule
Let’s verify this by considering an employee with Employee group 1 (Employee). In the next picture, we can see that the Work schedule rule is defaulted to RRRRWSR. This is in accordance with the feature.
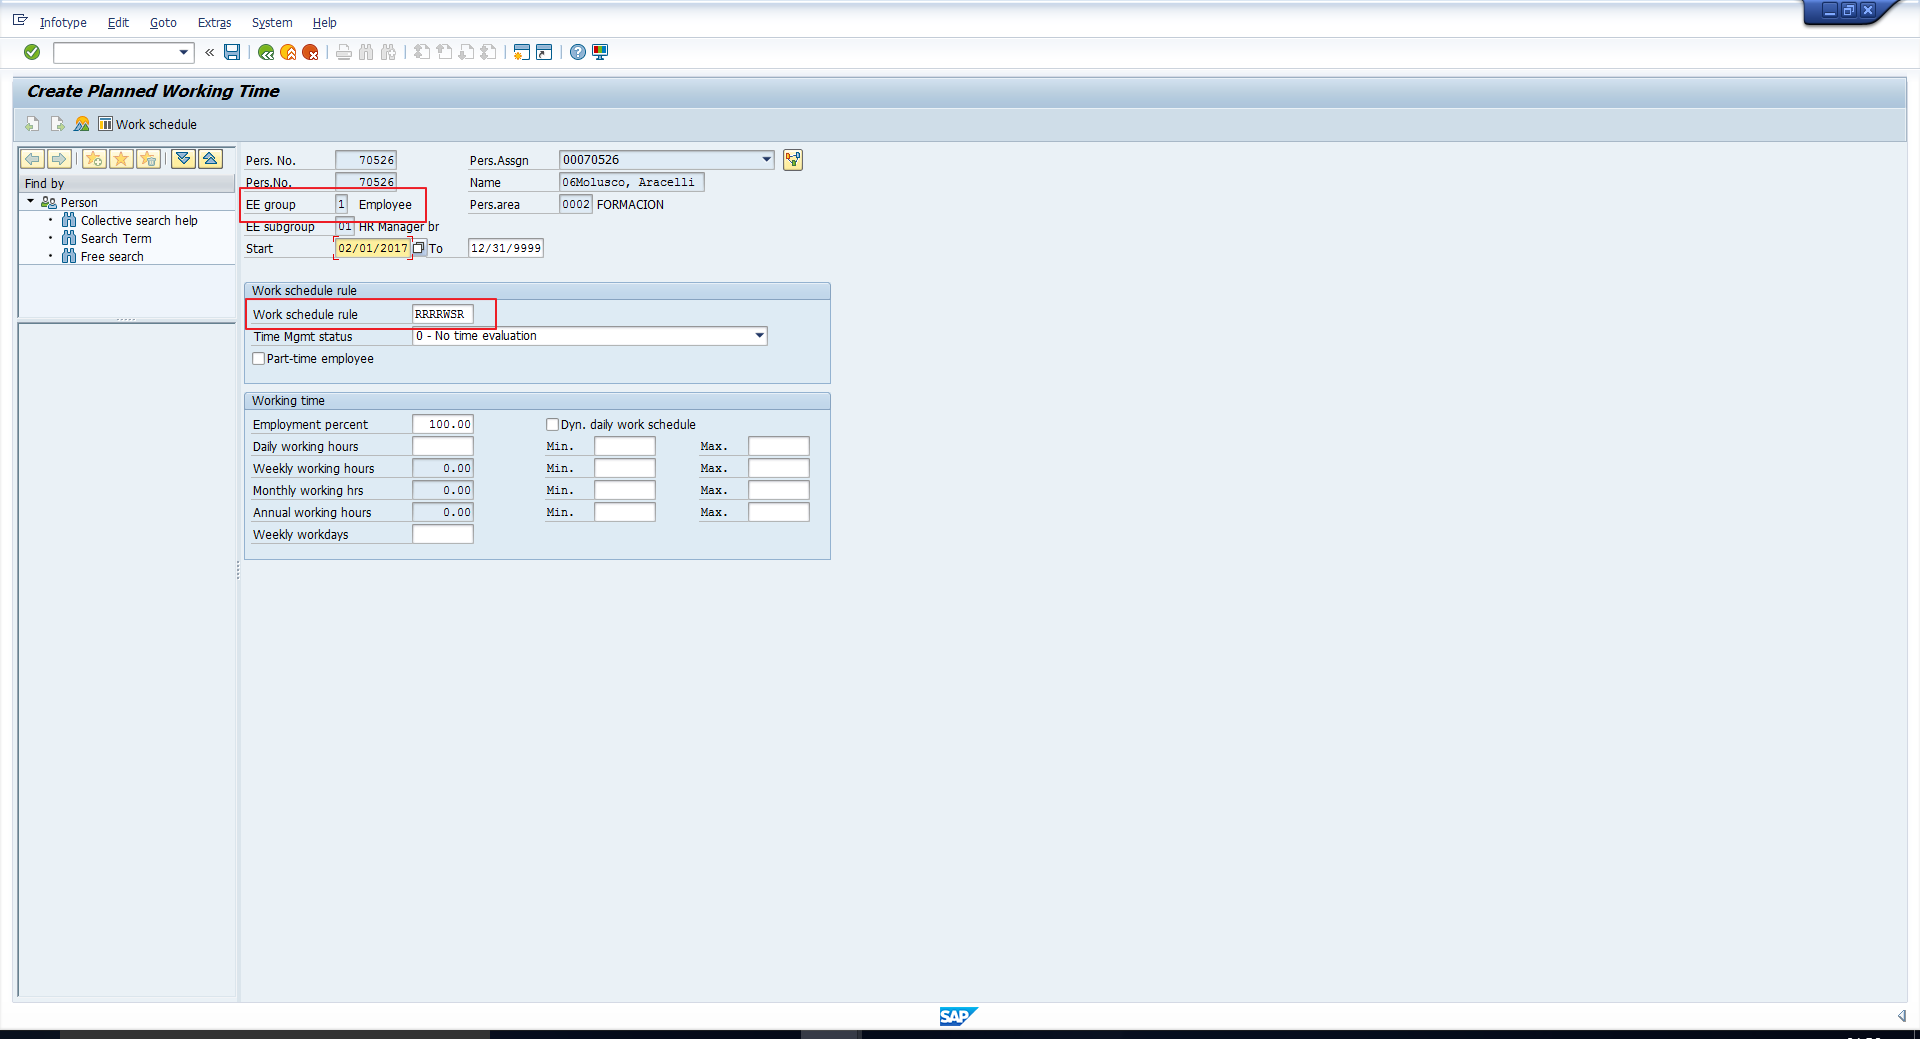 Transaction Code PA30 -Work Schedule Rule Defaulted Correctly
TMSTA
This SAP HCM feature enables you to define the default value for the Time management status in the Planned Working Time infotype (Infotype 0007). You can query various fields like country grouping, enterprise structure and personnel structure fields, and accordingly specify a return value. This return value is the Time management status that will be defaulted in the Planned Working Time infotype (Infotype 0007).
For example, you can specify a different time management status based on Country Grouping as depicted in the figure below. We can see from the below image that if the Country Group is anything other than those explicitly specified, then the Time management status will be defaulted as 0 in the Planned Working Time infotype.
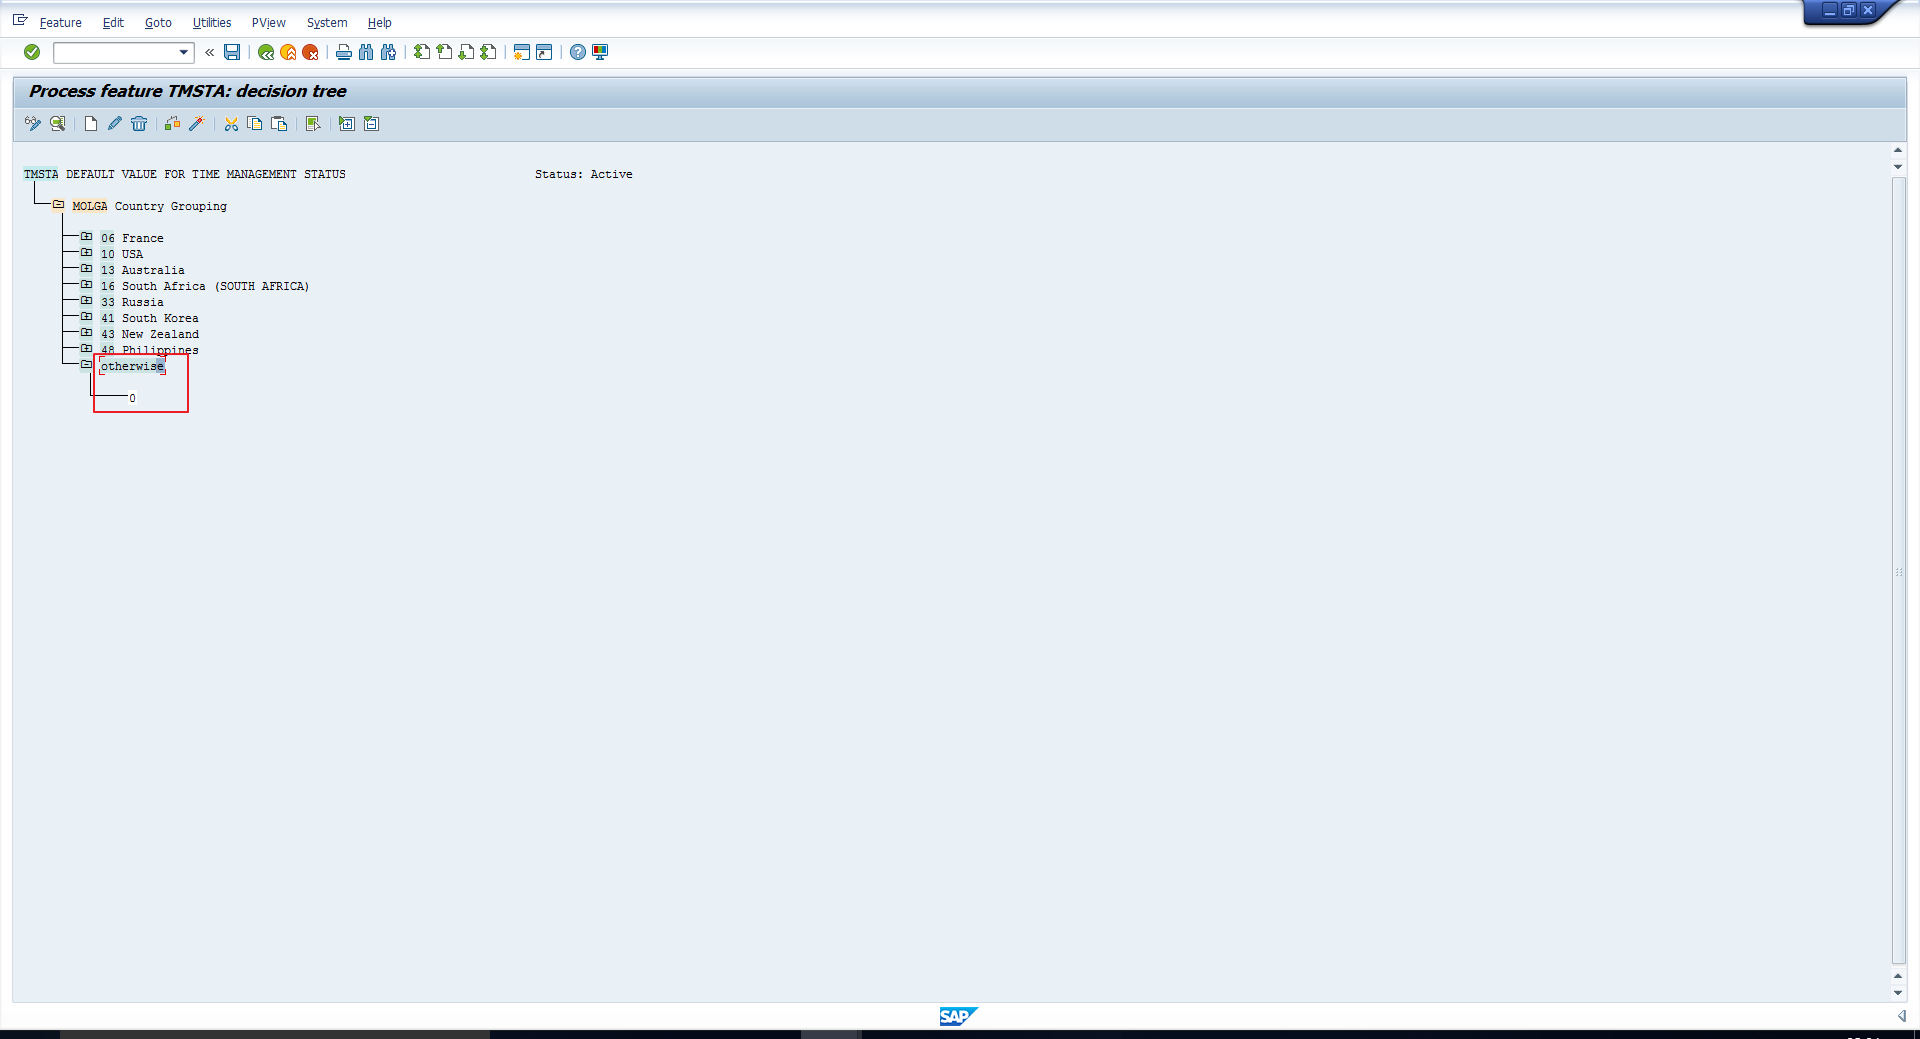 Transaction Code PE03 – Default Time Management Status
Let’s test this by considering an employee with Country grouping 04 (Spain). In the picture below, we can see that the Time management status is defaulted to 0. This is in accordance with the feature.
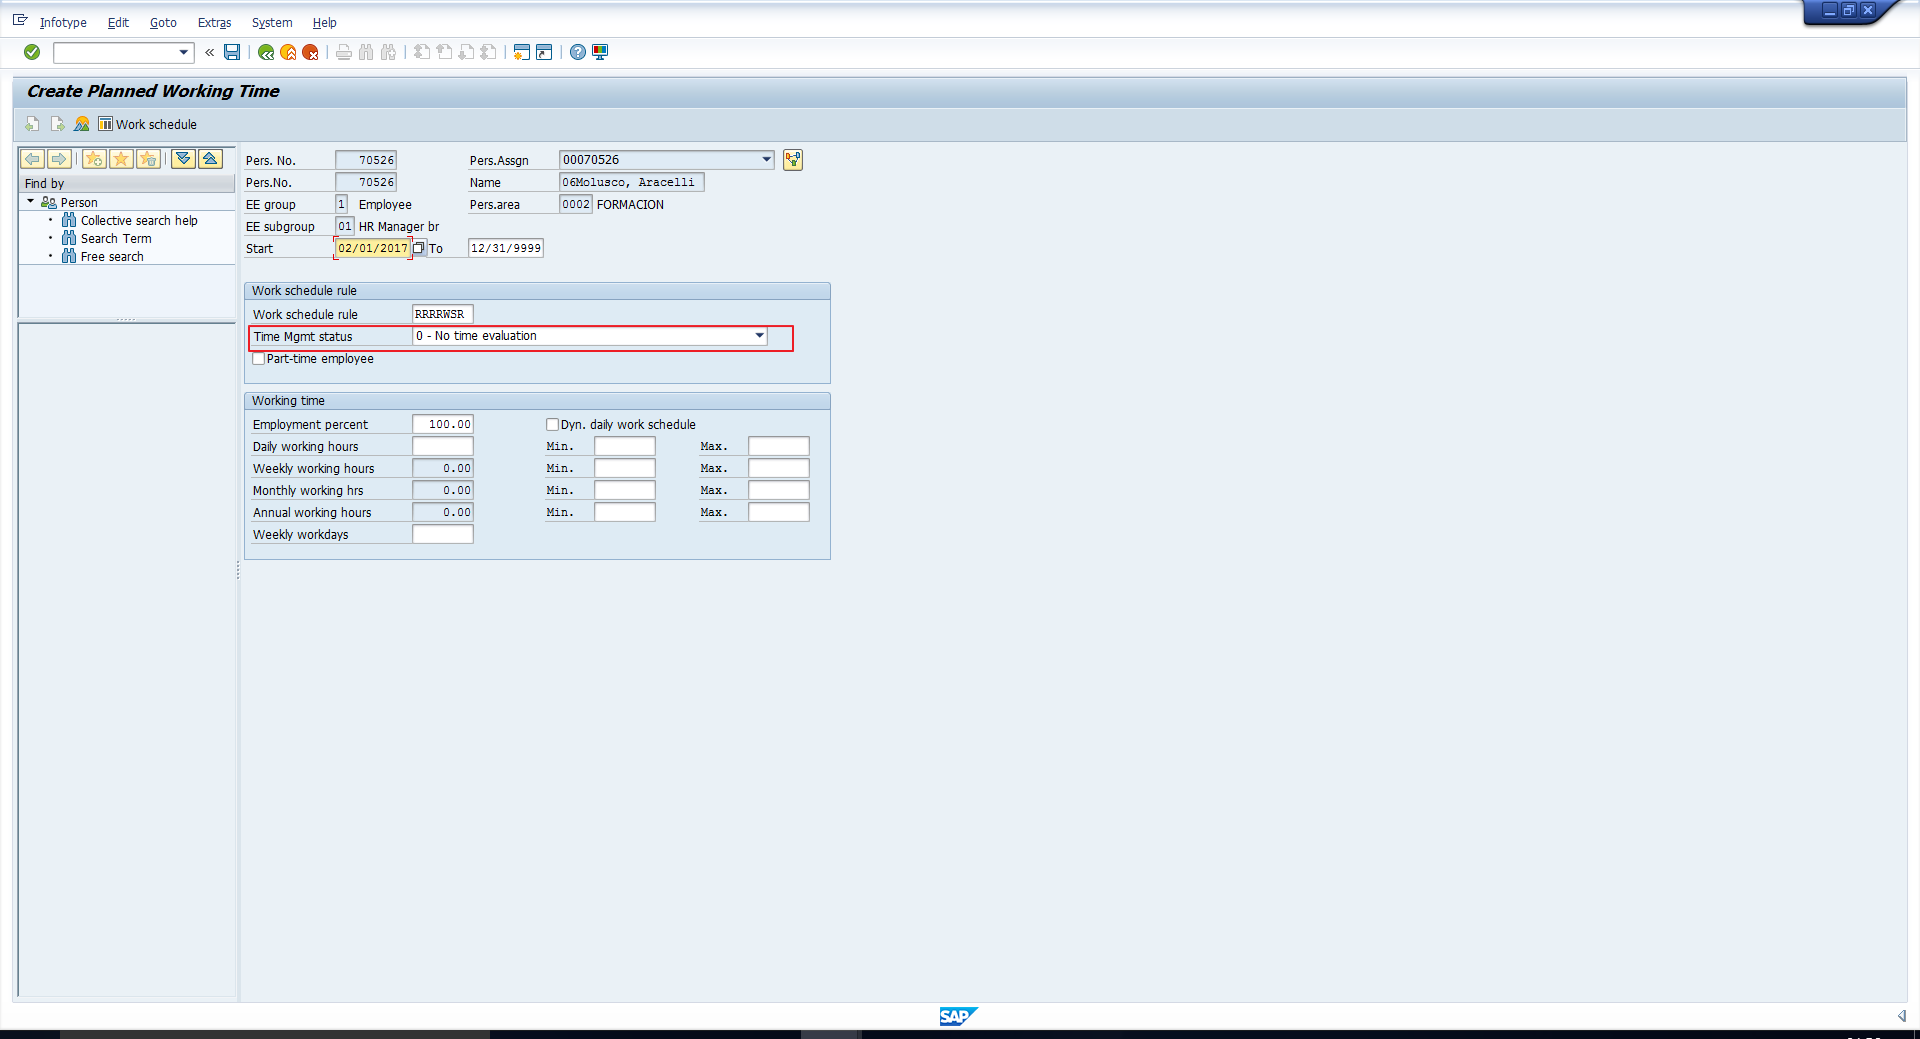 Transaction Code PA30 -Time Management Status Defaulted Correctly
DATAR
This feature enables you to define default date types in the Date Specifications infotype (Infotype 0041). You can query various fields like Country grouping, Enterprise structure and personnel structure fields, and accordingly specify a return table, comprising one or more return values. This return table is the list of date types that will be defaulted in the Date Specifications infotype (Infotype 0041).
For example, you can specify different date types based on Country Grouping as depicted in the next picture. We can see from the below image that if the Country Grouping is 04 (Spain), then the date types 40 and 41 will be defaulted in the Date Specifications infotype.
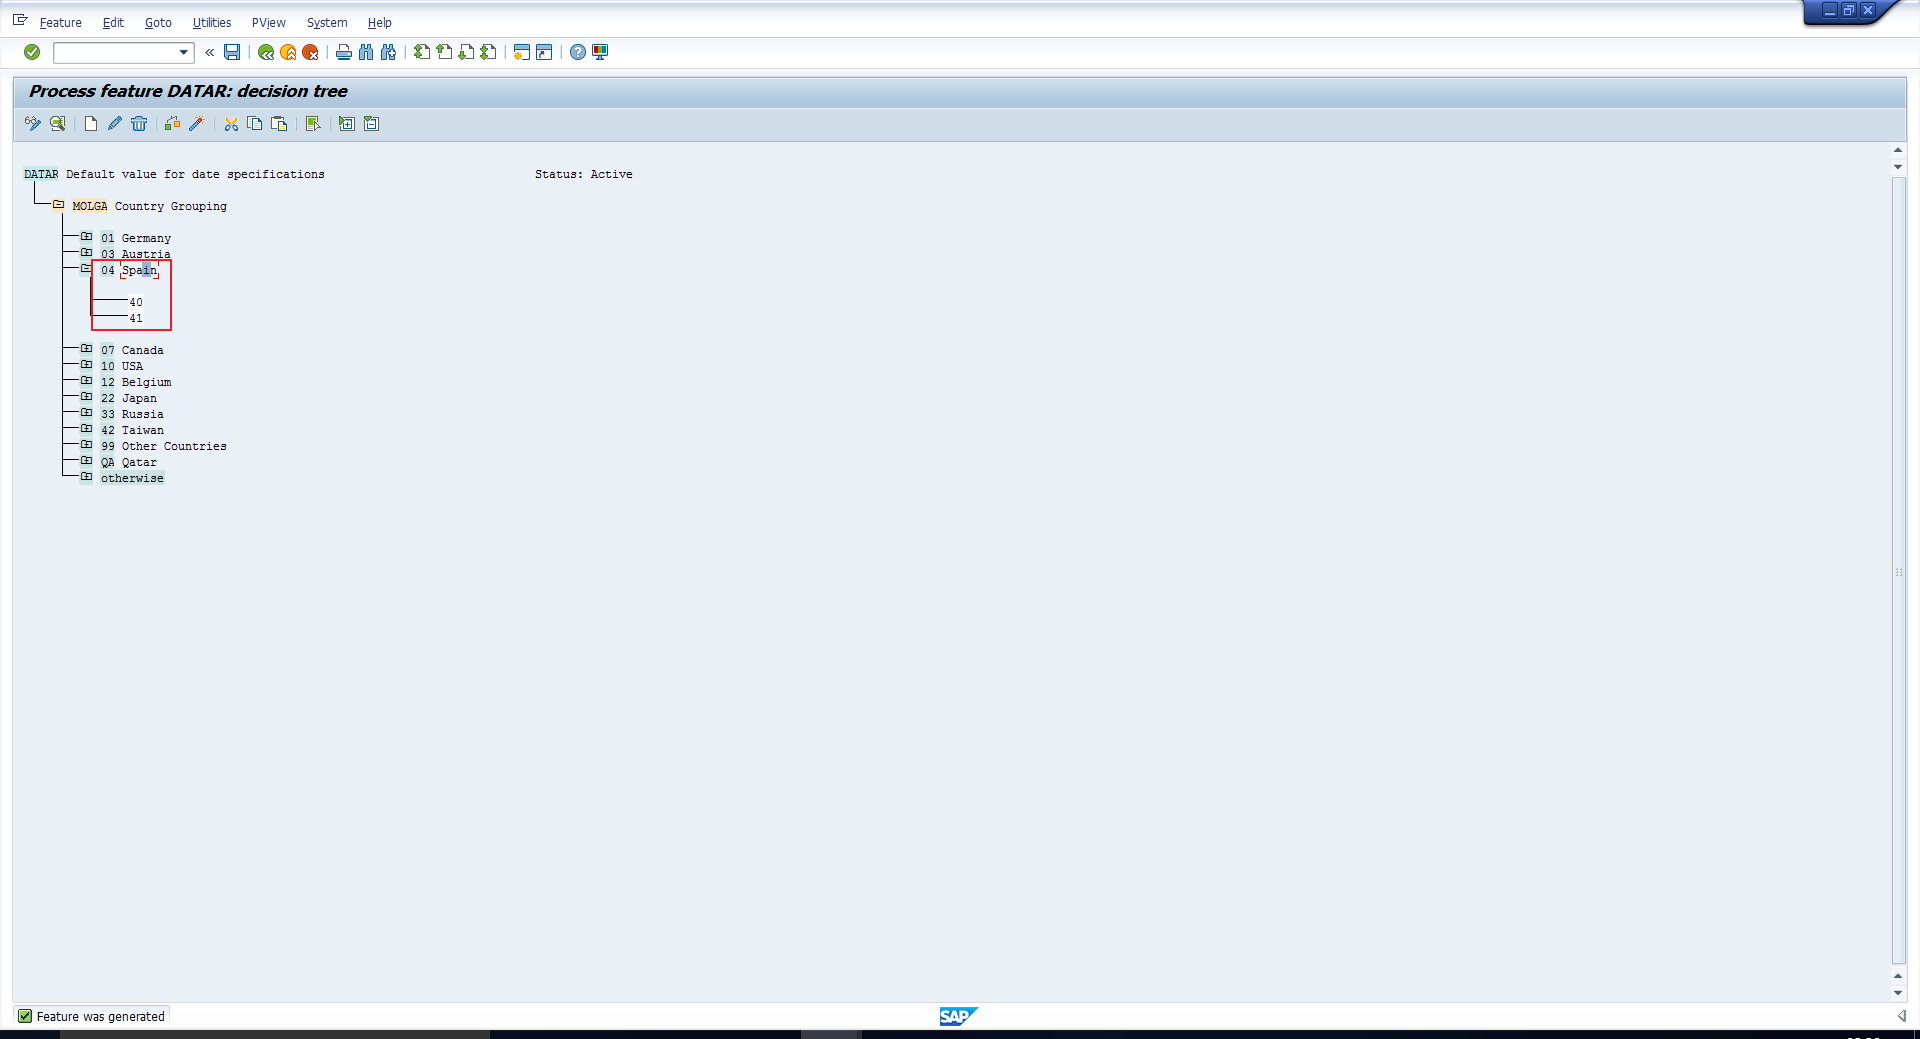 Transaction Code PE03 – Default Date Types
Let’s test this by considering an employee belonging to Country grouping 04 (Spain). In the next picture, we can see that the date types 40 (First working day) and 41(First payday) are defaulted. This is in accordance with the feature.
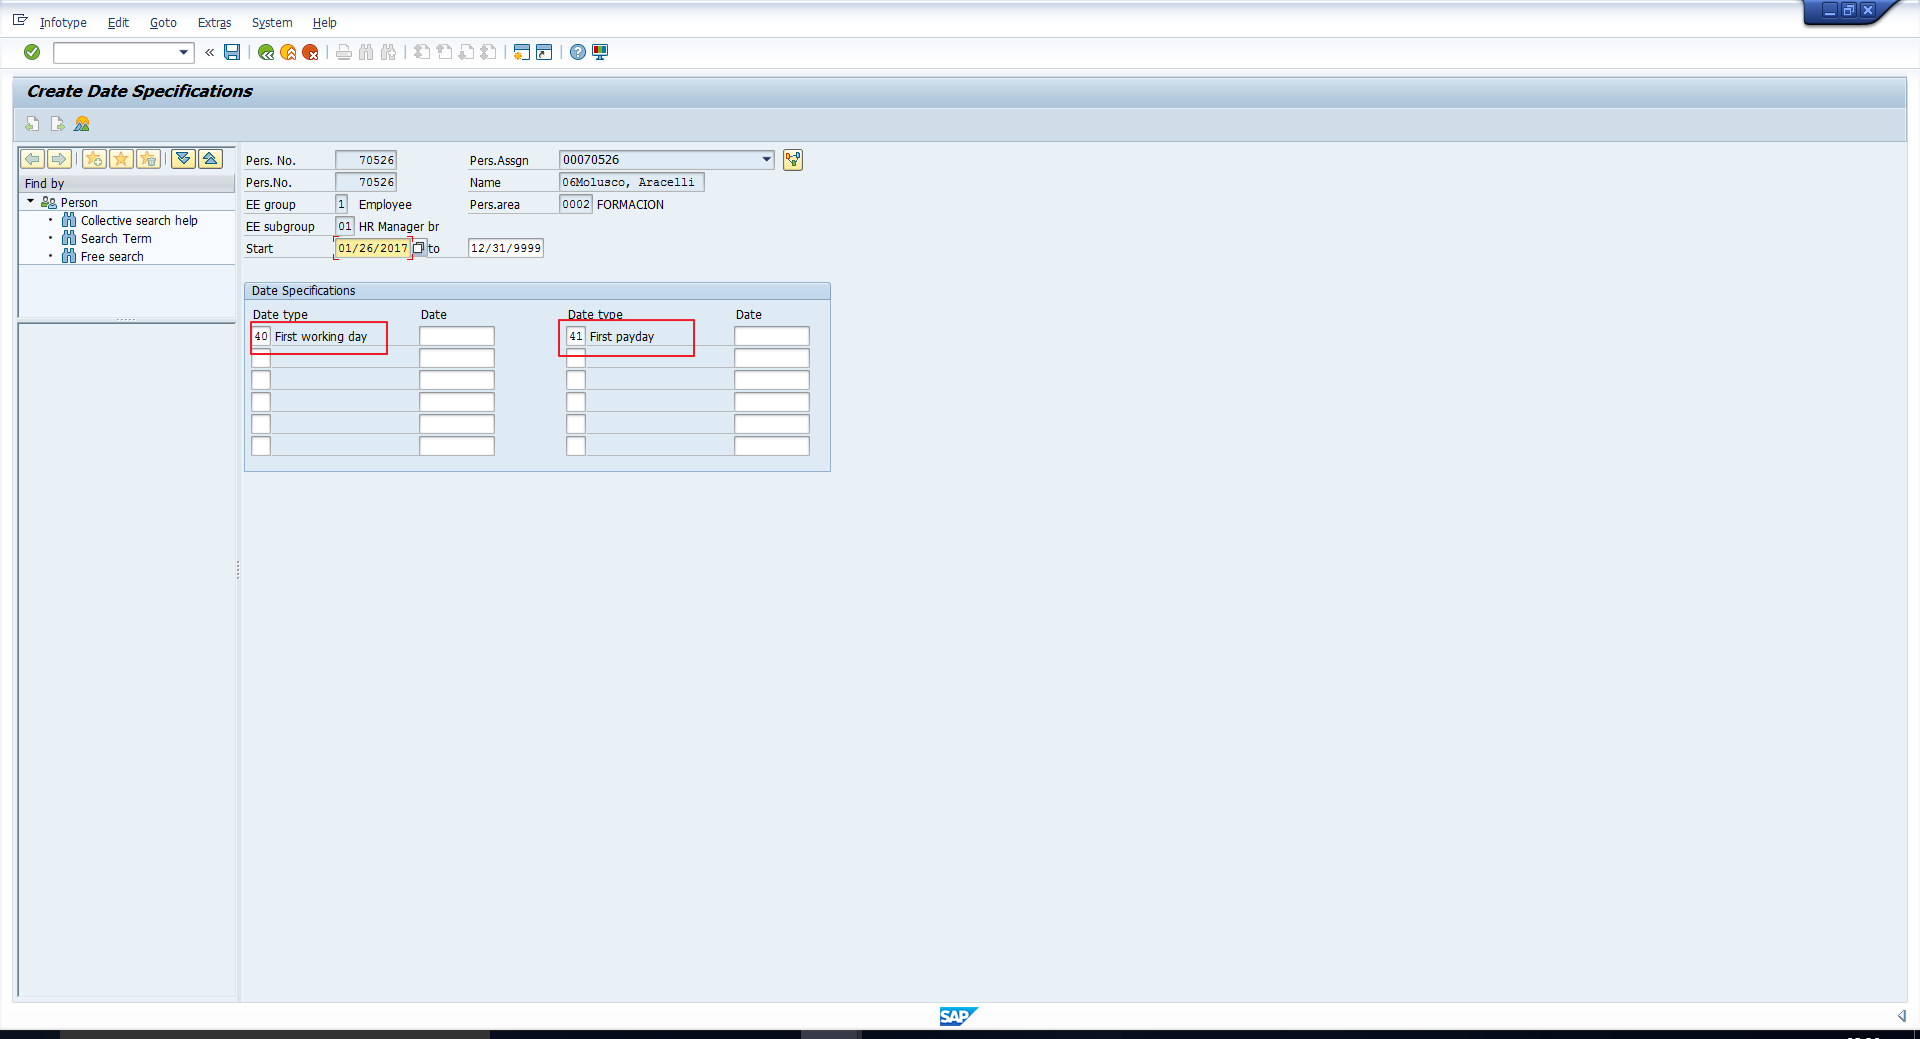 Transaction Code PA30 – Date Types Defaulted Correctly
SAP HCM Features Editor
Individual features can be accessed through various paths in Customizing based on the function of the feature. Alternatively, and more conveniently, all features can be accessed using a single transaction code PE03. The screen of this transaction is shown on the figure below.
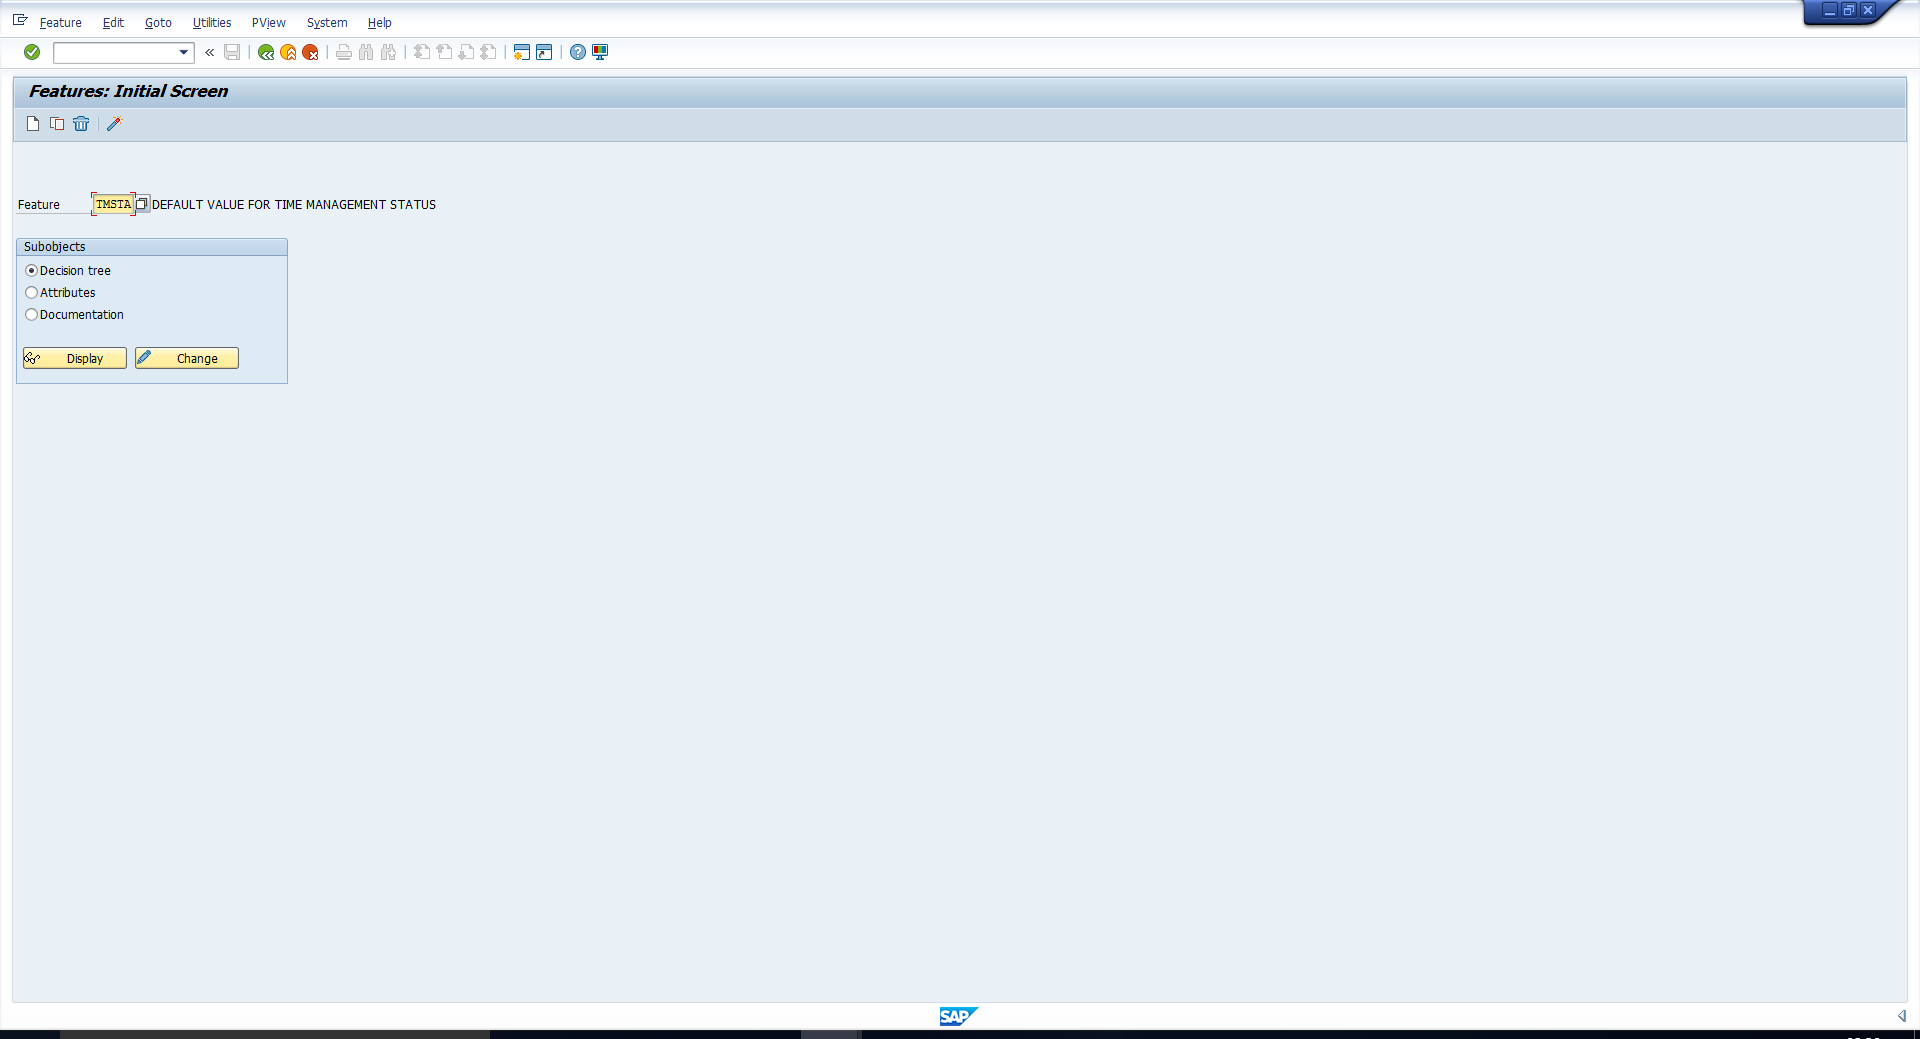 Transaction Code PE03 – Displaying or Editing Features
As you can see, there are three radio buttons in this screen. Select the Decision tree radio button and click on Display to view the feature, or Change to edit it. This takes you to the Decision tree which contains the actual feature maintenance.
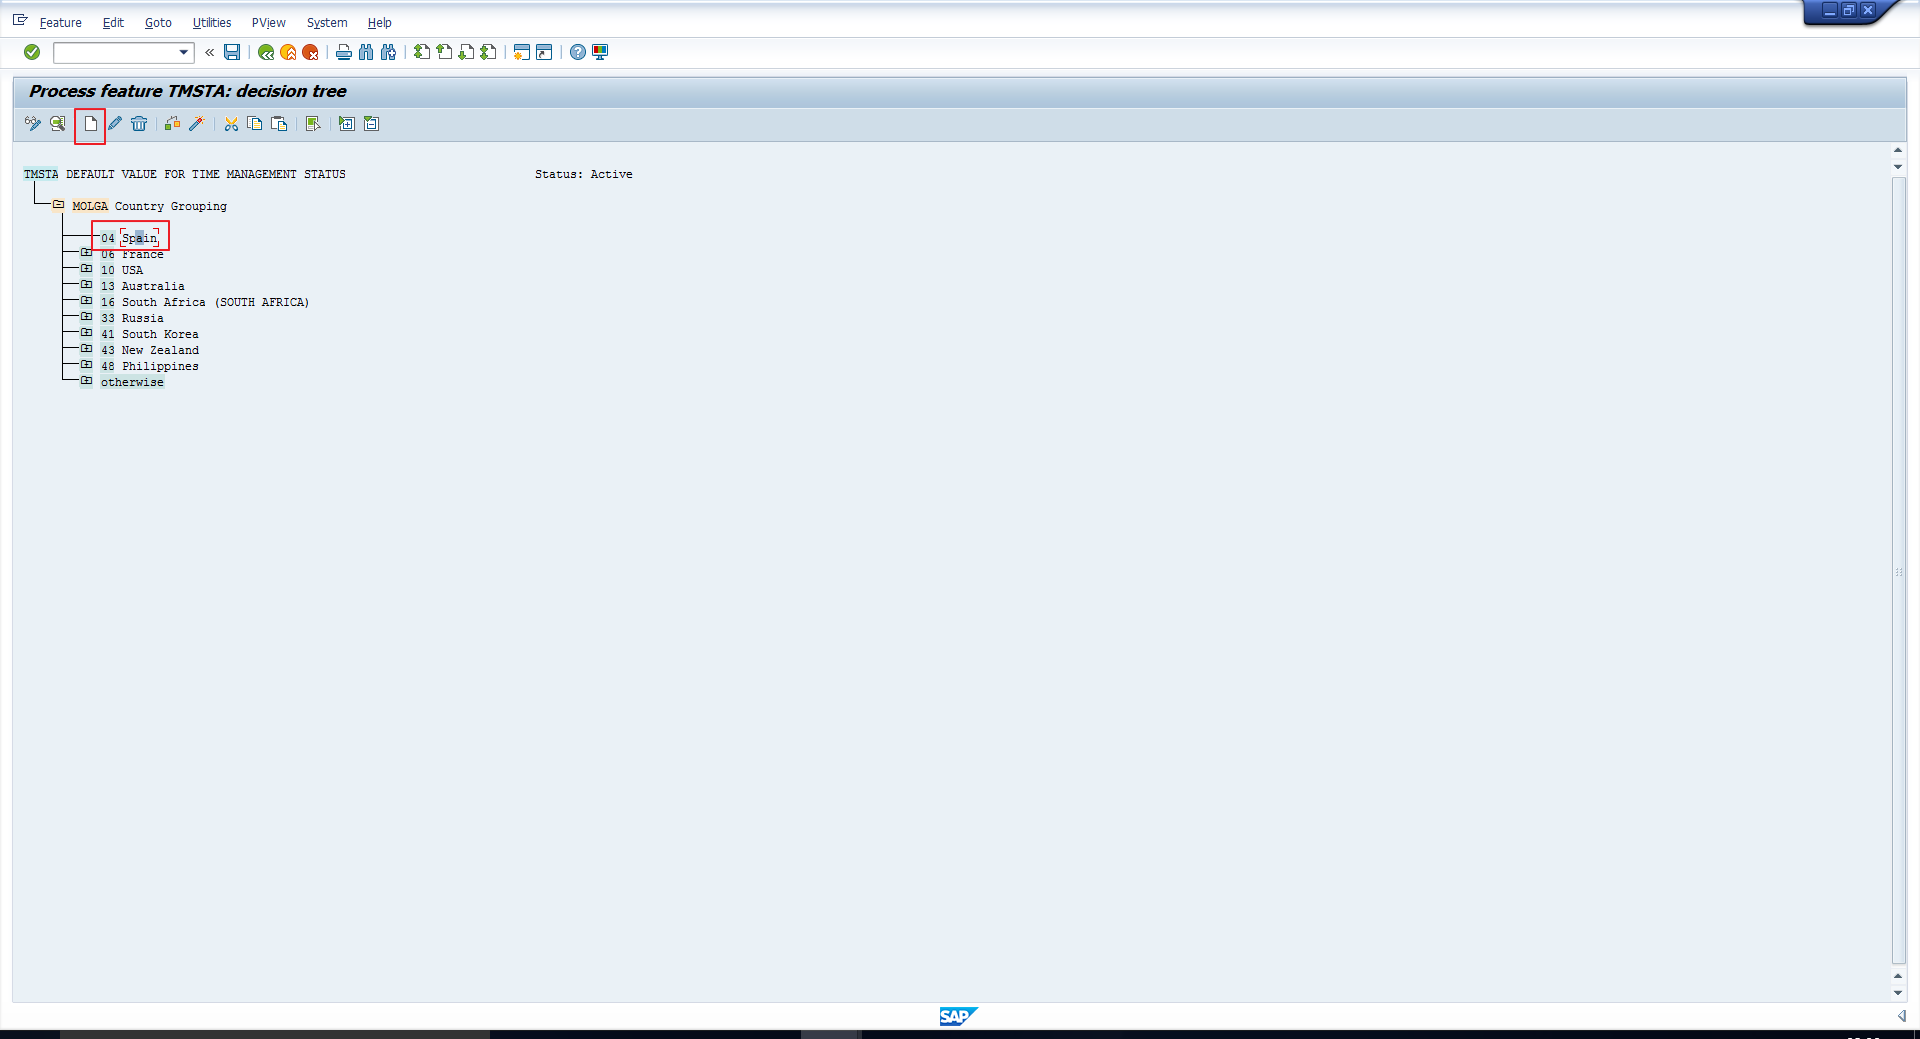
Assume we want to modify the TMSTA feature to include a new return value for the Country grouping 04 (Spain).
Carry out the below steps:
1. Position the cursor on the decision field under which you want to create a new decision value. In this case, we want to create a decision value 04 under the decision field MOLGA (Country Grouping). So, position the cursor on MOLGA and click on the Create icon.
 Editing a Feature- Position Cursor on Decision Field
2. Select the decision value that you want to create. In this case, select Country grouping 04 (Spain) and hit Enter.
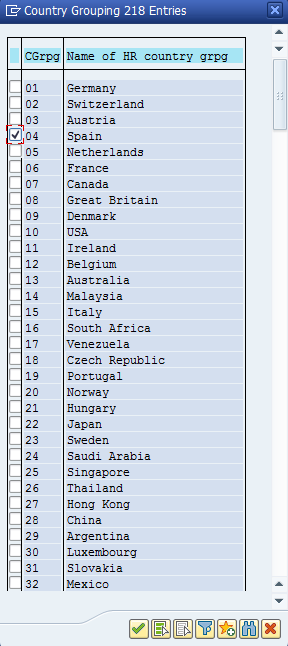 Select the Decision Value
3. You will see the newly added decision value. Click on this and click on Create.
4. Select the Return value radio button, as we want to create a new Return value for Spain.
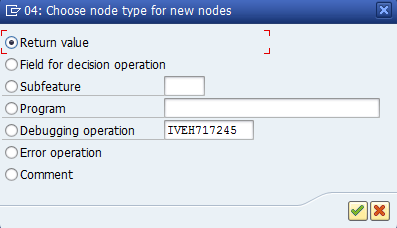 Return Value Radio Button
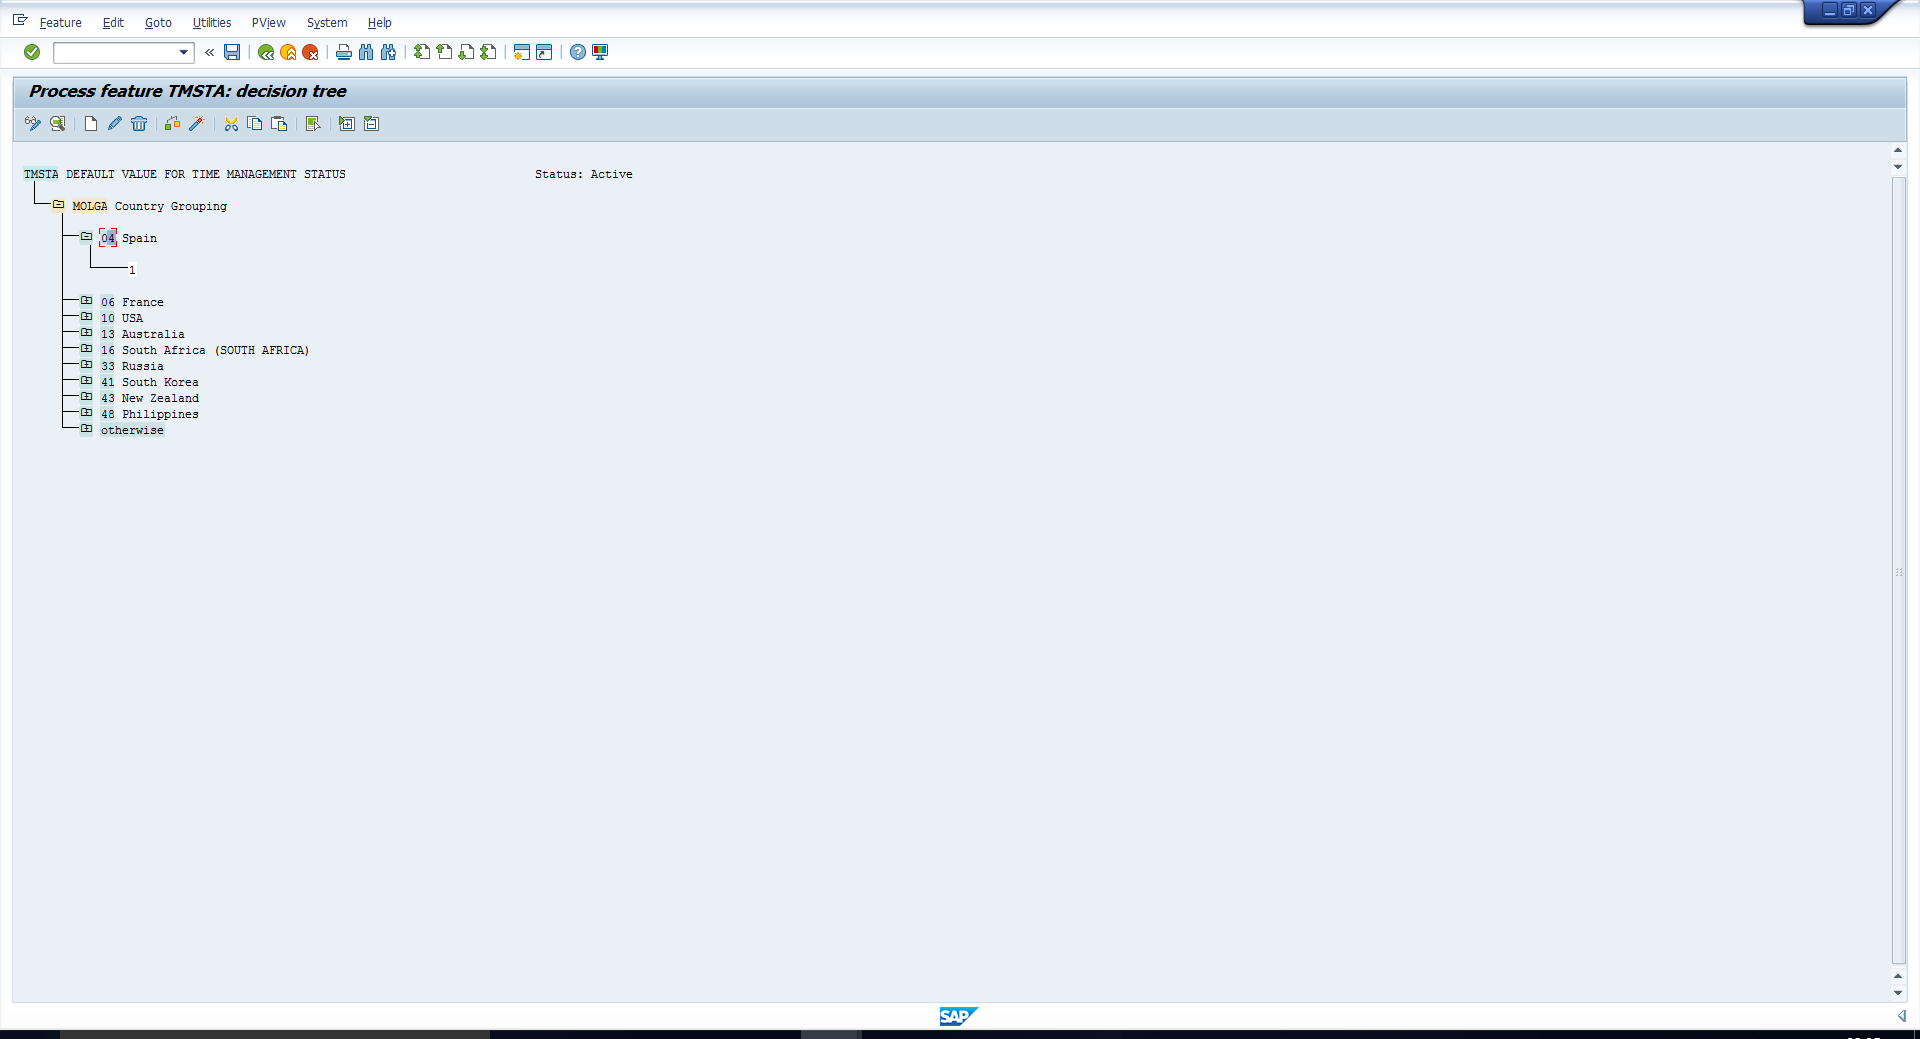
5. Enter the new return value that should be defaulted, say 1, and click on Transfer.
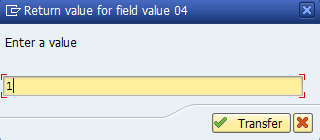 Enter the New Return Value
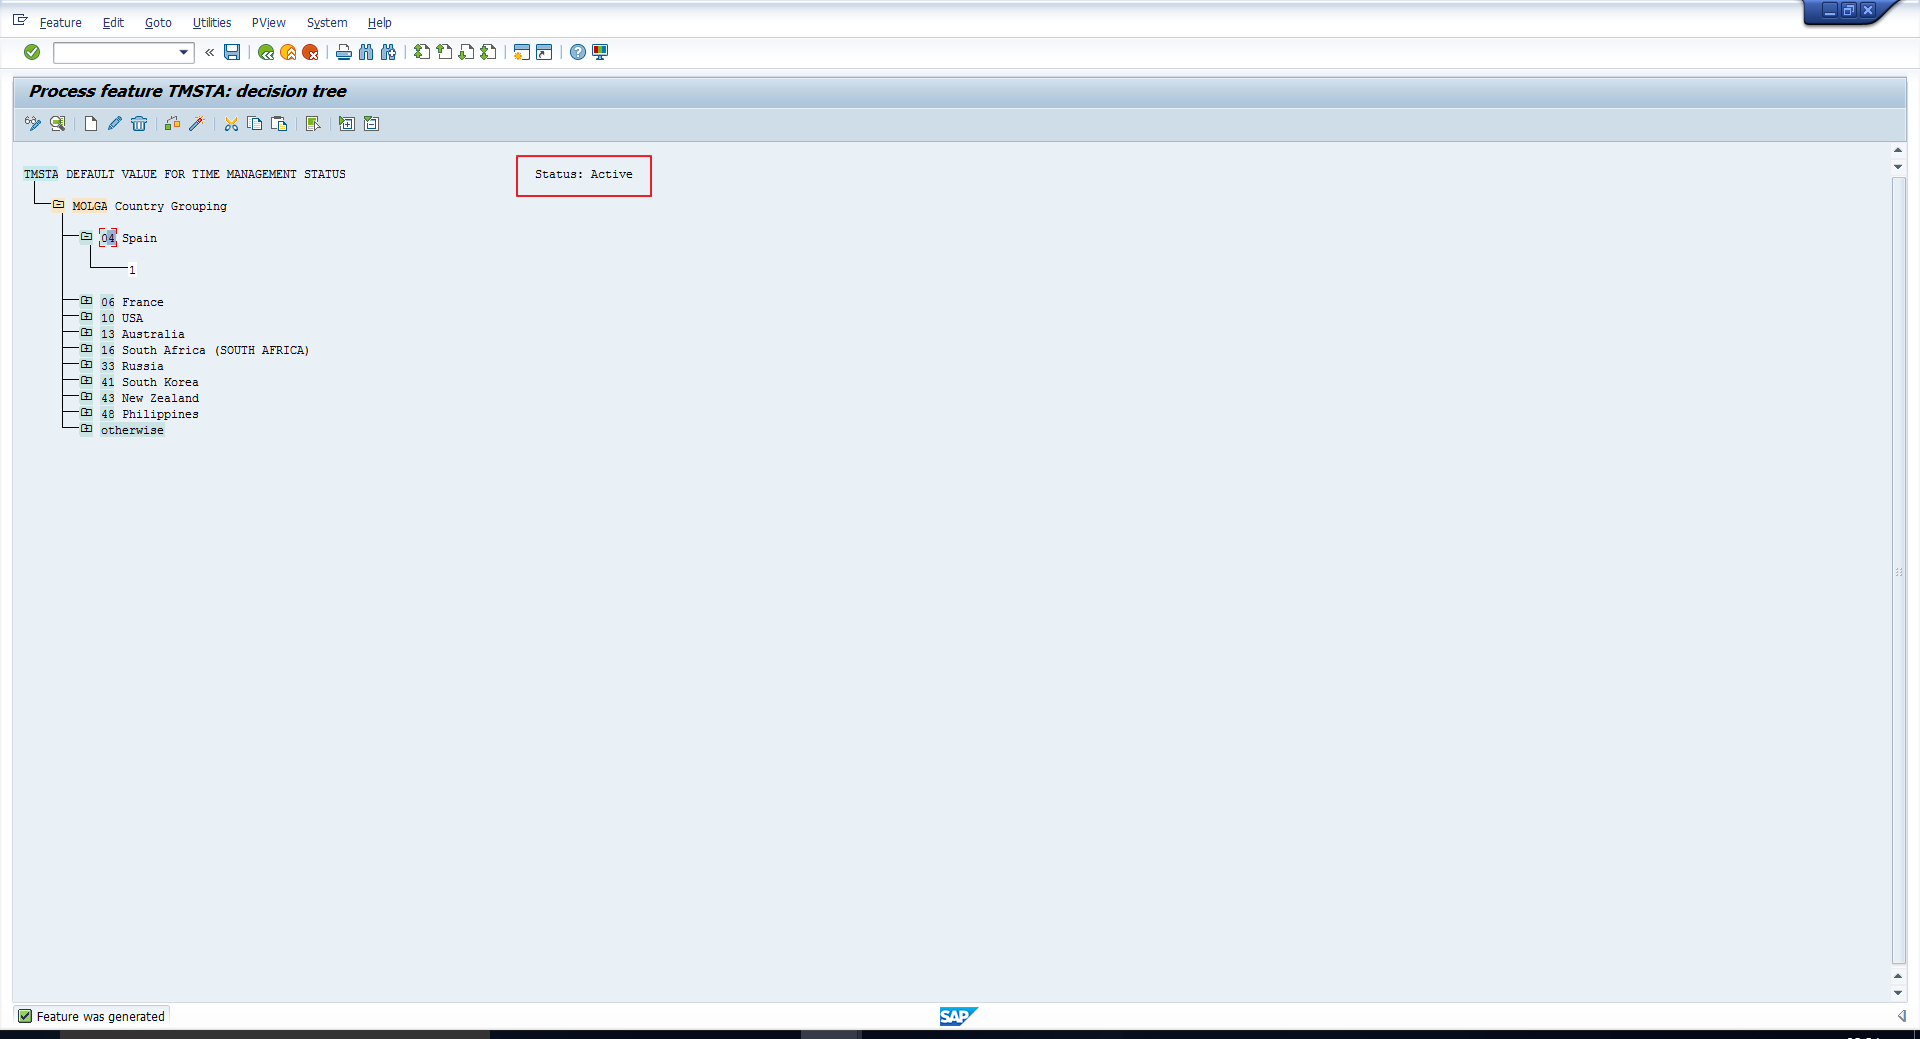
The new return value is now visible.
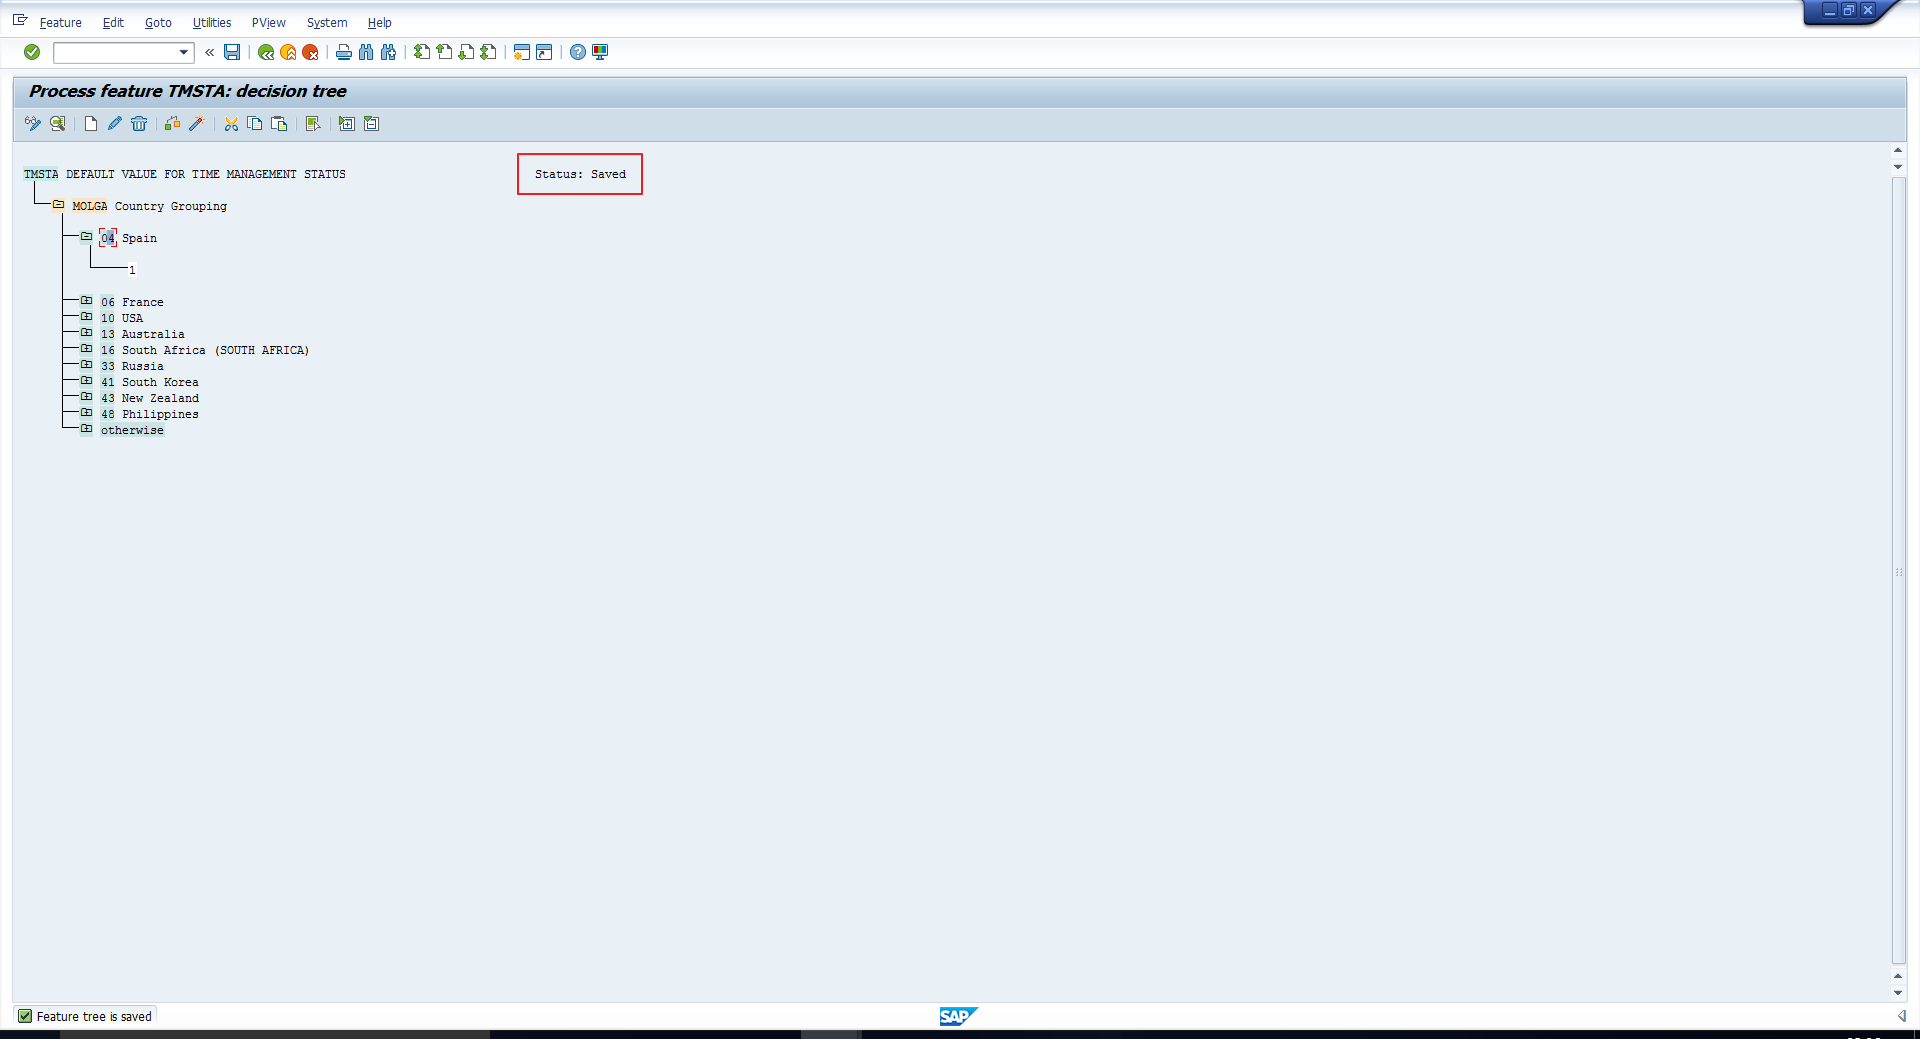
6. Save the feature. The status of the feature is Saved.
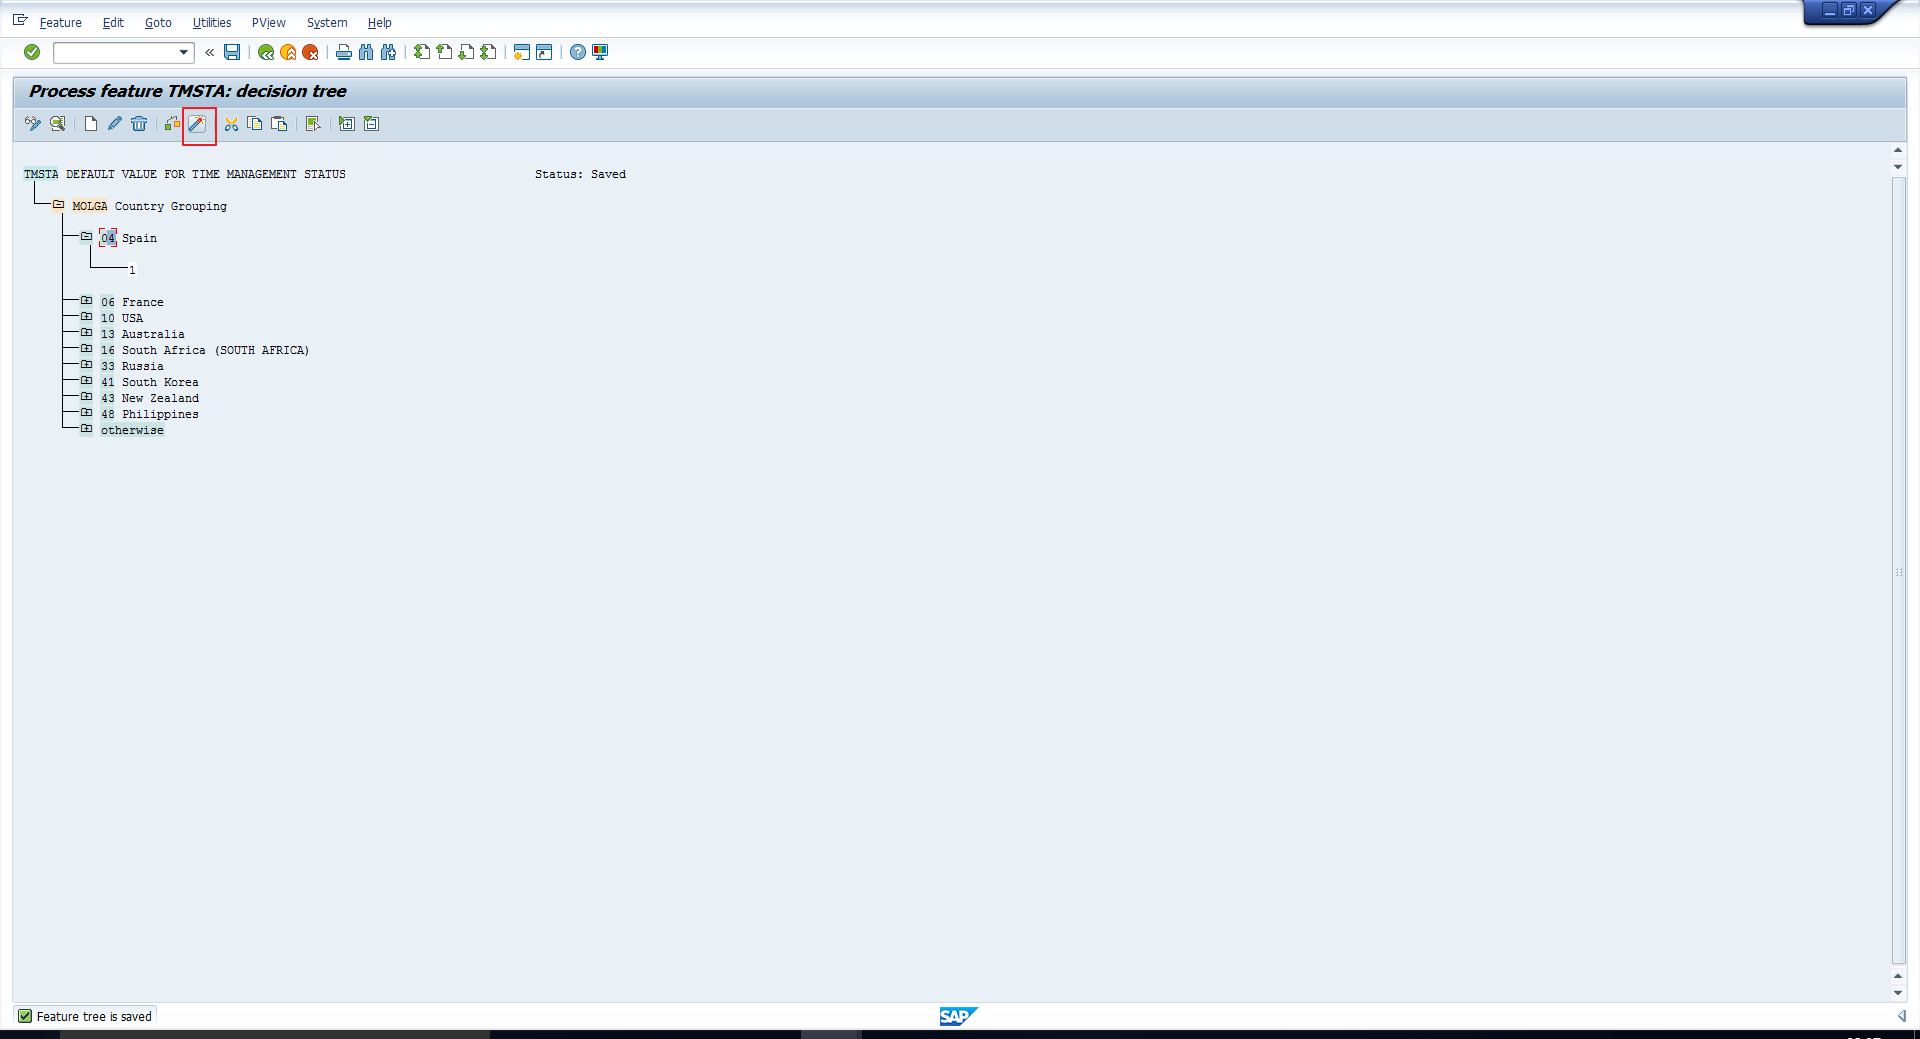
7. Activate the feature by clicking on the Activate icon as shown in the screenshot. We would like to emphasize that this step is essential for the changes to take effect.
The status of the feature changes to Active and the feature is now ready to use.
—
Did you like this tutorial? Have any questions or comments? We would love to hear your feedback in the comments section below. It’d be a big help for us, and hopefully it’s something we can address for you in improvement of our free SAP HR tutorials.

