Users Online
· Members Online: 0
· Total Members: 188
· Newest Member: meenachowdary055
Forum Threads
Latest Articles
Articles Hierarchy
SAP HR Module 4 TM03 SAP Holiday Calendar
SAP Holiday Calendar
Welcome to the tutorial on SAP Holiday Calendar. Every company publishes its list(s) of public holidays at the start of a new calendar year or at the end of the previous calendar year. In SAP, a holiday calendar is simply this list of applicable public holidays. In the most basic scenario, a company will have a common holiday calendar that applies to all its offices. In other cases, the holidays will vary from location to location within the same organization. In this tutorial, we will explain how to create public holidays and how to assign these holidays to SAP holiday calendar.
To execute both these activities, execute transaction code SPRO and follow the below customizing path:
Time Management – Work Schedules – Define Public Holiday Classes
This path has been shown in Figure 1.
 Figure 1: SAP Holiday Calendar Customizing Path
Executing the highlighted activity in Figure 1 will take you to the SAP Calendar: Main Menu screen shown in Figure 2. Alternatively, you can enter the transaction code SCAL to get to the same screen.
 Figure 2: SAP Calendar: Main Menu
Creation of Public Holidays in SAP Holiday Calendar
To work with public holidays, select the radio button “Public holidays” in Figure 2 and click on the Change icon. This takes you to the screen in Figure 3.
 Figure 3: Change Public holidays
To create a new public holiday, click on the Create icon that has been highlighted. This takes you to the pop-up screen depicted in Figure 4.
 Figure 4: Select the Public Holiday Type
Here you should select the public holiday type applicable to the holiday. There are five possible public holiday types, as you can see in the image. These are:
With Fixed Date
Select this radio button if the public holiday falls on the same date every year. This takes you to the screen in Figure 5, where you can enter the necessary details.
 Figure 5: Fixed Dates
For example, Christmas is a fixed holiday that falls on 25th December every year. To create a new holiday for Christmas, enter suitable values for Day, Month, Short Holiday Name and Long Holiday Name. You can refer to the values captured in Figure 6. Enter the Public Holiday Class value ‘1’ as this indicates a full-day public holiday. Enter any sort criterion as there may several holidays with the same name. The sort criterion will help you to sort and retrieve the holiday subsequently. We have entered “TES” (short for “Test”) as an example.
You may notice that we have left the field ‘Religious Denomination’ blank. The purpose of this field is not to specify that the holiday pertains to a certain Religion. Rather, this field must be filled only if you want to make the holiday applicable to employees of a certain Religious Denomination only. If you enter a Religious Denomination here, the system compares this value with the employee’s religion in the Personal Data infotype (Infotype 0002). If the values are identical, then the public holiday applies to the employee, otherwise it does not.
Since most companies do not create separate holiday lists based on Religion, we have left this field blank.
 Figure 6: Create a Holiday for Christmas
To save the holiday, click on the Create icon at the bottom of the screen.
With a Fixed Day from Date
Select this radio button if the public holiday falls on a fixed weekday from a particular date. This takes you to the screen in Figure 7.
 Figure 7: Fixed Day from Date
Assume, for example, that your company would like to declare the first Monday in April as a Public holiday. To create this holiday, enter the Day as ‘01’, Month as ‘04’, and select the radio button “Monday”. This means that the holiday will be created as the first Monday on or after 1st April of that year. You can refer to the values we have entered in Figure 8. Click on the Create icon to save the holiday.
 Figure 8: Create a Holiday for the First Monday of April
Distance to Easter
Select this option if the public holiday has a fixed distance to Easter. This will take you to the screen in Figure 9.
 Figure 9: Distance from Easter
Assume we want to create the public holiday “Good Friday”. This day is always two days before Easter. Enter the values shown in Figure 10 to create this holiday. Click on the Create icon to save the holiday.
 Figure 10: Create a Holiday for Good Friday
Easter Sunday
Select this option if the public holiday is Easter Sunday. This takes you to the screen in Figure 11.
 Figure 11: Easter Sunday
Enter the required values as in Figure 12. Click on the Create icon to save the holiday.
 Figure 12: Create a holiday for Easter
Floating Public Holiday
Select this option if the holiday is a movable public holiday, for which the date must be explicitly specified every year. This takes you to the screen in Figure 13.
 Figure 13: Floating Holiday
Assume we want to create a holiday for Diwali. This is a holiday in India, which can fall on a different day every year. Assume that in 2017, it falls on 19th October. To create this holiday, enter the values as shown in Figure 14. Then click on the Insert date button that has been highlighted in the screenshot.
 Figure 14: Create a Holiday for Diwali
This takes you to the screen in Figure 15. In this screen, click on the Create icon to save the holiday.
 Figure 15: Insert Date
Let us now check the five holidays we just created. In the Public Holidays Overview screen, select the Sort Key column and then click on the Set filter icon highlighted in Figure 16.
 Figure 16: Set Filter on Sort Key
In the screen that follows, enter the Sort key ‘TES’ as depicted in Figure 17. Then hit Enter.
 Figure 17: Enter Sort Key ‘TES’
This takes you to the screen in Figure 18, where you can see the newly created holidays.
 Figure 18: Holidays with Sort Key ‘TES’
Creation of SAP Holiday Calendar
After the public holidays have been created, the next step is to create SAP Holiday Calendar. The public holidays will subsequently be assigned to this holiday calendar.
To create a new SAP Holiday Calendar, select the “Holiday Calendar” radio button in the SAP Calendar: Main Menu screen, as depicted in Figure 19. Then click on the Change icon.
 Figure 19: SAP Calendar: Main Menu – Holiday Calendar
This takes you to the screen in Figure 20. Click on the Create icon, that has been highlighted in the screenshot, to create a new SAP Holiday Calendar.
 Figure 20: Holiday Calendar – Create
This takes you to the screen in Figure 21. Enter a two-character ID and a description for the SAP Holiday Calendar. Also enter the validity period in terms of start year and end year.
 Figure 21: Create a New Holiday Calendar
You can refer to the values we have entered in Figure 22 as an example.
 Figure 22: Create Holiday Calendar Z1
Next, assume that we want to add the five holidays to this SAP Holiday Calendar. To do this, click on the Assign Holiday button that has been highlighted in Figure 22. The screen depicted in Figure 23 will pop up.
 Figure 23: Insert Public Holidays
This is the entire list of public holidays in the system. We can restrict this list to display just the ones created by us (with sort key ‘TES’). To do this, select the Key column and then click on the Filter icon that we have highlighted in Figure 23. In the next screen displayed in Figure 24, enter the Sort Key ‘TES’. Then hit Enter.
 Figure 24: Filtering on Sort Key
We then see the filtered list of holidays as depicted in Figure 25.
 Figure 25: Filtered List of Holidays
Select the ones that need to be inserted in the Holiday Calendar. Since we want to insert all, select all the entries and then click on the Assign publ. holiday button.
 Figure 26: Assign Holidays
You can then see the message “5 public holidays were assigned”, as shown in Figure 27.
 Figure 27: Public Holidays Assigned
Click on the Save icon to save the changes. You will then see the message “Public holiday calendar Z1 was saved” as depicted in Figure 28.
 Figure 28: SAP Holiday Calendar Saved
To view the SAP holiday calendar, select the Holiday Calendar Z1 and then click on the icon that has been highlighted in Figure 29.
 Figure 29: Display SAP Holiday Calendar
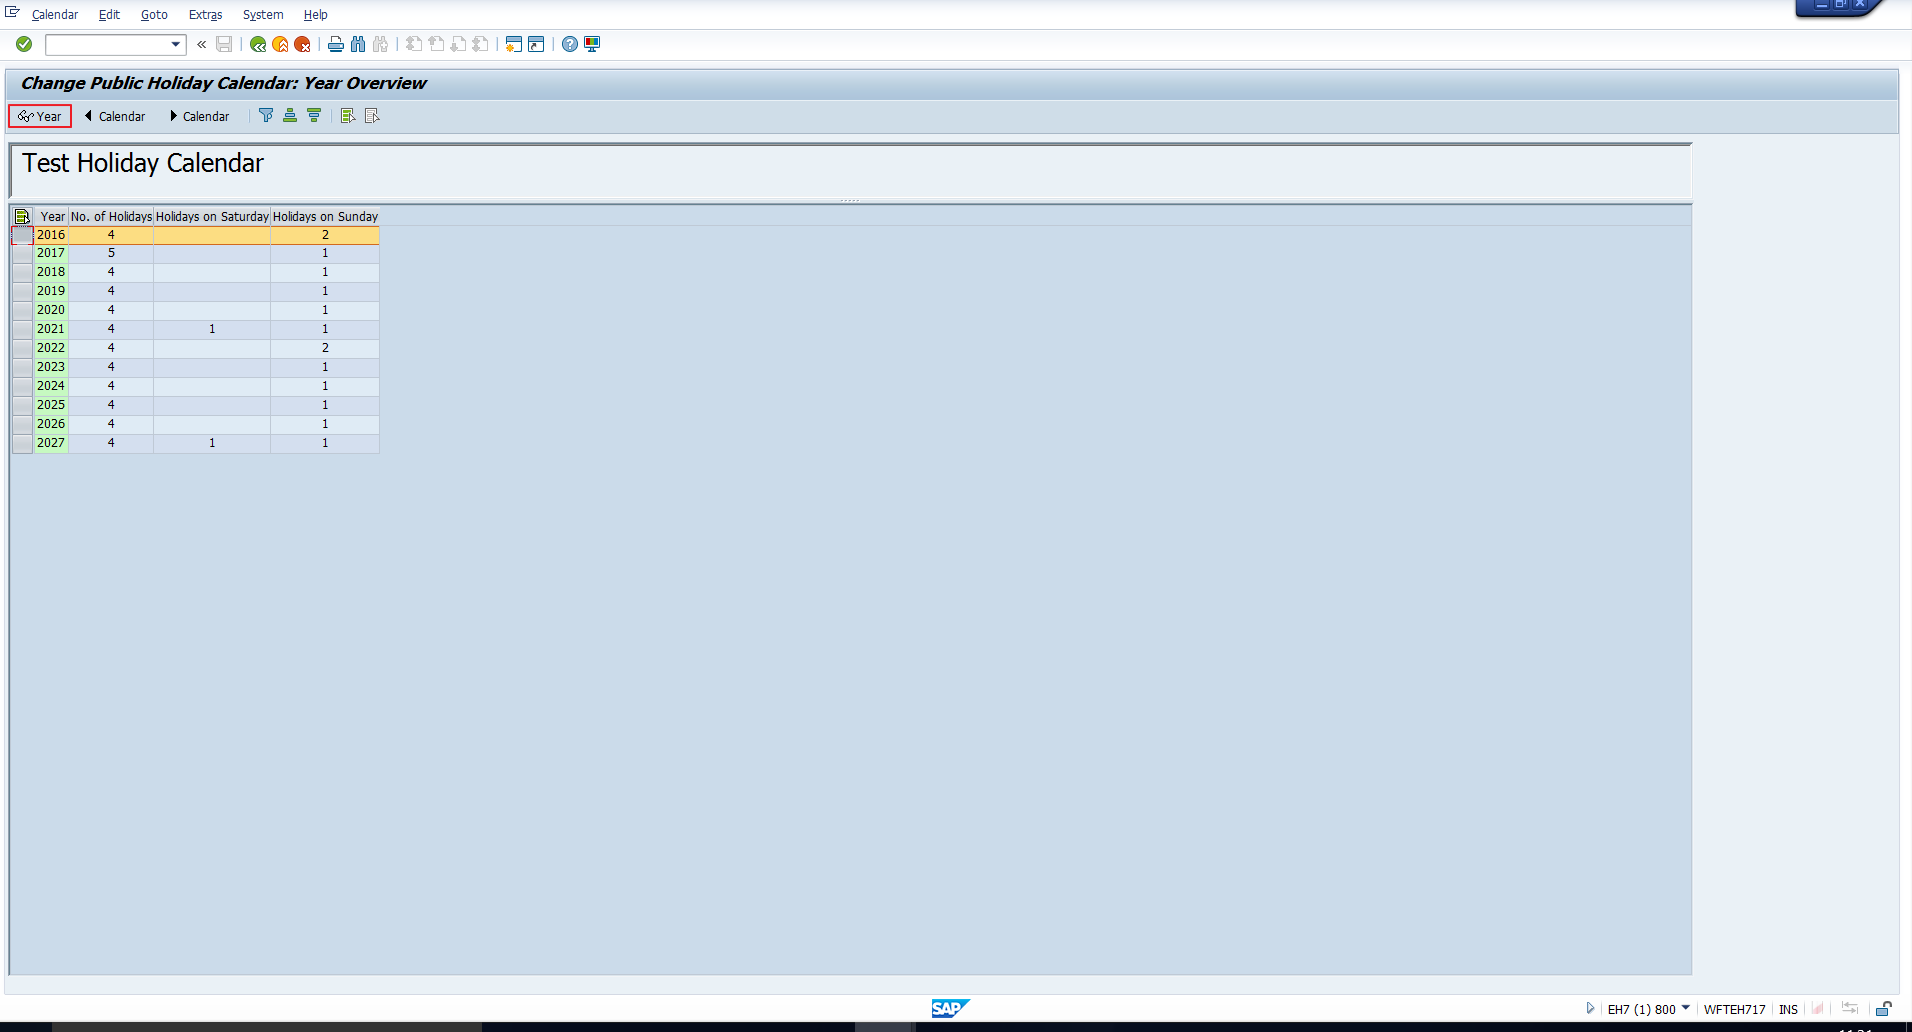
You will then get a year-wise overview of the Calendar, as depicted in Figure 30.
You may notice that there are 5 holidays in 2017, whereas for all other years there are just 4. This is because we defined the movable holiday “Diwali” for 2017 only. You can display the holidays for each year, by selecting the row corresponding to that year and clicking on the icon highlighted in Figure 31.
 Figure 31: Display Holidays for Year 2016
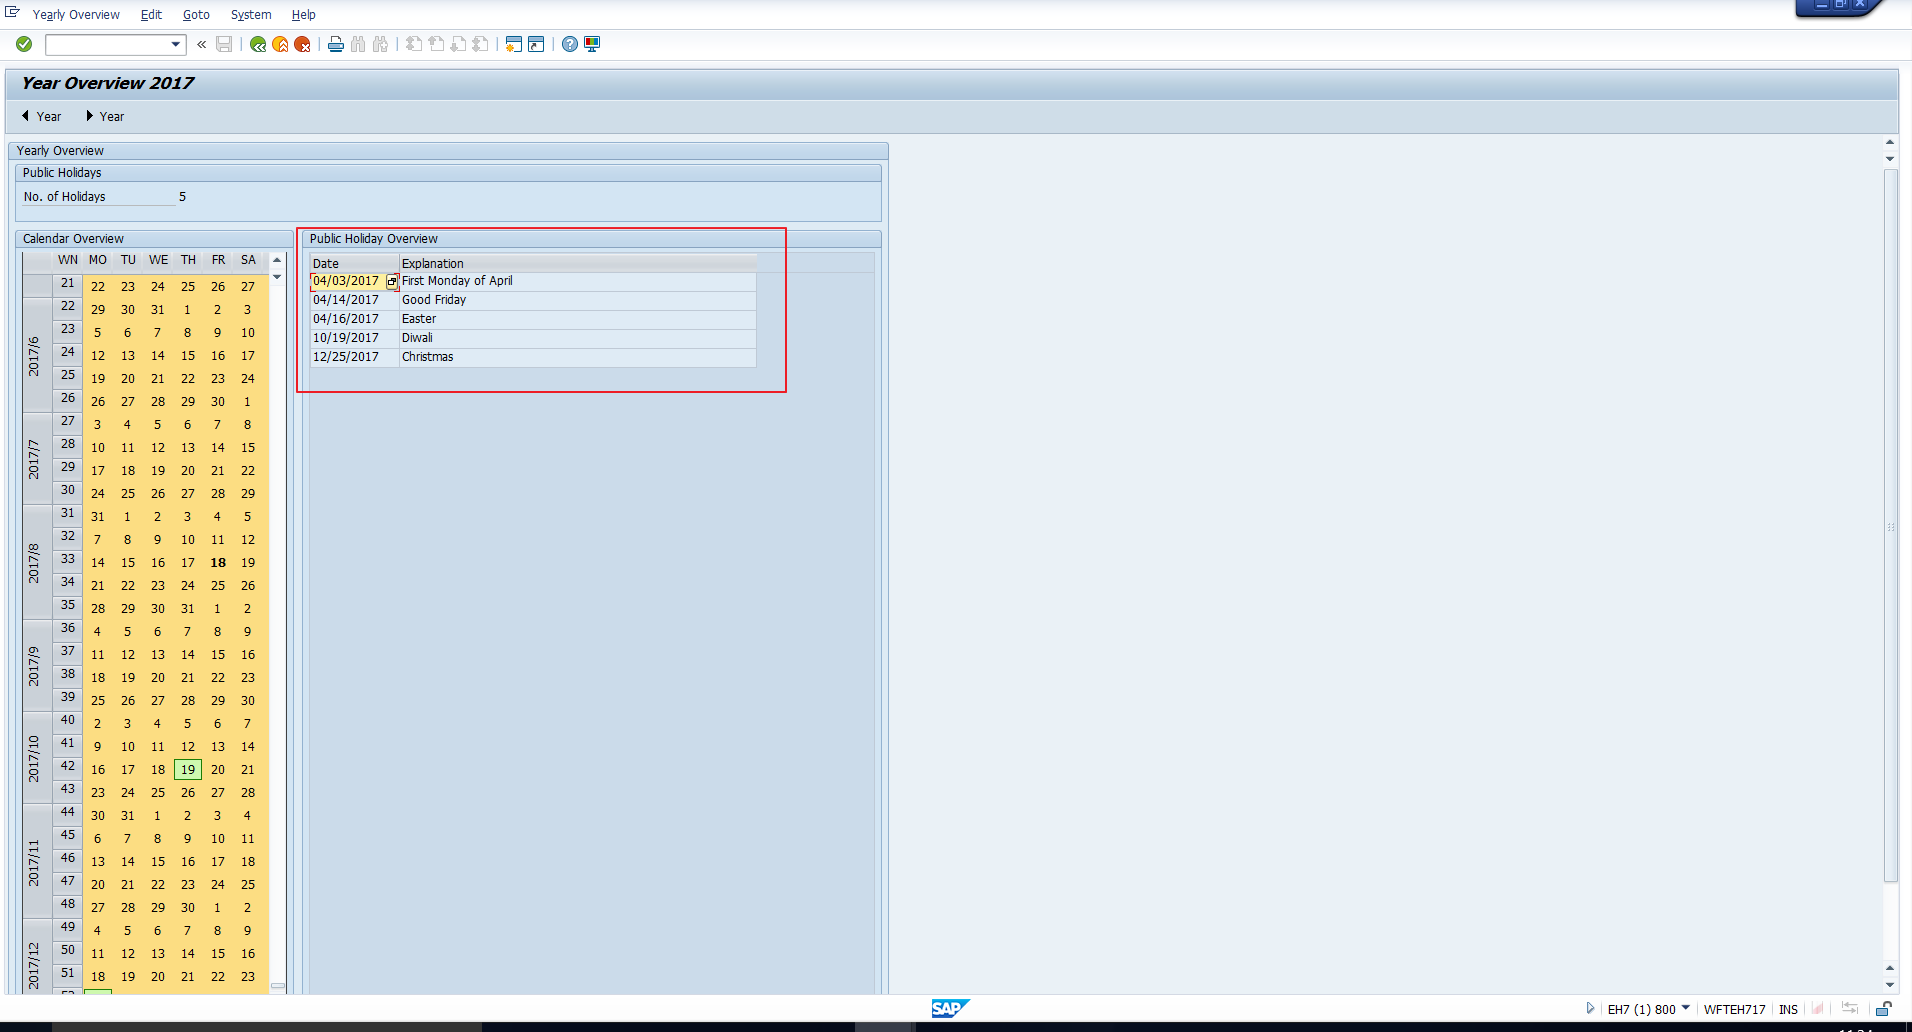
In this manner, we have displayed the holidays for 2016 and 2017 in Figures 32 and 33 respectively.
 Figure 32: Holidays List 2016
 Figure 33: Holidays List 2017
Transporting Holidays and Holiday Calendars
To transport any changes to holidays or holiday calendars, go to the Calendar menu in the SAP Calendar: Main menu screen. Then click on Transport, as shown in Figure 34.
 Figure 34: Transporting Calendars
The system will then display the message captured in Figure 35.
 Figure 35: Informational Message
This means that, if you make any change to a holiday or a holiday calendar, the entire directory of holidays, holiday calendars and factory calendars will be transported. This implies that all pre-existing holidays, holiday calendars and factory calendars in the Target system (for example, Quality or Production) will be overwritten by the holidays, holiday calendars and factory calendars in the source system in which the transport request is generated.
Note that this may impact not just HCM, but all modules of SAP that use these calendars. Hence, we would like to emphasize the need to thoroughly test the changes, compare the source and target systems if feasible, as well as get a go-ahead from other modules prior to transporting these changes.


