Introduction to Bootstrap WYSIWYG
The bootstrap has many advanced tools and classes for making user-friendly and advanced websites and web applications. It is a lightweight advanced tool used for manipulating and designing information. This is a text editor for website users. The user can make crafty information or text as per requirement. This is nothing but rich text editor using JavaScript and bootstrap technology.
Syntax
1. To make bootstrap WYSIWYG bootstrap, JavaScript, and jquery used. The basic syntax is below. The bootstrap WYSIWYGs JavaScript and CSS support files.
- wysiwyg.css
- wysiwyg.min.css
- wysiwyg.js
- wysiwyg.min.css
- wysiwyg.js.map
2. The bootstrap syntax for the plug-in.
<div class = "container-fluid" id ="demo">
Write a text here…
</div>
3. The JavaScript syntax for the plug-in.
$('#demo').wysiwyg();How do Bootstrap WYSIWYG works?
1. The basic BOOTSTRAP WYSIWYG shows the below.
Code:
<!DOCTYPE html >
<html>
<head>
<title> Bootstrap wysiwyg Example </title>
<meta charset="utf-8">
<meta name= "viewport" content= "width= device-width, initial-scale=1">
<link rel="stylesheet" href= "https://maxcdn.bootstrapcdn.com/bootstrap/3.4.1/css/bootstrap.min.css">
<link rel= "stylesheet" href= "https://cdnjs.cloudflare.com/ajax/libs/font-awesome/5.13.0/css/all.min.css" />
<script src= "https://ajax.googleapis.com/ajax/libs/jquery/3.4.1/jquery.min.js">
</script>
<script src= "https://maxcdn.bootstrapcdn.com/bootstrap/3.4.1/js/bootstrap.min.js">
</script>
<link rel=  "stylesheet" href= "https://cdnjs.cloudflare.com/ajax/libs/font-awesome/5.13.0/css/all.min.css" />
<link href=  "/path /folder /subfolder_css /wysiwyg.css" rel= "stylesheet" />
<script src= "/path /folder /subfolder_js /wysiwyg.js" > </script>
</head>
<body>
<div class="container" id="demo">
</div>
<script type= "text/javascript">
$( document). ready( function () {
$('#demo').wysiwyg( {
});
});
</script>
</body>
</html>
2. Enabling and disabling toolbar in the bootstrap text editor is below.
Code:
<script>
$('#demo').wysiwyg({
toolbar: [
['mode'],
['operations', ['cut', 'copy', 'paste', 'undo', 'rendo']],
['text', ['bold', 'italic', 'font-color', 'bg-color', 'underline', 'strike', 'subscript', 'superscript']],
['styles'],
['fonts', ['select', 'size']],
['align', ['left', 'center', 'right', 'justify']],
['lists', ['unordered', 'ordered', 'indent', 'outdent']],
['components', ['table',]],
['intervals', ['line-height', 'letter-spacing']],
['insert', ['emoji', 'link', 'image', '<a href="https://www.jqueryscript.net/tags.php?/video/">video</a>', 'symbol', ]],
['special', ['print', 'unformat', 'visual', 'clean']],
],
});
</script>
3. The font sizes, emoji, symbols, and colors in the bootstrap text editor are below.
Code:
<script>
$('#demo').wysiwyg({
fontSizes: ['10px', '11px', '12px', '14px', '15px', '16px', '18px', '20px', '24px'],
fontSizeDefault: '12px',
fontFamilies: ['Open Sans', 'Arial', 'Arial Black', 'Courier', 'Courier New', 'Comic Sans MS', 'Helvetica', 'Times New Roman', 'Verdana'],
fontFamilyDefault: 'Open Sans',
emojiDefault: ["\u{1f610}", "\u{1f61e}", "\u{1f61f}",
"\u{1f611}", "\u{1f612}", "\u{1f644}", "\u{1f914}",
"\u{1f620}", "\u{1f621}" ],
symbolsDefault: ["<", ">", "«", "»", "‹", "›", """, "′", "″", "‘", "’", "‚", "“", "”", "„", "❜", "❛", "&", "'", "§", "©", "¬", "®", "¯", "°", "±", "¹", "²", "³", "¼", "½", "¾", "´", "µ", "¶", "·", "¿", "ƒ", "™", "•", "…", "‾", "–", "—", "‰", "}", "{", "=", "≠", "≅", "≈", "≤", "≥", "∠", "⊥", "√", "∑", "∫", "※", "÷",],
colorPalette: [["rgb(0, 0, 0)","rgb(67, 67, 67)",
"rgb(102, 102, 102)", "rgb(153, 153, 153)",
"rgb(183, 183, 183)", "rgb(204, 204, 204)",
"rgb(217, 217, 217)", "rgb(239, 239, 239)",
"rgb(243, 243, 243)", "rgb(255, 255, 255)"]],
});
</script>4. Find out the editor mode on page load in the bootstrap text editor is below.
Code:
<script>
$('#demo'). wysiwyg({
mode: 'source'
});
</script>
5. The debug mode in the bootstrap text editor is below.
Code:
<script>
$('#demo').  wysiwyg({
debug: false
});
</script>
6. The translator in the bootstrap text editor is below.
Code:
<script>
$('#demo').wysiwyg({
language: 'en-us', 'en-uk',
translations: {},
});
</script>
Examples
Below are examples mentioned:
Example #1
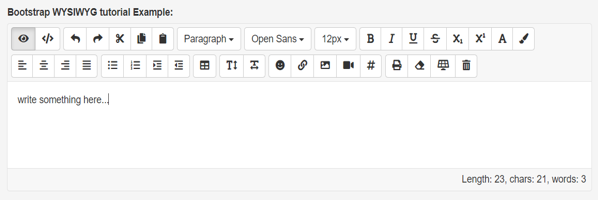
The Basic bootstrap rich text editor example is below with output.
Code:
<!DOCTYPE html>
<html >
<head>
<title> Bootstrap wysiwyg Example </title>
<meta charset="utf-8">
<meta name= "viewport" content= "width= device-width, initial-scale=1">
<link rel="stylesheet" href= "https://maxcdn.bootstrapcdn.com/bootstrap/3.4.1/css/bootstrap.min.css">
<link rel= "stylesheet" href= "https://cdnjs.cloudflare.com/ajax/libs/font-awesome/5.13.0/css/all.min.css" />
<script src= "https://ajax.googleapis.com/ajax/libs/jquery/3.4.1/jquery.min.js">
</script>
<script src= "https://maxcdn.bootstrapcdn.com/bootstrap/3.4.1/js/bootstrap.min.js">
</script>
<link rel=  "stylesheet" href= "https://cdnjs.cloudflare.com/ajax/libs/font-awesome/5.13.0/css/all.min.css" />
<link href=  "/path /folder /subfolder_css /wysiwyg.css" rel= "stylesheet" />
<script src= "/path /folder /subfolder_js /wysiwyg.js" > </script>
</head>
<body>
<label class="control-label" for="editor"> Bootstrap WYSIWYG tutorial Example: </label>
<div class="container" id=”demo”>
Write something here…
</div>
<script type= "text/javascript">
$( document). ready( function () {
$('#demo').wysiwyg( {
});
});
</script>
</body>
</html>
Output:

Output with Text Code in Editor:

Example #2
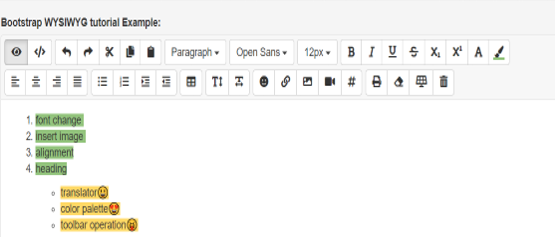
The bootstrap text editor with emoji, alignment, and listing.
Code:
<!DOCTYPE html>
<html >
<head>
<title> Bootstrap wysiwyg Example </title>
<meta charset="utf-8">
<meta name= "viewport" content= "width= device-width, initial-scale=1">
<link rel="stylesheet" href= "https://maxcdn.bootstrapcdn.com/bootstrap/3.4.1/css/bootstrap.min.css">
<link rel= "stylesheet" href= "https://cdnjs.cloudflare.com/ajax/libs/font-awesome/5.13.0/css/all.min.css" />
<script src= "https://ajax.googleapis.com/ajax/libs/jquery/3.4.1/jquery.min.js">
</script>
<script src= "https://maxcdn.bootstrapcdn.com/bootstrap/3.4.1/js/bootstrap.min.js">
</script>
<link rel=  "stylesheet" href= "https://cdnjs.cloudflare.com/ajax/libs/font-awesome/5.13.0/css/all.min.css" />
<link href=  "/path /folder /subfolder_css /wysiwyg.css" rel= "stylesheet" />
<script src= "/path /folder /subfolder_js /wysiwyg.js" > </script>
</head>
<body>
<div class="container" style="margin:150px auto">
<div class="row">
<div class="col-md-10">
<div class="well" style="margin: 2rem 0;">
<div class="container">
<label class="control-label" for="editor"> Bootstrap WYSIWYG tutorial Example: </label>
<div id="demo" class="form-control" rows="3">
<ol>
<li> font change <br></li>
<li> insert image <br></li>
<li> alignment </li>
<li> heading </li>
</ol>
<ul>
<ul>
<li> translator </li>
<li> color palette </li>
<li> toolbar operation </li>
</ul>
</ul>
</div>
</div>
</div>
<script type= "text/javascript">
$( document). ready( function () {
$('#demo').wysiwyg( {
});
});
</script>
</body>
</html>
Output:

Example #3
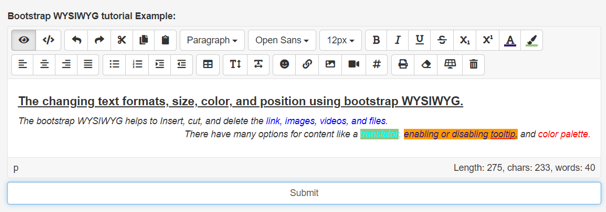
The bootstrap rich text editor with paragraph and their effect.
Code:
<!DOCTYPE html>
<html >
<head>
<title> Bootstrap wysiwyg Example </title>
<meta charset="utf-8">
<meta name= "viewport" content= "width= device-width, initial-scale=1">
<link rel="stylesheet" href= "https://maxcdn.bootstrapcdn.com/bootstrap/3.4.1/css/bootstrap.min.css">
<link rel= "stylesheet" href= "https://cdnjs.cloudflare.com/ajax/libs/font-awesome/5.13.0/css/all.min.css" />
<script src= "https://ajax.googleapis.com/ajax/libs/jquery/3.4.1/jquery.min.js">
</script>
<script src= "https://maxcdn.bootstrapcdn.com/bootstrap/3.4.1/js/bootstrap.min.js">
</script>
<link rel=  "stylesheet" href= "https://cdnjs.cloudflare.com/ajax/libs/font-awesome/5.13.0/css/all.min.css" />
<link href=  "/path /folder /subfolder_css /wysiwyg.css" rel= "stylesheet" />
<script src= "/path /folder /subfolder_js /wysiwyg.js" > </script>
</head>
<body>
<div class="container" style="margin:150px auto">
<div class="row">
<div class="col-md-10">
<div class="well" style="margin: 2rem 0;">
<div class="container">
<label class="control-label" for="editor"> Bootstrap WYSIWYG tutorial Example: </label>
<textarea id="demo" class="form-control" rows="3>
<p>
The changing text formats, size, color, and position using bootstrap WYSIWYG. <br>
The bootstrap WYSIWYG helps to Insert, cut, and delete the link, images, videos, and files.<br>
There have many options for content like a translator, enabling or disabling tooltip, and color palette
</p>
</textarea> <input type="submit" class="form-control">
</div>
</div>
<script type= "text/javascript">
$( document). ready( function () {
$('#demo').wysiwyg( {
});
});
</script>
</body>
</html>
Output:

Explanation: This is useful for changing text formats, size, color, and position. This is used to Insert, cut, and delete the link, images, videos, and files. This is used for a translator, enabling or disabling tooltip, and color palette.
Conclusion
The bootstrap WYSIWYG is more useful for the user as per their convenience. This plug-in helps the user to add the information with design. The user can modify the information or content of websites as per choice. This is a user friendly, unique, and advanced tool for a web application.