Informatica Sessions & Mappings
Posted by Superadmin on June 29 2022 14:58:23
Informatica Sessions & Mappings
This Informatica tutorial section explains the creation of Informatics Sessions, Mapping, and Workflow. This section of Informatica tutorial is the most important section because of its reusability in all the transformations.
- Target Designer
- Create Target table using Source Definition
- Create New Target Table
- How to Create Mapping
- Create Session
- How to Create Reusable Session
- Create Workflow
- Creating Workflow using Wizard
- Command Task
- Event Wait Task
Target Designer in Informatica
To perform Extraction, Transformation, and Load (ETL operations), we require Source Data, Target tables, and Transformations (if needed). The Target Designer in Informatica allows us to create our destination tables, Modify already existing target definitions.
Informatica Target Designer also allows us to Import target definitions from various sources includes Flat Files, Relational Databases, XML definitions, Excel Worksheets, etc.
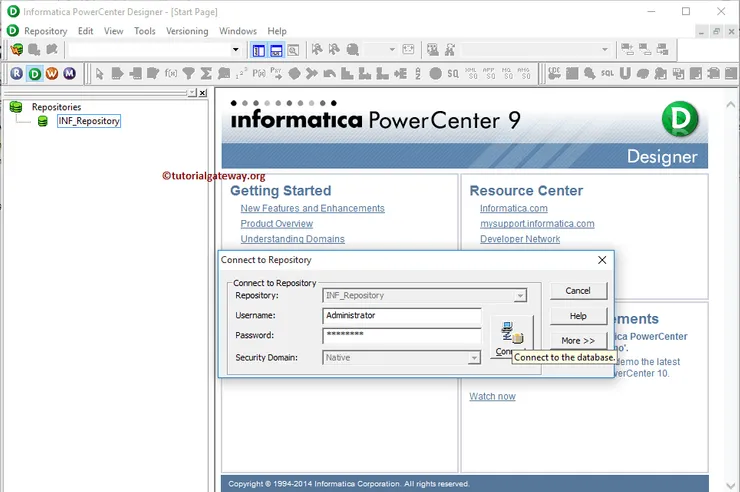
Before we start doing anything, First connect to the repository service. To connect with the Repository service, we have to provide the Admin Console credentials. So, please enter the Username and Password and click on the Connect button.
TIP: Here, you have to provide the Admin Console Username and password that you specified while installing the Informatica Server.
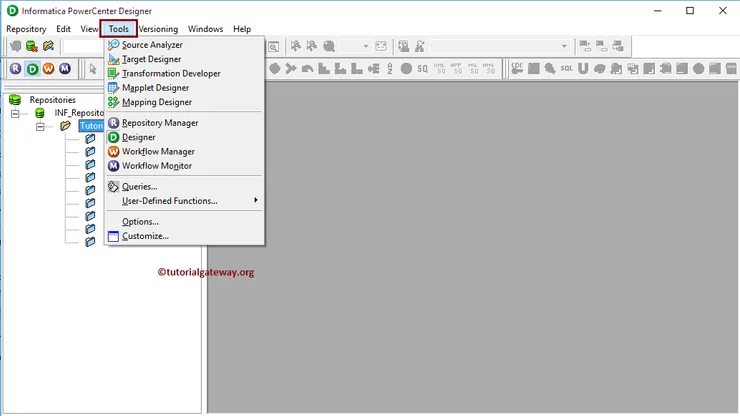
Once you connected successfully, Please navigate to Tools menu in Menu Bar. The following screenshot will show the list of available tools inside the PowerCenter Designer. In this article, we are explaining about the Target Designer in Informatica. So, please select the Target Designer option.
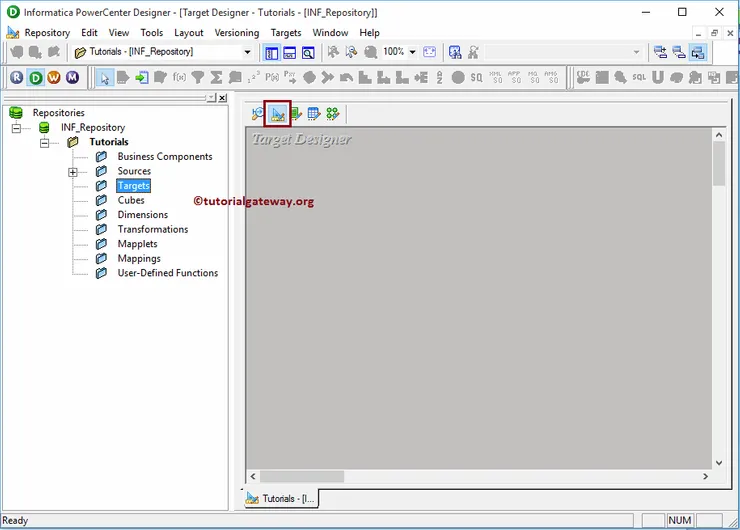
Once you select the Target Designer option, we will be in the Target Designer screen. The target Menu in the Menu bar will be available only when you are in the Informatica Target Designer section. Otherwise, it will not show.
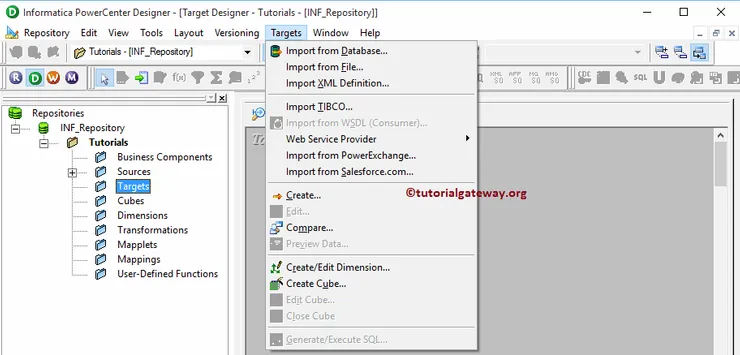
Next, Please navigate to Targets menu in Menu Bar. From the following screenshot, you can observe the list of available targets inside the Informatica PowerCenter Designer. They are
- Import from Database: This option allows us to import destination table(s) from a relational database. Informatica Target designer supports various relational databases, such as Microsoft SQL Server, Oracle, SAP HANA, Sybase, Teradata, etc.
- Import from File: This option allows us to import target files from flat files which are separated by Delimiter or fixed width.
- Web Service: The PowerCenter helps us to use web services as target or destination
- Import from COBOL File: This allows us to export source data to COBOL files.
- Import XML Definition: This option allows us to import XML definition as a target or destination
- Create: This option will enable us to create our data-target table from scratch.
- Import from PeopleSoft: This option will enable us to use PeopleSoft as a target or destination.
- Create Cube: This option allows us to create a multidimensional cube.
Create Informatica Target table using Source Definition
In this article, we will show you how to create an Informatica target table using the source definition that exists in the Sources folder. And how to use it as the destination/target table for the transformed data with an example.
For example, If we want to copy or use the source definition as your target definition, this will be the best bet for you.
Before we start doing anything, First connect to Informatica repository service with your Admin credentials and then Navigate to Target Designer. Please refer to Target Designer article to understand the Target Designer screen. From the below Informatica screenshot, you can observe that we are in the Target Designer.
TIP: Target Menu in the Menu bar will be available only when you are in the Target Designer section. Otherwise, it won’t show up.
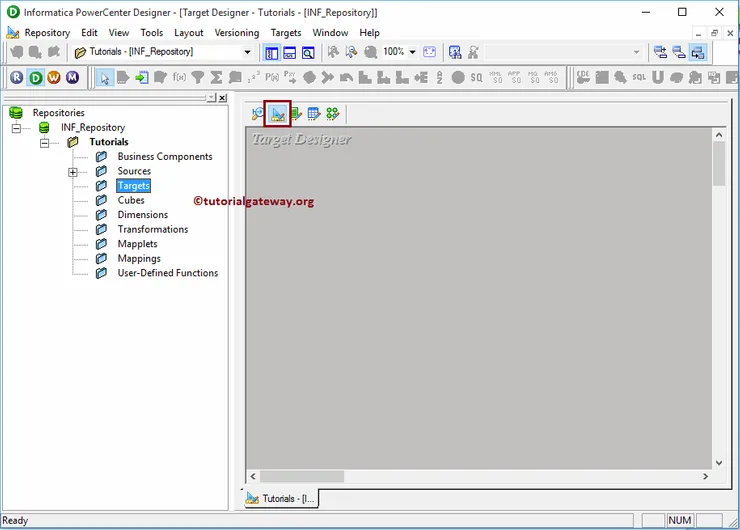
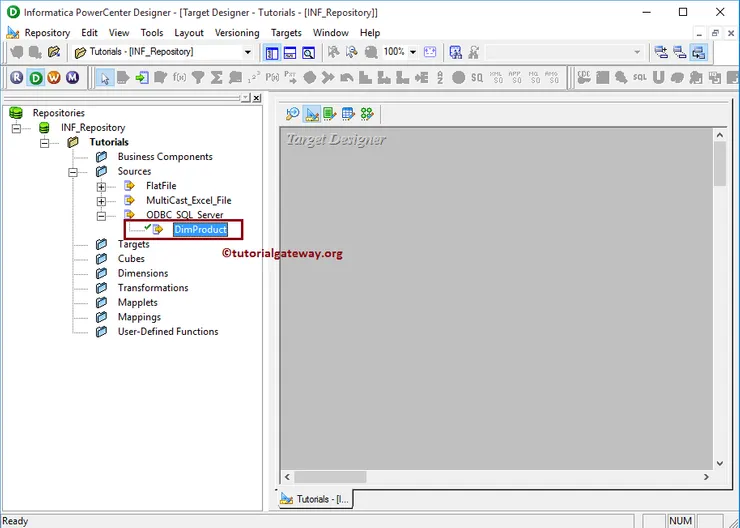
Drag and drop the DimProducts from the Sources subfolder to the Target Designer. The PowerCenter target designer will automatically create an Informatica target table using source definition.
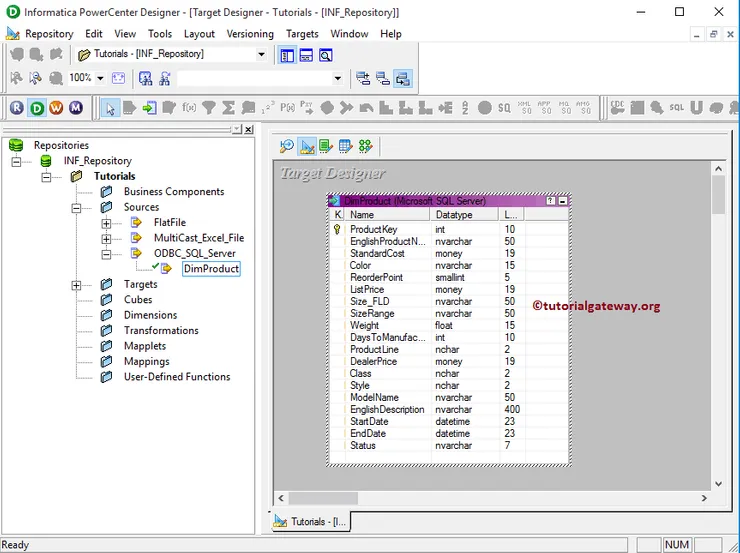
From the below screenshot, under the Targets subfolder, view our newly created target in Informatica and the table definition (Column Names and appropriate data types) inside our workspace.
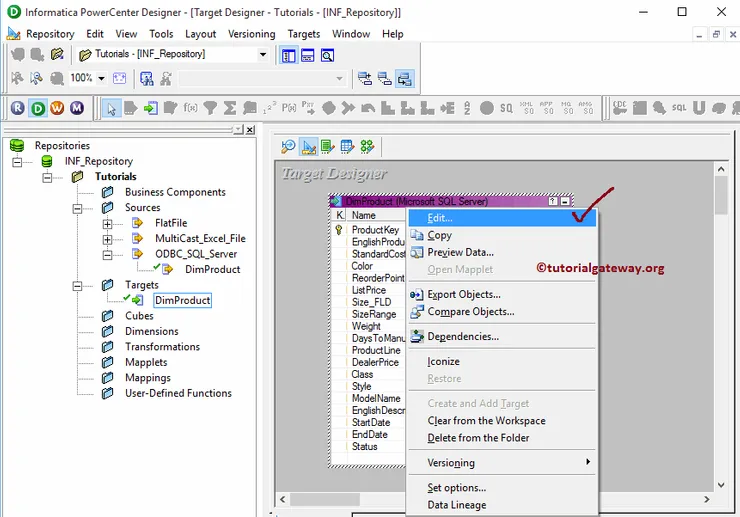
Although we copied the DimProducts table from source definition, we may not require all the columns present in that table. To resolve this, we can edit the table by Right-click on the table definition and selecting the Edit.. option from the context menu.
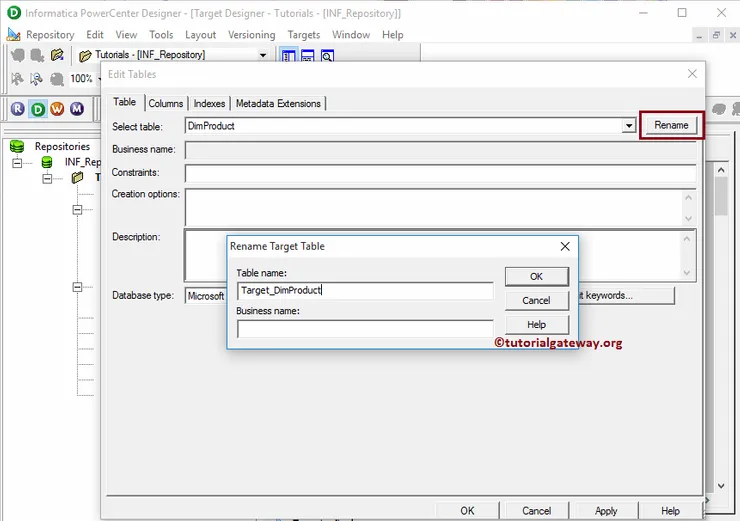
Once you select the Edit.. option, a new window called Edit tables will open. Within the Table tab, we can rename the table name by clicking the Rename button. From the below screenshot, see we are changing the table name from DimProducts to Target_DimProducts
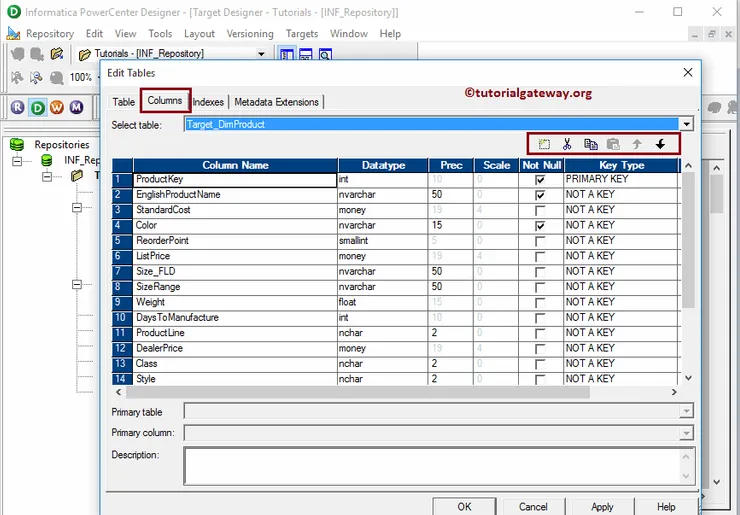
To alter or modify the existing table, we have to navigate to Columns Tab. For example,
- If you want to add new columns then, Please select the first button (before scissors symbol) and add Column Name, Data Type, Precision (if required), Scale (if needed), If it is primary key then change the Key type to primary and checkmark the Not Null option (if your column doesn’t allow null values)
- If you want to delete columns, then select the unwanted columns and click the scissors button.
- You can use the UP and DOWN arrows to move column names up and down
Once editing completed, Click OK to close the Edit tables window
The target tables we created in PowerCenter target designer will exist only in the target designer. If you want to add this table definition to SQL Server, we have to follow the few steps:
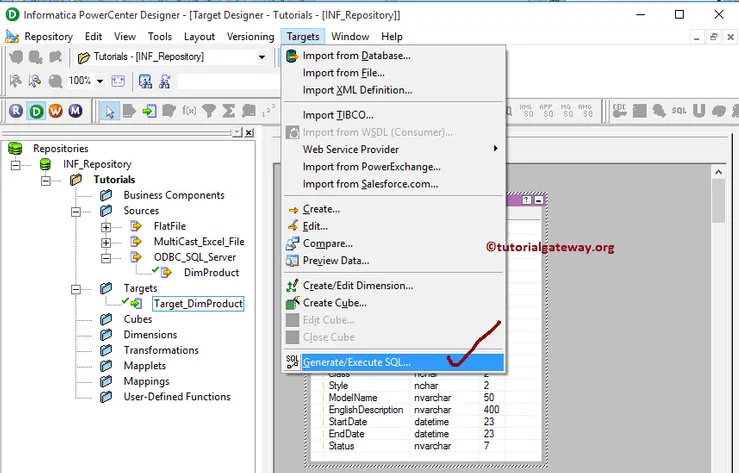
Step 1: Please navigate to Targets menu in Menu Bar. From the following screenshot, you can observe the list of available targets inside the PowerCenter Designer. In this example, our task is to create an Informatica target table using source definition. So, we are selecting the Generate/Execute SQL.. option.
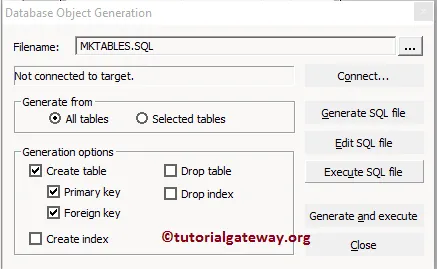
Step 2: Once you select the Generate/Execute SQL.. option, a new window called Database Object Generationwindow will open. Before we start using these properties, let us see them in detail:
Generate from: Here we have two options:
- All tables: If you want to generate and execute the SQL file for all the tables that exist in our Target Designer then, you have to select this option.
- Selected tables: If you want to generate and execute the SQL file for the selected table(s) in our Target Designer, you have to choose this option.
Generation options: This section holds multiple options:
- Create Table: If you want to create a new table in our database then, Please check mark this option.
- Create Primary Key: If you want to add a primary key to that table then, Please check this option.
- Foreign Key: If you want to add a Foreign key to that table then, Please checkmark this.
- Create Index: If you want to create a new index on our table then, Please check mark this option.
- Drop Table: If you want to drop the existing table (if there is any with the same name) from our database then, Please check mark this option.
- Drop Index: If you want to drop the index name then, Please check mark this option.
Let us see the action behind each button:
- Connect: This button will help you to connect with a relational database using ODBC Connection
- Generate SQL: This button will generate the SQL query of the target definition.
- Edit SQL File: This button will help you to edit the generated SQL file and allow us to make changes as per our requirements.
- Execute SQL File: This button will execute the generated SQL file.
- Generate and Execute: This button will generate the SQL query of the target definition and execute the generated SQL file.
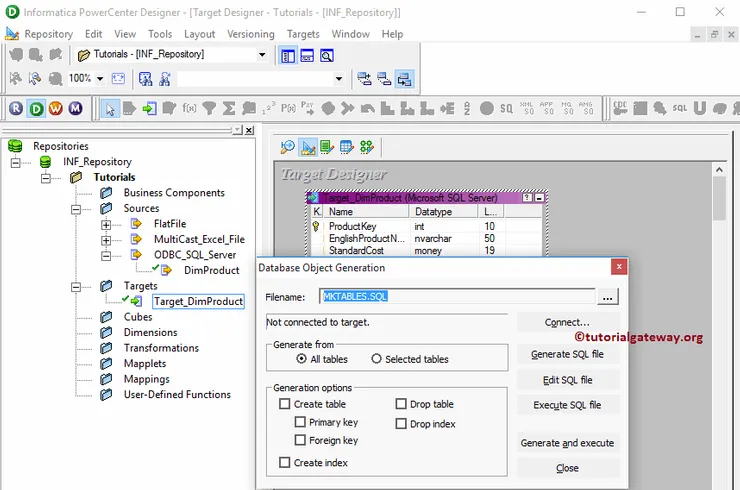
Step 3: From the below screenshot, you can observe that we are selecting Create Table, Create Primary Key, and Create Foreign Key. We are not dropping anything because our database is new and empty.
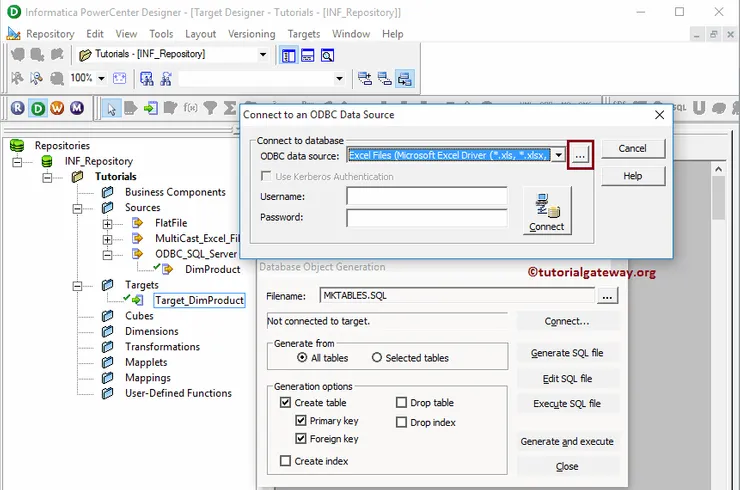
Step 4: Once you click on the connect.. button, Connect to ODBC Data Source window will be opened to select the existing ODBC connection or to create a new one. Currently, we don’t have any so, we are creating a new one by clicking on the … button.
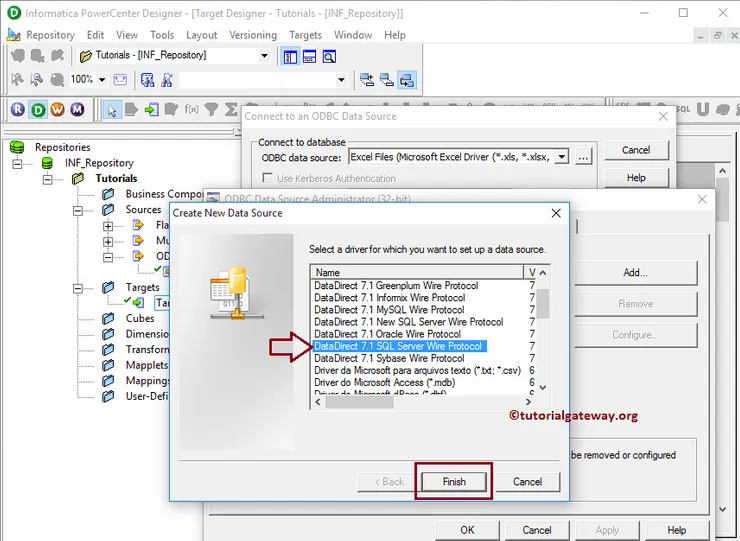
Step 5: Once you click on the … button, ODBC Data Source Administrator Window will be opened to add a new ODBC connection. If you have any, then please select it from the list. In this example, we are adding a new connection so, Click on the Add button. Once you click on the Add button, Create a New Data Source window will open.
Here we have an option to select the required database from the available list. As we said before, we are using SQL Server. So we are choosing the DataDirect 7.1 SQL Server Wire Protocol for this example.
TIP: Please refer to ODBC Connection to understand the steps in detail.
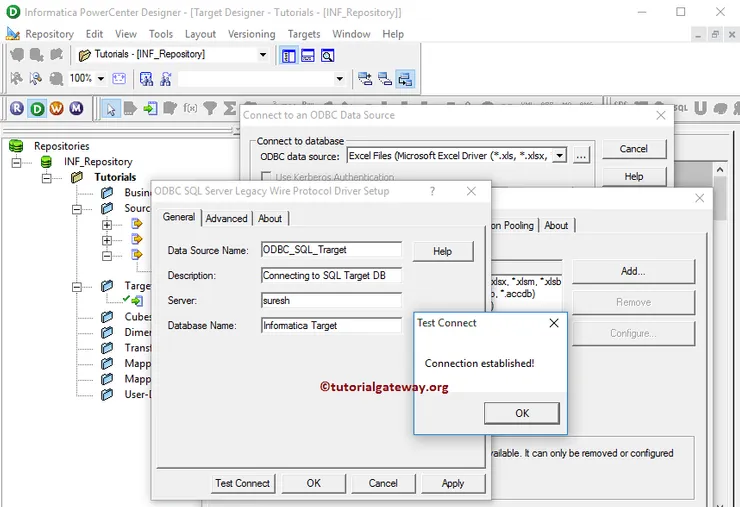
Step 6: It opens a new pop up window called ODBC SQL Server Legacy Wire Protocol Driver Setup. Here we have to fill the required details to connect with our database.
- Data Source Name: Please specify a unique name for this ODBC Connection.
- Description: An accurate description of the connection we are going to establish.
- Server: Please specify the SQL Server instance name.
- Database Name: Here, you have to write the SQL database name from which you want to extract the data. For the time being, we are selecting the below Target.
Once you have done, click the Apply button and then click OK button to close the window
NOTE: Once you fill the required details, It is always advisable to Test your connection using the Test Connection button
Step 7: From the drop-down list, Please select the ODBC connection that we created now.
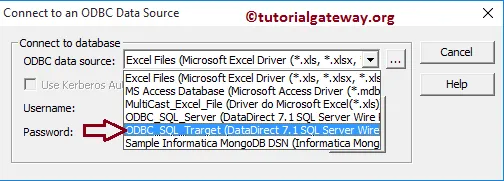
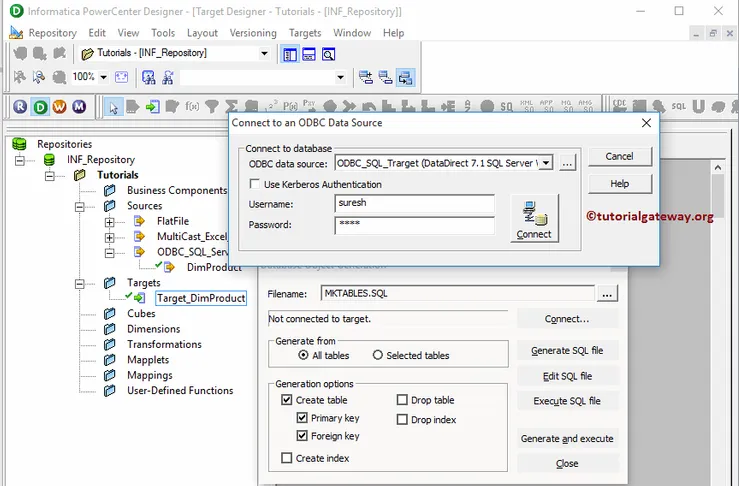
Step 8: Next, We have to provide the credentials required to connect with the respective database. Here we are providing the Username and password of our Microsoft SQL Server 2014 and owner name as dbo.
Once you fill the details, please click on the connect button to connect with the SQL database. After you connected successfully, click on the Generate and Execute button to generate and execute the SQL file
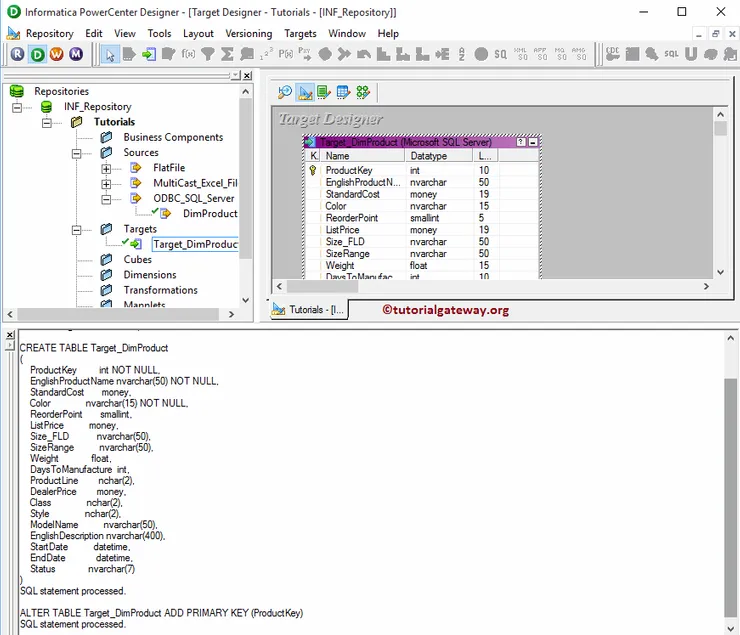
From the below screenshot, you can observe that we successfully created the Target table inside our Microsoft SQL Server 2014.
Create Target Table in Informatica
In this article, we will show you how to create a target table in Informatica and use it as the destination/target table for the transformed data with an example. For example, If we don’t have a table structure that matches our requirement, then this option can be beneficial.
Before we start to Create Target Table in Informatica, First connect to the repository service with your Admin credentials and then Navigate to Target Designer.
Please refer to Target Designer article to understand the Target Designer screen. From the below screenshot, you can observe that we are in the Informatica Target Designer.
TIP: Target Menu in the Menu bar available only when you are in the Target Designer section.

Next, Please navigate to Targets menu in Menu Bar. From the following screenshot, you can observe the list of available targets inside the Informatica PowerCenter Designer. In this example, our task is to create a target table in Informatica from scratch. So, we are selecting the Create option.
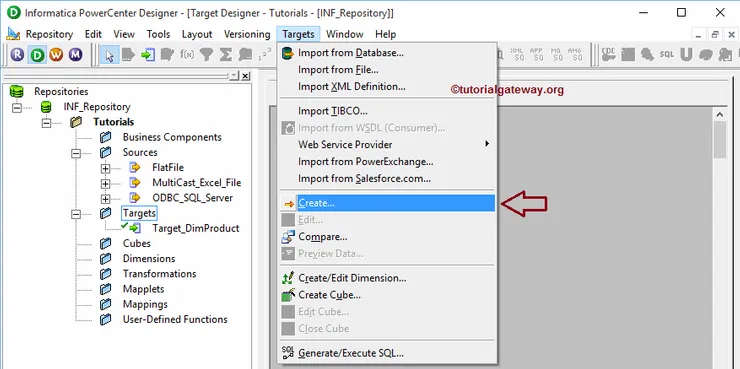
Once you select the Create option, a new window called Create Target table will be displayed:
- Enter a new name for this table: Please provide the unique name for this new table. We assigned Target_Multicast as the new name for this table
- Select a database type: Please select the required database type from the list of available databases. Here we are selecting the Microsoft SQL Server
Once you are done filling in the details, please click on the Create button to create a new empty table in our PowerCenter Target Designer.

We successfully created a new empty target table in Informatica Target Designer.

To add new columns, we can edit the table definition by Right-click on the table definition and selecting the Edit..option from the context menu.
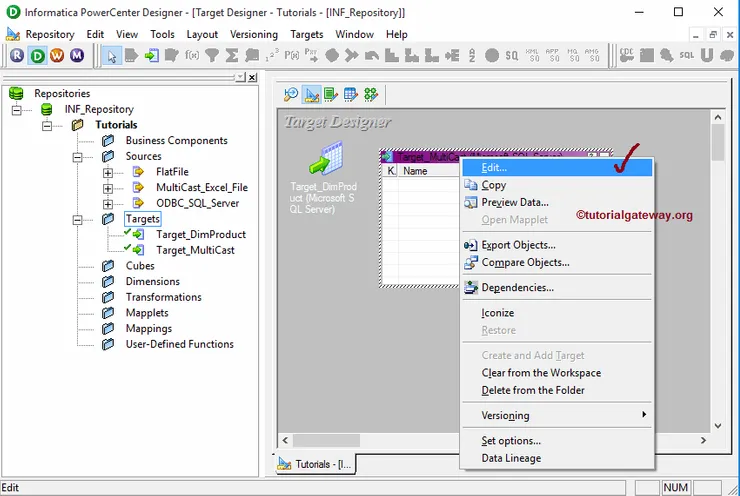
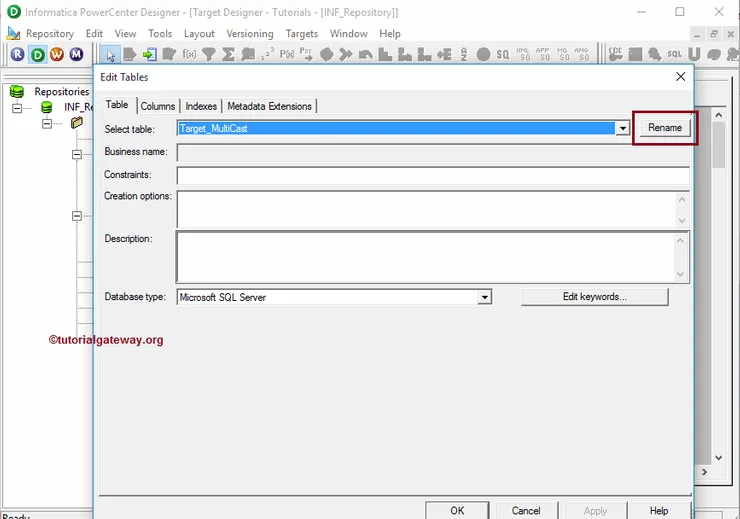
Once you select the Edit.. option, a new window called Edit tables will open. Within the Table tab, we can rename the table name by clicking the Rename button. Please change as per your requirements
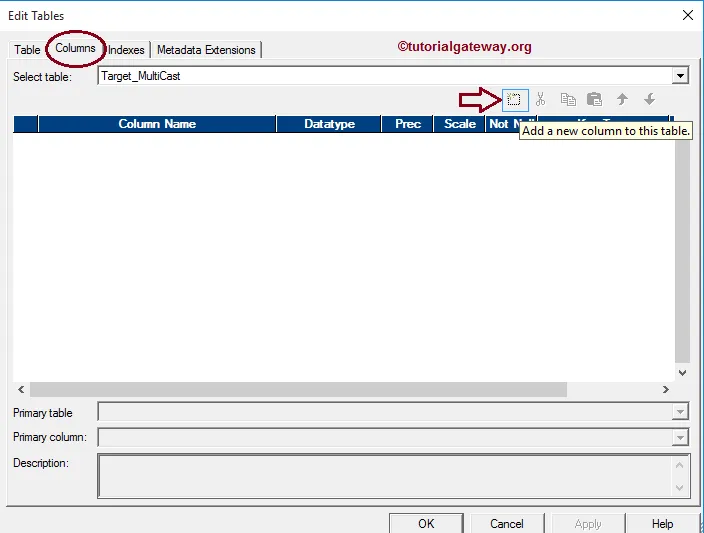
To alter or modify the existing table, we have to navigate to Columns Tab. Here we want to add new columns so, Please select the first button (before scissors symbol) as shown below. It opens an empty row to add Column Name, Data Type, Precision (if required), Scale (if needed).
If it is a primary key, then change the Key type to primary and checkmark the Not Null option (if your column doesn’t allow null values)
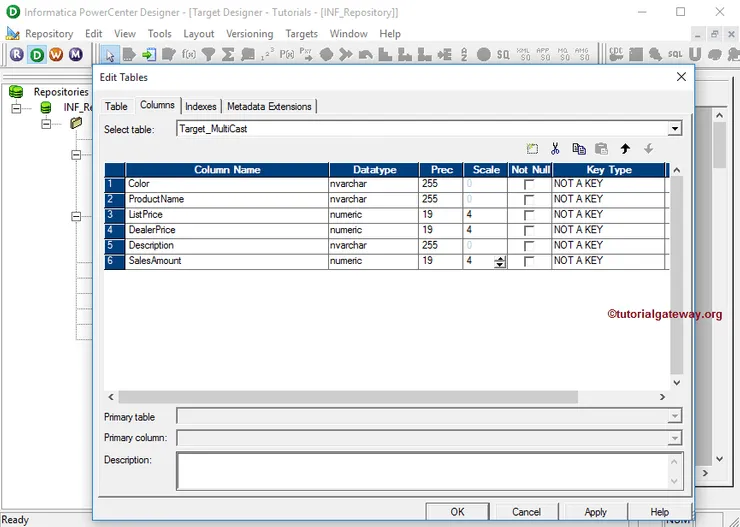
We added six columns with three NVarchar data types and three Numeric data types. Once you added the required columns, Click OK to close the Edit tables window
From the below screenshot, see our newly created target table in Informatica. And also the table definition (Column Names and appropriate data types) inside our workspace.
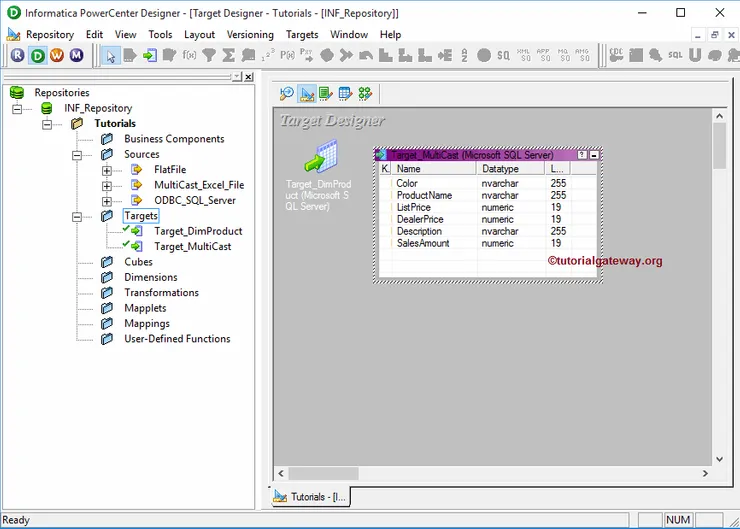
NOTE: The target tables we created in Informatica PowerCenter target designer will exist only in the target designer. If you want to add this table definition to SQL Server, we have to follow the steps we specified in Create Target table using Source Definition article (Starting from Step 1 to Step 8)
Informatica Mapping
Informatica Mapping represents the data flow between the Source and target tables. Or we can say that it defines the rules for data Transformation. To create Informatica Mapping, we require one or more Source Definitions, one or more Target definitions, and Transformations.
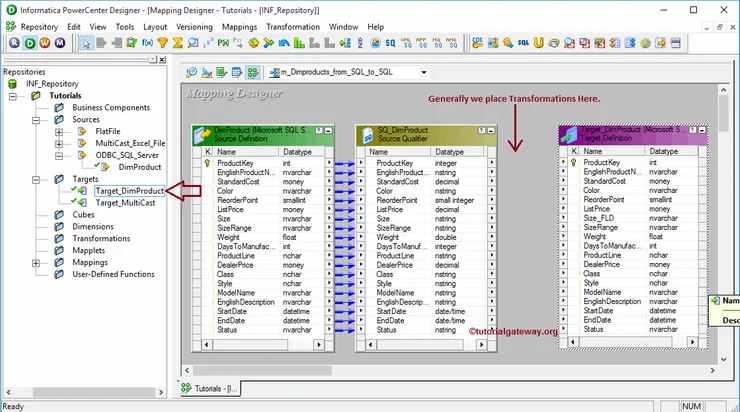
The following screenshot will show you the diagrammatic representation of the Informatica Mapping.

From the above screenshot, you can observe that Every mapping in Informatica should contain the following components:
- Source Definition: Here, we are going to use one or more sources that we created in the source analyzer. Please refer to the Source Analyzer article to understand its functionality.
- Transformations: Modifies the source data using different types of available transformations.
- Target Definition: Here, we are going to use one or more targets that we created in the target designer. Please refer to the Target Designer article to understand its functionality.
Before we start Informatica Mapping, First connect to the repository service.
To connect with the Repository service, we have to provide the Admin Console credentials. So, Please provide the Informatica Username and Password and click on the Connect button.
TIP: Here, you have to provide the Admin Username and password that you specified while installing the Informatica Server.

Once you connected successfully, Please navigate to the Tools menu in Menu Bar. The following screenshot will show the list of available tools inside the PowerCenter Designer.
In this article, we are explaining the Informatica Mapping. So, please select the Mapping Designer option.

Once you select the Mapping Designer option, we will be in the Mapping Designer screen.
TIP: Mapping Menu in the Menu bar will be available only when you are in the Mapping Designer section. Otherwise, it won’t show up.
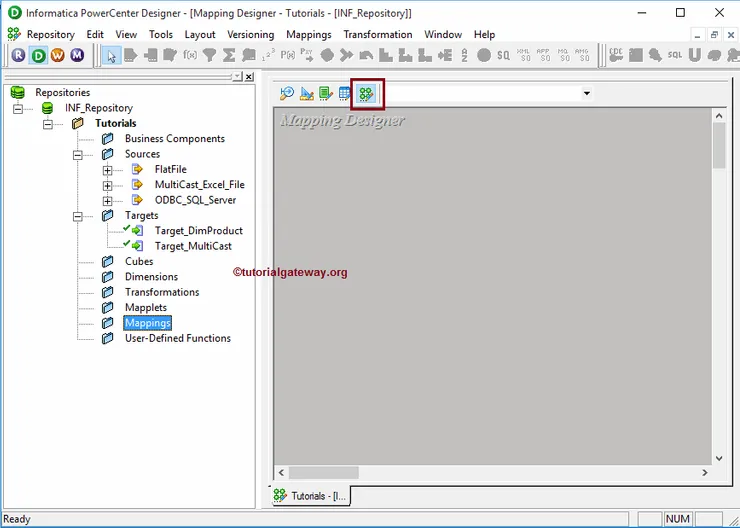
STEP 1: To create a new mapping, Please navigate to the Mappings menu in Menu Bar and select the Create..option. It will open the Name window. Here, you have to write the unique name for this Informatica mapping and click the OK button.
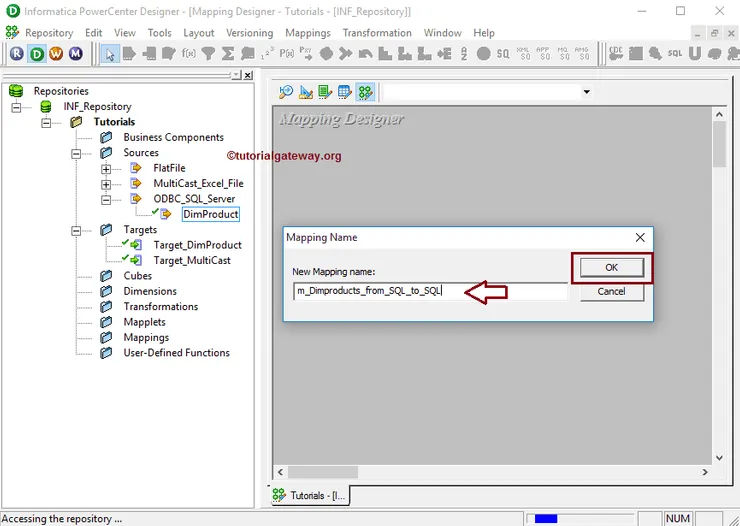
STEP 2: Drag and drop the DimProducts source definition from Sources folder to the mapping designer. Once you drag the source, the PowerCenter designer will automatically create the default transformation called source qualifier.
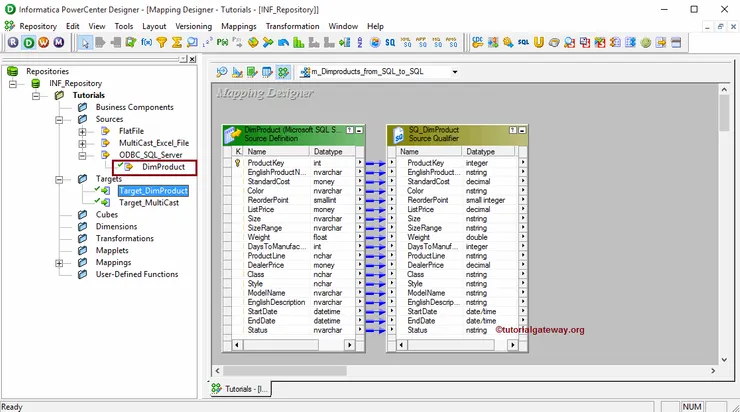
STEP 3: Drag and drop the Target_DimProducts target definition from Target’s folder to the Informatica mapping designer.
TIP: Generally, we place one or more transformations in between the Source definition and the target definition, and we will cover them in the following tutorials.
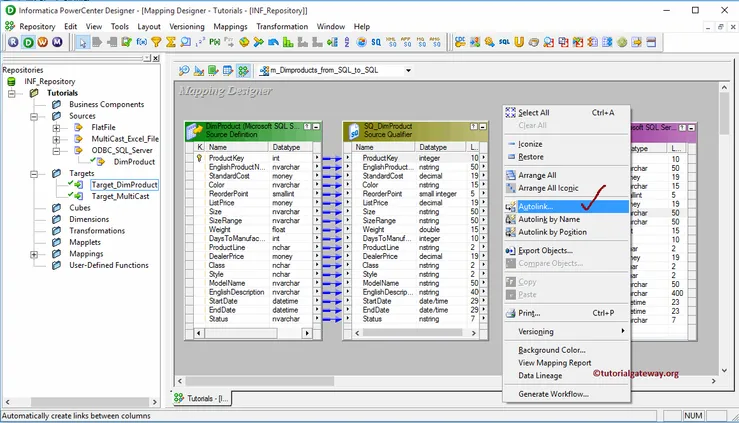
STEP 4: We have to connect the source qualifier with the target definition. The PowerCenter Designer provides multiple ways to connect them. The first approach is, Right-click on the empty space present in the mapping designer will open the context menu. Please select the Autolink.. option from it.
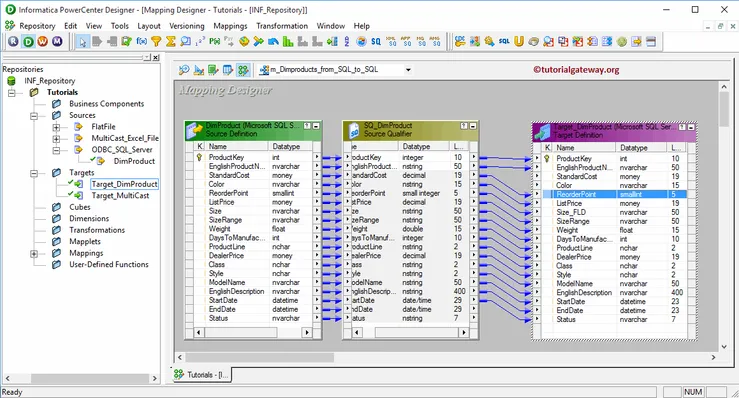
The second approach is selecting all columns present in Source Qualifier and dragging them to the target definition. In both these approaches, if there is any mismatch in the column names, then we have to attach them manually.
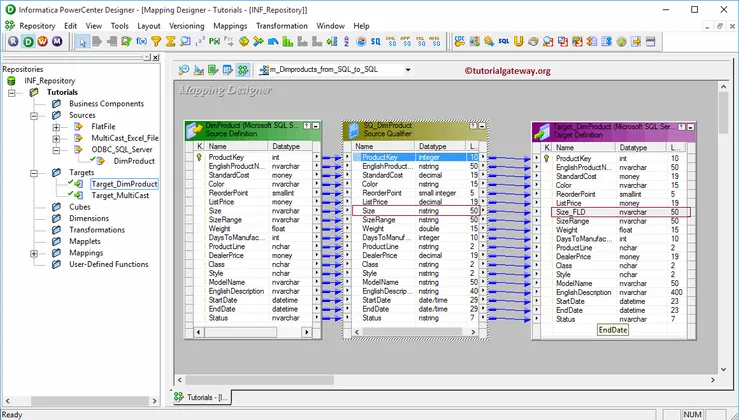
From the below screenshot, you can observe that we have a Size column in Source and Size_FLD in the target. In these situations, Auto link or dragging columns will not link them. So, please select the required column (Size) and drag it to the destination column (Size_FLD) to create the connection.
NOTE: Informatica Mapping designer allows us to delete the wrong connections by selecting the link and deleting it.
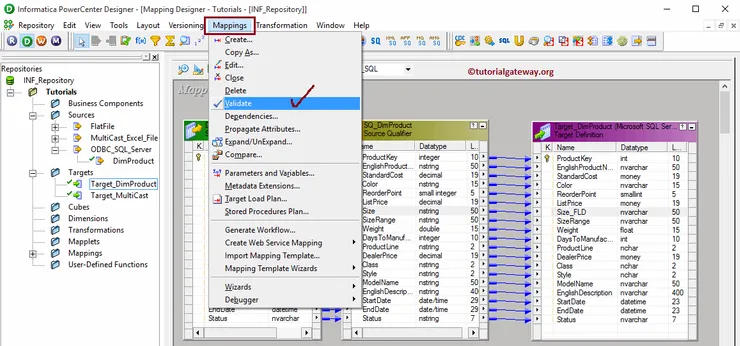
STEP 5: Let us validate it by going to Mapping Menu bar and selecting the Validate option.
Session in Informatica
A Session in Informatica is a set of instructions that tells the Informatica Integration Service when and how to move data from Source to target.
In Informatica, we have to create a session task for each Mapping because the Mapping is just a structural definition, and the session will move data from Source to destination. There are two types of sessions in Informatica:
- Non-reusable Session Task: Session Task that we created in the Workflow Designer is non-reusable.
- Reusable Session Task: Session Task that we created in Informatica Task Developer is reusable
NOTE: Before you create a Non-reusable Session in Informatica, we must configure the Workflow manager to communicate with databases and Integration services.
In this article, we will show you how to create Non-reusable Session in Informatica with an example. For this example, we are going to use the Mapping that we created in our previous article.
Creating Non-reusable Session in Informatica follows three steps, so you have to follow the same procedure:
- Step 1: Configuring the Source and Destination connection. In this example, we are a connection to the SQL Server Relational Database.
- Step 2: Creating a Workflow manager to communicate with Informatica integration services
- Step 3: Creating Session in Informatica
First, connect to the repository service. To connect with the Repository service, we have to provide the Admin Console credentials so, Please provide the appropriate Informatica Username and Password and click on the Connect button.
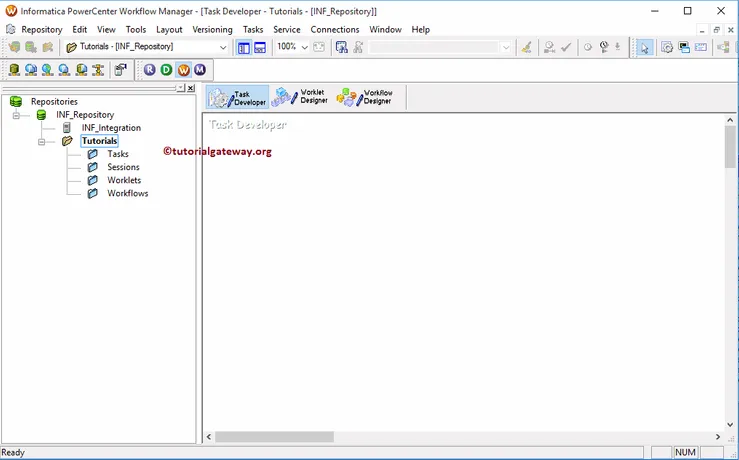
From the below screenshot, you can observe that we are in the Task Developer.
Configuring the Source and Destination connection
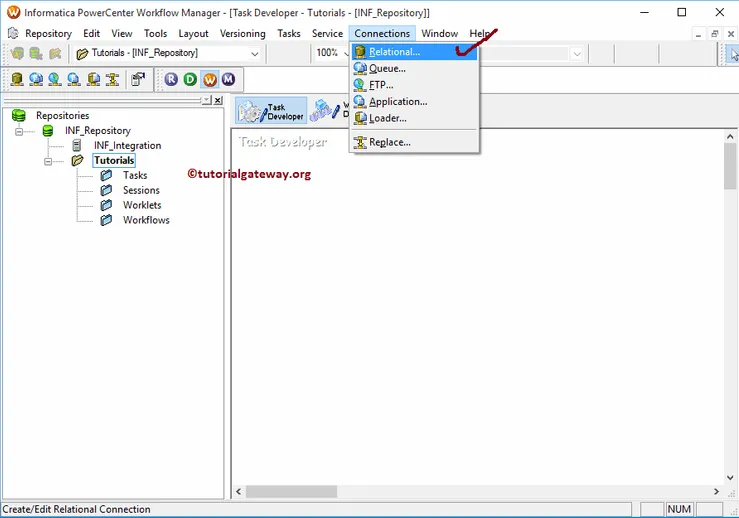
Before we start creating Session in Informatica, we have to set the relational database connections. To do this, Please navigate to Connections Menu and select the Relational option.
Once you select on the Relational option, a new window called Relational Connection Browser will open. It helps us to create a connection to our relational database.
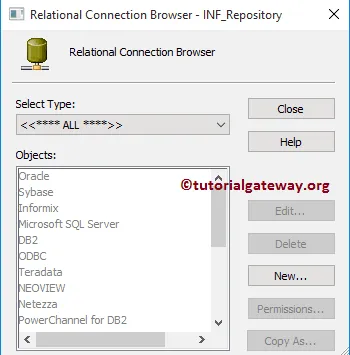
For this Informatica session example, we are using the SQL as our source database that’s why we are selecting the Microsoft SQL Server as the Select Type
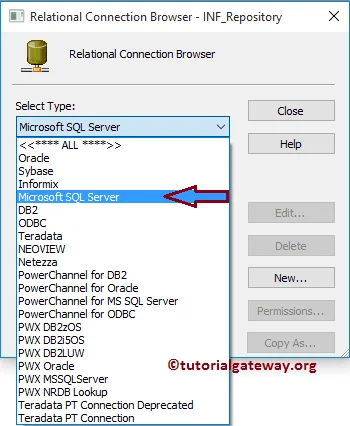
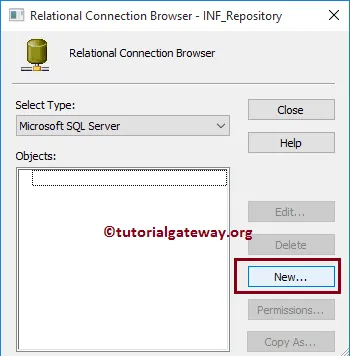
From the below screenshot, you can observe that currently, we don’t have any relational connections. To create a new one, please click on the New button.
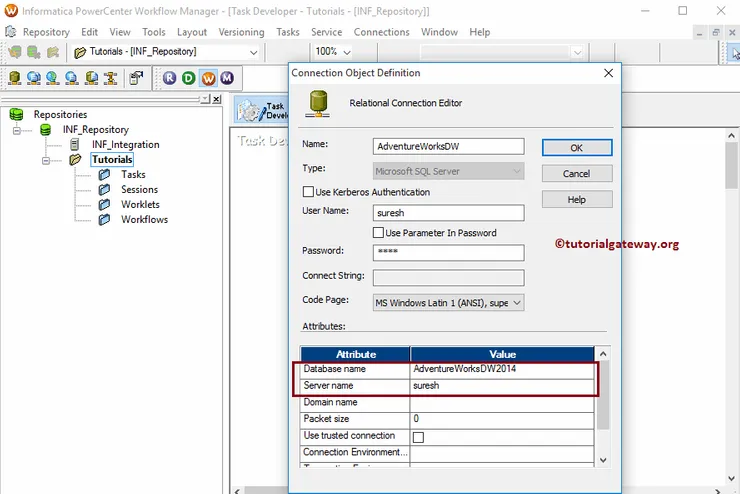
Once you click on the New button, a new window called Connection Object Definition will open.
- Name: Please specify the unique name for this connection.
- Username: You have to specify the username to connect with the database.
- Password: Here, provide the password of the user mentioned above.
- Database Name: Please specify the name of a database you are going to use. For this example, we are using AdventureWorksDW2014.
- Server name: Here, you have to write your server instance name.
Click Ok button after you fill the details
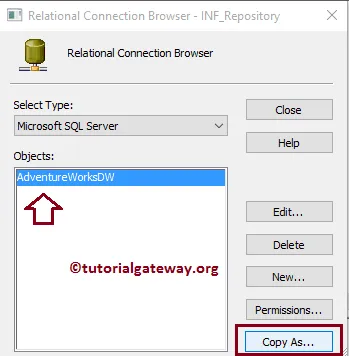
We need to create one more connection string for our target database. Although we can create using the steps mentioned above, we want to copy the above connection using the Copy As.. option.
It opens the connection Object definition window for the target so, please specify the connection name, database name, and the remaining details.
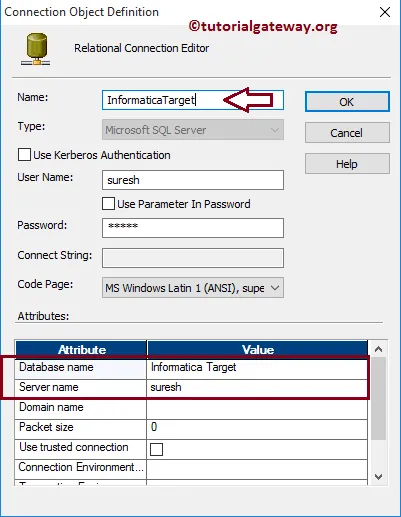
NOTE: Once we configured the database connections, we have to create a workflow within the workflow manager. We will explain this in our next article.
To create Non-reusable Session in Informatica, Please navigate to Tasks Menu and select the Create option.
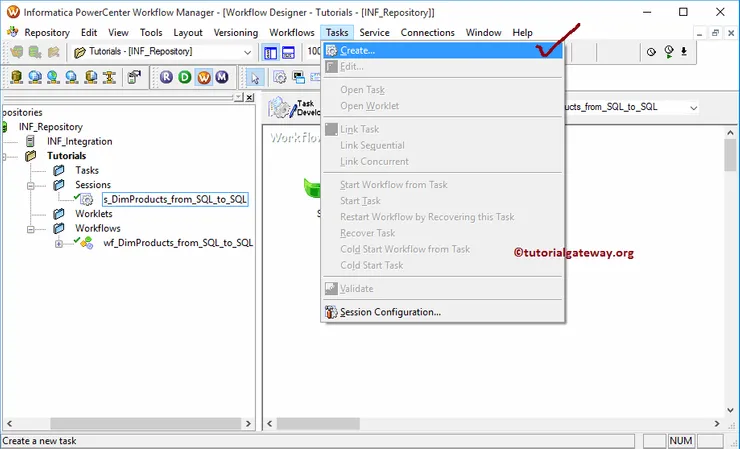
Next, you have to enter a New name for this non-reusable session task in Informatica. Here we assigned the name as s_DimProducts_from_SQL_to_SQL
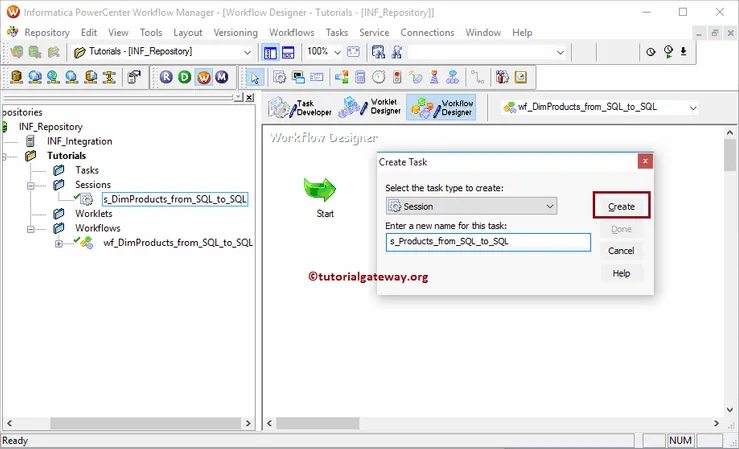
Once you click on the Create button, a new window called Mappings will open. Here, we have to select the Mapping that you want to associate with this session. From the below screenshot, you can observe that currently, we have only one mapping, so we are selecting it.
TIP: Please refer Mapping article to understand the data transformation in below specified mapping m_DimProducts_from_SQL_to_SQL
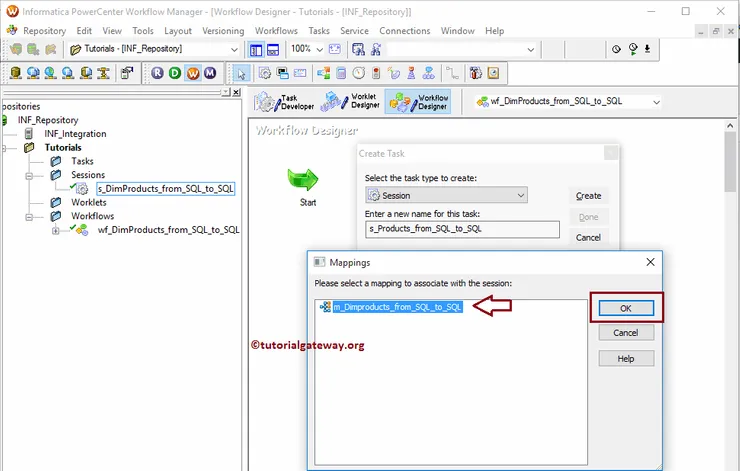
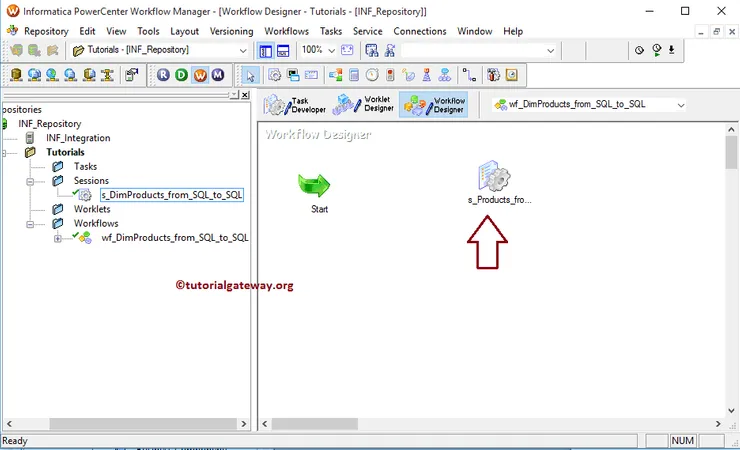
Our newly created Informatica session task was added to the Workflow Manager. Before we are adding or linking to the Workflow, we have to change a few properties and configure the connection strings of a Source and target. To do so, Please double-click on our Informatica session task
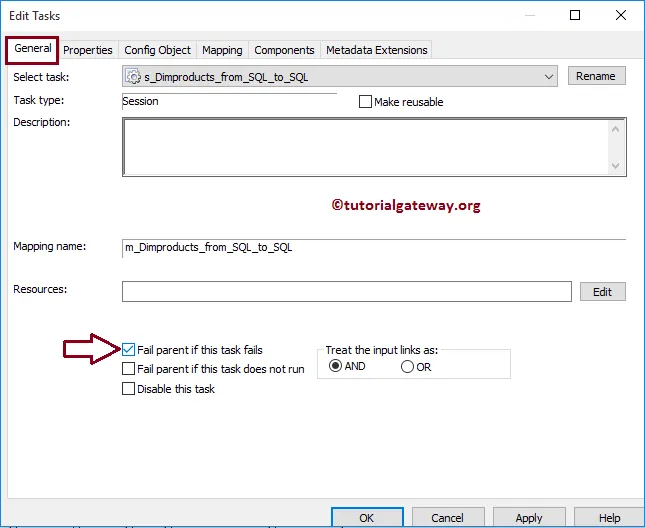
Double click on the Informatica Session task will open the following window. Within the General Tab, we can rename the Session Task to a more meaningful name. Please do not forget to provide a valid description of the Task.
Fail Parent if this Task fails: Please check mark this option. If this session task fails, then it will fail the workflow.
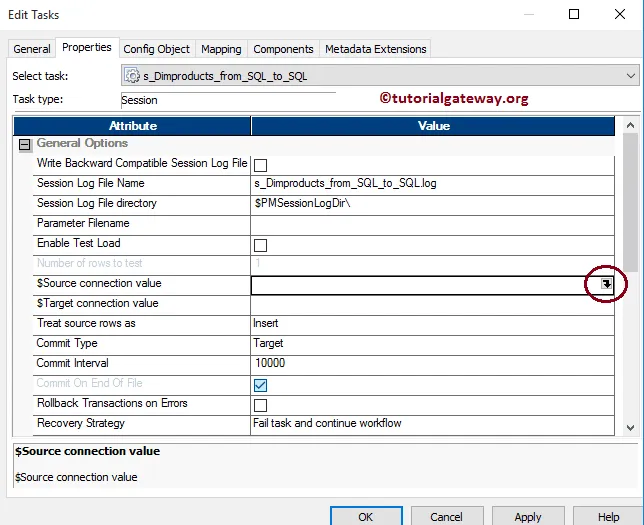
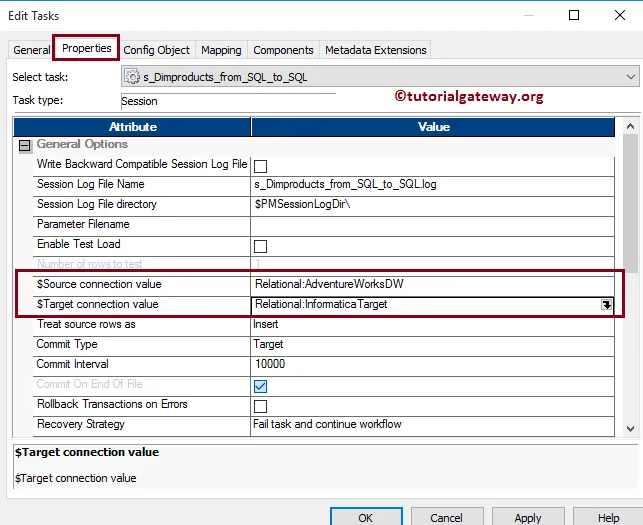
Within Properties Tab, we have three common properties that we have to configure for the relational databases.
$Source connection value: This property will store the relational source information in $Source variable. So, we have to configure the source connection by clicking on the Arrow we marked below.
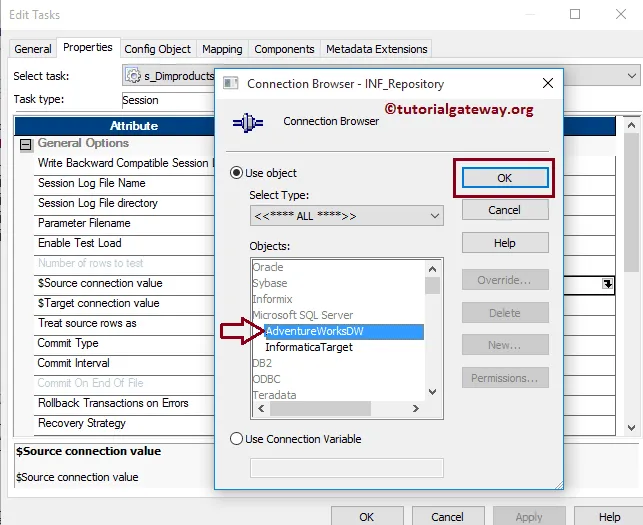
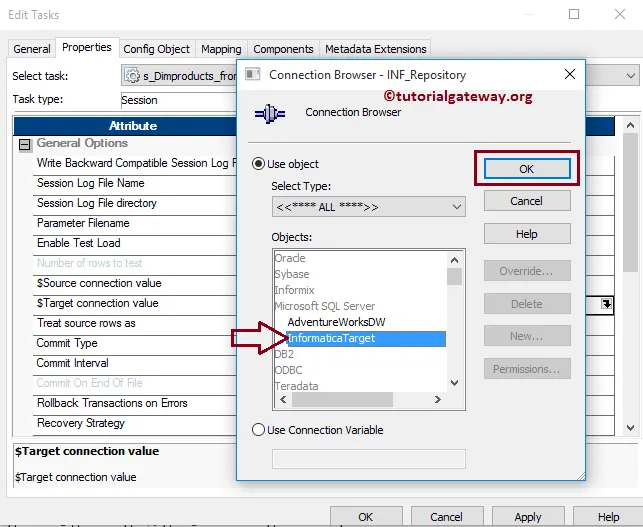
Once you click on the Arrow, a new window called Connection Browser will open. Since we are using the SQL as our source database, we are selecting the Microsoft SQL Server as the Select Type. Next, we are selecting the already created connection i.e., AdventureWorksDW
TIP: If you want to create a new connection before then, you can use the New button.
$Target connection value: This property will store the relational target information in the $Target variable. So, we have to configure the target connection by clicking on the Arrow we marked below.
For this example, we are using the database as the destination so, we selected the Microsoft SQL Server as the Select Type and target as the Destination database name
Write backward Compatible Session Log File: If you checkmark this option, Informatica generates the session file in text format so that we can review it later. Otherwise, it will produce only a binary format.
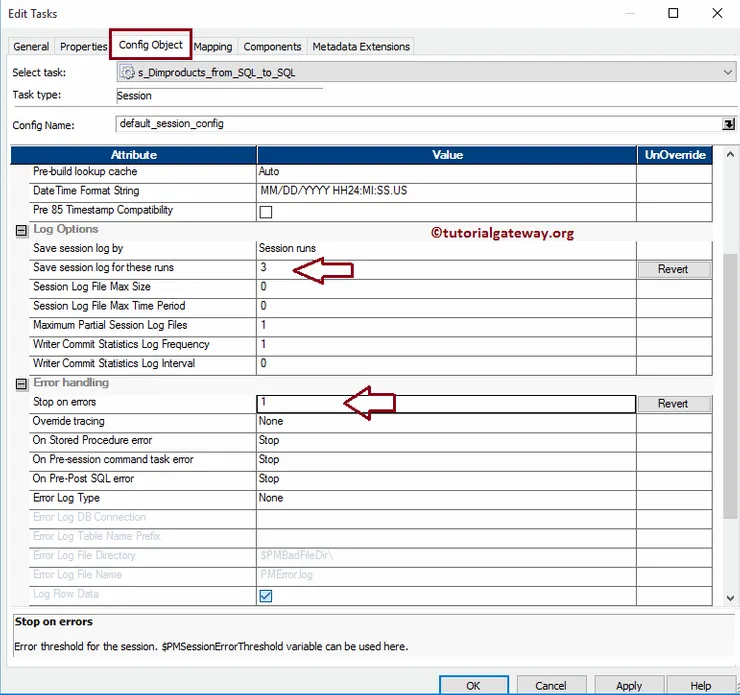
Within the Config Object, we have to configure the Log options and Error handling. Although we have many properties, we are discussing and configuring the most common properties within this window.
- Save Session log for these runs: Please specify the integer number here. For example, if you specify 3, the last three sessions will be saved to our Informatica session log file
- Stop on Errors: Please specify how many errors you want the session to tolerate. For example, if you specify 3, the session runs until it encounters three errors.
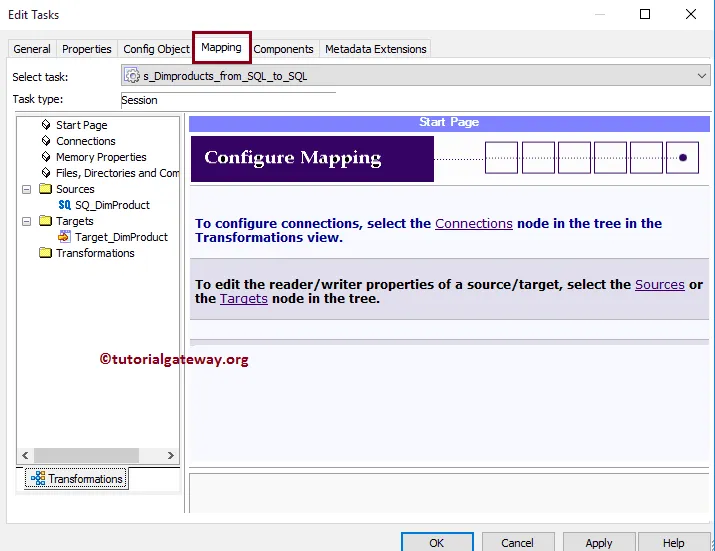
Within the mappings tab, we have to configure the Source, target Connections, and some common properties. First, let us configure the source connections by clicking on the Dimproducts source present in the Sources folder.
Within the Connections, select the Arrow button beside the relational type to open the Relational Connection Browser. This window helps you to configure the source connections (creating new, modifying, etc).
Here, we are using the Connection variable that we created in our previous step, i.e., $Source
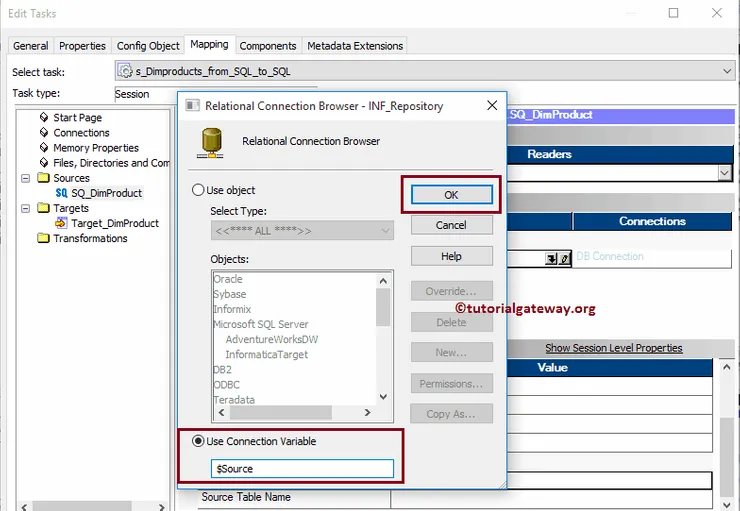
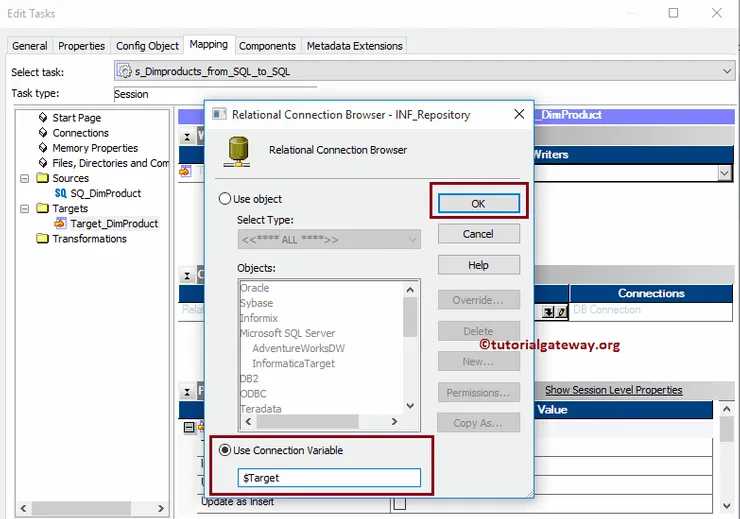
Now, let us configure the target connections by clicking on the Target_Dimproducts present in the Targets folder.
Within the Connections, select the Arrow button beside the relational type to open the Relational Connection Browser. Here, we are using the Connection variable that we created in our previous step, i.e., $Target
TIP: You can also select the Use Object option and select the Database name also.
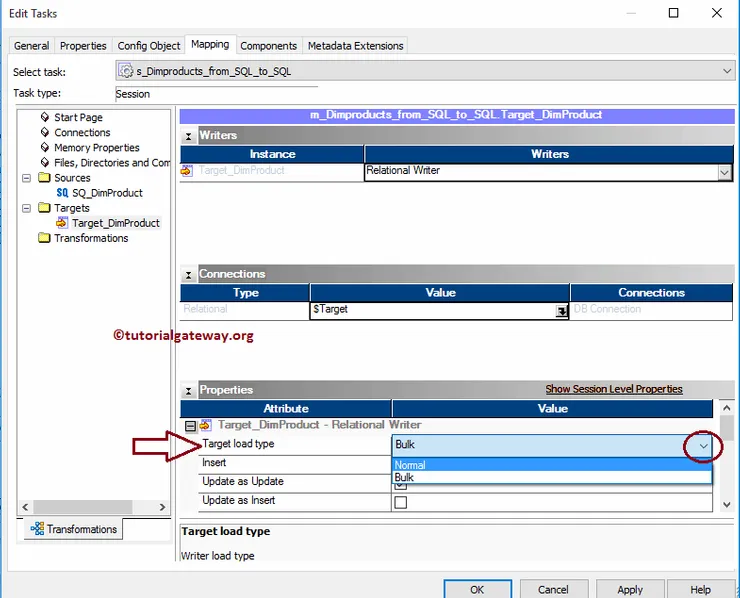
Within the Target properties, we have to configure two common properties, and they are:
Target Load Type: If your target table has indexes, then use the Normal-type. Otherwise, Bulk type. Remember, the bulk type will insert the data faster than Normal, but it does not work on indexed tables.
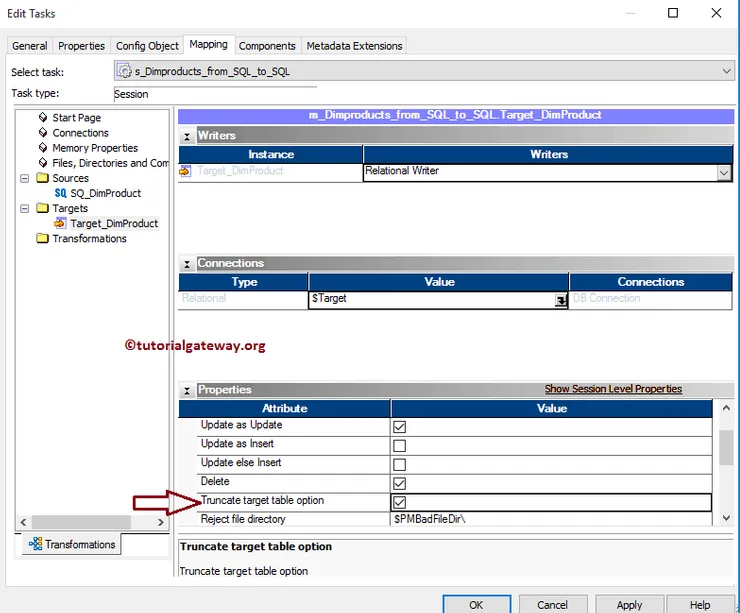
Truncate target table option: By check-marking, this option will truncate the existing data from the destination table. It helps us to insert new data for every successful run.
Once you finished creating the Informatica session task, we have to Link the workflow with the Session Task.
Reusable Session in Informatica
In this article, we will show you how to create Reusable Session in Informatica with an example. For this example, we are going to use the Mapping that we created in our previous article.
Creating a Reusable Session in Informatica follows two steps. So you have to follow the same procedure:
- Step 1: Configuring the Source and Destination connection. In this example, we are connecting to SQL Server Relational Database.
- Step 2: Creating Reusable Session in Informatica
Before creating Reusable Session in Informatica, connect to the repository service. To connect with it, enter the Admin Console credentials. So, Please provide the appropriate Username and Password and click on the Connect button.
From the below screenshot, see that we are in the Informatica Target Designer.
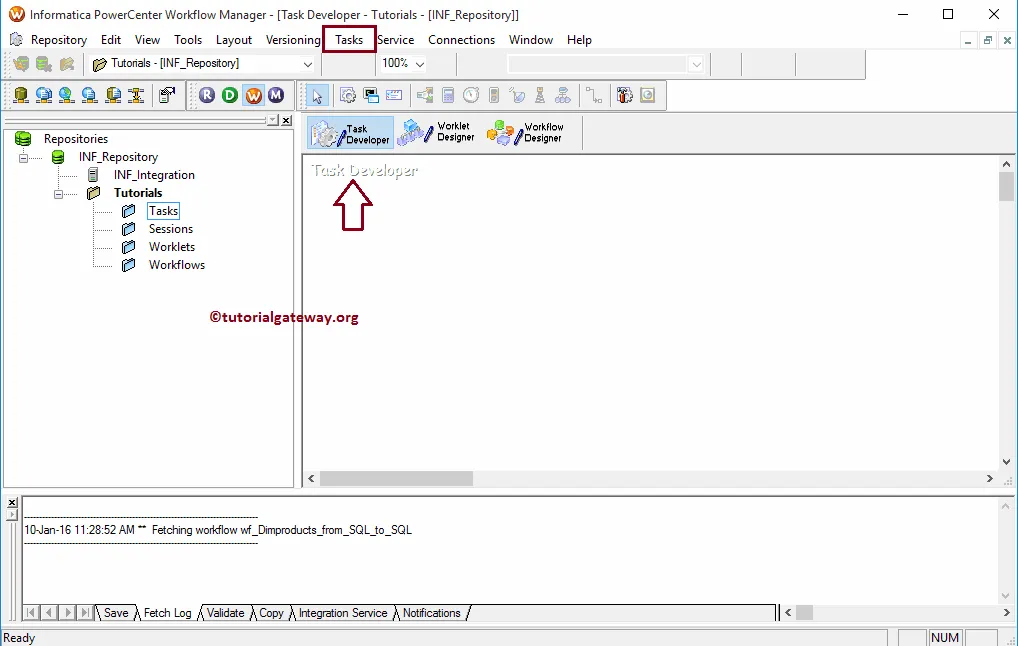
Configuring the Source and Destination connection
Before we start creating Reusable Session in Informatica, we have to set the relational database connections. To do this, Please navigate to Connections Menu and select the Relational option.

Selecting the Relational option opens a new window called Relational Connection Browser. It helps us to create a connection to our relational database.

For this Informatica reusable session example, we used the SQL as our source database. So, select the Microsoft SQL Server as the Select Type

From the below screenshot, we don’t have any relational connections. To create a new one, click on the New button.

Clicking the New button opens a new window Connection Object Definition
- Name: Unique name for this connection.
- Username: Username to connect with the database.
- Password: Provide the password for the above user.
- Database Name: Name of a database that you are going to use. For this demo, we are using AdventureWorksDW2014.
- Server name: Here, write your server instance name.
Click Ok button after you fill the details

We require to create one more connection string for our target database. Although we can build using the steps as discussed earlier, we copy the above connection using the Copy As.. option.

It opens the Connection Object Definition window for the target. So, please specify the connection name, database name, and the remaining details.

To create a reusable Session in Informatica, Within the Task Developer, Please navigate to Tasks Menu and select the Create option.
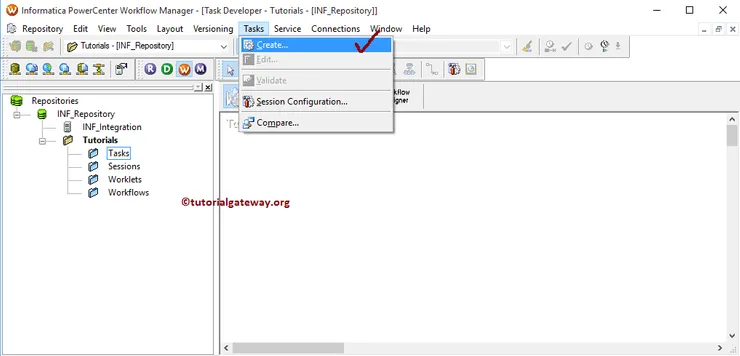
Once you select the Create option, Create Task window will open. From the drop-down list, Please select the Session Task

Next, you have to enter a New name for this Informatica reusable session task. Here we assigned the name as s_DimProducts_from_SQL_to_SQL

Once you click on the Create button, a new window called Mappings will open. Here we have to select the Mapping you want to associate with this session. From the following screenshot, currently, we have only one mapping, so we are choosing it.
TIP: Please refer Mapping article to understand the data transformation in below specified mapping m_DimProducts_from_SQL_to_SQL
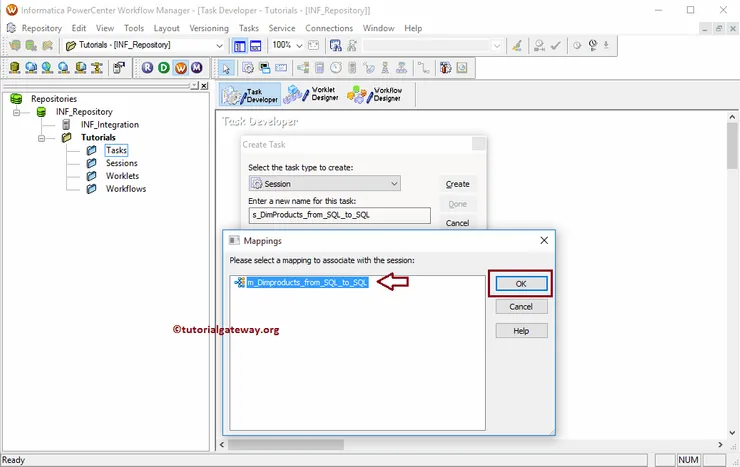
Our newly created Informatica reusable session task was added to the Task Developer. Before we were adding or linking to the Workflow, we have to change a few properties and configure the connection strings of a Source and target. To do so, double-click on our session task

Double click on the Session task will open the following window. Within the General Tab, we can rename the Session Task to a more meaningful name. Please do not forget to provide a Task description for this Reusable Session in Informatica.
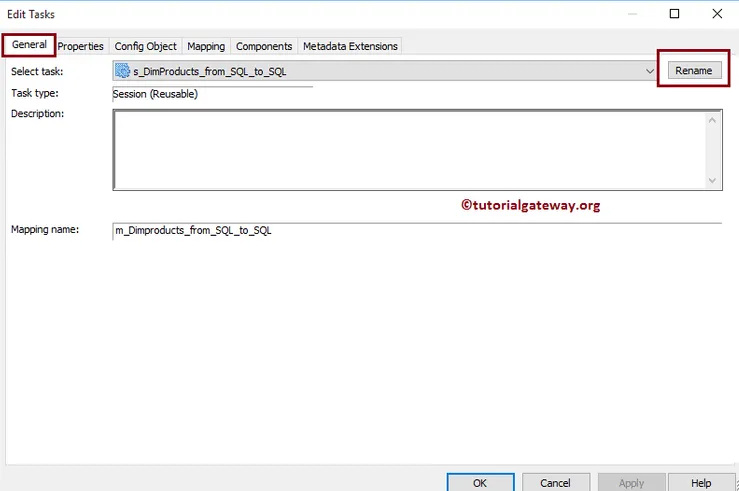
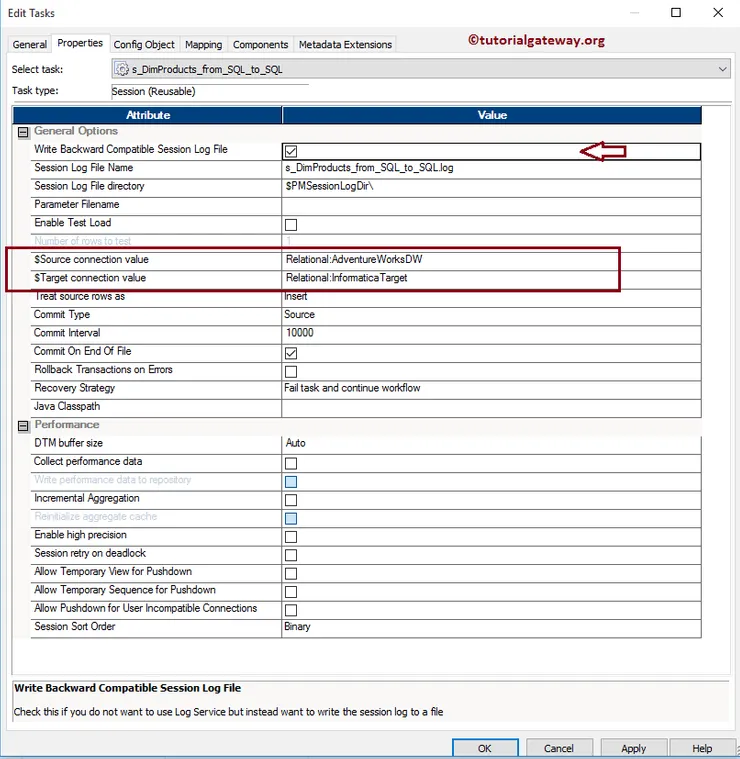
Within Properties Tab, we have three common properties that we have to configure for the relational databases.
$Source connection value: This property will store the relational source information in $Source variable. So, we have to configure the source connection by Click on the Arrow we marked below.
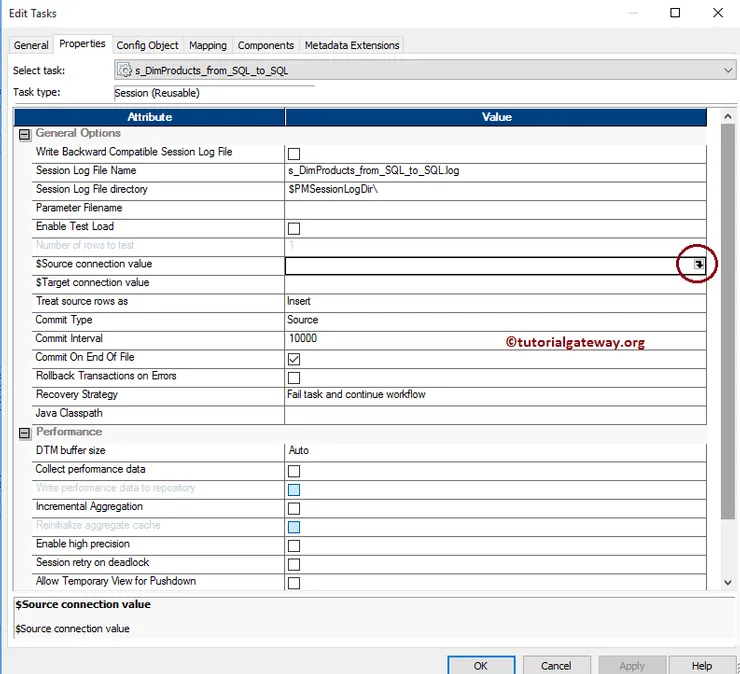
Once you click on the Arrow, a new window called Connection Browser opens. Since we are using the SQL as our source database, we are selecting the Microsoft SQL Server as the Select Type
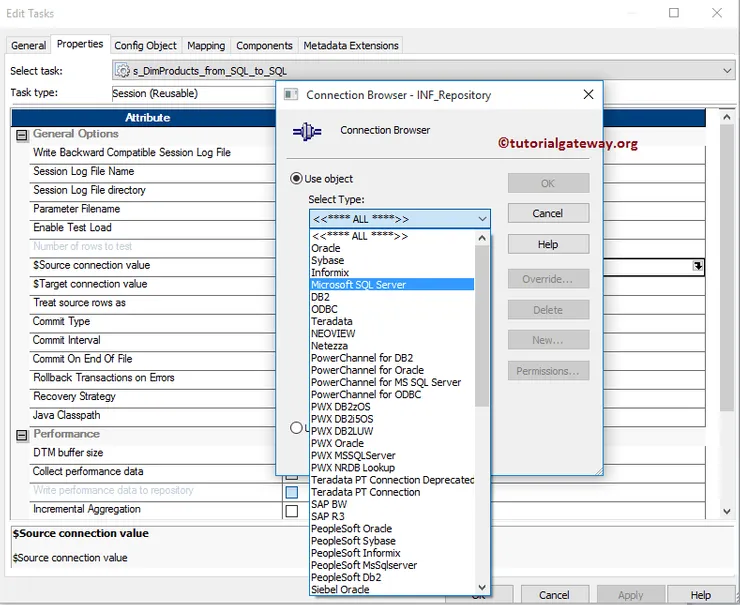
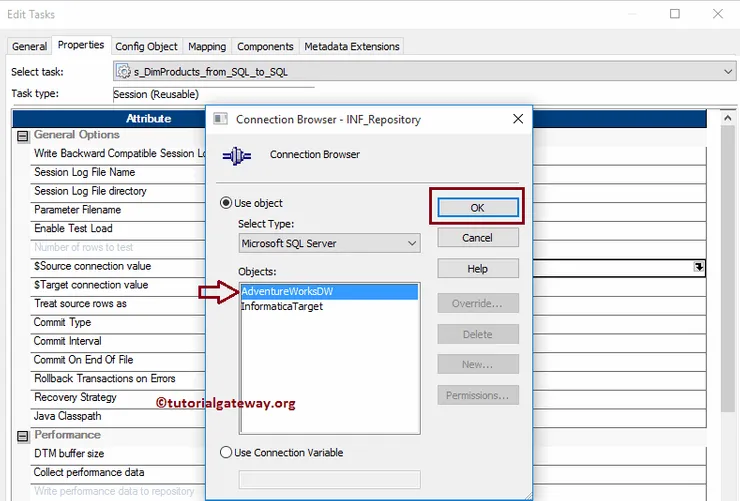
Next, we are selecting the already created connection i.e, AdventureWorksDW
TIP: If you want to create a new connection, use the New button to create one.
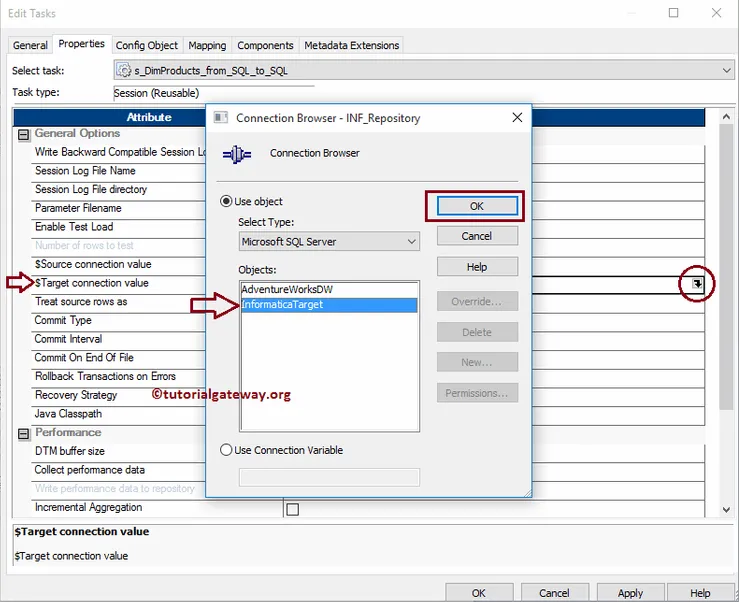
$Target connection value: This property will store the relational target information in the $Target variable. So, we have to configure the target connection by Click on the Arrow we marked below.
For this example, we are using the database as the destination so, we selected the Microsoft SQL Server as the Select Type and target as the Destination database name
Write backward Compatible Session Log File: If you checkmark this, Informatica generates the session file in text format so we can review it later. Otherwise, it generates in a binary format only.
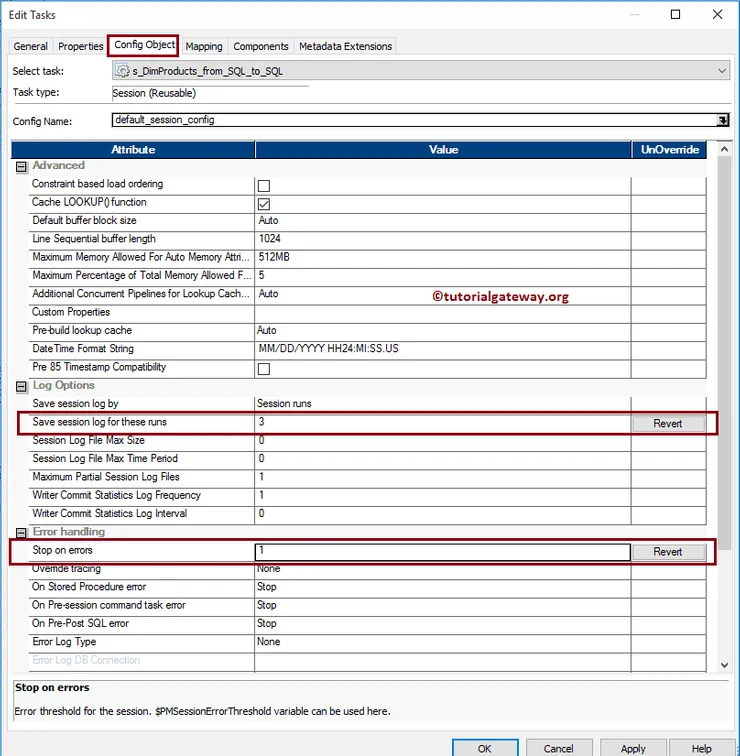
Within the Config Object, we have to configure the Log options and Error handling. Here, we are considering and configuring the most common properties within this window.
- Save Session log for these runs: Please specify the integer number here. For instance, if you specify 3, the last three sessions saved to our session log file
- Stop on Errors: How many errors you want to allow. For instance, if we specify 3, the session runs until it encounters three errors.
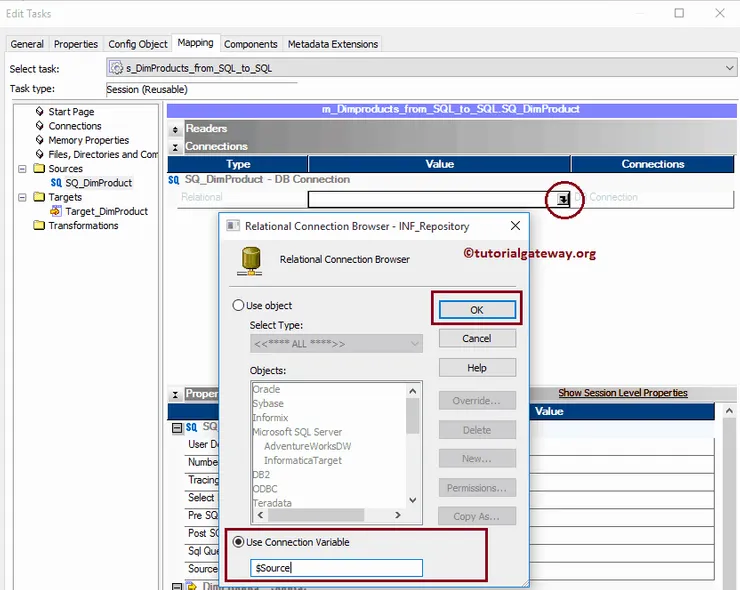
Within the mappings tab, configure the Source, target Connections, and some general properties. First, let us set the source connections by clicking on the Dimproducts Source present in the Sources folder.
Within the Connections, select the Arrow beside the relational type to open the Relational Connection Browser. This window helps to configure the source connections (creating, modifying). Here, we used the Connection variable we created in our earlier step, i.e., $ Source
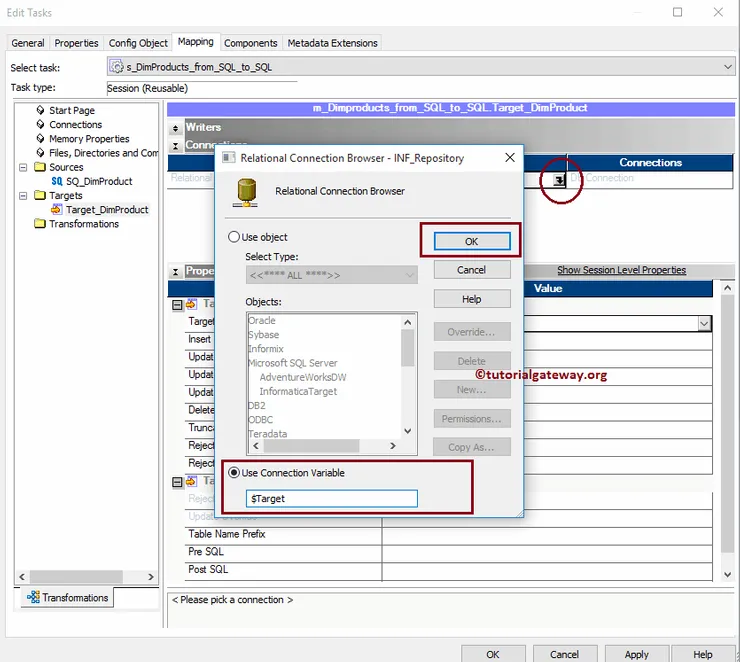
Now, let us configure the target connections by clicking on the Target_Dimproducts present in the Targets folder.
Within the Connections, select the Arrow button beside the relational type to open the Relational Connection Browser. Here, we are using the Connection variable that we created in our earlier step, i.e., $Target
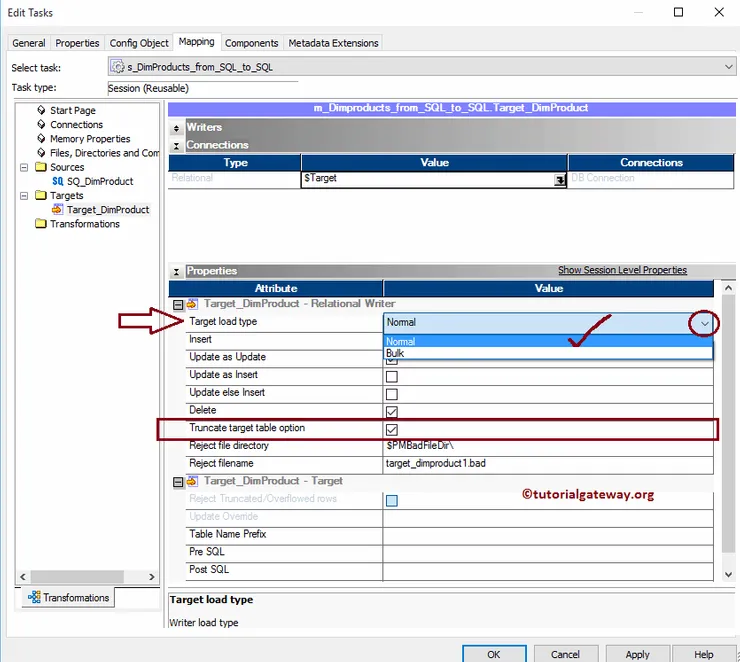
Within the Target properties, configure two common properties, and they are:
- Target Load Type: If the target table has indexes, use the Normal-type otherwise, Bulk type. The bulk type inserts the data faster than Normal, but it does not support indexed tables.
- Truncate target table option: It truncates the data from the destination table. It helps us to insert fresh data for every successful run.
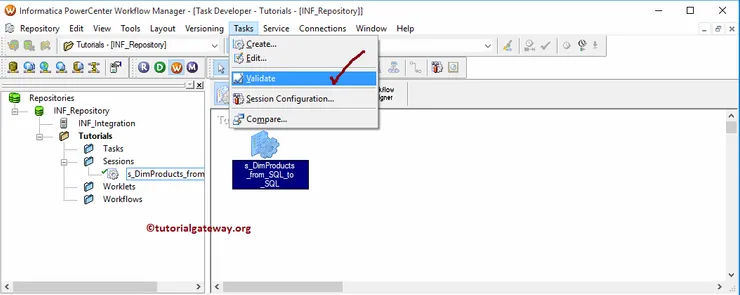
Once you completed creating the session task, we have to Verify the task before using it. For this, navigate to Tasks Menu and select the Validate option.
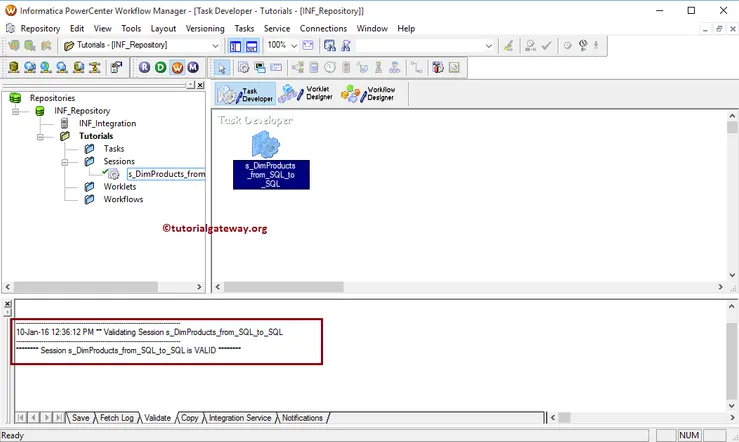
From the below image, see our Reusable session in Informatica is a valid one.
Informatica Workflow
An Informatica Workflow is a set of instructions that tells the Informatica integration services how to run one or more task which is connected by links. Every workflow will start with a Start task (by default). So, when you start the workflow, it will begin executing from the Start Task and continue until the tasks get finished. Informatica PowerCenter Workflow manager provides two approaches to create it.
- Creating Informatica Workflow manually
- Creating Informatica Workflow using Wizard
In this article, we will show you how to create an Informatica Workflow manually with an example. To create a workflow, we need the task (Session or Email). For this example, we are going to use the already created session task.
Before we start the Informatica Workflow demo, First connect to the repository service. To connect with the Repository service, we have to provide the Admin Console credentials. So, Please provide the appropriate Username and Password and click on the Connect button.
TIP: Please refer Session article to understand the creation of session task and Reusable Session article to understand the creation of reusable Informatica session task
From the below screenshot, you can observe that we are in the Task Developer.

To create a new Informatica Workflow, first, we have to go to the Workflow Designer tab. Next, Please navigate to Workflows Menu and select the Create option.
TIP: Workflows Menu in the Menu bar will be available only when you are in the Workflow Designer section. Otherwise, it won’t show up.

Once you select the Create option, a new window called Create Workflow will open Please provide the unique name, comments and You can leave the default settings
NOTE: Here you can change or delete the existing integration service also

Once you created the Informatica workflow, you can create a Non-reusable session. Or you can use the already created reusable session. To demonstrate both, first, we are dragging the already created Reusable session s_DimProducts. Please refer to Reusable Session article to understand the steps involved in creating this.

Next, we removed the Reusable session and created a New session task. Please refer to the Session to understand the series of steps involved in creating the new session.

Once you finished creating the Session task, we have link both the Start Task and Session Task. There are two ways to link them: First, you can select the Link Tasks button from the toolbar as shown below

The second approach, Please go to Task Menu bar and select the Link Task option

From the below screenshot, you can see the connection/link between the Start Task and Session Task.

Once you finished creating the workflow in Informatica, we have to Validate the task before using it. To do so, Please navigate to Informatica Workflows Menu and select the Validate option.

From the below screenshot, see that Our Informatica workflow is a valid one. Now, let us start the Informatica Workflow by navigating to the menu and selecting the Start Workflow option.

Once you select the Start Workflow option, the PowerCenter Workflow monitor will be opened to monitor it. From the below screenshot, you can observe that our Informatica workflow executed without any errors.

Let us open the SQL Server Management Studio to check whether we successfully transferred the data from Adventure Works DW to the target database.

Informatica Workflow using Wizard
In this article, we will show you how to create Informatica Workflow using Wizard with an example. Please refer Workflow article to understand the steps involved in creating Informatica Workflow manually
Before we start creating Informatica Workflow using Wizard, First connect to the repository service using the Admin Console credentials.
To create a new Informatica Workflow using Wizard, first, we have to go to the Workflow Designer tab. Next, Please navigate to Workflows Menu and select the Wizard option.

Select the Wizard option opens a new window called Workflow Wizard. Please provide a unique name, description and select the Integration service from the drop-down list

Within Step 2, we have to select the mapping from the Select the Mappings section.
From the following screenshot, we have only one mapping. So we are selecting it. Once you chose the Mapping click on the >> button to create the session for the selected mapping
TIP: Please refer Mapping article to understand the data transformation in below mapping m_DimProducts_from_SQL_to_SQL

Once you click on the >> button, the session task created automatically. By check-marking, the Reusable option will make this session as a reusable session task.

Within Step 2, we have to schedule the workflow. Here we have three Run options:
- Run On Demand: You have to start the workflow as per your requirements.
- Run Continuously: Workflow will run continuously.

Next,
Run On Integration Service: Here, you have an option to schedule the workflow. For instance, if you want to load data from text file to SQL Database every Monday, then you schedule the workflow on Monday 1 AM

Before we click on the finish button, check the details. If you find any issues, click the Back button to alter the workflow.

From the below screenshot you can see the new workflow

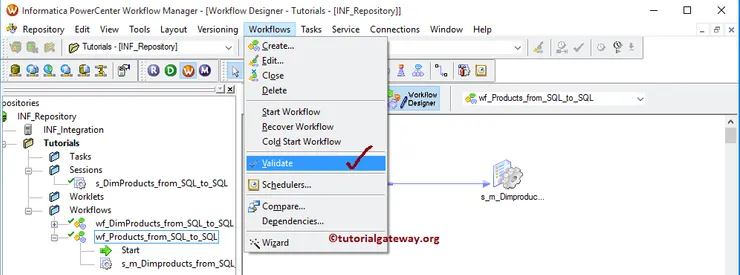
Once you finished creating the Informatica Workflow using Wizard, we have to Validate the task. For this, navigate to Workflows Menu -> Validate option.
From the below screenshot, you can see that Our Informatica workflow is a valid one.

Let us start the Informatica Workflow by selecting the Start Workflow option.

Once you select the Start Workflow option, the Informatica PowerCenter Workflow monitor opens to monitor the workflow. As you can see, the workflow was executed without any errors.

Let us open the Management Studio to check whether we successfully transferred the data from AdventureWorksDW to the target SQL Server database.

Command Task in Informatica
The Command Task in Informatica is used to run Unix or Shell commands during the Workflow. You can use this Task to Move, Copy, or Remove files after the data is loaded, etc. In this article, we will show you how to use the Command Task in Informatica with an example.
For this Informatica Command Task example, we are going to use the below show text file data (Employee table). From the below screenshot, you can see that the Source table has 15 records
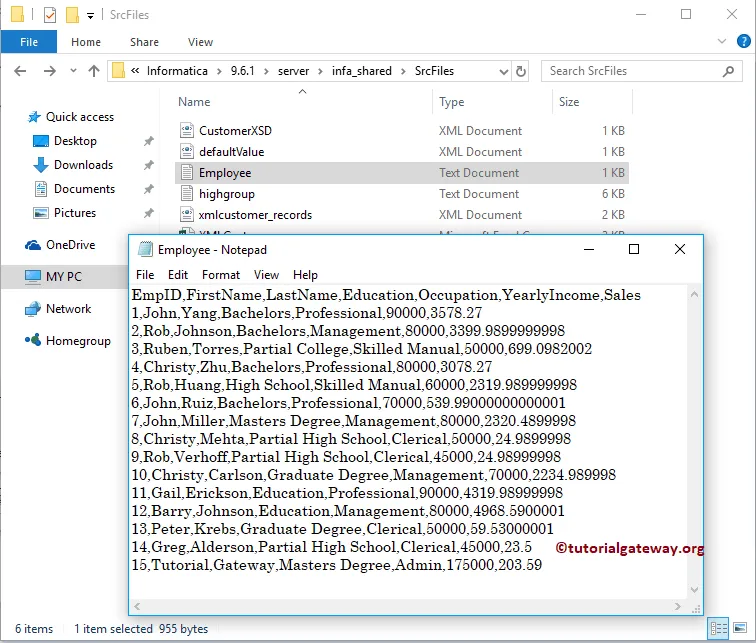
And the Destination table is Employee File. As you can see, it is an Empty table

Before we start configuring the Command Task in Informatica to Load Data from Flat File to SQL Server. First, let me connect with the Informatica repository service. To do so, we have to provide the Admin Console credentials. So, Please provide the appropriate Username and Password specified while installing the Server.
Once you connected successfully, Please navigate to Source Analyzer to define your Sources. As we said before, we are using the Employee table present in the local File System as our source definitions. So, Please navigate to Source menu and select the Import from File.. option

Once you choose the Import from File.. option, a new window called Open Flat File will open. Please select the Employee.txt file from your local file system and click the Open button. I suggest you refer Flat File Source article to understand the following steps.

From the below screenshot you can observe that, you can see our newly created Flat File source.

TIP: We already explained the steps involved in importing a Text file in our previous article. So, Please refer to Flat File Source to understand the same.
Please navigate to Target Designer to define the Informatica Command Task Target. In this example, we are using the existing SQL table (Employee File) as our target definition. You can refer to Create a Target Table to understand the process of creating a target definition

To create a new mapping, Please navigate to Mappings menu in Menu Bar, and select the Create.. option.

Once you select the Create.. option, a new Mapping Name window will open. Let me provide m_SQLEmp as the mapping name and click the OK button.

Drag and drop the Employee source definitions from the Flat File Sources folder to the mapping designer. Once you drag the source, the Power Center designer automatically creates the Source Qualifier Transformation for you

Next, Drag and drop the target definition (Employee File) from the Targets folder to the mapping designer. Next, connect the source qualifier with the target definition using the Autolink.. option.

Before we close the Mapping, Let us Save, and Validate the mapping by going to Mapping Menu bar, and select the Validate option.
After we finish creating the Informatica Command Task Mapping, we have to create the workflow for it. PowerCenter Workflow manager provides two approaches to create a workflow.
In this Informatica Command Task example, we will create the Workflow manually. To do so, Please navigate to Workflows Menu and select the Create option.

It will open the Create Workflow window. Please provide the unique name (wf_CommandEx) and leave the default settings.

Once we created the workflow, our next step is to create a session task for our mapping.
There are two types of sessions:
For this Informatica Command Task example, we created a Non-reusable Session. To create Non-reusable Session, Please navigate to Tasks Menu and select the Create option.
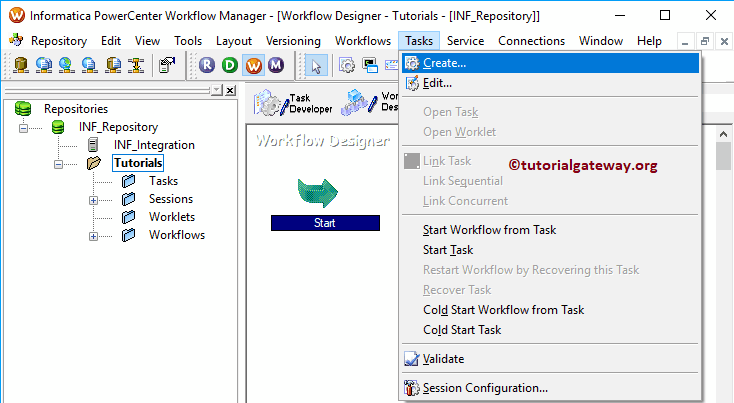
Please provide a unique name for this Session. Here, we are naming it as s_CommandEx. Once you click on the Create button, a new window called Mappings opened. Here you have to select the Mapping that you want to associate with this Session, i.e., m_CommandEx.

Double click on the Session task will open the Edit Tasks window. Within the mappings tab, we have to configure the Source and Target Connections. First, let us configure the Target connection by clicking on the EmployeeFile.
Within the Connections, click on the Arrow button beside the Relational type, and Select the Target Database (Target)

Now, we have to configure the Source Connection. Please click on the SQ_Employee present in the Sources folder.
- Source File directory: It will use the default directory, but you can change the directory by giving the full path.
- Source filename: It will automatically detect. If not, please specify the file name along with the extension.

Next, navigate to Workflows Menu and select the Validate option to validate the Informatica Command Task Workflow.

To create an Informatica Command Task, First, go to the Task Developer Tab. Next, navigate to Tasks Menu and select the Create option.

Once you select the Create option, a new window called Create Task will open. First, select the Command Task, and provide a unique name for this Task and click on the Create button. Here, we are naming it as cmd_CopyFile.

Click on the Create button will create a Command task for you

Double click on the Informatica Command Task will open the following window. Within the General Tab, we can rename the Command Task to a more meaningful name. Please do not forget to provide a valid description of the Task.

Within the Properties Tab, there is one property called :
- Fail Parent if this task fails: Please check mark this option. If this Command Task fails, then it will fail the workflow.
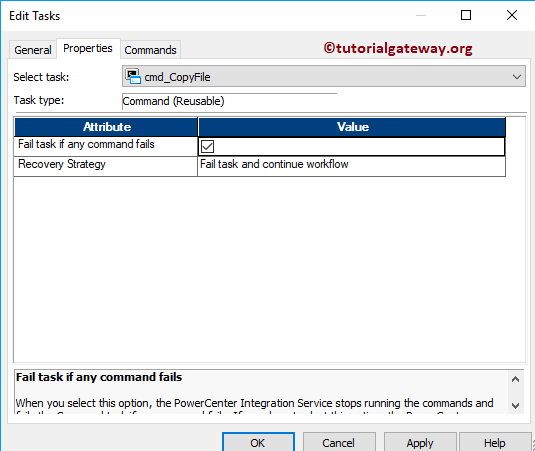
Within the Commands Tab, you have to provide the command that you are going to use in this workflow. Please click on the New button to add a new command

We renamed the field as the Copy Command. Next, click on the Arrow to add the command

It opens a space to write your command. For this example, we are using the Copy command to copy the Employee File from Source Files to target files

Next, navigate to Workflows Menu and select the Validate option to validate the Workflow.
If you observe the Workflow, First, we are starting the Workflow. Next, it will run the Session task to load data from the text file to the SQL table. Once the data transferred, the Informatica Command Task will copy Employee File from Source to target

Now, Let me start the Workflow. To do so, navigate to the Workflows menu and select the Start Workflow option.

Let us open the SQL Server Management Studio and write the following SQL Query.

Now you can see the Employee file in the default target location.

Instead of creating a Separate command task, you can also apply the functionality within the Informatica Session Task. Let me remove the Command task from the workflow to demonstrate the same.

Double click on the Session task, and go to the Components tab
- Pre-Session Command: This command executed before the Session
- Post-Session Command: This command executed after the Session complete
- Post-Session Failure Command: It executes if the session task fails

For this example, we are going to create a command that has to execute after the Session is complete (Post-Session). Under the Type drop-down, we have three options. Let me select the Non-reusable command
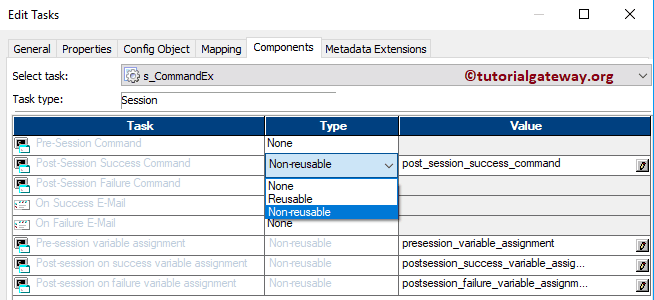
Click on the New field

Next, click the Arrow field to write a command

For this example, we are using the Move command to move the Employee File from Source Files to target files

Let me run the Informatica Command Task Workflow and see. As you can see, there is no Employee under the Source folder

And the destination folder has this employee file

Event Wait Task in Informatica
The Event Wait Task in Informatica will wait for a particular (or specified) Event to occur. You can define an event for which this Event Wait Task should wait.
For example, you can create an event to check whether the Employee Source file (Text or CSV) is available at the Source location or not. It means, Informatica Event Wait Task will wait for Employee, and once it found, the task will succeed, and the next task will execute.
For this Informatica Event Wait Task example, we are going to use below show text file data (Employee table). From the below screenshot, you can see that the Source table has 15 records

And the Destination table is Employee File. As you can see, it is an Empty table

Before we start configuring the Event Wait Task in Informatica to Load Data from Text File to SQL Server. First, let me connect with the Informatica repository service.
To do so, we have to provide the Admin Console credentials. So, please enter the Username and Password you gave while installing the Server, and click the Connect button.
Once you connected successfully, Please navigate to Source Analyzer to define your Sources. As we said before, we are using Employee table present in the local File System as our source definitions.
TIP: We already explained the steps involved in importing a Text file in our previous article. So, Please refer to Flat File Source to understand the same.

Please navigate to Target Designer to define the Target. In this example, we are using the existing SQL table (Employee File) as our target definition. You can refer to Create Target Table to understand the process of creating a target definition

To create a new mapping, Please navigate to the Mappings menu in Menu Bar and select the Create.. option. Let me provide m_EventWait as the mapping name and click the OK button.

Drag and drop the Employee source definitions from the Flat File Sources folder to the mapping designer. It automatically creates the Source Qualifier Transformation for you
Next, Drag and drop the target definition (Employee File) from the Targets folder to the mapping designer. Next, connect the source qualifier with the target definition using the Autolink.. option.

Before we close the Mapping, Let us Save, and Validate the mapping by going to Mapping Menu bar, and select the Validate option.
After you finish creating the Informatica Event Wait Task Mapping, we have to create the Workflow for it. PowerCenter Workflow manager provides two approaches to create a workflow.
In this Informatica Event Wait Task example, we will create the Workflow manually. To do so, Please navigate to Workflows Menu and select the Create option.

It opens the Create Workflow window. Please provide the unique name (wf_EventWait) and leave the default settings.

Once we created the workflow, our next step is to create a session task for our mapping.
There are two types of sessions:
For this Informatica Event Wait Task example, we created a Non-reusable Session. To create Non-reusable Session, Please navigate to Tasks Menu and select the Create option.

Please provide a unique name for this session. Here, we are naming it as s_EventWait. Once you click on the Create button, a new window called Mappings will open. Select the Mapping that you want to associate with this session, i.e., m_EventWait.

Within the mappings tab, we have to configure the Source and Target Connections. First, let us configure the Source connection by clicking on the SQ_Employee present in the Sources folder.
- Source File directory: It will use the default directory, but you can change the directory by giving the full path. For example, D:\File Examples\
- Source filename: It will automatically detect. If not, please specify the file name along with the extension.

Now we have to configure the Target connection. So, first, select the EmployeeFile present in the Target folder. Next, within the Connections, click on the Arrow button beside the Relational type, and choose target

To create an Event Wait Task, Please navigate to Tasks Menu and select the Create option.

Once you select the Create option, a new window called Create Task will open.
First, select the Informatica Event Wait Task from the drop-down list. Next, provide a unique name for this task and click on the Create button to create a New Event Wait. Here, we are naming it as WaitFor_TestFile.

Double click on the Event Wait task will open the following window. Within the General Tab, we can rename the Event Wait Task to a more meaningful name. Please do not forget to provide a valid description of the Task.
Fail Parent if this task fails: Please check mark this option. If this Informatica Event Wait task fails, then it will fail the workflow.

Within the Informatica Event Wait Task Events tab, we have two options:
- Predefined: If you select this option, you have to define the event
- User Defined: You have to select the existing Event

As you can see, if you select the User-defined event, it is opening the Event browser. As w don’t have any existing event, it displays an empty window.

For this example, we are selecting the predefined option and providing the path of an Employee text file. It means, Event Wait Task will wait for an Employee text file (at that location) and once it found the task will succeed

Next, navigate to Workflows Menu and select the Validate option to validate the Workflow. If you observe the Informatica Event Wait Task Workflow, First, we are starting the Workflow. Next, it waits for Employee file (Event Wait Task), and if it found, Session task will load data from text file to SQL table.

Before we start running the workflow, let me delete the Employee text file from the Source location.

Now, Let me start the Informatica Event Wait Task Workflow. To do so, navigate to the Workflows menu and select the Start Workflow option.

As you can see the status, the Workflow is running infinitely.

Once you add the Employee text file at the location Workflow will succeed.

Let us open the SQL Server Management Studio and write the following SQL Query.


