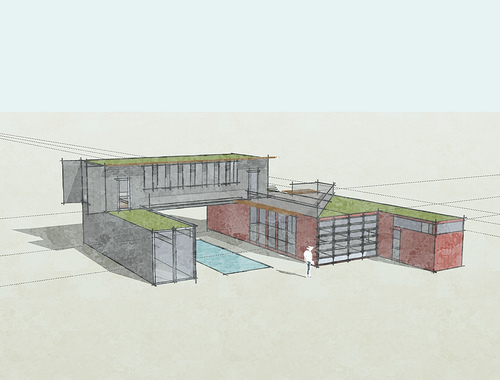
If you’re an architect or designer, it’s essential to know how to create sections in Sketchup. They are found in almost any set of construction documents and they show detail to help you or your client better understand the vertical relationships within a building. In this tutorial, we’ll show you how you can easily create section views for your Sketchup models.
View > Section Planes. Once you have your model open, the first step is to make sure your section planes are turned on. Navigate to “view” and select “section planes” so that it is checked.
On the left side of your screen, there is a toolbar with some section tools. If you don’t have this toolbar simply right-click in a white space and select “large tool set.” Alternatively, you can go to “tools” and select “section plane” if you don’t want to add the toolbar.
Section Plane. Click on the “section plane” icon to open the “place section plane” window. Before you begin placing sections in Sketchup, it’s important to think about naming them in a way that makes sense for your model. Type in a name and symbol for your section and hit “enter.”
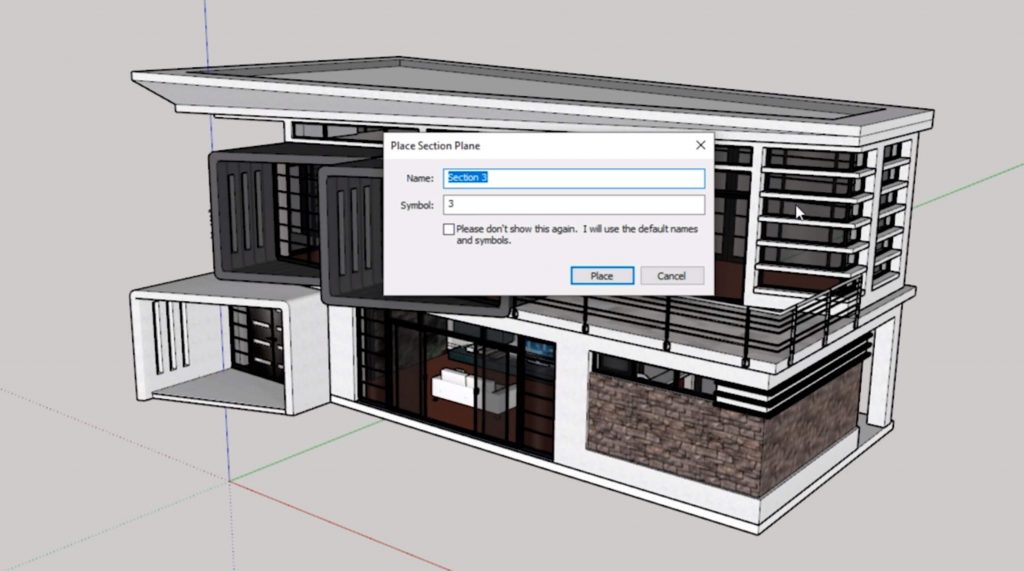
Place Section Plane. When you move your mouse around your model you will notice the plane shift based on whatever plane you mouseover. You can use your arrow keys to lock to a certain axis to make sure you have a straight cut. For example, “up” locks to the blue axis, “right” locks to the red axis, and “left” locks to the green axis. Click on a point somewhere in the center of your model while holding the “right” arrow key.
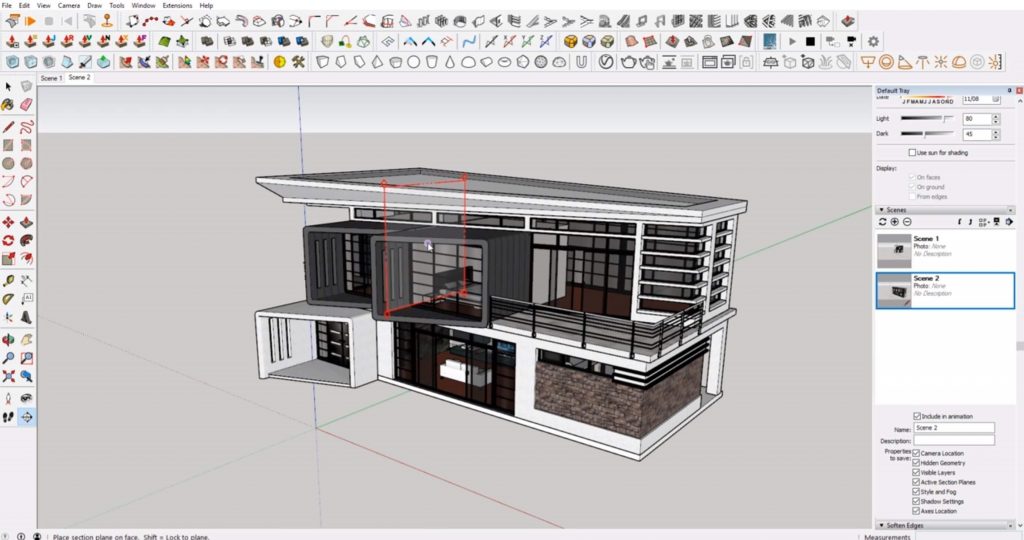
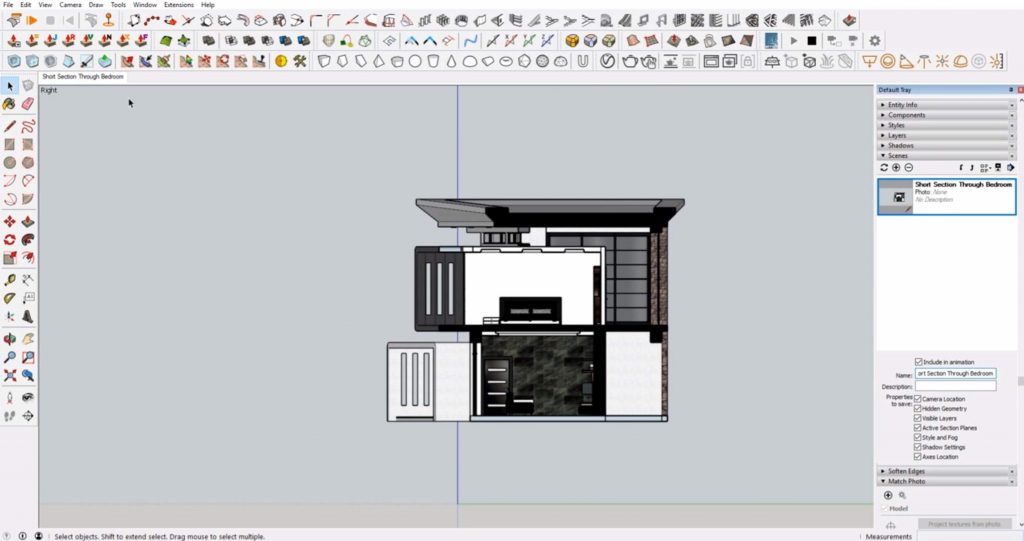
Window > Default Tray > Scenes. If you plan on making a lot of sections, you may want to create separate scenes for each view. To open the “scenes” tab, go to “window” > “default tray” and select “scenes.” In the “scenes” tab, click on the “+” to add a scene. Below the scene thumbnails, there are a lot of options you can select. The most important one you want to have selected is “active section planes.” This will allow you to switch back and forth between what you’re seeing. To make the section cut active, right-click on the section plane and select “active cut.”
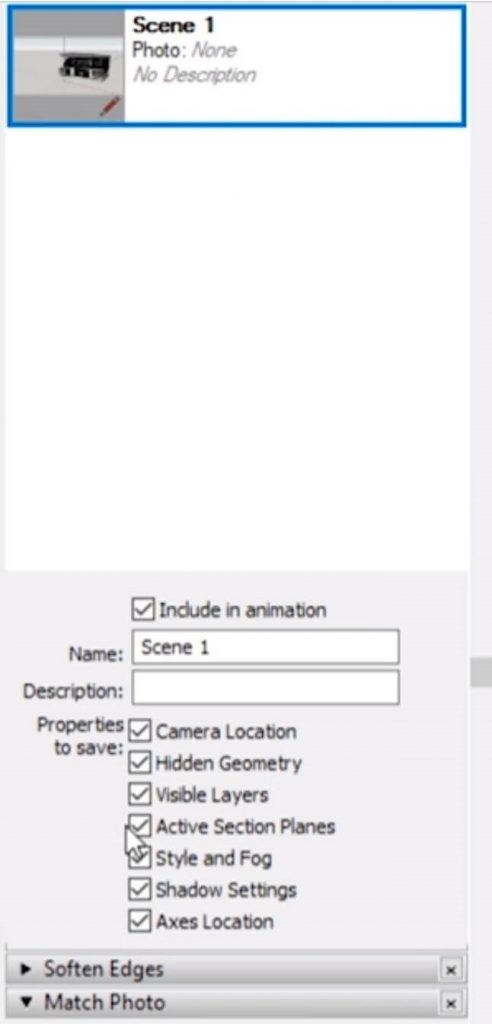
Standard View. To get a standard, straight-on view, go to “camera” > “parallel projection.” Then go to “camera” > “standard views” and select “right.” If you mouse over the “view” tab you will notice a few different options you can select. “Section cuts” refers to the actual section cut and “section planes” gives a bit of a hue to everything in the background. Once you have the view you want, right-click on your scene in the “scenes” tab and select “update scene.” A window will pop up with update options. Leave everything checked and click “update.” Make sure you don’t forget to type a title for your scene in the “name box!”
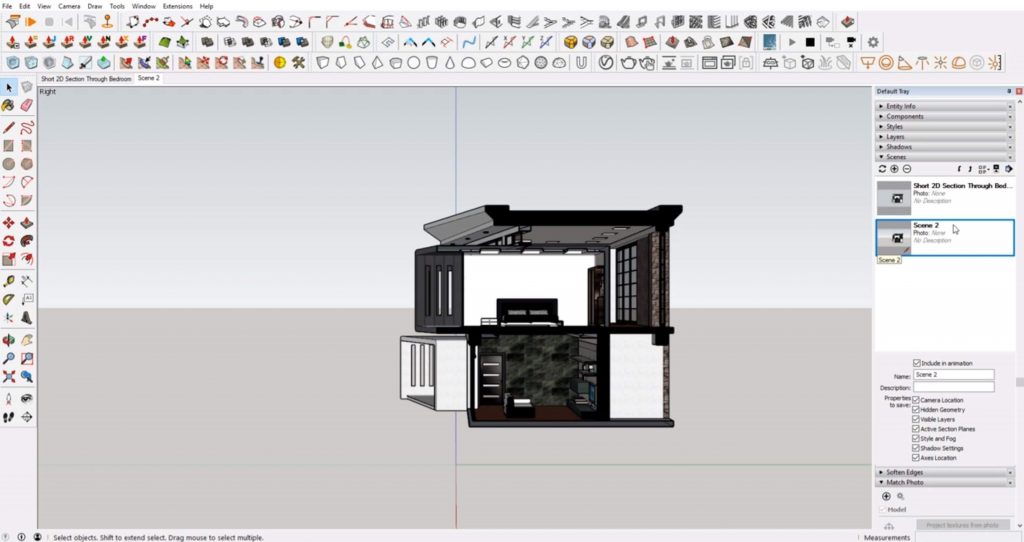
Add Scene. If you want to add a scene with a bit more depth, right-click on your existing scene and click “add scene.” Then, navigate to “camera” and select “perspective.” Right-click on the second scene and select “update scene.”
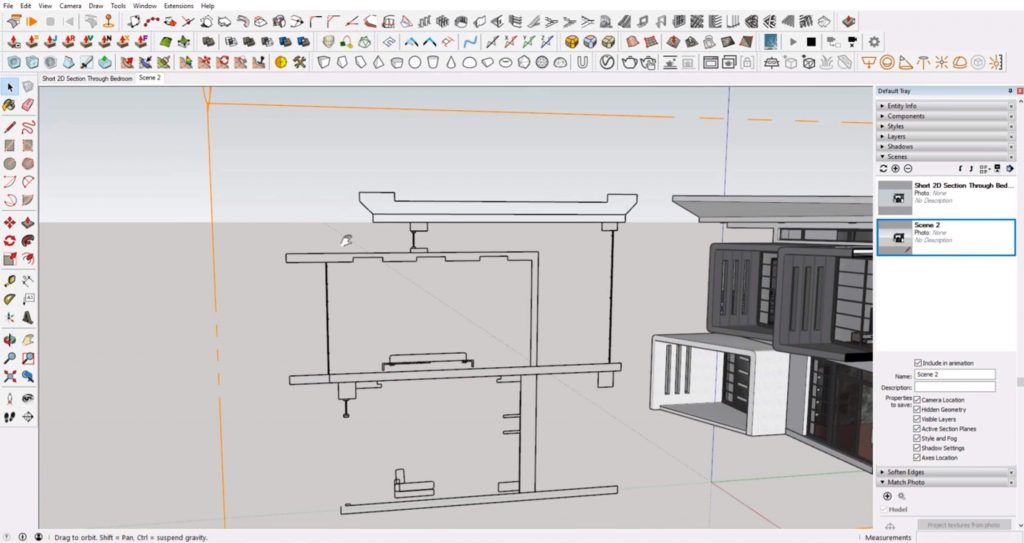
Create Group from Slice. Another neat feature you can use when you have “section planes” turned on is the “create group from slice” tool. Right-click on your section plane and select “create group from slice.” This will automatically create a line drawing of your section. If you want, you could easily import it into Illustrator or AutoCAD and easily create a detailed line drawing! Before you create any sections though, you may want to turn off any extra items like furniture and accessories. Good layer management comes in handy here!
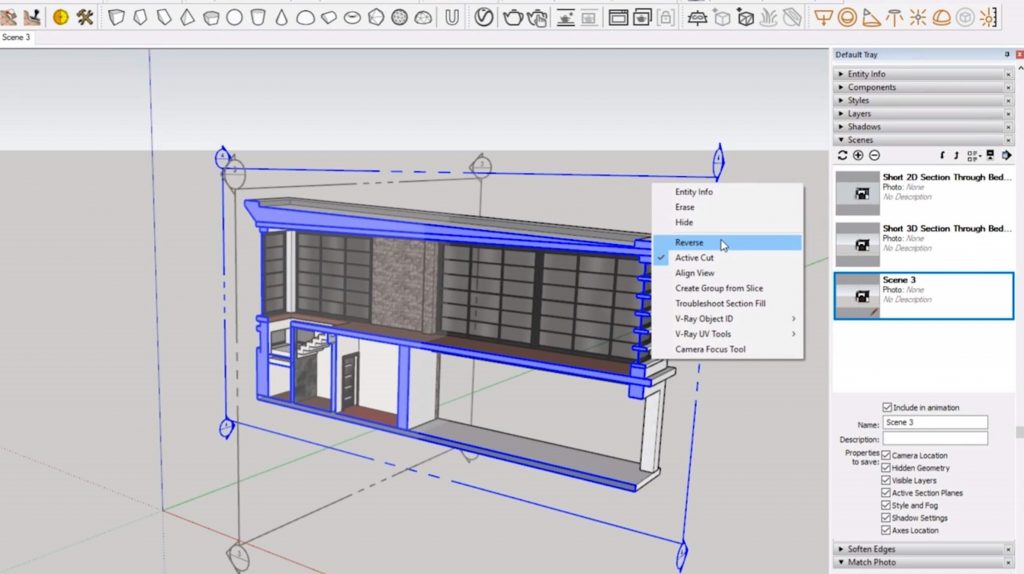
Add Section in Another Direction. Select “+” in the “scenes” tab to add another scene. Make sure “section planes” is turned on. Right-click on the section plane and turn off “active cut”. Select the “section plane” tool again. Hold the “left” arrow key to lock to the green axis and select a point in your model to make your section cut. If you want to change the direction of your section cut, simply right-click on the plane and select “reverse” to see the other side of your building.
View > Section Planes. Go to “view” and turn off “section planes.” Go to “camera” > “standard views” > “left.” Right-click on the third scene and click “update.”
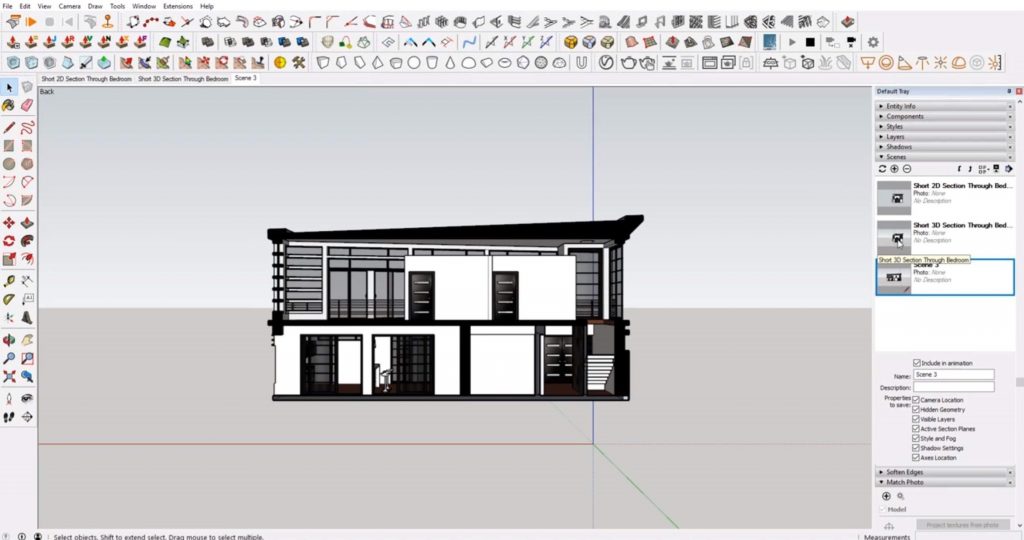
Now you have three unique scenes that you can easily switch between! If you want a more in-depth tutorial on creating scenes, take a look at this article. Or if you’re looking for even more Sketchup tips, check out the rest of our tutorials here! We hope this tutorial was helpful in showing you how to create sections in Sketchup! Let us know in the comments what other tricks you want to learn.
If you’ve ever had problems with clipping in Sketchup, this tutorial will give you an easy fix to this pesky problem. Not familiar with clipping? It’s essentially when certain parts of your Sketchup model get cut off and don’t show up in your view. It almost appears as if you are looking at a section, even if you don’t have any section cuts turned on. Clipping is a common problem when orbiting a 3D model, and it can really interfere with your workflow! Thankfully there is a simple solution for anyone, no matter your skill level. Follow the steps below to avoid clipping your views in Sketchup. Let’s get started!
If you have a model open and you notice parts of it are getting cut off, you can use one of the three following methods to fix it!
The first method is by adjusting the camera view. You can do this by clicking on the “camera” tab on the top menu. If you’re new to Sketchup, this can be a great way to familiarize yourself with the different “camera” options and how to navigate your view. Check out this article if you want more details on getting started with Sketchup!
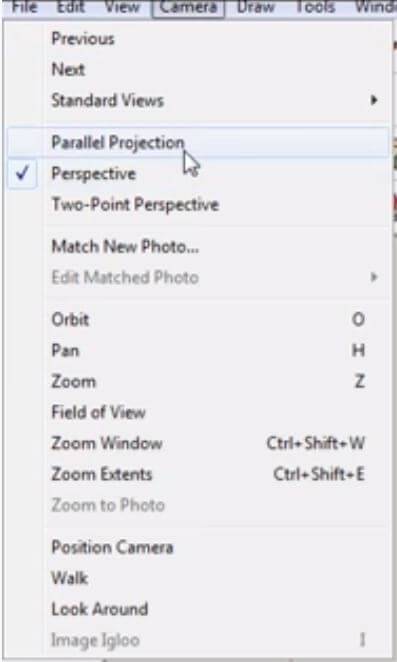
Camera > Perspective. In the top menu bar, navigate to “camera.” From this tab, you can select what view you want or access tools like “orbit,” “pan,” and “zoom.” To change how you view your 3D model, select “perspective” from the dropdown menu. From this view, you should have a corrected perspective that clearly shows everything in your model.
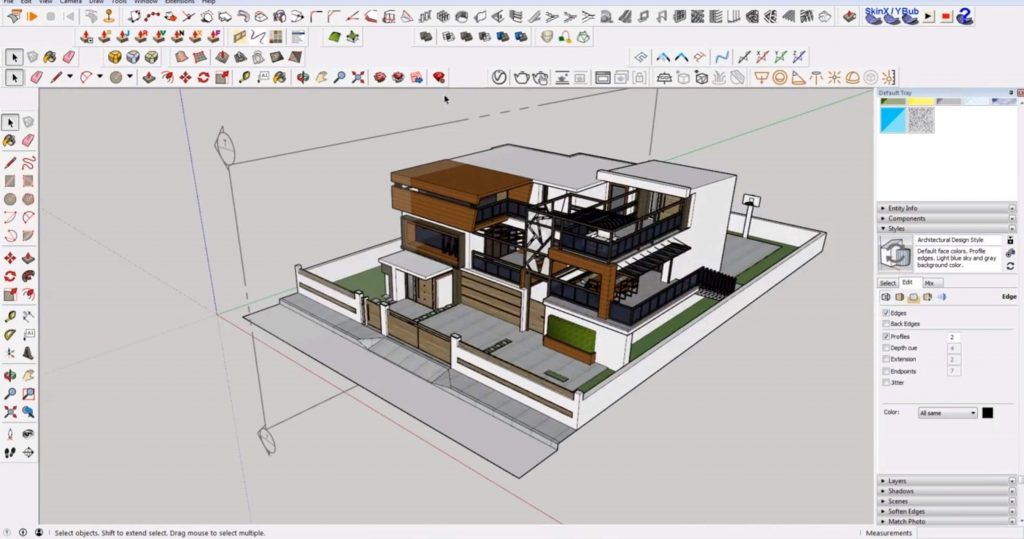
Camera > Parallel Projection. The clipping in Sketchup may have something to do with the parallel projection settings. If you want to return to a “parallel projection” view after changing the camera settings, you can always select it again. Your view should return to normal after selecting “perspective.” Just navigate to “camera” and select “parallel projection” from the dropdown menu. Now you should have a complete view with no clipping!
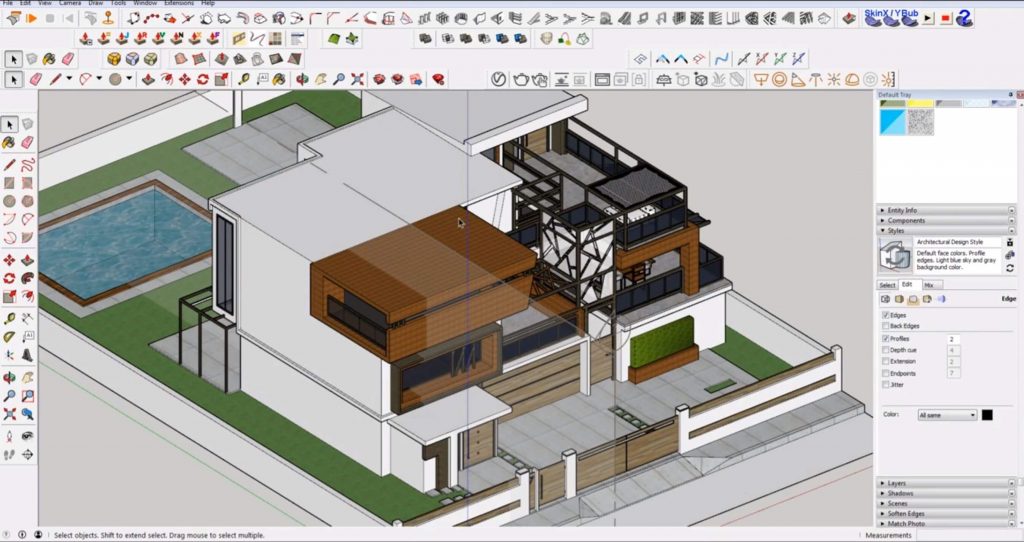
If you’re clipping into something, you’re likely too close to it, pressing zoom extents will pull back your camera an allow you to see everything.
The FOV, or field of view, can be changed once the zoom tool has been selected. You’ll see a field in the bottom right-hand corner. Play around with increasing or decreasing this number to see if it fixes your clipping.
The next time you come across any clipping in Sketchup, just remember these simple steps and you can easily fix the problem! Have you ever experienced clipping before? What other problems have you come across while working in Sketchup? Let us know in the comments, we would love to help out!
If you’re looking for more helpful tips and tricks for Sketchup, check out our tutorials page here. You can be sure to find something for every skill level from beginner to advanced! Or, take a look at some of our related articles below:
Getting Started with Sketchup for Beginners
Sketchup File Size: The Impact of Groups and Components
How to Install Sketchup Plugins & Extensions and Increase Your Productivity
We hope this tutorial was helpful! Be sure to check back often for more new tips and tutorials. We add new articles every week and are always looking for new tips and tricks to share.
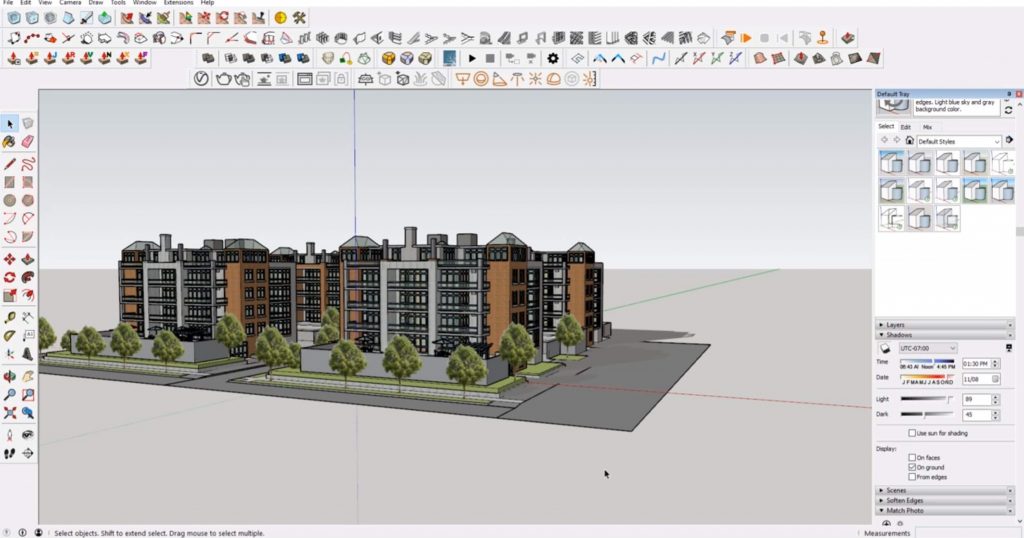
We recently received a question on how to get rid of duplicate shadows in Sketchup. If you look at the picture below, you will notice this model is showing a light gray shadow with a darker gray one underneath. If you have ever experienced this issue or something similar, keep reading to see how you can fix it!
View > Shadows. In order to see if you are experiencing this problem, you must first make sure that “shadows” are enabled. To turn them on, navigate to “view” and select “shadows.” If they are already enabled, there will be a checkmark next to it.
Window > Default Tray > Shadows. You also want to make sure you have it selected in the default tray. To do this, simply navigate to “window” > “default tray” and click on “shadows.” Now there should be a tab in the default tray where you can edit them.
The reason Sketchup displays two separate shadows is that the model essentially has two. For example, if you were to model a building with no terrain or ground plane you may only want to show one shadow option. You can edit these and other options in the default tray.
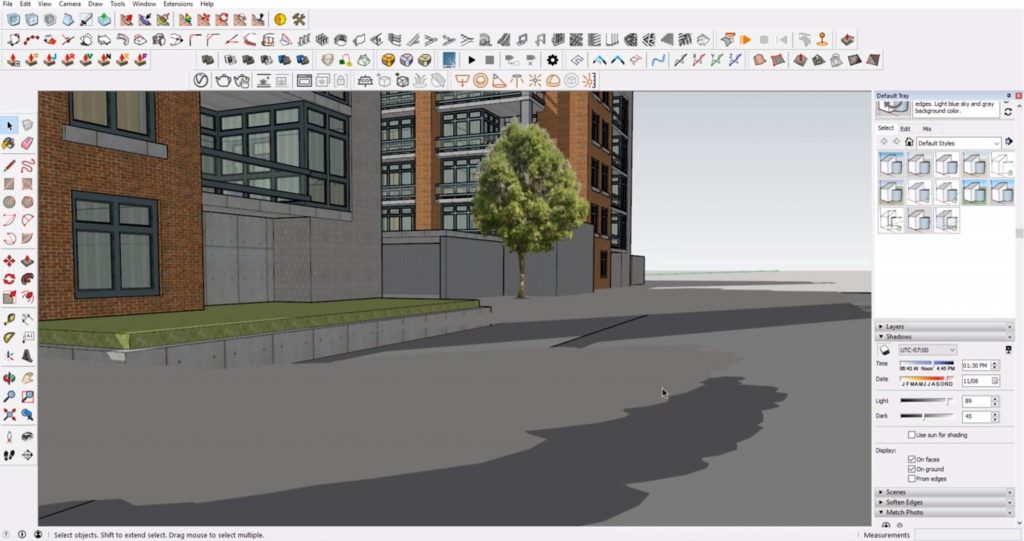
Edit Shadows. Open the “shadows” tab in the “default tray.” You will see a variety of sliders and options you can edit. The “light” slider changes the opacity. The “date” and “time” sliders will change the angle of them. If you want longer shadows, choose a winter month. If you want shorter ones, choose a summer month.
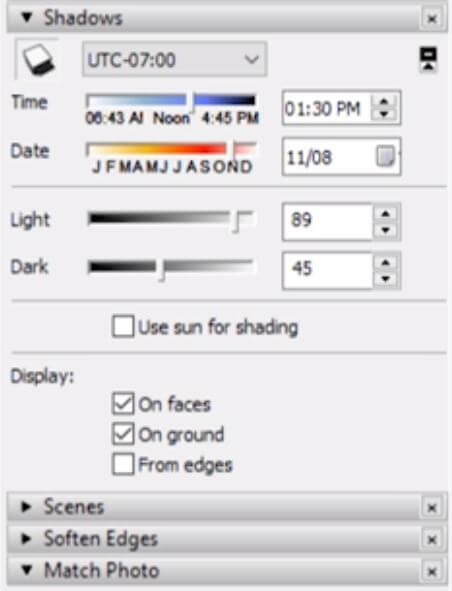
For now, we will focus on the “display” options. These change where the duplicate shadows in Sketchup are being cast. For example, “on faces” means they are cast on geometry and “on ground” means they are being cast on the ground plane. In this model, if we uncheck “on ground,” the light gray one goes away.
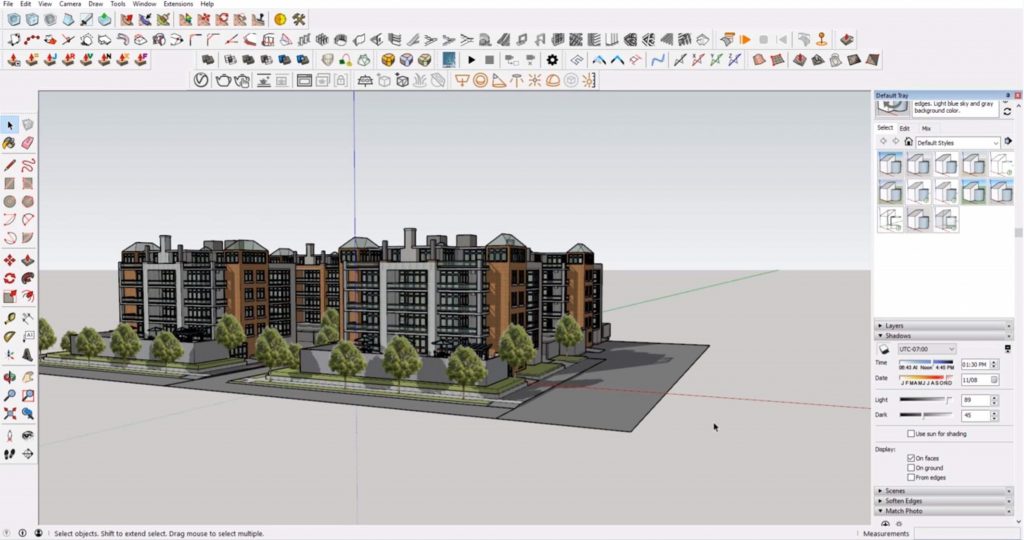
You will notice that the edge of the shadow gets cut off because there is no geometry drawn beyond the ground plane. If you want to still show the entire thing, just simply extend the ground plane until the entire outline can be seen.
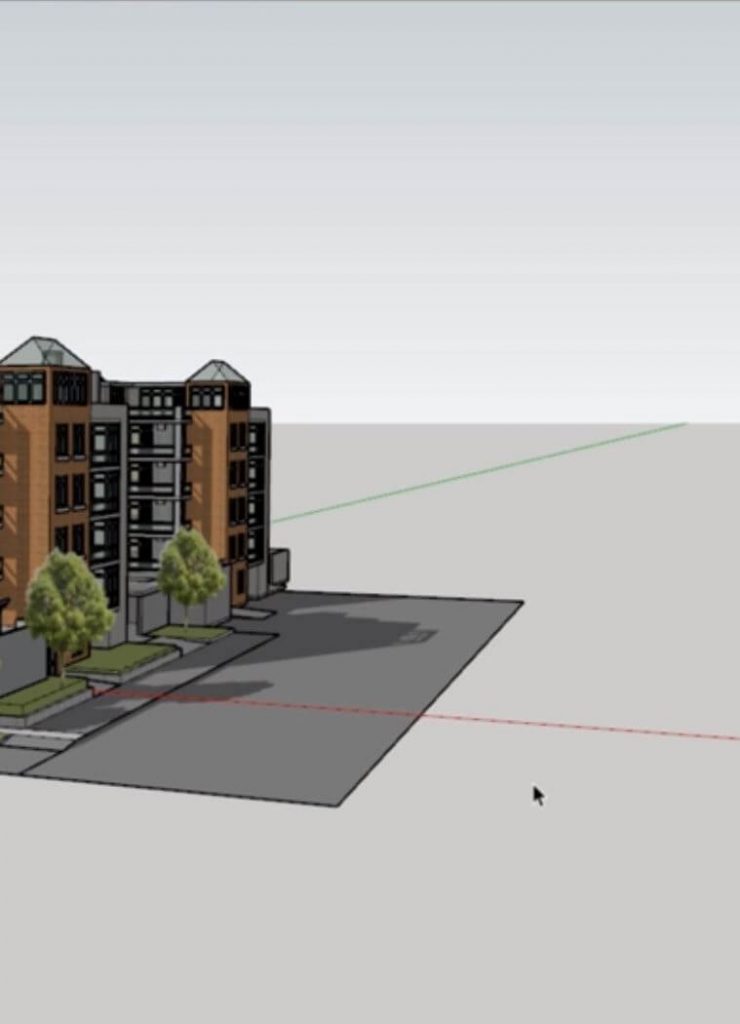
Alternatively, you can uncheck “on faces” and bring everything up to the ground plane of Sketchup. This way, you don’t have to extend anything you’ve already modeled and the shadows will be cast evenly on the ground plane. Just make sure the base of your model is aligned with the ground plane(which starts at the world origin) to ensure they line up correctly.
Next time you have a problem with duplicate shadows in Sketchup, follow these steps to fix it! What other problems have you encountered in Sketchup? Let us know in the comments below! If you’re looking for other quick fixes to common problems in Sketchup check out 5 Sketchup Mistakes Every Beginner Makes or 5 Unconventional Sketchup Tips You May Not be Aware of. Want even more tutorials? Take a look at our tutorials page to find articles for every skill level!
For this tutorial, we’re going to teach you how to draw 2D in Sketchup by going back to the basics. It may sound simple, but 2D drawing is a foundational principle for anything you do in Sketchup. Before getting into 3D modeling, it’s important to take the time to familiarize yourself with the 2D drawing tools so you can create better geometry in your final models. Once you’re comfortable with the basic tools, you can move on to more complex models and drawings. Let’s get started!
Draw a Rectangle. Click on the rectangle tool and draw a rectangle from the origin point. One common mistake people make when using Sketchup is drawing on different axes. To avoid this, make sure the tool reads “on face” when you hover over the rectangle.
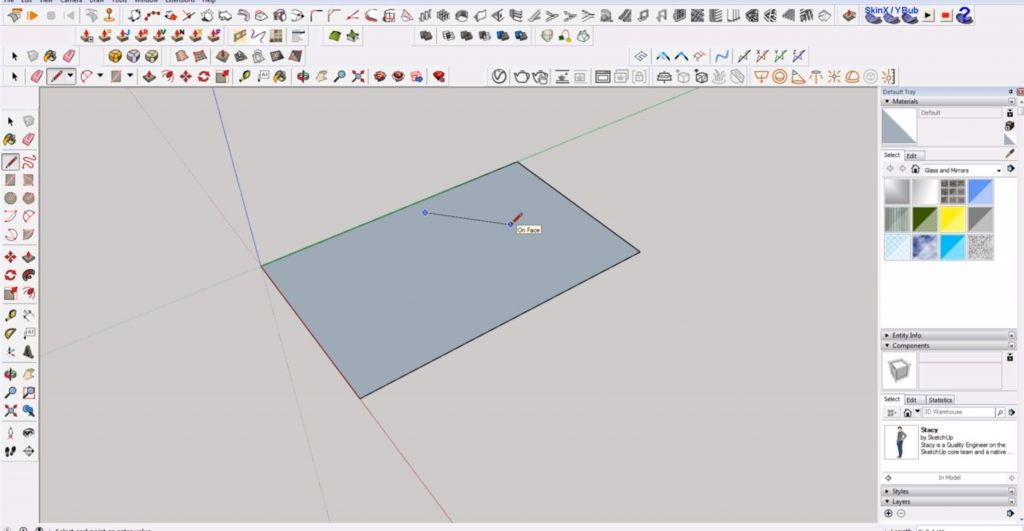
If you connect any two lines across the rectangle you drew, they will always be on the same plane.
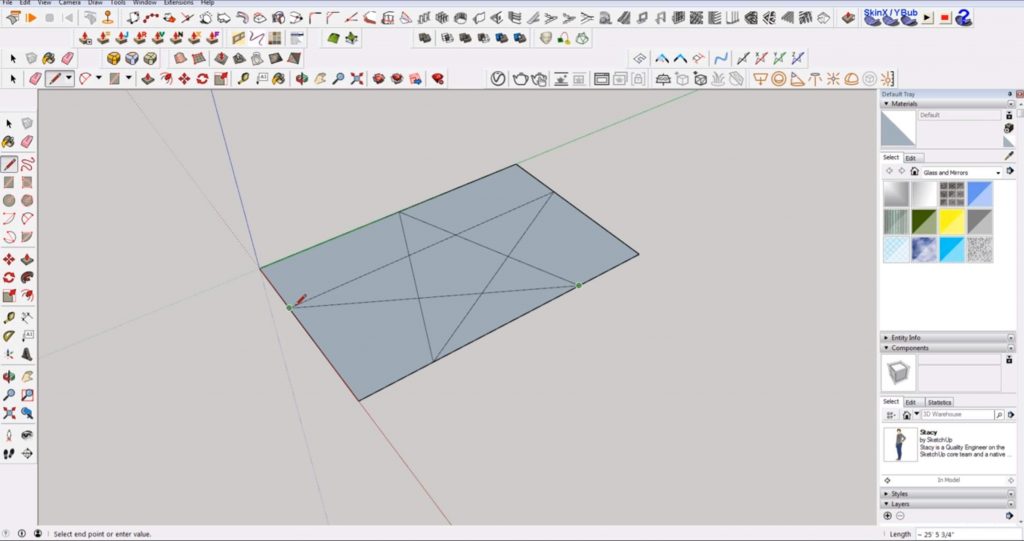
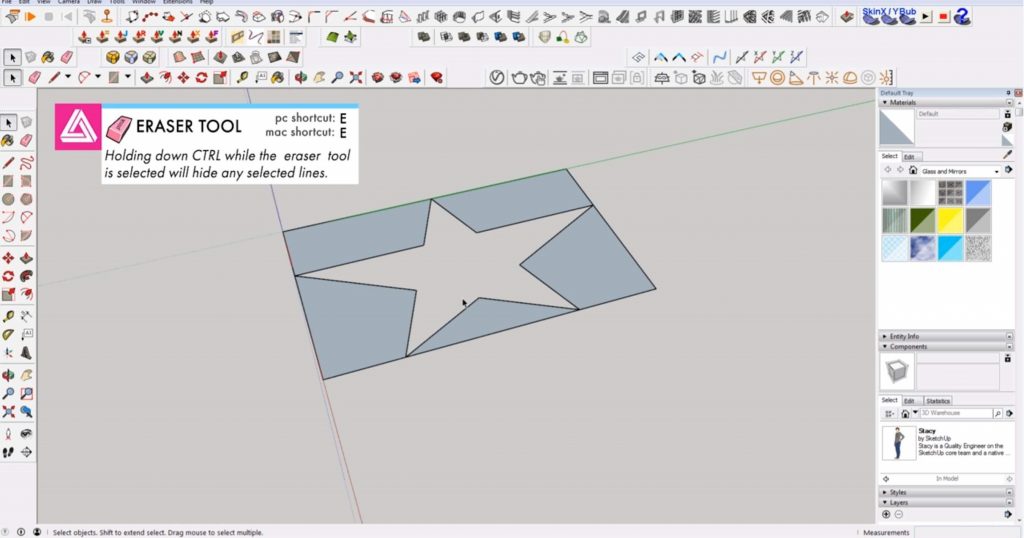
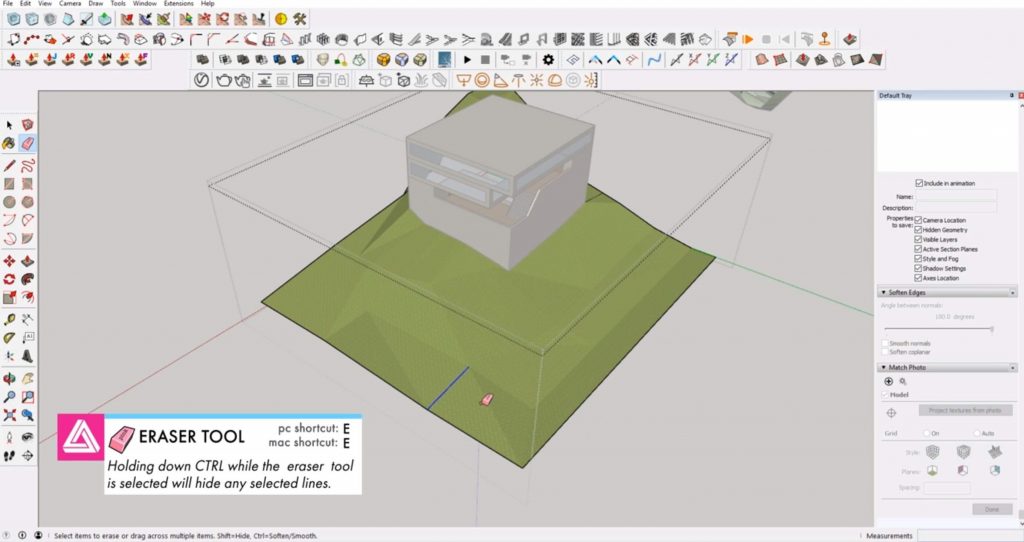
Erase Lines. Now that you have a shape drawn on your rectangle, you can delete the inner face. Click the eraser tool and hold “ctrl” while dragging over the lines to hide them. Select the inner face and hit “delete.”
Another way to draw 2D in Sketchup is by using the “freehand” tool. Keep the rectangle plane and select the “freehand” tool. Make sure you are drawing on the face, and click and drag the mouse to create your shape. Keep in mind, this isn’t a perfect tool so you won’t end up with perfect geometry. If you want more precision, use tools like the line tool or circle tool.
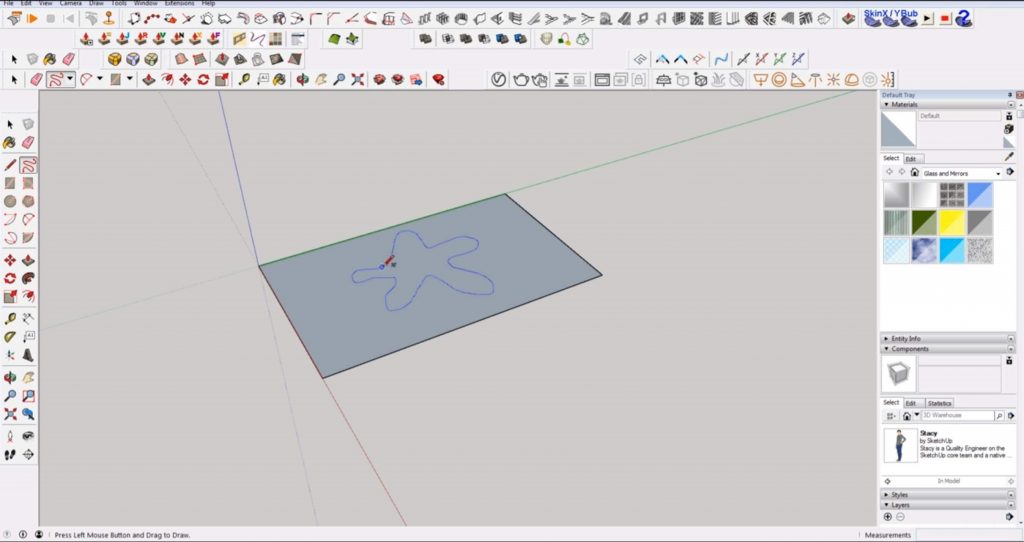
Draw a Circle. Select the “circle” tool and draw a circle on your rectangle plane.
Find the Center Point. Identifying the center point is useful for creating objects like domes or cylinders. Before you start modeling, you’ll want to mark the center of your circle. Find the center point of the circle by mousing near where it should be and use the line tool to draw a vertical line. You can always hide or delete it later, but keep it for now.
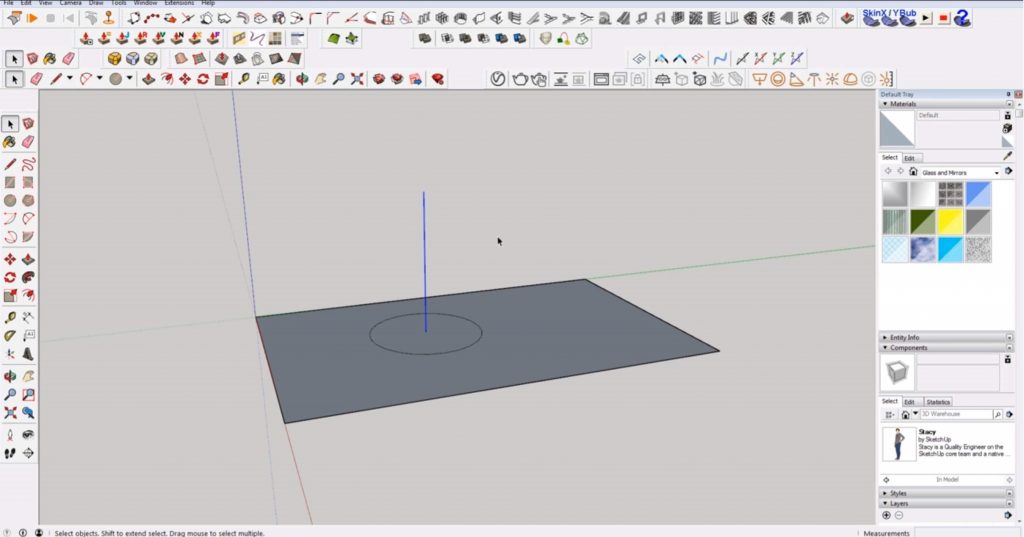
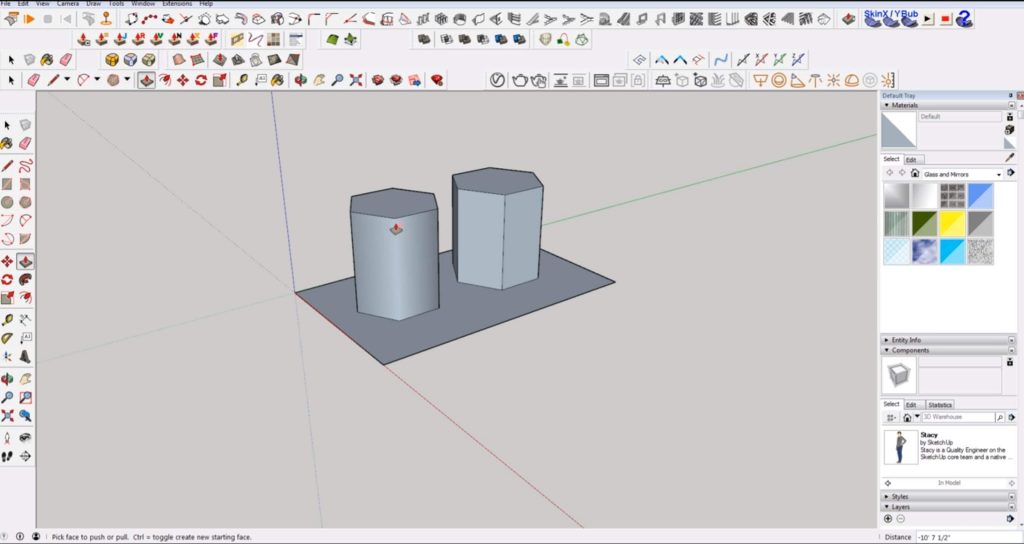
Edit the Number of Sides. When drawing a circle, you can edit the number of sides by typing a number into the “sides” box in the lower right corner. The higher the number of sides, the smoother your circle will look. If you want to draw a polygon instead of a circle, use the polygon tool to create a shape with a specific number of edges. You can basically use the circle and polygon tools interchangeably. The difference comes in when you push/pull them. A push/pulled circle will have softened edges. A push/pulled polygon will have hard edges.
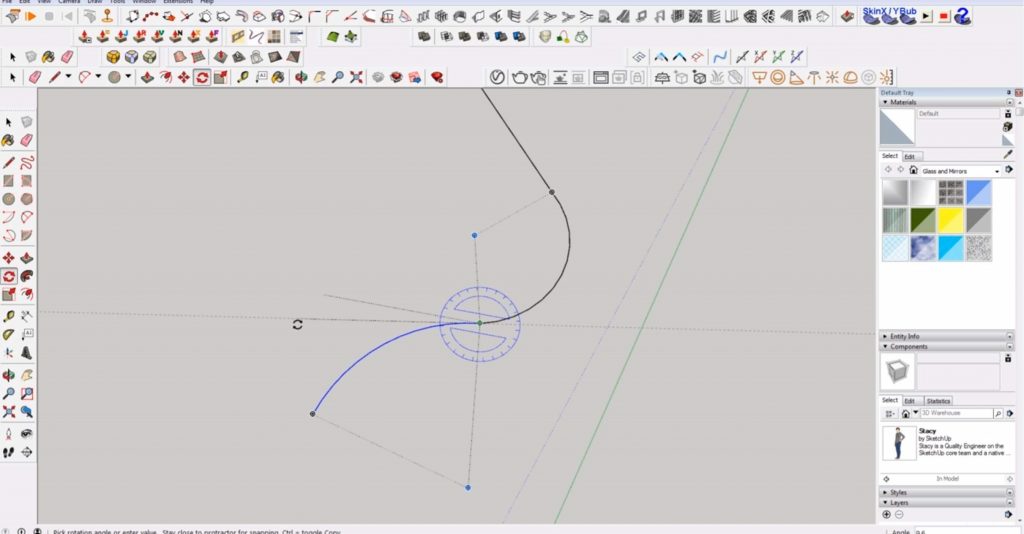
Sketchup has a few different arc tools you can use depending on what you are trying to draw. If you have a reference image, the “three-point arc” is probably the best one to use. Alternatively, you can use a different arc tool to select the center point and then the angle of the arc. The final arc tool allows you to select two endpoints and then the radius.
When using arcs to connect flowing lines, you want to make sure they are tangent with each other. Use the “rotate” tool to align the arcs as best you can.
Hopefully, this tutorial has taught you some basics tips on how to draw 2D in Sketchup! If you’re looking for more advanced tutorials or you’re just getting started, check out our tutorials page! There’s something for every level.
Sketchup is a great program for creating 3D models, site plans, and floor plans. This tutorial explains how to take a floor plan and turn it into a 3D model. However, in this article, we’re going to go over how to make a 2D elevation in Sketchup using a 3D model.
Camera > Parallel Projection. To change the view from a perspective to a 2D view, go to “camera” and select “parallel projection” from the dropdown menu.
Camera > Standard Views > Front. Then, to get a front view, navigate to “camera” > “standard views” and select “front.” You may have to choose “back,” “left,” or “right” depending on what view you want to use.
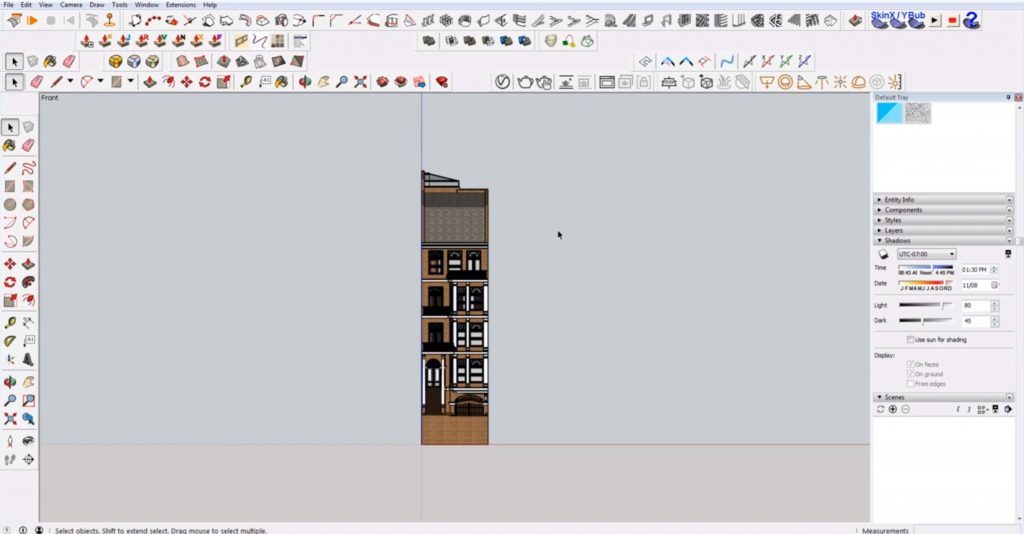
Default Tray > Styles > Edit. Go to the “styles” tab in the “default tray” and then select the “edit” tab. Uncheck the “sky” and “ground” boxes so you can export the final file as a PNG.
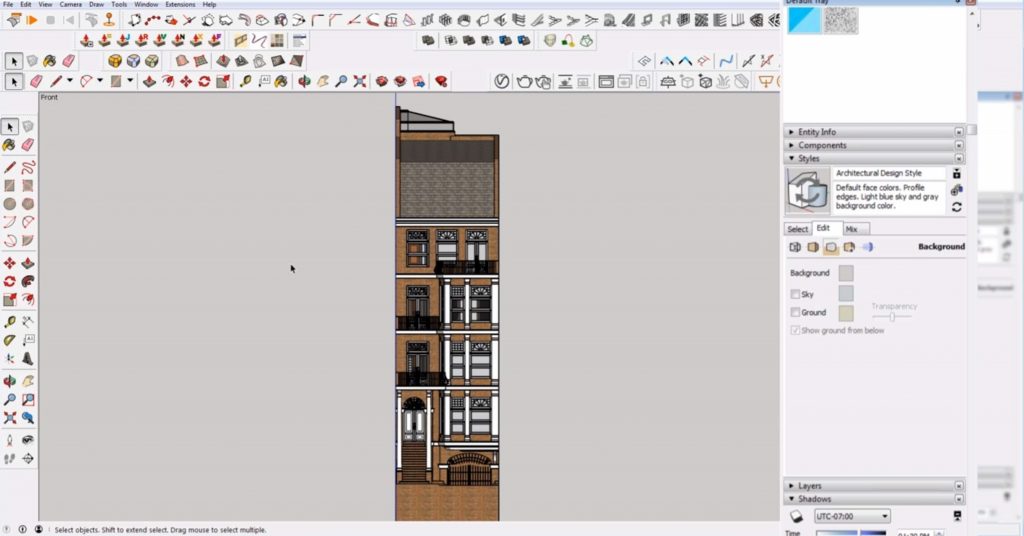
Edge Settings. While you are in the “edit” tab, select the “edge” settings from the thumbnail images. Uncheck “edges” and “profiles.” This view is good to use when adding shadows because the shadows define the shapes rather than the lines.
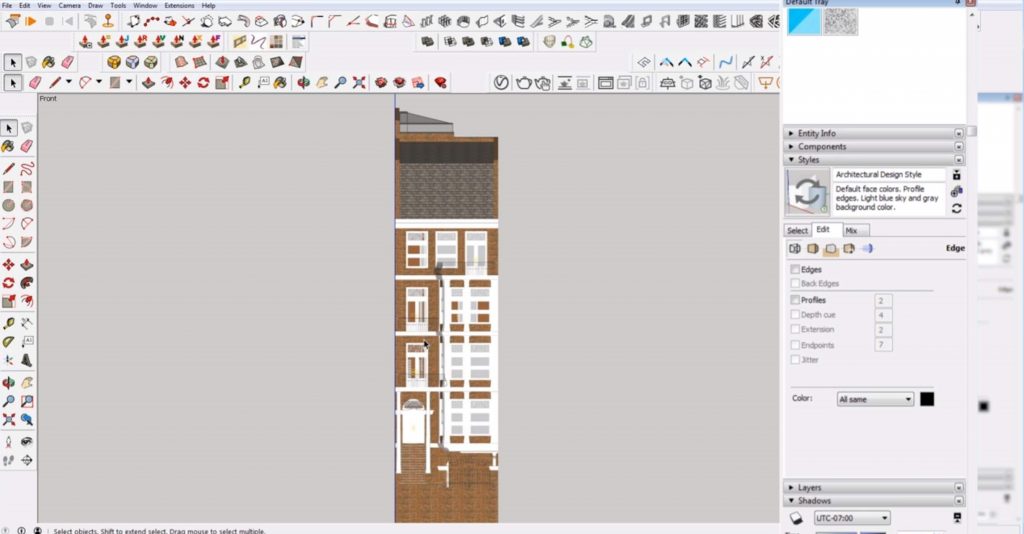
Face Settings. Next to the “edge” settings, you can select “face” settings. Here, you can change the style of the faces. We selected shading with textures.
Modeling Settings. The final thumbnail is for the “modeling” settings. Uncheck “model axes.”
When you finish editing the settings, click on the image under the “styles” tab to update the style with changes.
Shadows. Under the “shadows” tab of the “default tray” there is a small icon that you can select to turn the shadows in your view on or off. You can also change the time of year to get a different effect with your shadows. If you want more dramatic shadows, use the “date” slider to select a winter month. If you want shorter, less dramatic shadows, select a summer month instead. You can also use the “time” slider to adjust the time of day. Play around with each setting until you get the look you want.
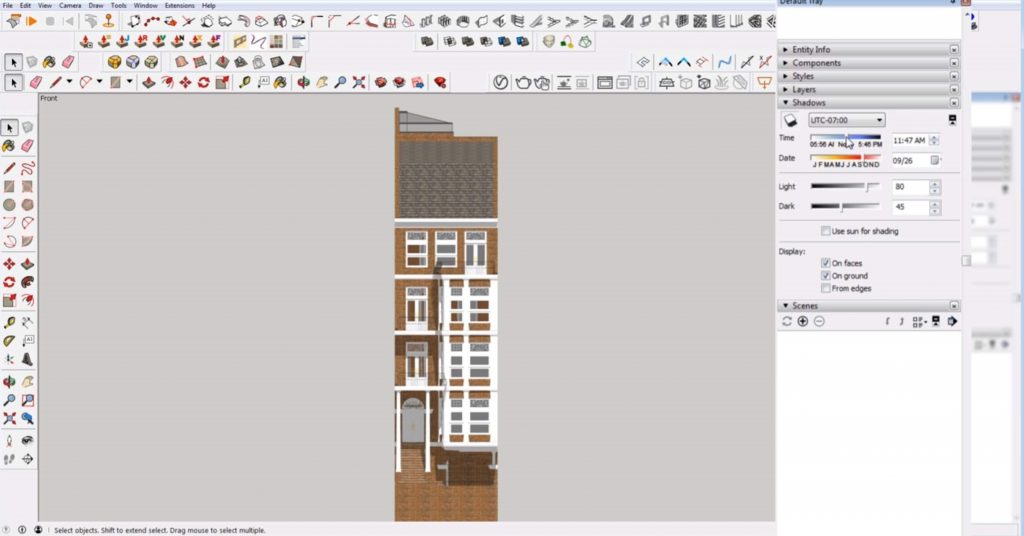
View > Fog. If you want to edit the view depth of your 2D elevation in Sketchup, go to “view” and select “fog.”
Window > Default Tray > Fog. You can also go to the “fog” tab in the “default tray” by selecting “window” > “default tray” > “fog.” Here, you can select and deselect the “fog” setting or use the slider to edit where the fog starts and ends. The leftmost slider changes where the fog starts, and the rightmost slider changes how far back it goes.
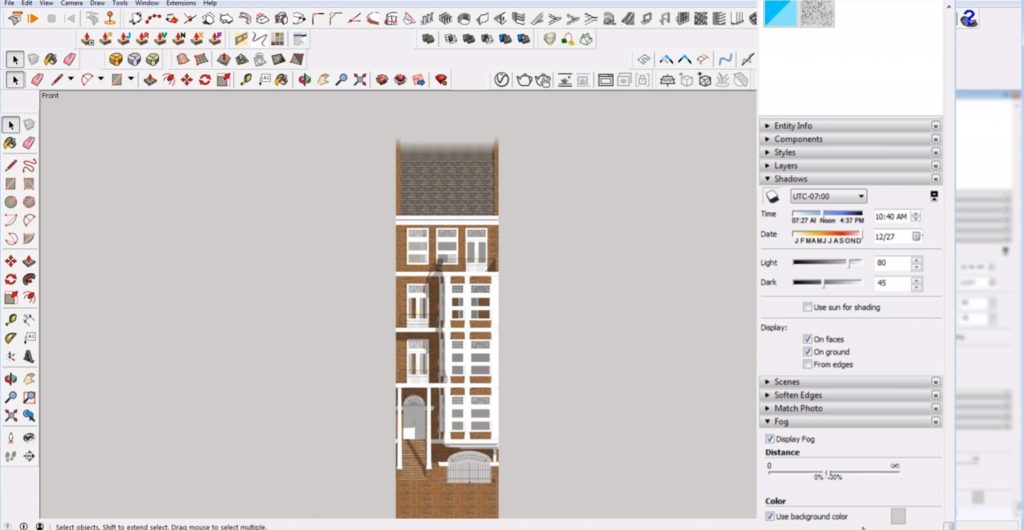
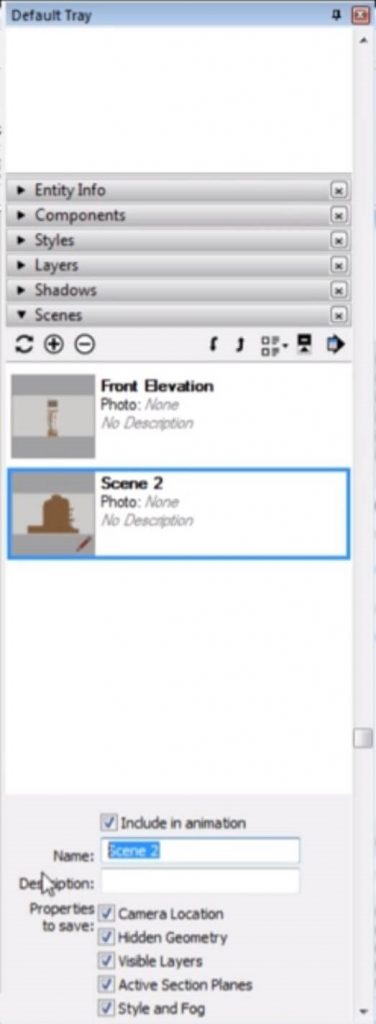
Add Scene. To save your view, go to the “scenes” tab in the “default tray” and click on the plus button. You can enter a name for your scene in the “name” box. If you change your view to a “left” elevation for example, you can simply click on the plus button again to save the view as a new scene. If you make any changes to your model in a scene, simply right-click on the image in the “scenes” tab and select “update scene.” Check which elements you want to update and then hit “update.”
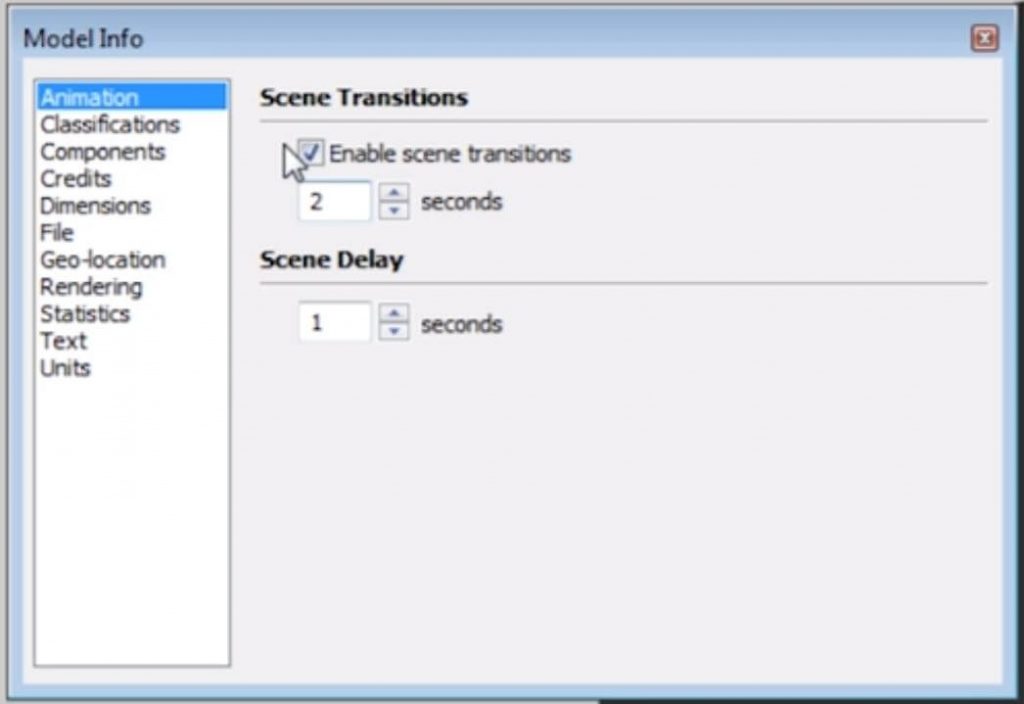
Window > Model Info. When you have more than one scene you can toggle between them, but the animation between each scene may cause Sketchup to lag. If you want to disable this feature go to “window” > “model info” and select the “animation” tab. Uncheck the box that says “enable scene transitions.”
File > Export > 2D Graphic. To export your final elevation, make sure you have the view selected from the “scenes” tab. Go to “file” > “export” and select “2D graphic.”
If you found this article on making a 2D elevation in Sketchup helpful, be sure to check out the rest of our tutorials! What other types of views do you need help creating in Sketchup? Let us know in the comments!
Sometimes you may find yourself working in a model that has numerous components. Maybe there’s a specific one you want to edit but no matter how hard you look for it, you can’t find it. In this article, we’re going to go over how you can select components in Sketchup that are identical. We’re going to use a fun analogy to demonstrate how to use this command.
Ever heard of Where’s Waldo? If you’re not familiar with Where’s Waldo, it is a book series that has images with a number of objects and people and the goal is to find Waldo in huge crowds. He wears a red and white striped shirt and walks with a cane. We have actually downloaded a model from the 3D Warehouse by Lord Zed that resembles a page from the Where’s Waldo books. As you can see, this model is filled with cars, buildings, traffic cones, and people. One thing you might not be able to spot right away is Waldo. Follow these steps to see how you can spot him quickly!
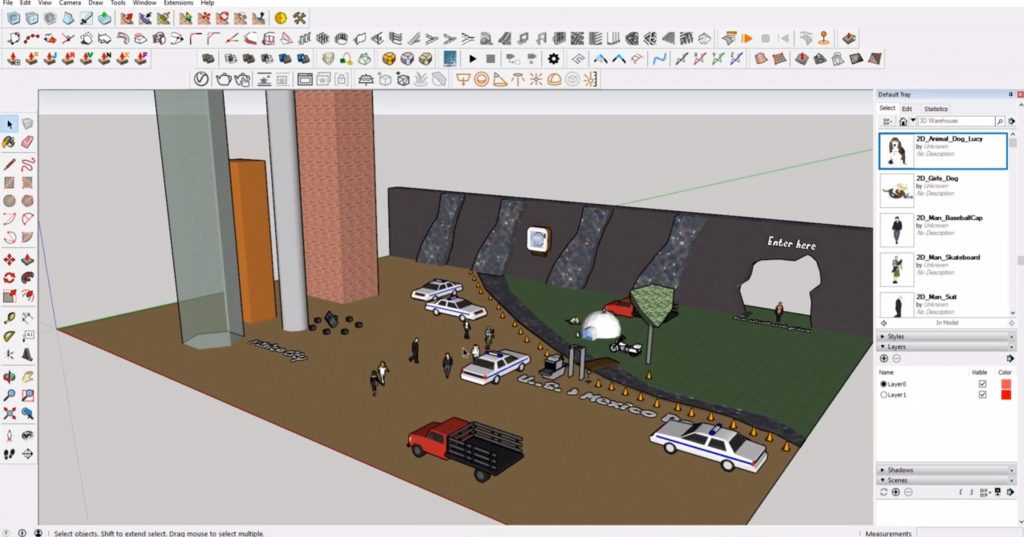
If you ever find yourself looking for Waldo, or any other component, follow these simple steps!
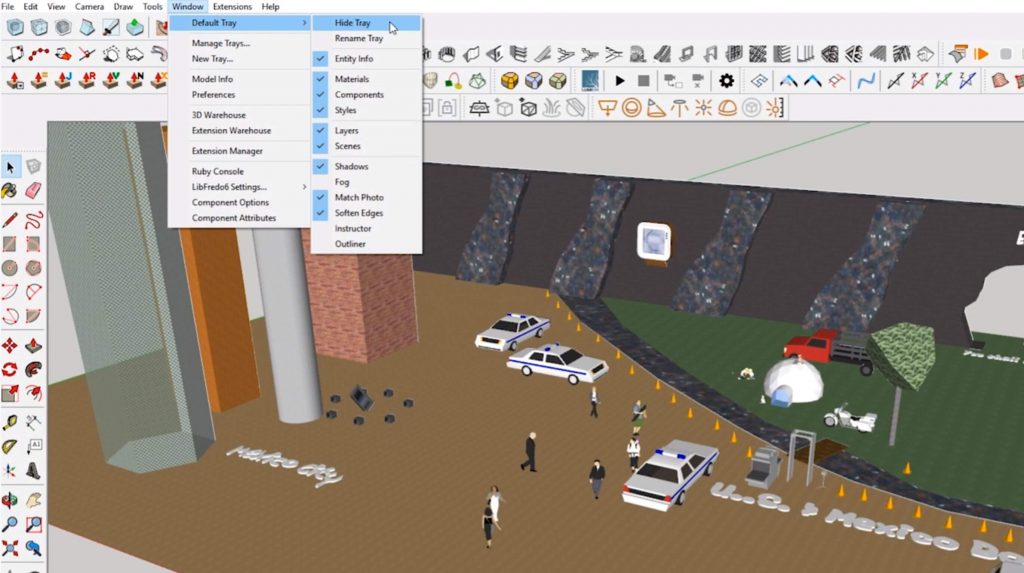
Window > Default Tray > Show Tray. First, you will want to use the default tray. If you do not have the default tray open, you can navigate to “window” > “default tray” and select “show tray.” While you are in the “window” drop-down, make sure “components” is also checked. This will open the “components” tab over in the default tray. From here, you can select components that you can then edit in your model.
Default Tray > Components. On the righthand side of your screen, go to the “components” tab in the “default tray.” Underneath the “select,” “edit,” and “statistics” tabs, there are a few small icons. If you click on the arrow next to the house icon, make sure “in model” is selected. This will ensure that only the components that are currently in your model will show up in the list. Scroll through the list until you find the component you are looking for.
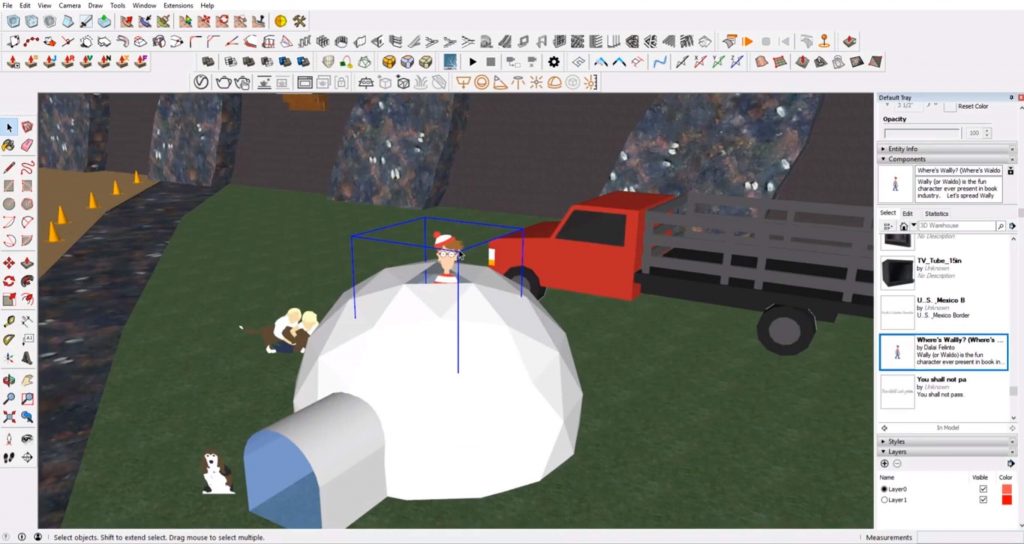
Select Instances. When you find the component that you are looking for, select it. Then, right-click and click on “select instances” from the dropdown. The component you are looking for will now be selected and highlighted with a blue bounding box in your model. Congratulations! You’ve found Waldo!
This can be really useful if you have multiple instances of a component, surrounded by lots of other objects. From here, you can select just the ones you want to edit and work from there. Maybe you have extra foliage you want to manipulate, or multiple scale figures you want to move around. Who knows, maybe you do want to place Waldo in your next model!
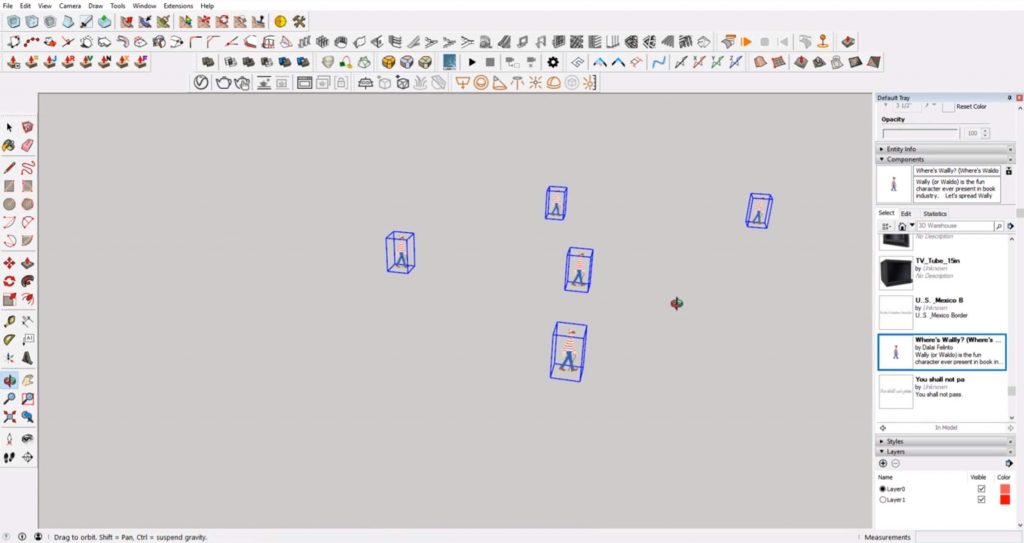
Chances are, you won’t be looking for Waldo in your Sketchup models any time soon, but you can still use the same steps to select components that you may be searching for. If you’re looking for other Sketchup tips, check out the rest of our tutorials here!
In this article, we’re going to go over how to add materials in Sketchup. Sketchup comes with a variety of preloaded materials, but sometimes they may not be exactly what you’re looking for. By using this method, you can customize your model and add unique materials that can’t be found in the standard Sketchup library.
Before we get into how to add a new material, let’s take a look at how to edit an existing one. If you’ve never edited a material, this section will familiarize you with how it works!
Window > Default Tray > Show Tray. Open the default tray by navigating to “window” > “default tray” and select “show tray.” Once the tray is open, go to the “materials” tab. If you click on the dropdown menu and select “in model,” only the materials that are currently being used in your model will show up.
Select Material. Click on the eyedropper tool in the default tray and select one of the materials in Sketchup. Now it will appear in the “materials” tab of the default tray.
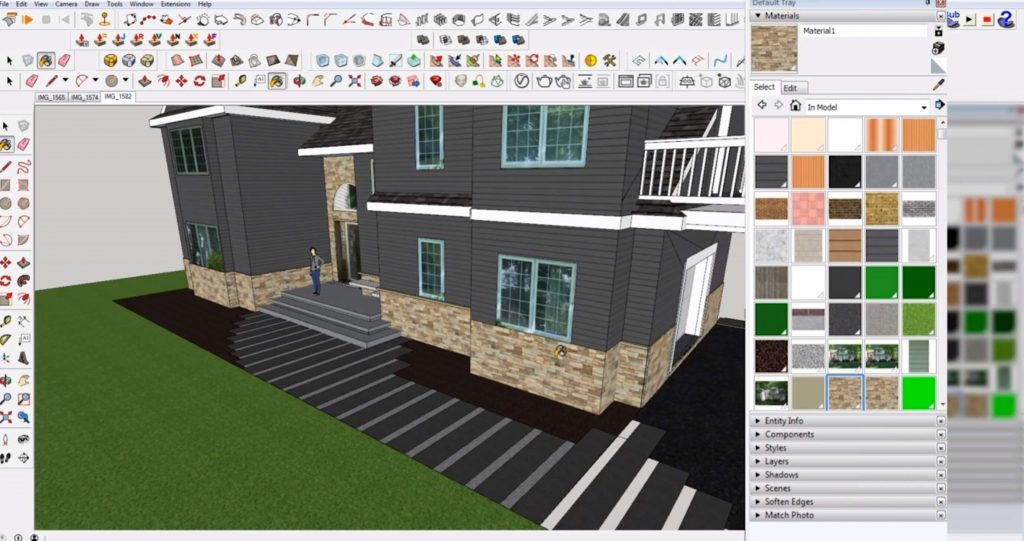
Edit. There is also an “edit” tab where you can change the color, hue, saturation, and brightness of the material. The color thumbnail next to the “picker” dropdown allows you to undo any changes. If you check the “colorizer” box, it will act as a monochromatic application of the color over whatever you do. If you uncheck the “use texture image” box, the material will just show up as a solid color. You can also edit the scale of your material from this tab.
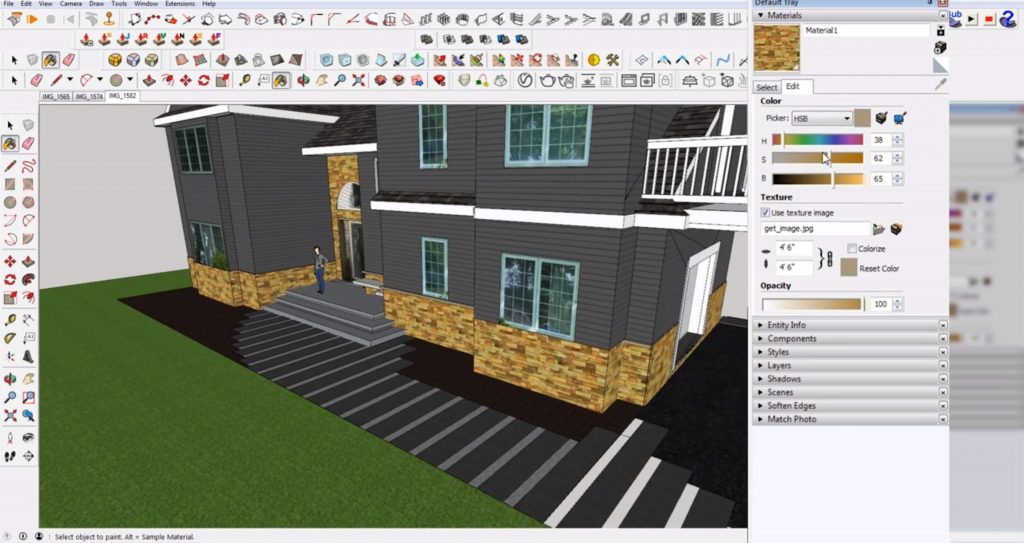
Create Material. In the “materials” tab of the default tray, click on the “create material” icon. This will duplicate whatever material you currently have selected.
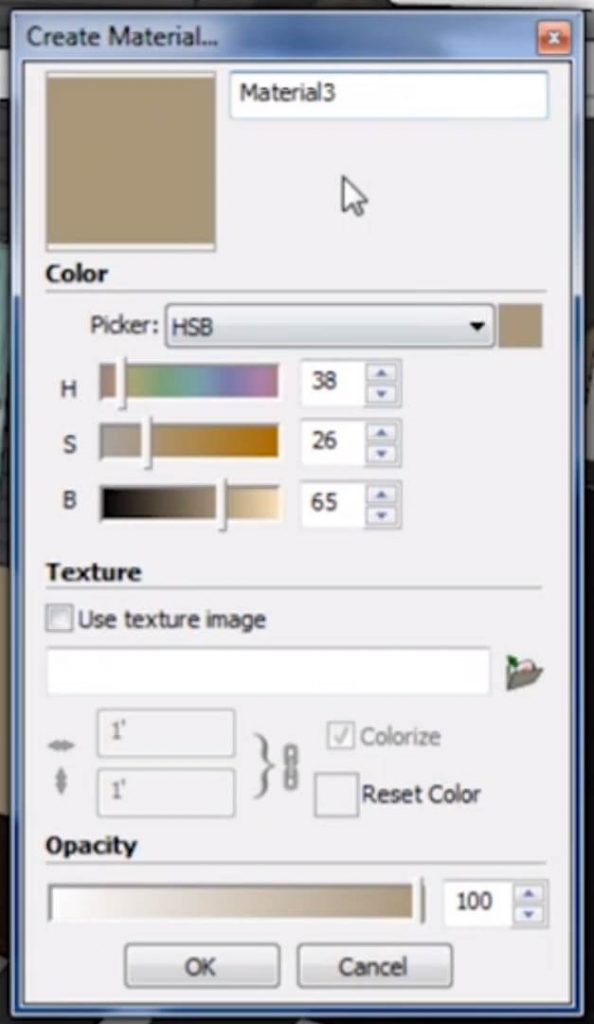
Upload Image. Select the “use texture image” box under the “texture” section. Select the image you want to use from your files and click “open.”
Adjust the Color. Use the sliders in the “color” section to adjust the hue, saturation, and brightness. Click “ok” when you are happy with how the material looks.
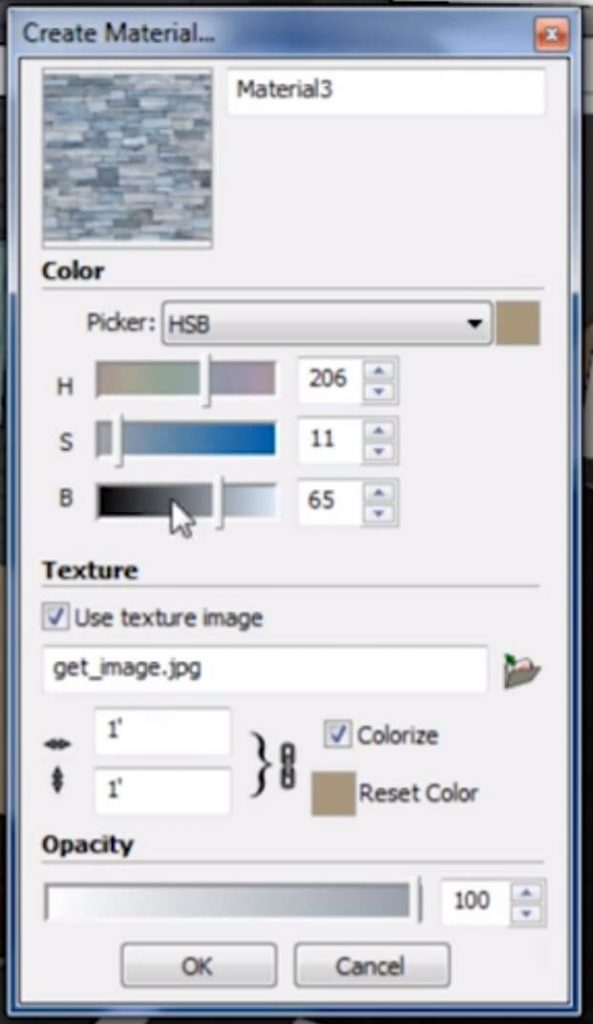
Apply Material. Double click on the object you want to paint and use the paint bucket tool to paint the faces with the new material. If objects in your model are in separate groups, selecting faces one by one may get a bit tedious. If all of the faces you want to paint are already the same material, you can use a trick to make this process faster.
Select > All with Same Material. Right-click one of the faces you want to paint. Click on “select” > “all with same material.” Then use the paint bucket tool to apply the new material to all of the selected faces.
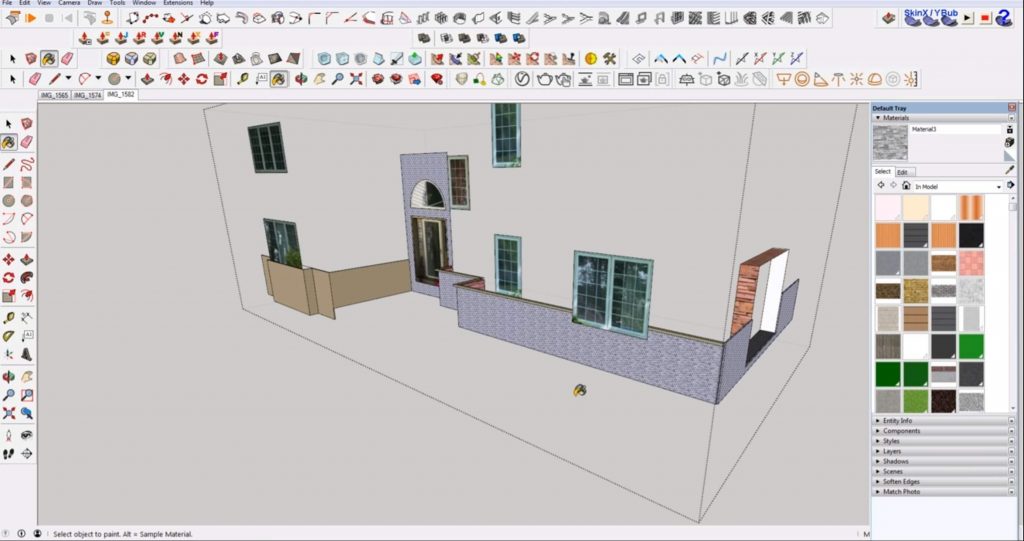
Scale. After you apply the new material you may notice the scale is not right. You can always go back to the “edit” tab of the material and adjust the image to a more appropriate scale.
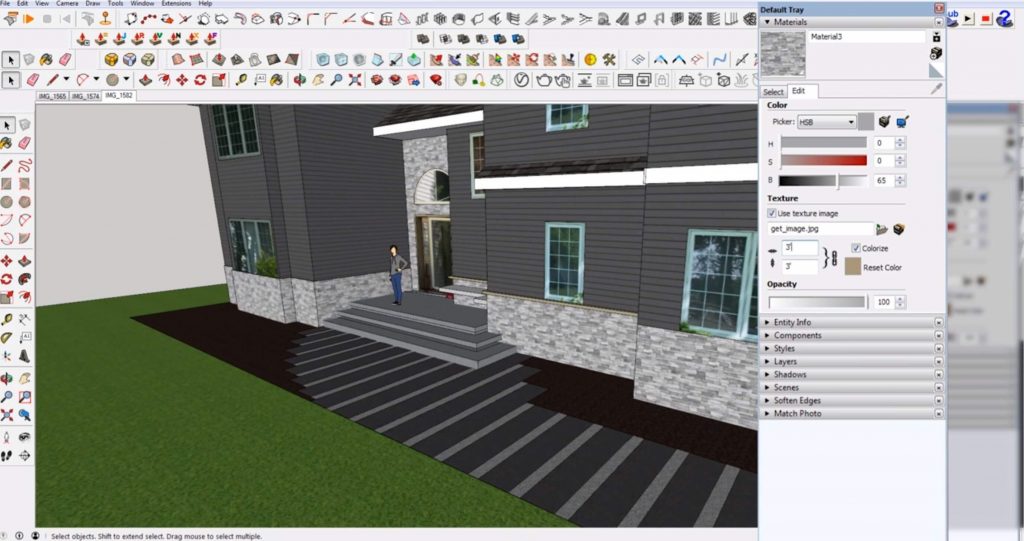
Next time you want to add new materials in Sketchup, just use these simple steps!
If you’re looking for more Sketchup tips, check out the rest of our tutorials. What types of custom materials have you made in Sketchup? Let us know in the comments!
New to Sketchup? This article is for you! We’re going to go over some tips for Sketchup for beginners and show you how you can start modeling right away. If you’re more advanced but still want to learn some new tips, go to our tutorials page to find tutorials for every level! Otherwise, go ahead and open up Sketchup and let’s dive in!
When you first open Sketchup you’ll notice a bunch of toolbars at the top. Those are just plugins that we’ve downloaded into Sketchup. Yours may have less-and that’s ok! For now, we’re going to focus mainly on the left-hand toolbar. If you don’t see the toolbar, just right-click in an open space on the left side of the screen and make sure “Large Tool Set” is selected.
When using Sketchup for beginners, a helpful hint to remember is that keyboard shortcuts are vital to make your modeling efficient!
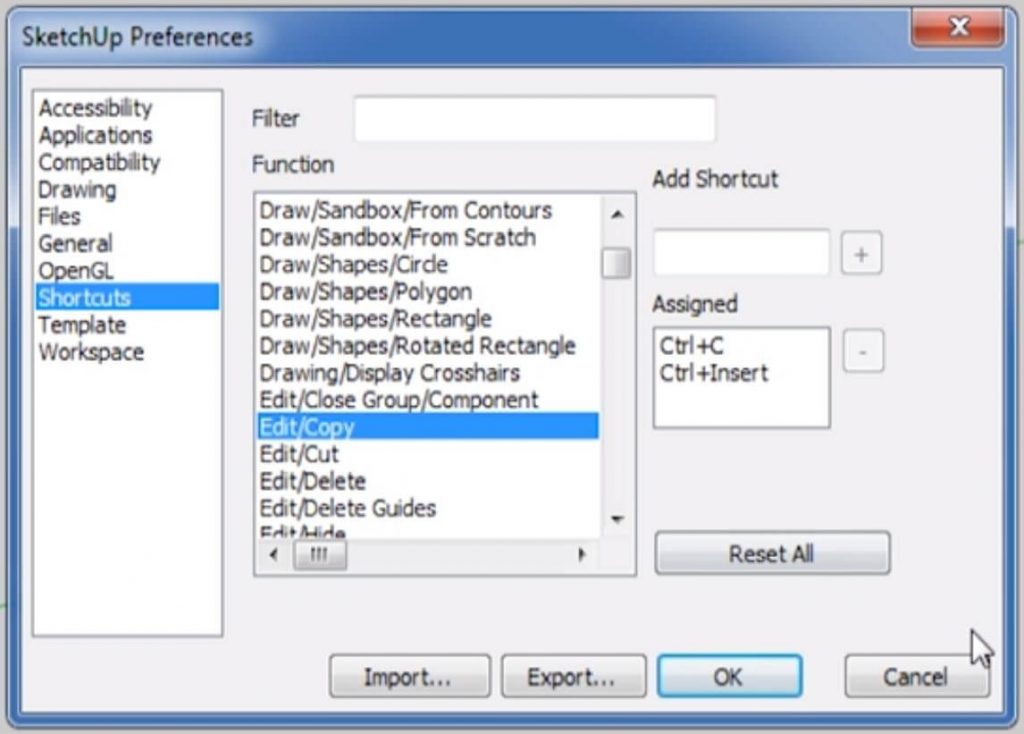
To view a list of shortcuts, you can navigate to “window” > “preferences” and select “shortcuts” from the list. From this window you can create your own shortcuts or view the existing ones.
One important thing to remember is that Sketchup is based on faces and lines. Any geometry that you make is hollow inside, rather than being a solid object. Let’s start by drawing a simple square.
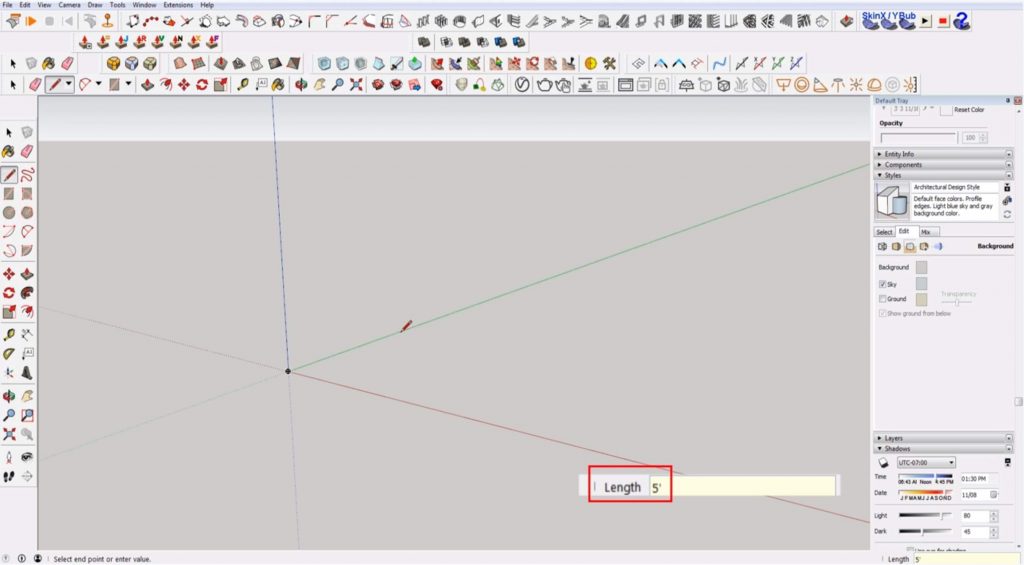
Draw a Line. Press “L” to open the “line” tool. Click on the origin point and drag the line along the green axis. Type 5’ and hit “enter.” If you look in the bottom right corner in the “length” box, you will see that your line is 5 feet long.
Use the Tape Measure Tool. To double-check the length of your line, click on the tape measure tool, to hit T on the keyboard. Click and drag over the line you just drew. The length should measure 5 feet. Hit “ESC” to exit the tool.
Finish the Square. Repeat the same process to draw the rest of the lines for the square. You can use the arrow keys to lock to a certain axis to make sure the lines are parallel with each other. Use the right arrow key to lock to the red axis. The left arrow key locks to the green axis, and the up arrow key locks to the blue axis.
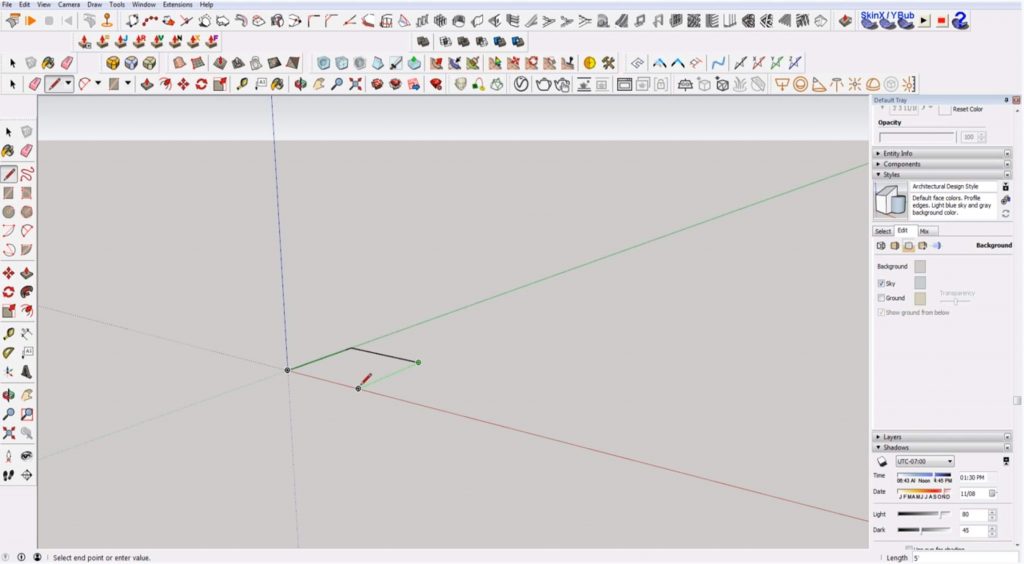
Orbit. Moving around Sketchup can take some getting used to. Let’s move around the square we just drew to get some practice. Click on the “orbit” tool to rotate around the square.
Pan. Click on the “pan” tool to move the model vertically or horizontally.
Zoom Extents. If you ever get lost in your model, click on the “zoom extents” tool to zoom directly to whatever is modeled in your file.
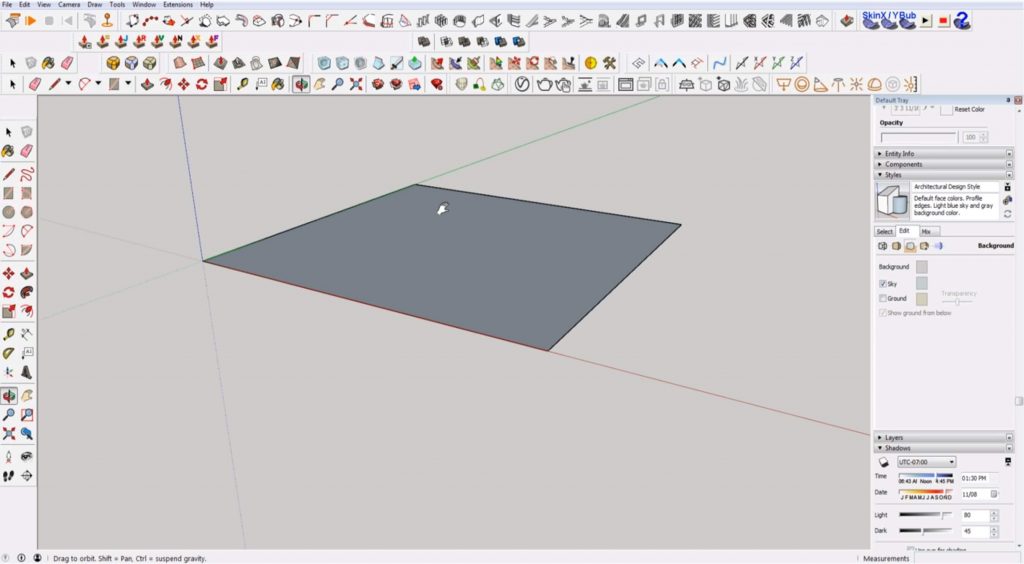
If you click the center of your mouse you can use the “orbit” tool. Scrolling up or down will allow you to zoom in and out. If you hold “shift” while orbiting, you can then use the “pan” tool.
Push/Pull. Select the “push/pull” tool. Click on your square and drag it up to extrude the shape. Type 5’ to create a perfect cube.
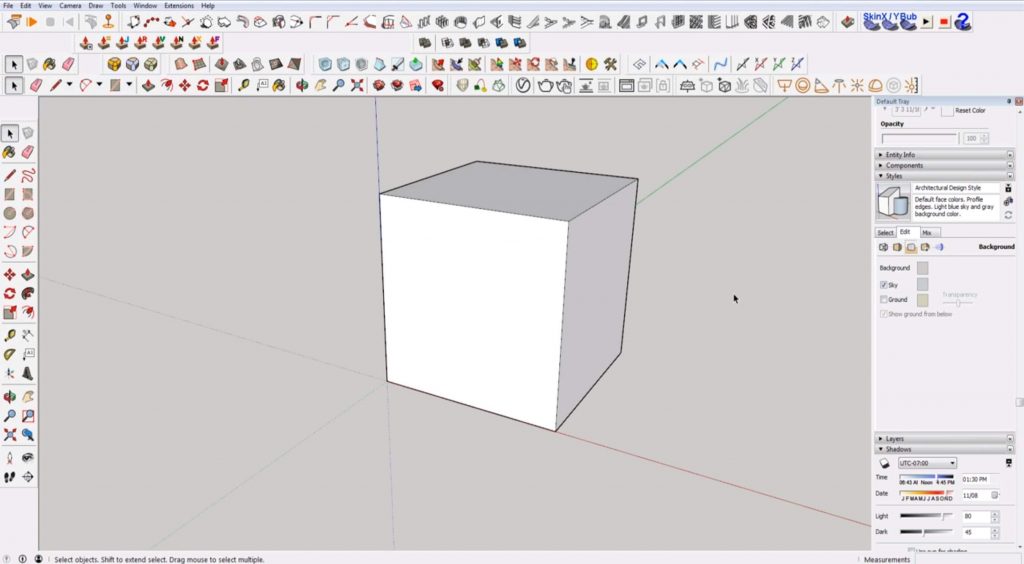
Add a Roof. Open the “line” tool and find the midpoint of the cube. It should automatically snap to that location when you get there. Draw a vertical line and draw another line connecting it to each corner. Select the center line and hit “delete.”
Push/Pull. Hit “P” to open the “push/pull” tool and push the shape all the way to the back edge of the cube.
Erase. If you don’t want to delete a line, you can hold “ctrl” while using the “erase” tool and select a line to hide it.
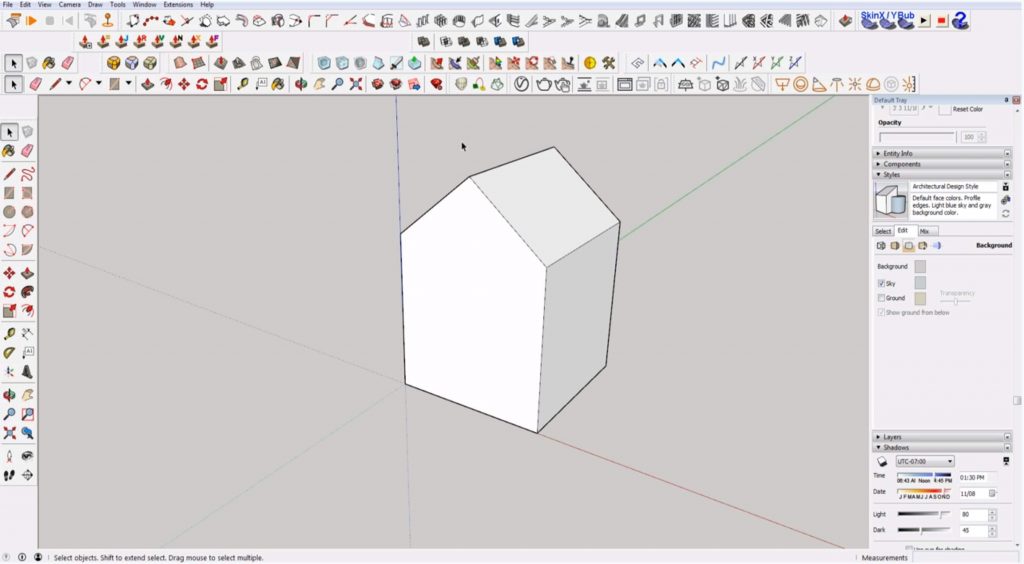
Change Height. Click on the “select” tool. Select the point of the roof (the ridge). Hit “M” to open the “move tool. Click on the front corner of the roof to move the house shape. Press the “up” arrow key to lock to the blue axis and move the shape down.
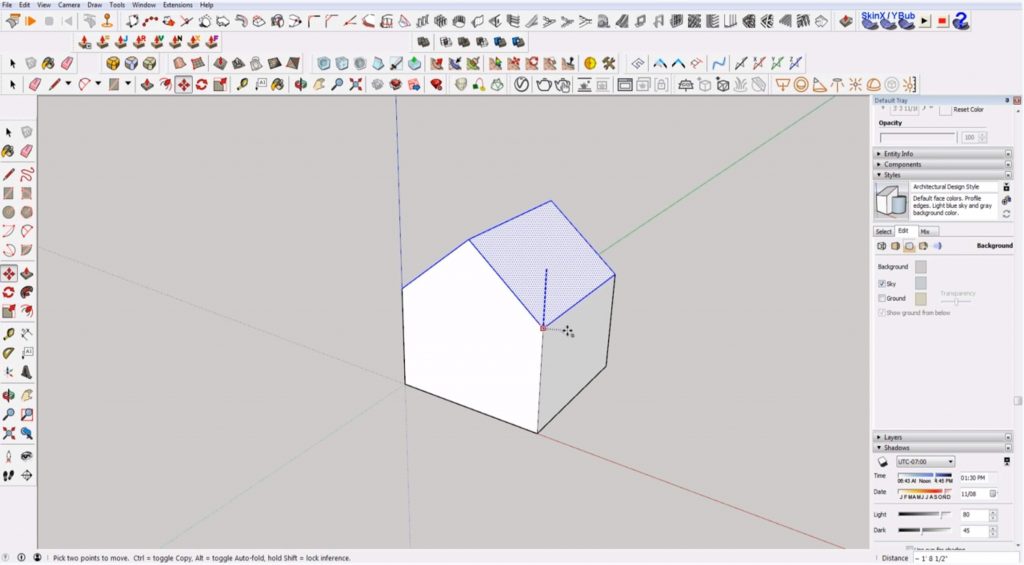
When modeling, you want to make sure you are making your objects into groups or components. This way you can edit parts of your object without it affecting the entire shape. To make your model a group, select the object. Then right-click and select “make group.”
Groups and components are similar, but it’s important to know the difference so you know when to use each one in your model. Components are copies of the same thing, so when you change one component it will change all of them. Groups are a single instance of certain geometry. To edit a group, simply double click on the object.
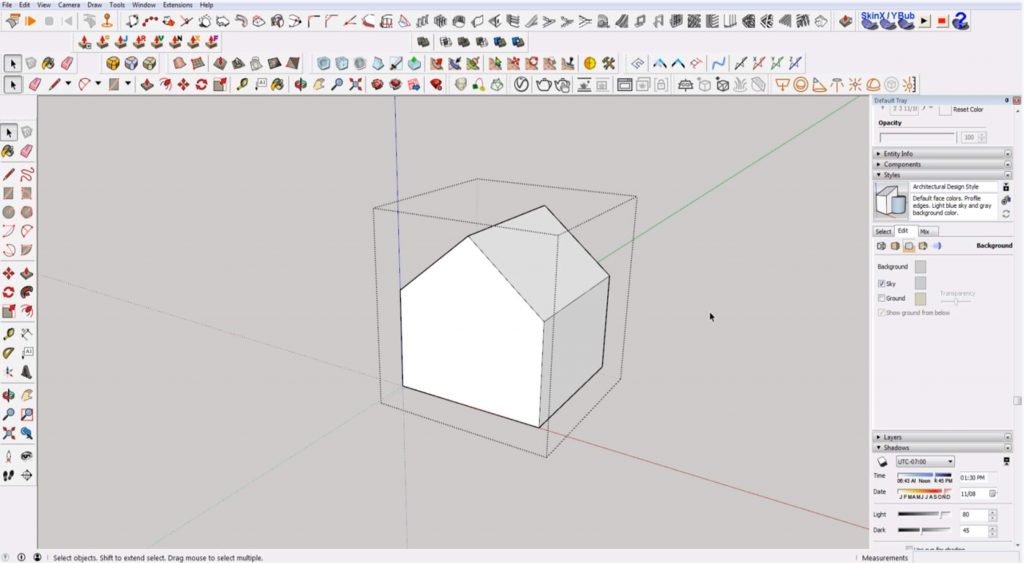
When using Sketchup for beginners, it’s important to know how to select objects. If you use the “select” tool and drag from the top left to the bottom right, it will only select instances that are fully within the box. If you select from the bottom right to the top left, it will select everything the box touches.
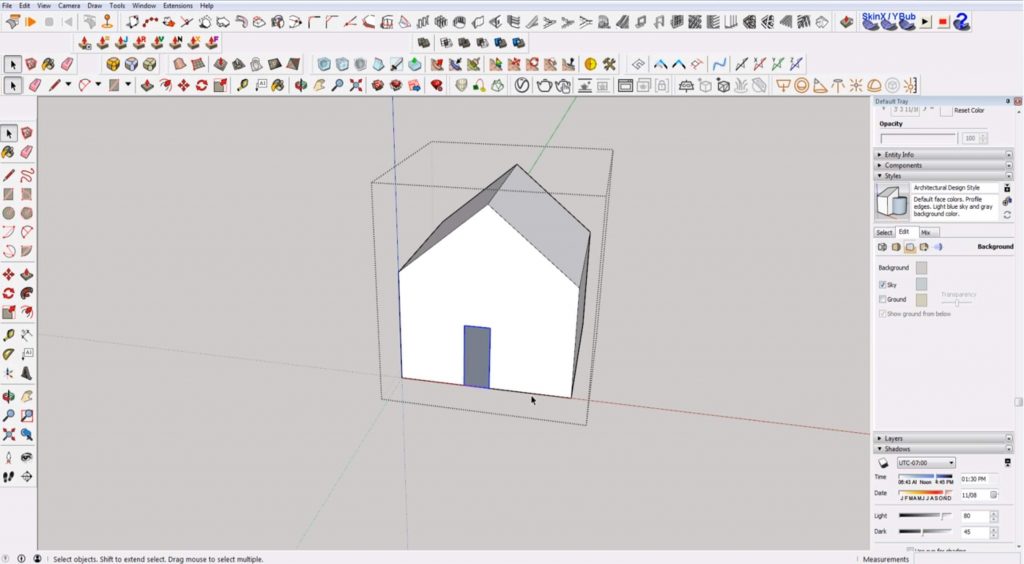
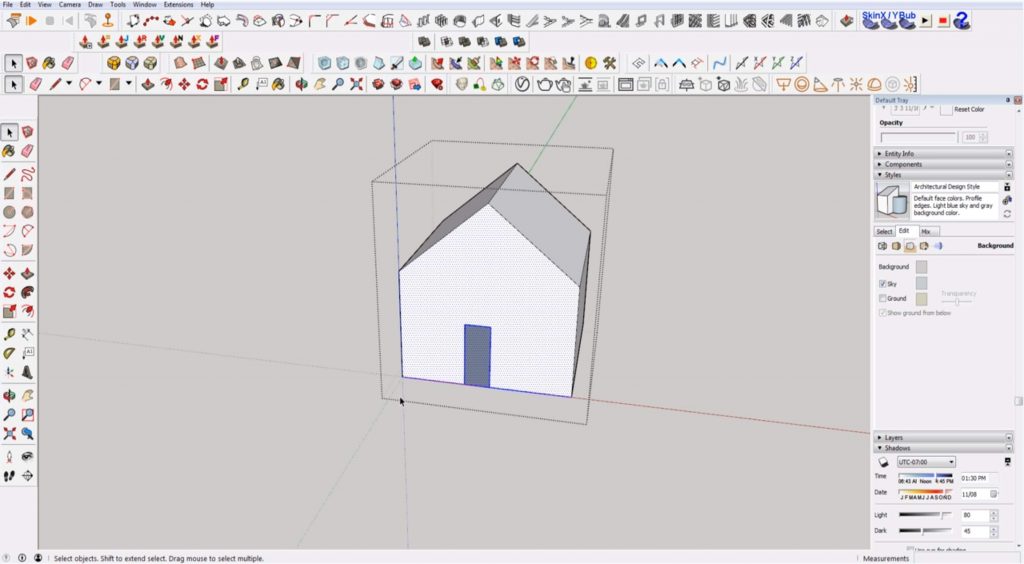
Draw the Door. Use the rectangle tool to draw a door on the front of the house. Delete the face.
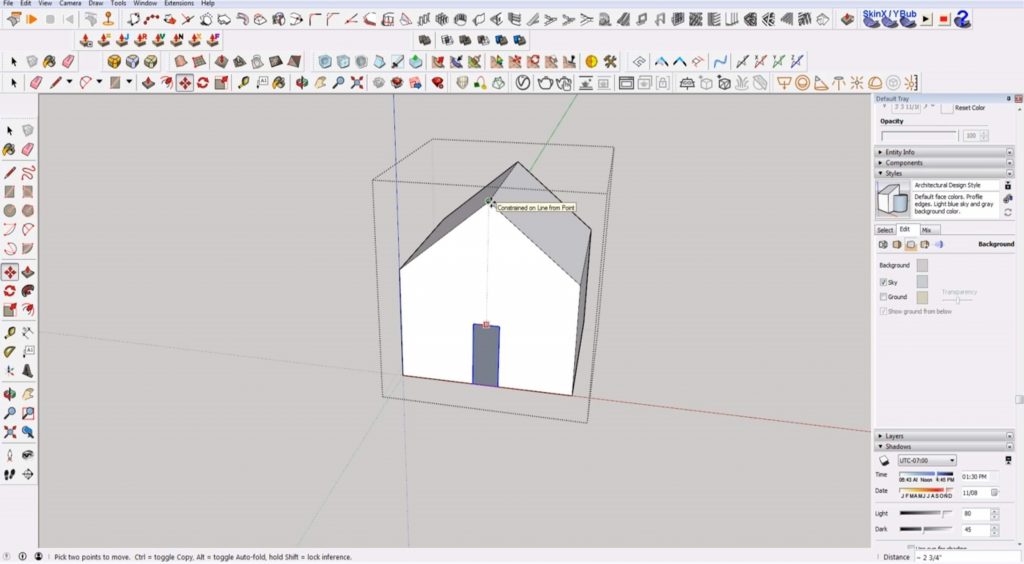
Align the Door to Center. Select the door. Click on the midpoint of the door. Hold the “shift” key to lock to the direction you’re moving and select the midpoint of the pitched roof.
Draw Rectangle. Use the “rectangle” tool to draw the face of the door. Right-click and select “reverse faces.” Switching faces to the correct side is a good habit to get into if you ever plan on rendering.
Make Group. Right-click on the door and select “make group.”
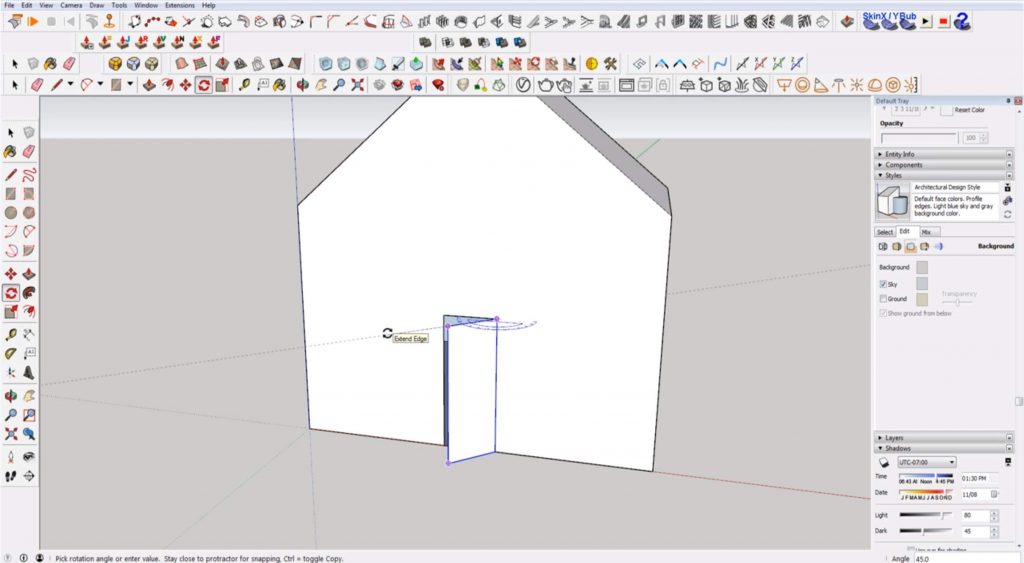
Rotate. Hit “Q” to open the rotate tool. Hit the “up” arrow to lock to the blue axis. Select the top two corners of the door. Rotate it open 45 degrees.
Draw Window. Use the “rectangle” tool to draw a square on one side of the house.
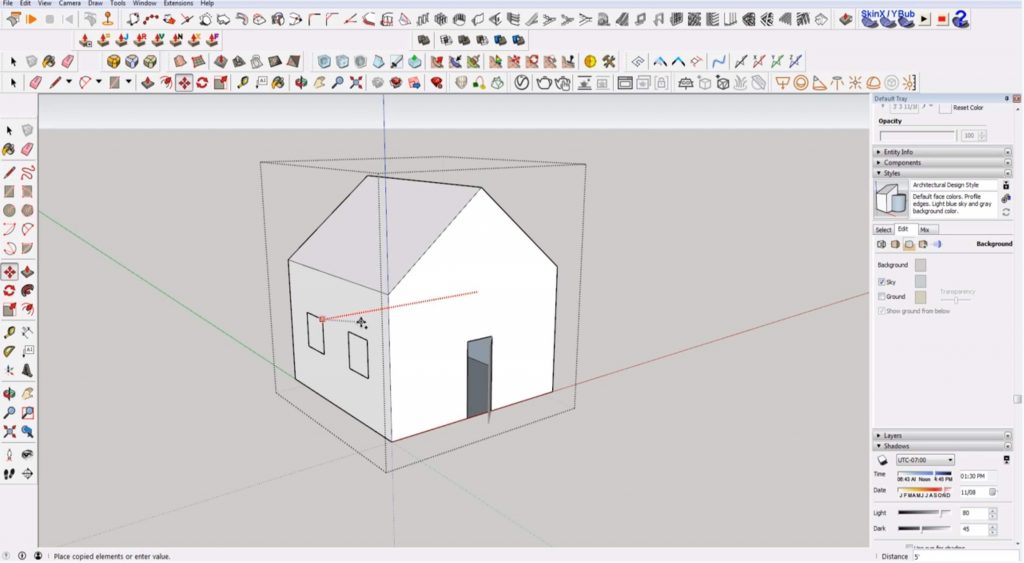
Make a Copy. Select the window. Hit “M” to open the move tool. Select a corner of the window and hold “ctrl” to make a copy. Place the copy so that it is symmetrical with the first window. Delete the faces of the windows.
Copy Windows. Select both windows. Hit “M” to open the move tool. Hold “ctrl” to make a copy and use the right arrow key to lock to the red axis. Drag the window copies to the opposite side of the house and click on the face you want the windows to be placed on.
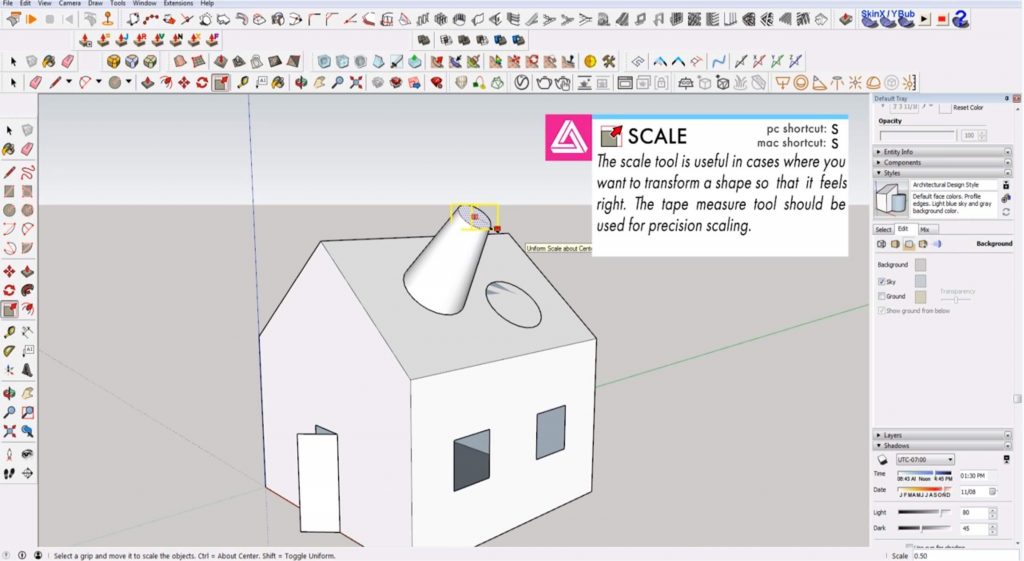
Draw a Cylinder. Hit “C” to open the circle tool. Draw a circle on the roof. Hit “P” and push/pull the shape up.
Scale. Select the circle face. Hit “S” to open the “scale” tool. Use the green points to scale the shape down and create a more conical shape.
To hide a line, open the “eraser” tool and hold “ctrl” while you select the line. Sometimes this is a better alternative to deleting a line because deleting a line may delete the entire face.
If you ever want to view the lines you have hidden, simply navigate to “view” and select “hidden geometry.” The hidden lines will show up as dashed lines.
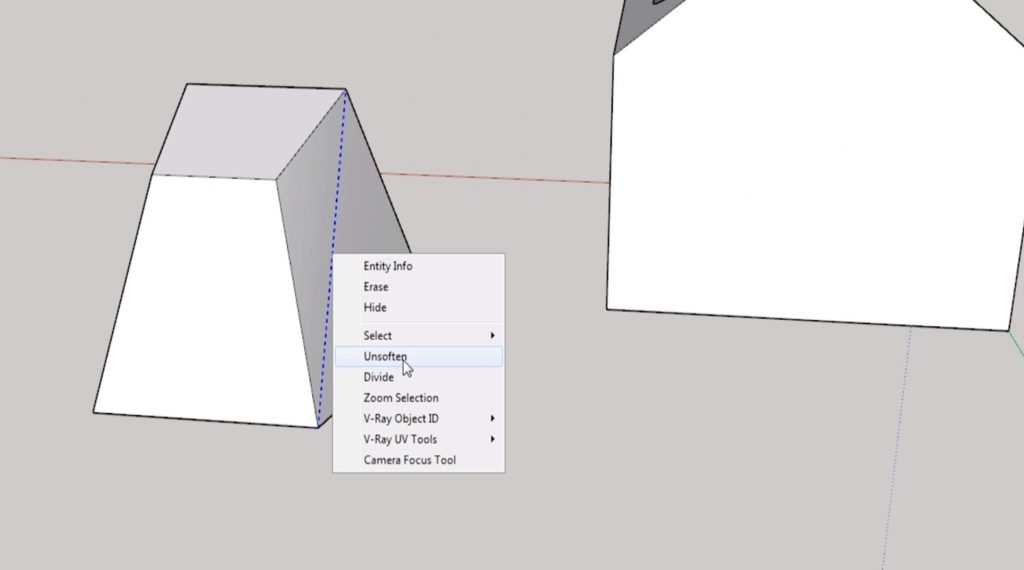
To unhide a line, right-click on the hidden line and select “unsoften.”
Earlier we mentioned that Sketchup is face based. It is also line based which means there are no perfect circles. If you open the “circle” tool you will notice there is a box in the lower right corner that says “sides.” If you type a number before drawing the circle you can change the number of sides. The more sides there are, the more round the circle will appear.
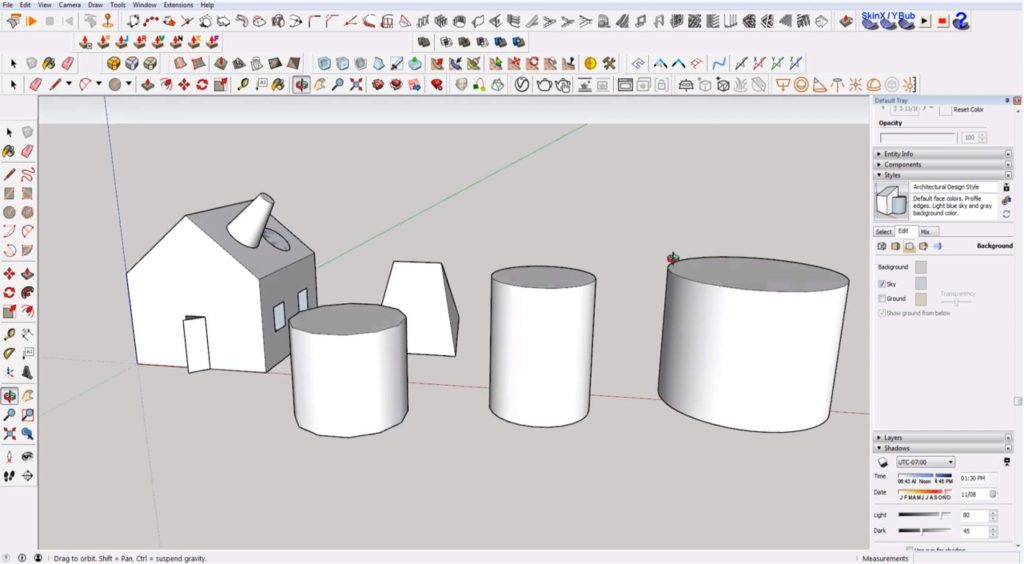
Check out our tutorials page for even more videos on Sketchup for beginners! What other questions do you have for starting out in Sketchup? Let us know in the comments, we would love to help!
In this article, we’re going to be going over what not to do with your Sketchup site models! The 3D warehouse can be a great resource for downloading models, but sometimes topographic models aren’t used in the most effective way. We’ll show you a few different examples and explain how you can turn them into better topographic models. If you’re looking for a more detailed tutorial on typography, check out this one. Otherwise, let’s get started!
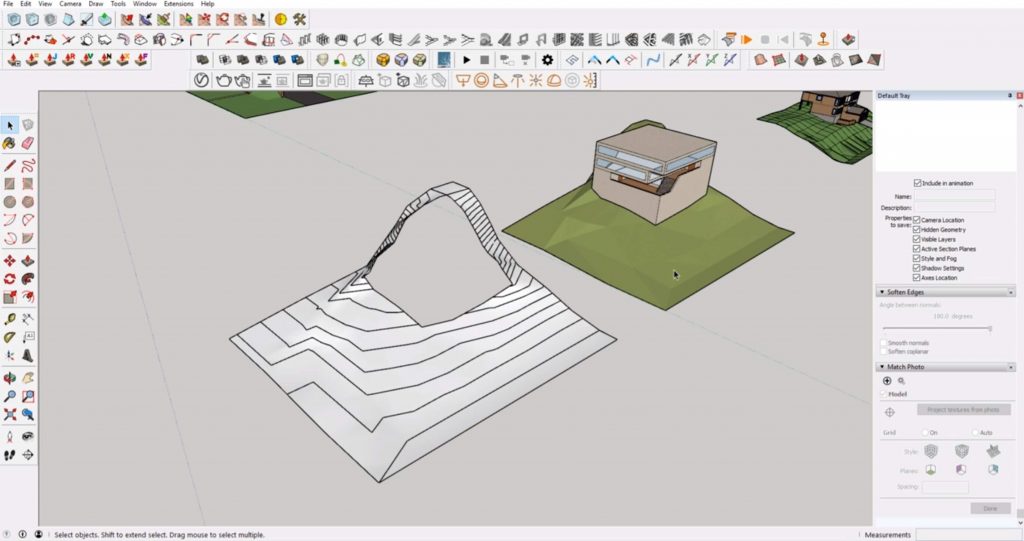
In this first example, you can see that the model was created by using survey information from somewhere else and extruding each topographic line up. This can be a good method when physically modeling something, but it can become a bit distracting in a computer model. It’s important to step back and realize that at the end of the day, topographic contours are a tool used to communicate site information. They don’t actually exist. And if the contours were done at a different interval, they’d be completely different. Use them to get what you need and to generally inform your design, but don’t let the literal lines take control.
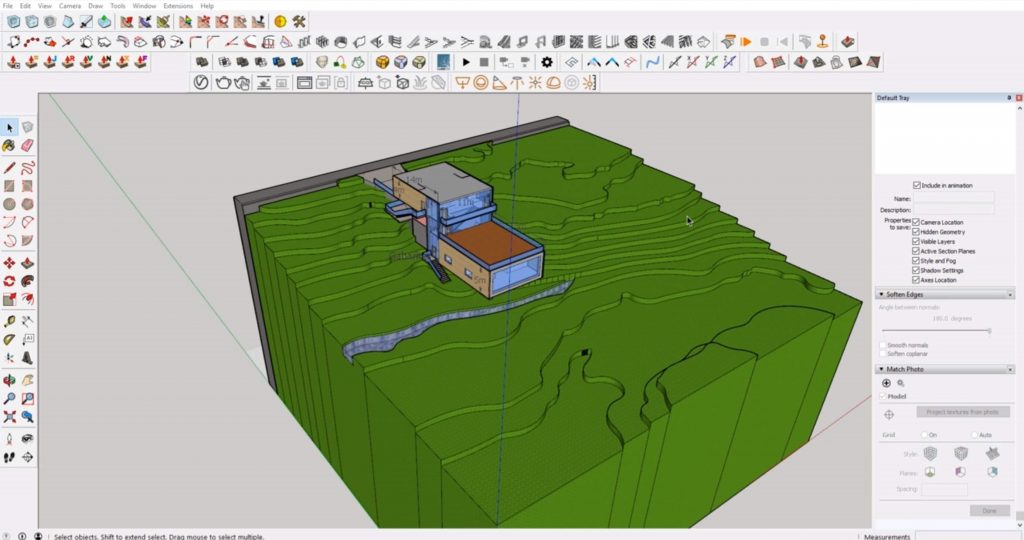
If your site is already like this, how do you fix it?
Delete Faces. Select the top face of the topography and copy it over to another area of your model. Delete the faces. Delete the lines that formed the outline of the extrusion so you are left with just the contour lines.
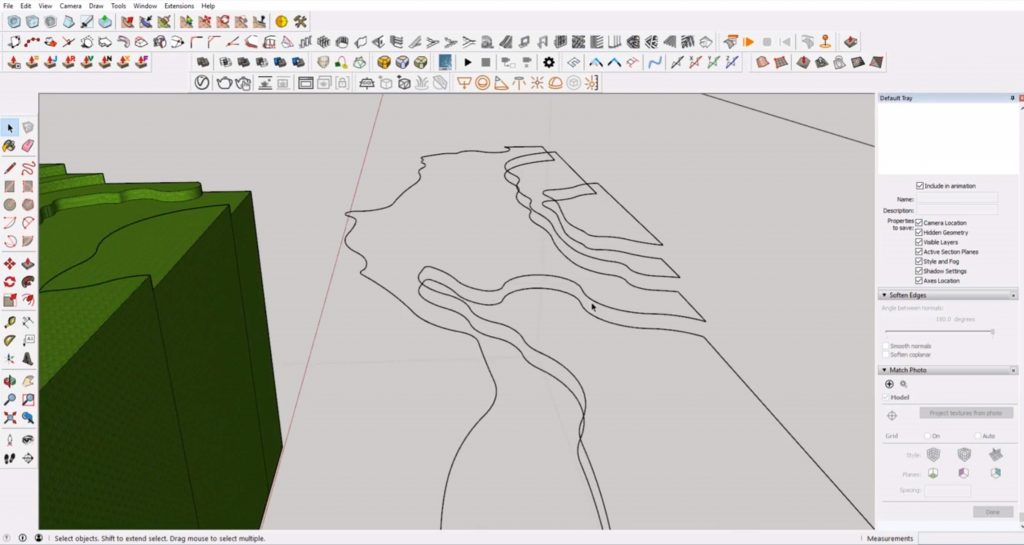
Draw > Sandbox > From Contours. Select the contour lines. Navigate to “draw” in the menu bar. Select “sandbox” > “from contours.” This will create a more realistic representation of the actual topography.
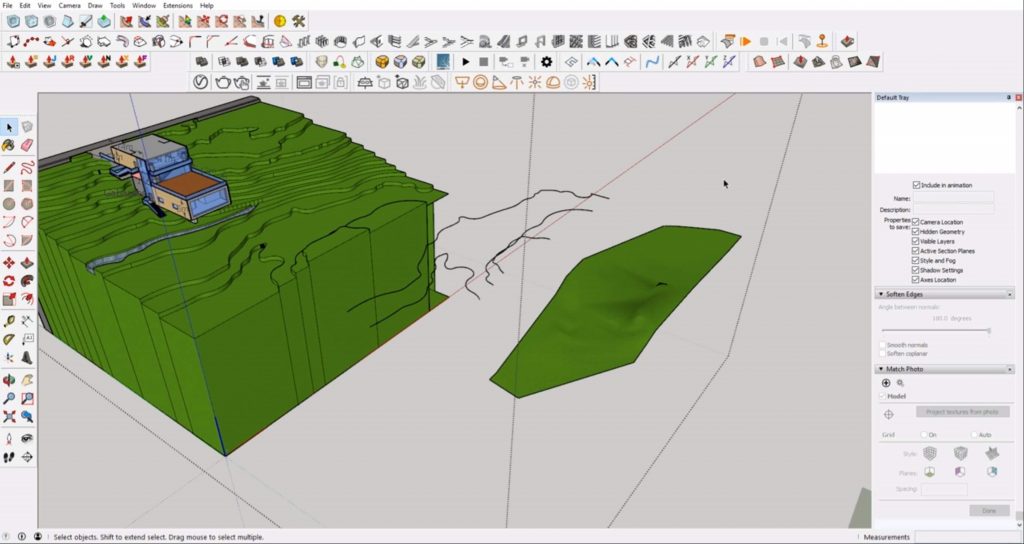
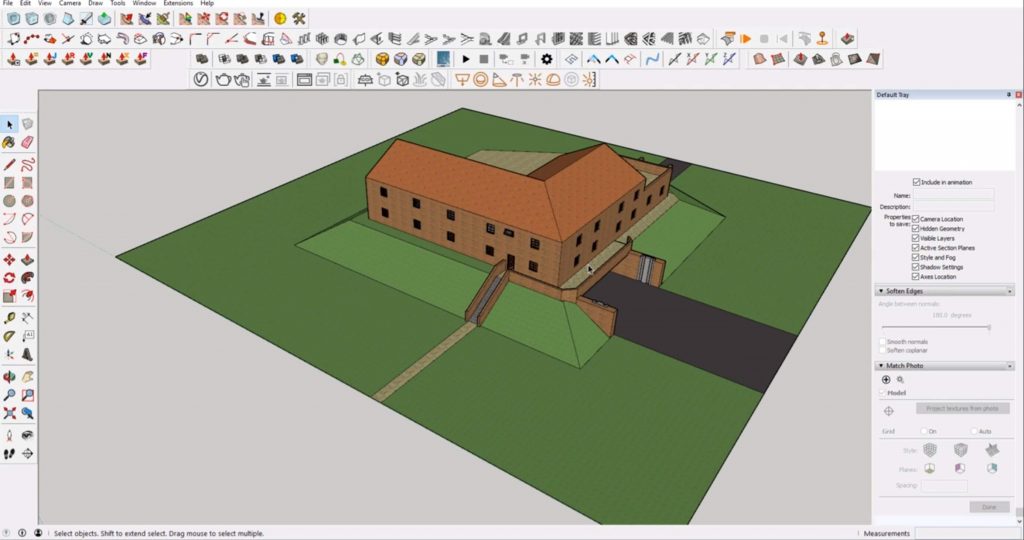
Another example is having the land be too flat. In this model, there are sharp lines with a very geometric slope in the center. To fix this, just soften the edges and corners to make a smoother transition.
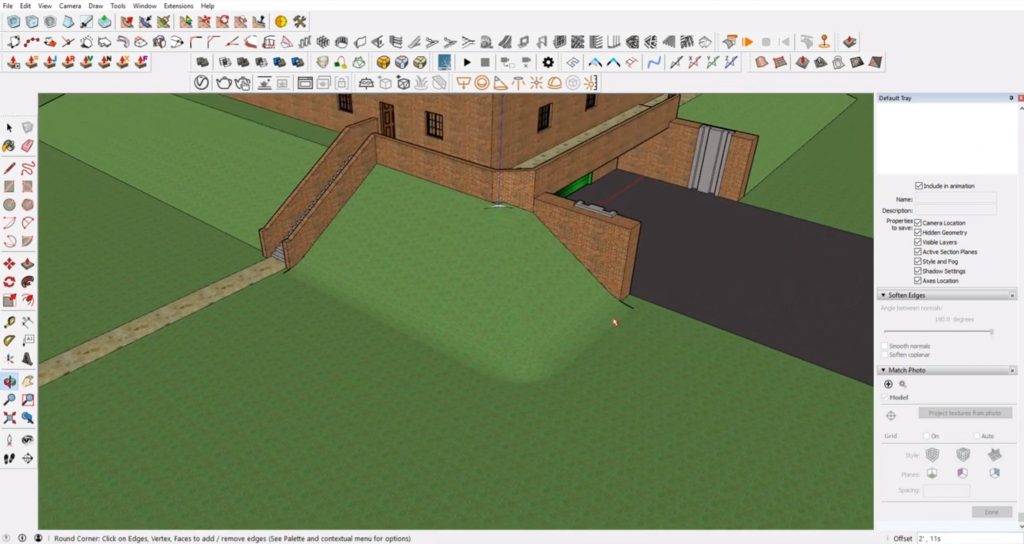
Round Corners. Select the lines where the corners of the slope meet. Click on the “Round Corner” plugin. Change the value of the offset to about 2 feet. Hit enter. Now you have a much smoother transition between the flat land and the slope.
A common modeling method is creating your own topography by triangulation or using a grid. We’re going to show you how to smooth out those lines for either method.
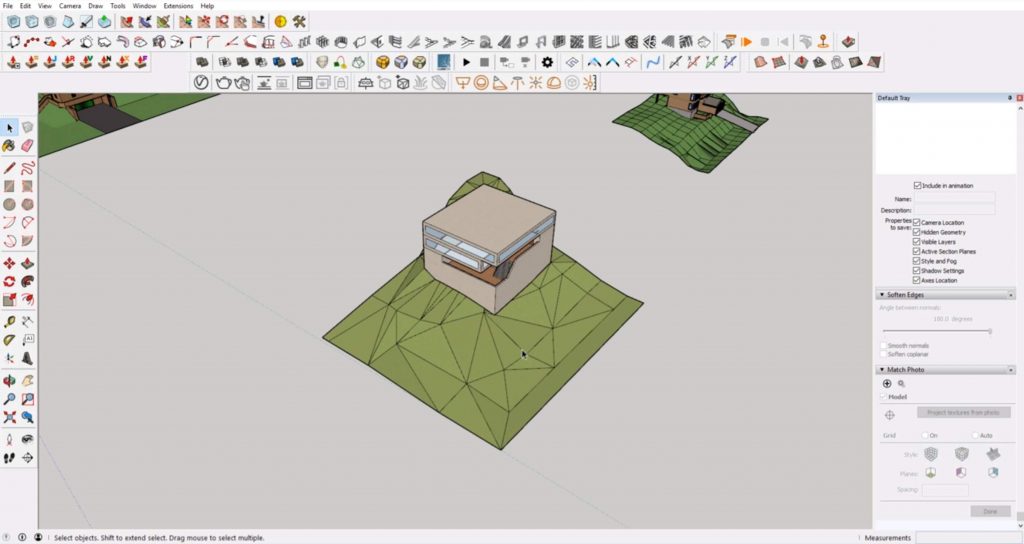
Soften Edges. Select all of the faces. Make sure your default tray is open by going to “window” > “default tray” > “show tray.” Also, make sure “soften edges” is selected. In the “soften edges” section of the “default tray,” use the slider to soften the edges. Most of the lines become dashed lines which means they are now hidden.
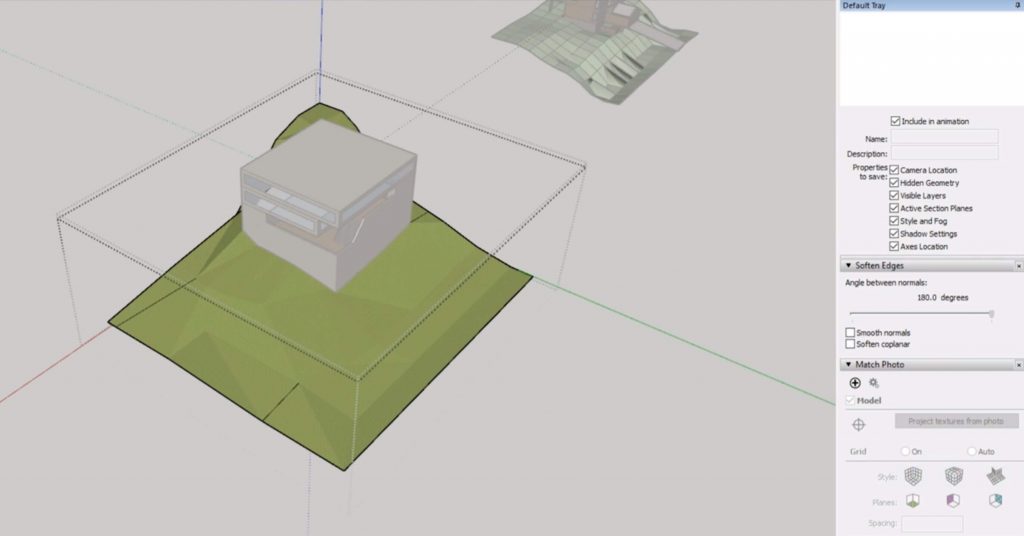
Erase. Hit “E” to open the eraser tool. Hold “ctrl” while scrolling over any additional lines you want to hide.
The model looks a lot better already, but we could still smooth out the topography even more.
Copy. Select only the topography from the model and copy it off to the side. You may have to make the topography a “component” if it isn’t already.
Draw Rectangle. Hit “R” to open the rectangle tool. Draw a rectangle underneath the topography, connecting opposite corners.
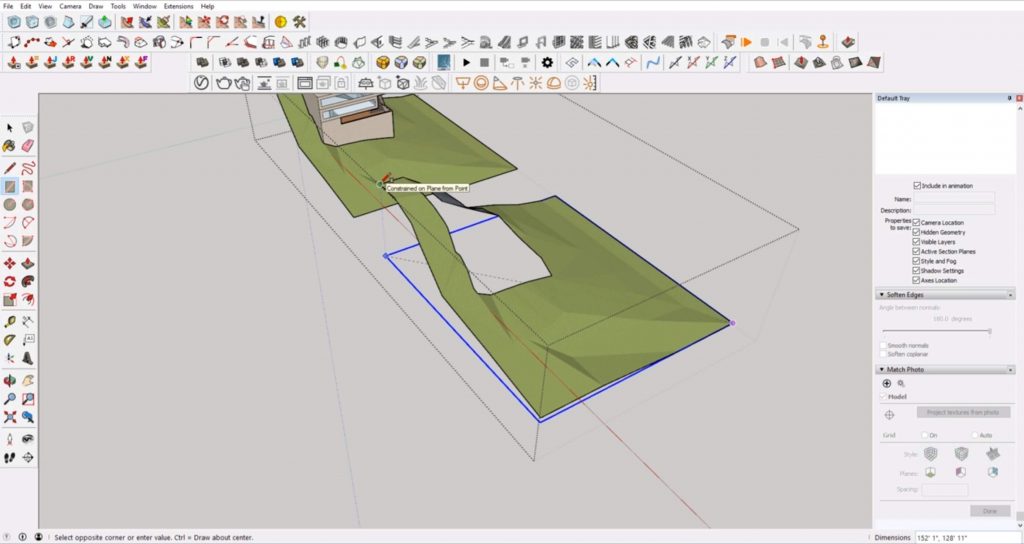
Scale. Select the rectangle. Hit “S” to open the scale tool. Hold “ctrl” and drag the rectangle outward so it is just a bit bigger than the area you are going to cut through. Right-click on the rectangle and select “make group.”
Move. Hit “M” to move and “ctrl” to make a copy. Press the “up” arrow key to lock to the blue axis and type “2*30.” Hit enter. Now you have 30 planes that are equally spaced 2 feet apart over your topographic model.
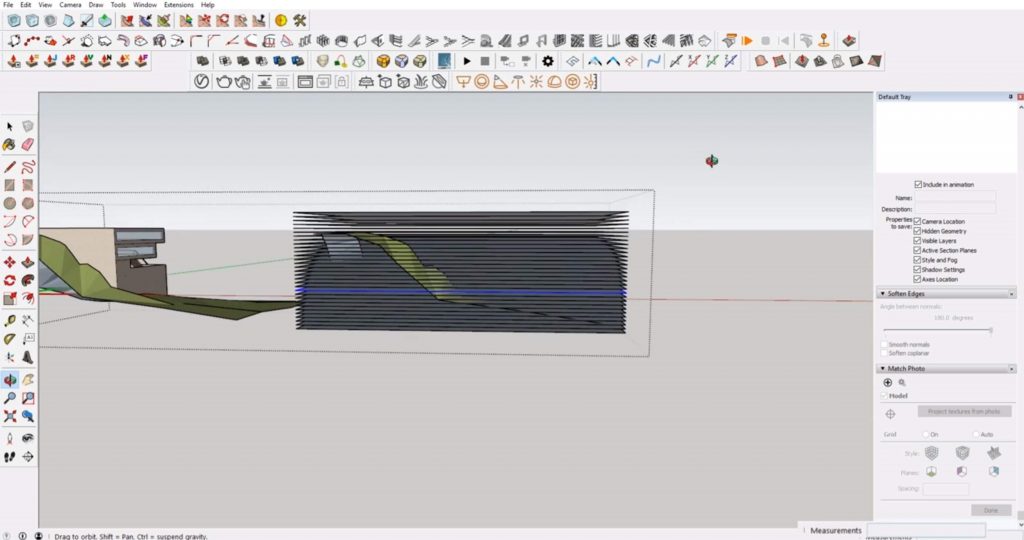
Intersect Faces. Select all of the planes and topography. Right-click and select “intersect faces” > “with selection.” Delete the planes. If there are any strange intersecting points, just use the eraser tool to hide the lines.
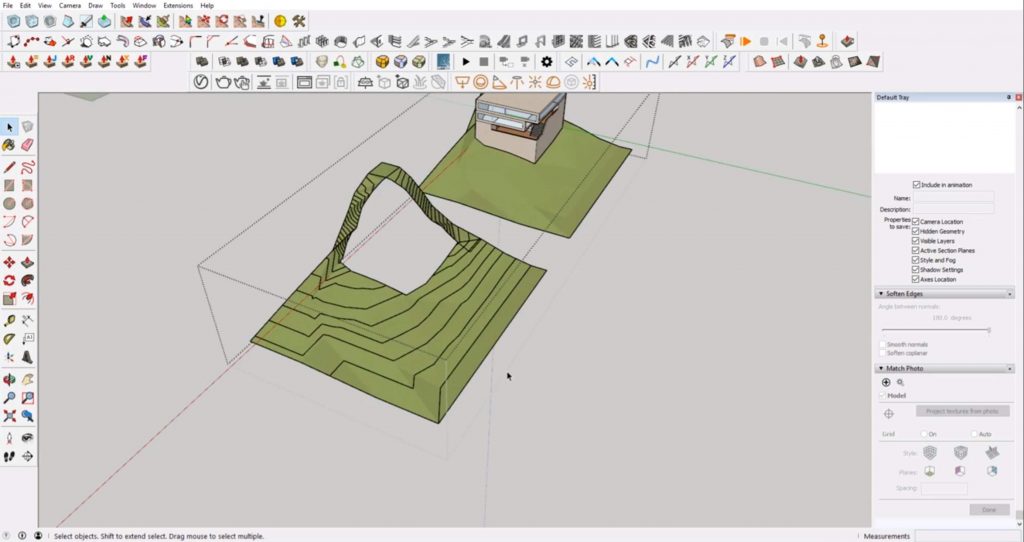
Explode. Right click on the topography and select “explode.” Right-click on a piece of the topography and click “select” > “all with same material.” Hit delete. You may have to do some cleanup and delete a few stray lines.
Draw > Sandbox. > From Contours. Just like we did in the first example, you can now create a smoother topography by selecting the contours and going to “draw” > “sandbox” > “from contours.” You can always delete any extra lines that may interfere with your architectural model.
If you’re looking for more tips for your Sketchup site models, check out our full list of tutorials here! What tutorial do you want to see next? Let us know in the comments!
When you first start out, it can be easy to fall into the same Sketchup mistakes and not know where to turn! In this article, we’re going to go over the top five mistakes beginners make. We’ll also give you helpful hints so that you can avoid making the same mistakes in the future. Follow these simple tips and you’ll be able to speed up your workflow and model efficiently. You’ll be a Sketchup pro in no time!
1. Sticky Business
When modeling objects in Sketchup, you need to separate different parts into groups and components. Otherwise, you won’t be able to move individual parts of your model without affecting the whole.
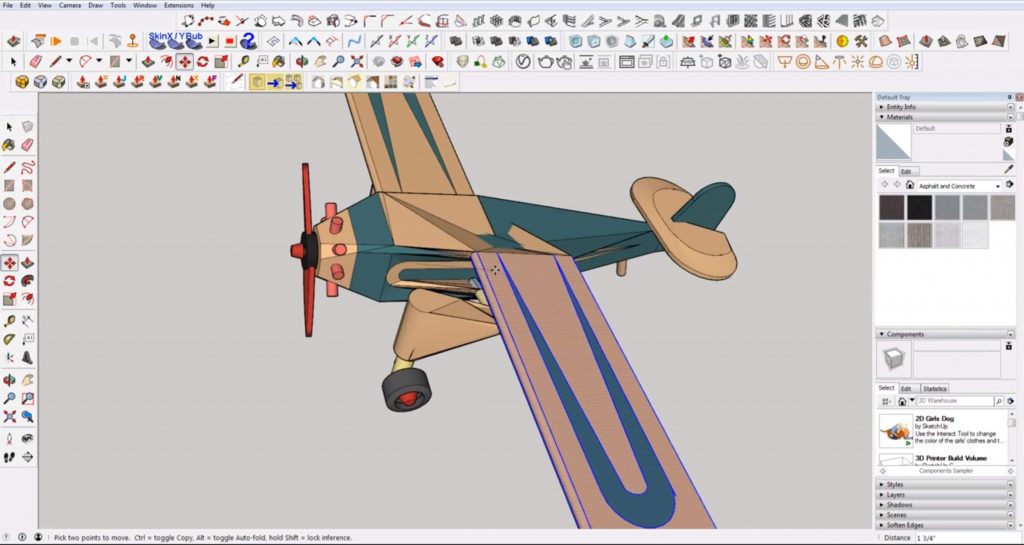
How to fix it: Select the objects that you want to move independently from the rest of the model. Right-click and select “make group.” Now when you move the object, it won’t take the rest of the model with it.
2. Overstocking from 3D Warehouse
Another one of the most common Sketchup mistakes is overstocking. Basically, it means downloading a bunch of 3D models from the 3D warehouse and placing them into your model. It can be a good thing, but sometimes when you are new to Sketchup it’s easy to go overboard with it. At first glance, you can never really be sure what you are downloading.
For example, in this model, we downloaded a pendant light, but when you click on it you can see the blue bounding box is not confined to just the light. If you turn on “hidden geometry,” you will notice there are other objects within the pendant model. This can really begin to slow down your model because it’s extra information Sketchup must load.
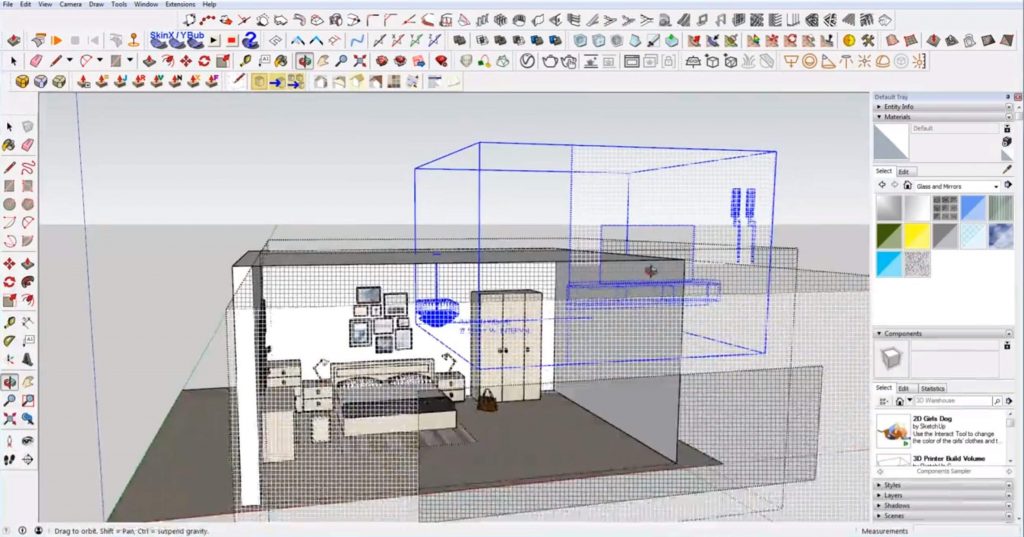
How to fix it: Click into the group you downloaded and delete any extra information. If you have ta bunch of unused components in the model they still add to your filesize even if you don’t have anything in your 3d modeling view. To get rid of them you can navigate to window > model info > statistics and click on the “purge unused” button. This will get rid of any extra components you aren’t currently using.
3. Getting Hung up on Style
Sometimes when modeling, people can get caught up in the look of the model or the style they choose to add. This can really slow down the load time and it’s not really necessary when modeling.
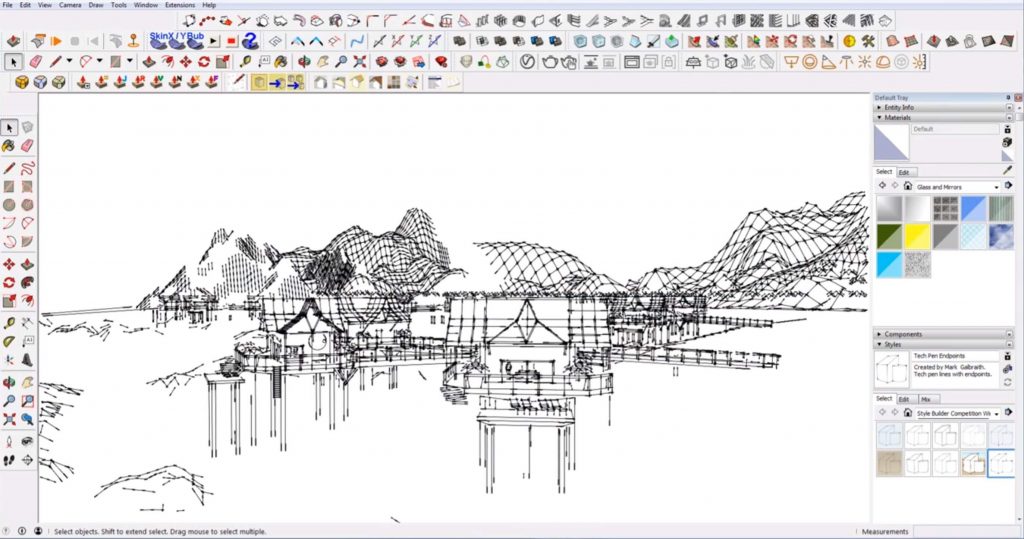
How to fix it: Navigate to the “styles” tab in the “default tray.” In the “select” tab, click on “assorted styles” from the dropdown menu. If you look in the bottom right corner of each style, you may see a green stopwatch icon. This indicates that it is a fast modeling style. Try to use fast modeling styles when working and save more artistic styles for final renderings. The best practice is to set up a “working” scene with a fast style and other scenes with the desired finished result.
4. Modeling Everything
It can be easy to get caught up in modeling everything but don’t waste your time. You may not see everything in the model anyway.
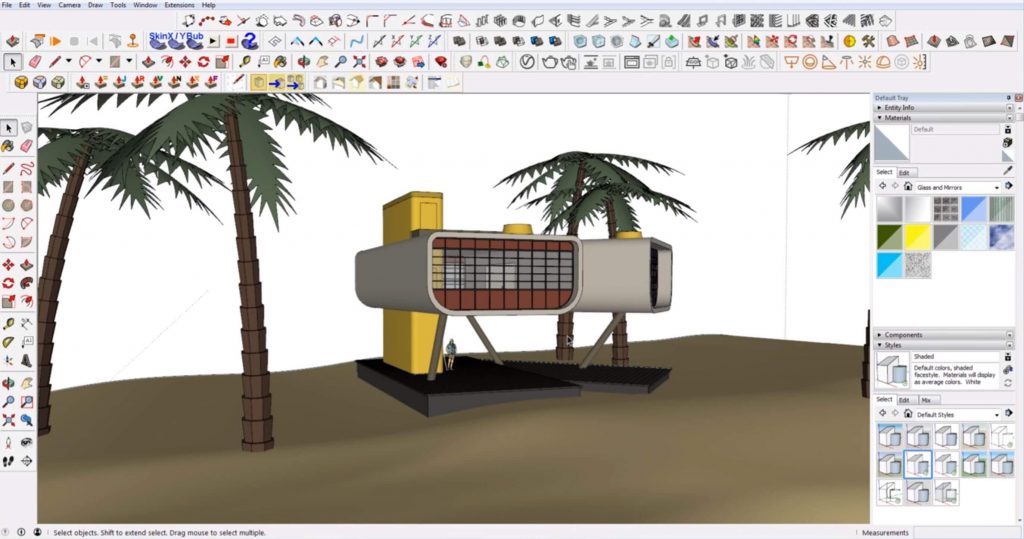
How to fix it: Make sure you define the parameters at the beginning of the project. Choose your views ahead of time and think about what you will see in the final image as you model. Don’t model what you don’t need or can’t see.
5. Using too Many Tools
When you have too many plugins, they can start to conflict. Sometimes beginners may fall into the trap of not learning Sketchup fully, so they use Sketchup for one thing then take their model into another program to do something else and so on.

How to fix it: Minimize the number of tools you use. The simpler and more fundamental the tools are, the better. Try not to use tools as a crutch when modeling. Instead, learn all of the tools in Sketchup and become familiar with the program so that you can do as much work as possible in Sketchup before moving to another program.
Are you a beginner at Sketchup? What Sketchup mistakes do you need help with? Check out our tutorials page for more helpful tips or leave a question in the comment below!
One of the most important steps in an architecture project is gathering site information. In this tutorial, we’re going to show you how to get information about the site when you don’t have a survey. A quick note to keep in mind is that this is a very rough estimate! You don’t want to use this information in place of getting an actual survey. For example, you might only use this if you’re roughing out a concept for a proposal or you just want to get a quick estimate of what information the surveyor might need specifically for you. But don’t ever use your own survey instead of getting an actual survey because you’ll regret it!
One way to get the property line information is to look at an assessment map which is basically the tax information for a property. Some counties make this information available online, but if not, you can go to the city and ask for an assessment map. If you are lucky enough to find the assessment map online, you can often then use the measuring tool from the site to measure the property line.
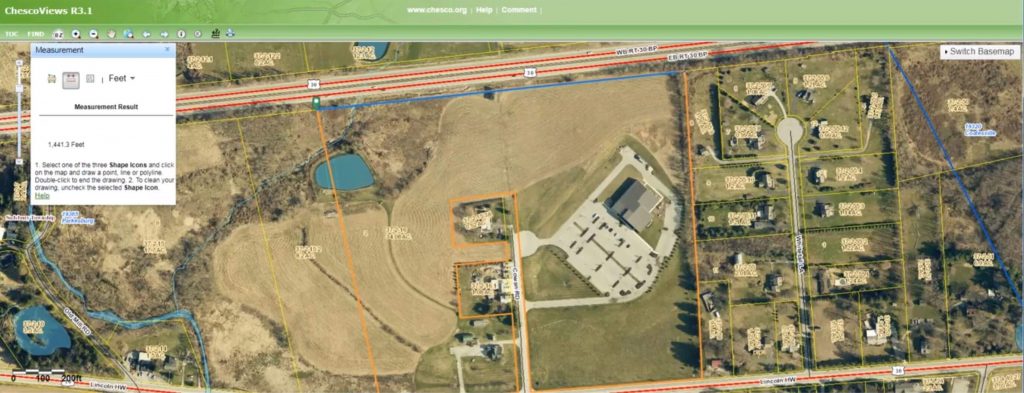
Import Image. Zoom out of the assessment map so you can see the entire property line. Take a screen capture and save it as a jpeg. Then, go back to Sketchup and import your image. Place it in your Sketchup model with the uploaded geo-location of your site.
Scale. Use the line tool to trace the property line. Select the image and the line you just drew and right-click. Select “make group.” This way when you scale the image you won’t be scaling the entire model. Double click on the group. Hit “T” to open the tape measure tool. If your tape measure tool has a “+” symbol in the bottom right, hit ctrl to get rid of it. Then click and measure the property line. Type the actual measurement you got from the assessment map. Make sure you include the feet or inches increment. Hit “enter.”
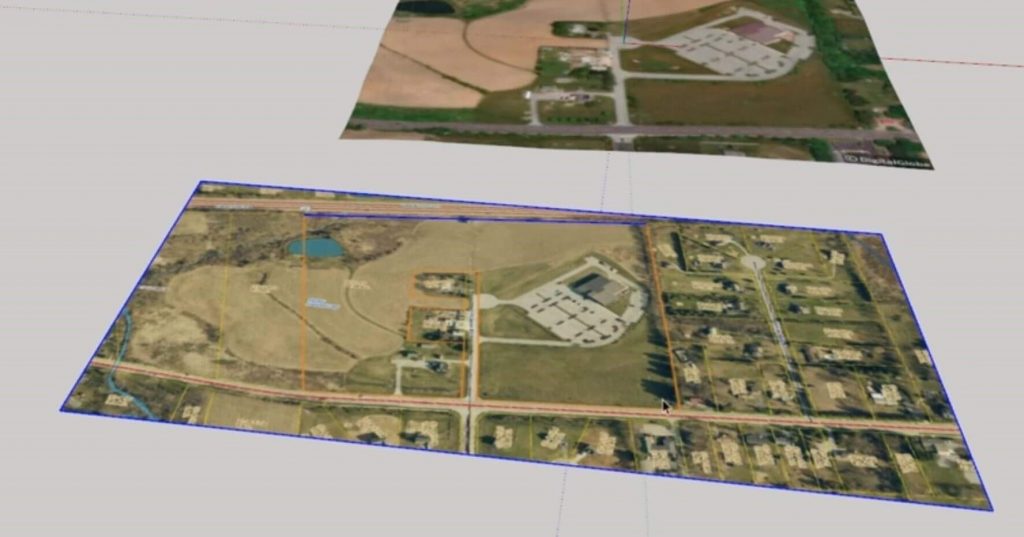
A message will pop up asking if you want to resize the active group. Click “yes.” Your imported image should now be the same size as the original map.
Camera > Parallel Projection. Navigate to the camera tab and select “parallel projection” from the dropdown.
Camera > Standard Views > Top. Go to the camera dropdown again and select “standard views” > “top.”
Select the assessment map, press “m” to move it, and then tap the “up” arrow key to move it in the Z (blue) direction above the original map. Then move the assessment map along the green and red axis so that it covers the original map.
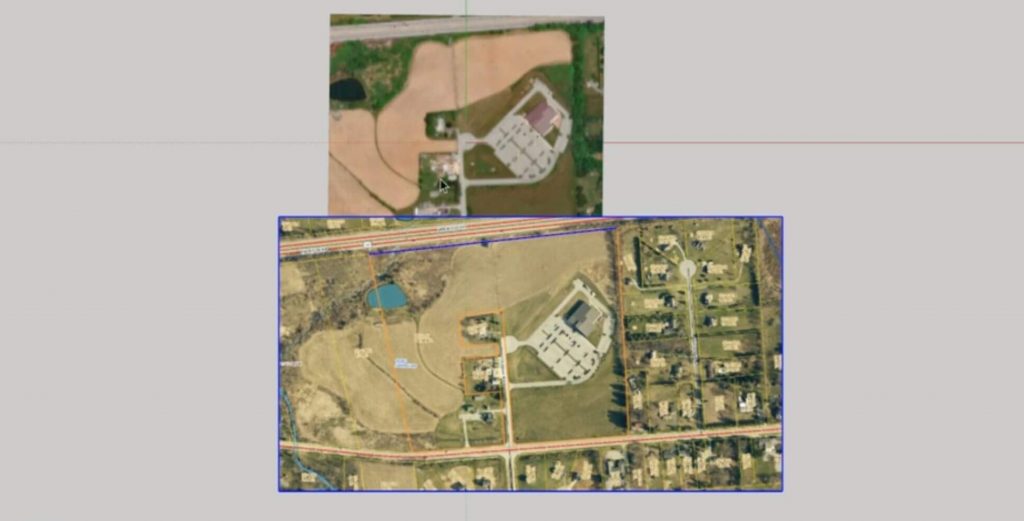
Window > Default Tray > Show Tray. Navigate to “window” and select “default tray” > “show tray.” Make sure “materials” is selected.
In the default tray, go to the “select” tab. Use the eyedropper tool to select the assessment map. Go to the “edit” tab in the materials tray and adjust the opacity so you can see through the image you imported. From here, you can position it so that it lines up with the image below. It won’t match perfectly but just line it up as close as you can!
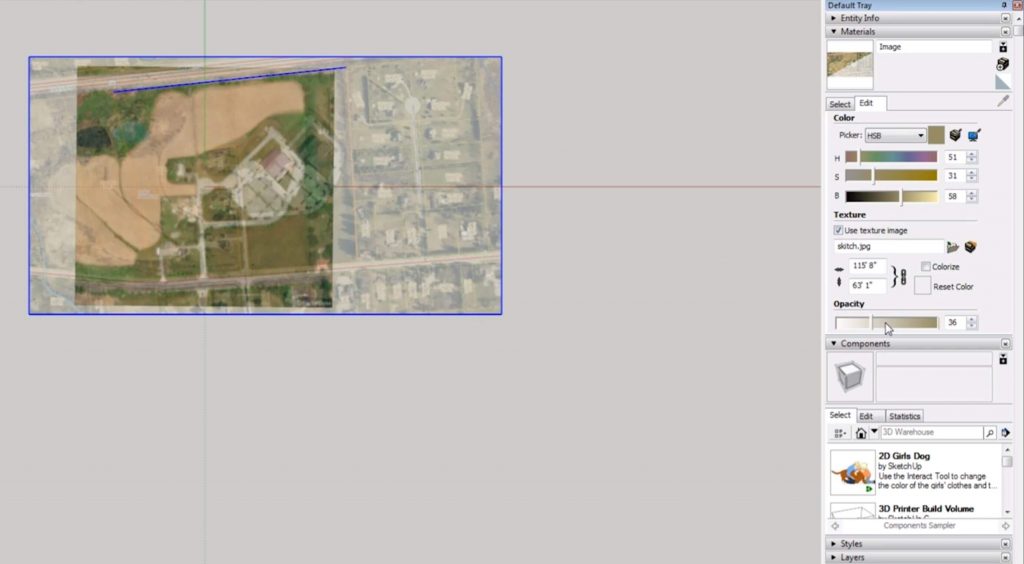
Trace. Trace the entire property line. Right-click on the assessment map and select “hide.”
Explode. Click on the original map and select “unlock.” Then right-click again and select “explode.”
Make Group. Select the property shape that you traced and right-click to select “make group.”
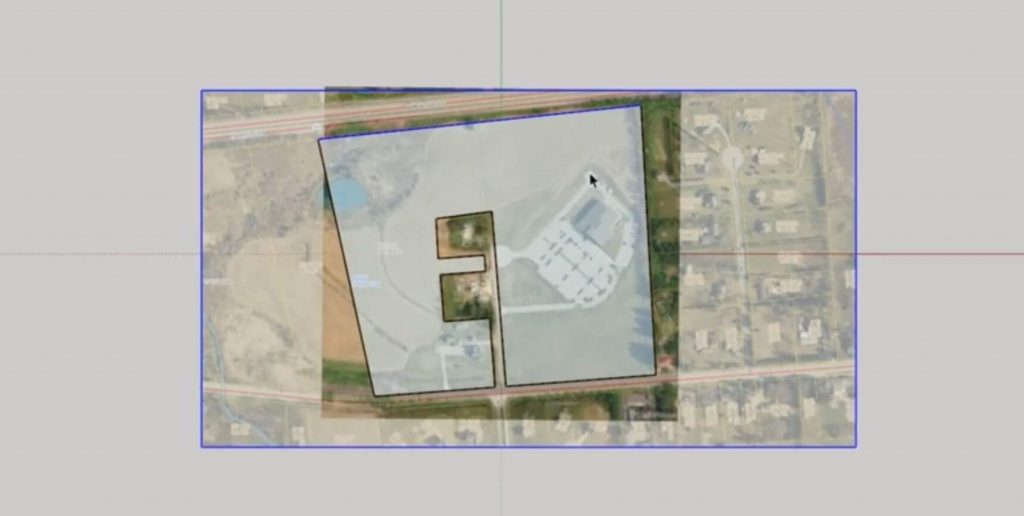
Tools > Sandbox > Drape. Select the property outline. Navigate to the “tools” > “sandbox” and select “drape.” Click on the original image. Now, you can see that the property line is being projected on the original image.
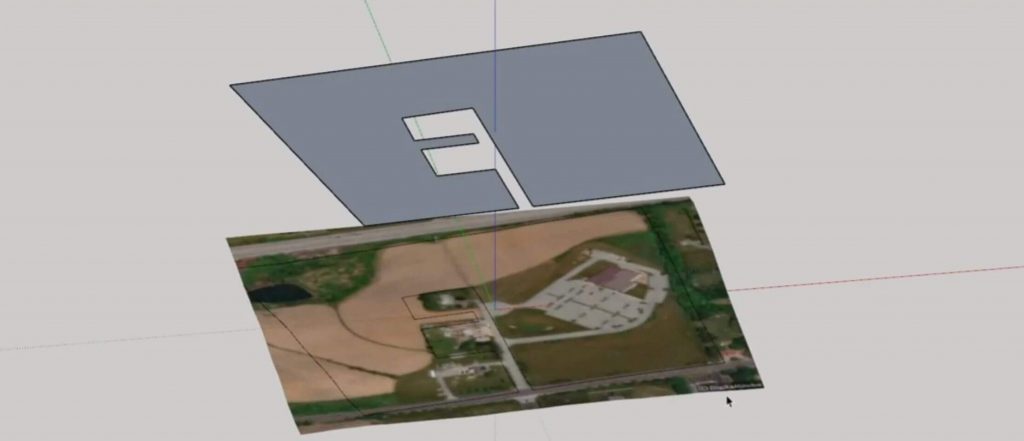
Now that you have the property line visible on your site, you have some fundamental site topography and property line information for your project! If you found this tutorial helpful, be sure to check out our other hacks on our tutorials page.
Hey designers! In this tutorial, we’re going to go over how to snap in Sketchup. No, not like Snapchat. Snaps refer to points that you can lock to when drawing a line. For example, you can lock to the origin or a certain axis. You can also snap to endpoints or midpoints to ensure that your lines intersect at the correct point. This is definitely a useful tool to make sure that the shapes you draw are in the same plane. If you haven’t used the snap tool already, be sure to check out this tutorial to see how helpful it can be!
To start off, let’s go over the basics of what snapping means and a few different ways you can achieve this. First, open up Sketchup and go ahead and delete the scale figure. Press “L” to open the line tool. If you move your cursor over the origin, you will see a small circle appear. This indicates a point you can snap to. In other words, you will be able to draw another line that locks on to this point. You can snap onto endpoints, midpoints, and the center of circles.
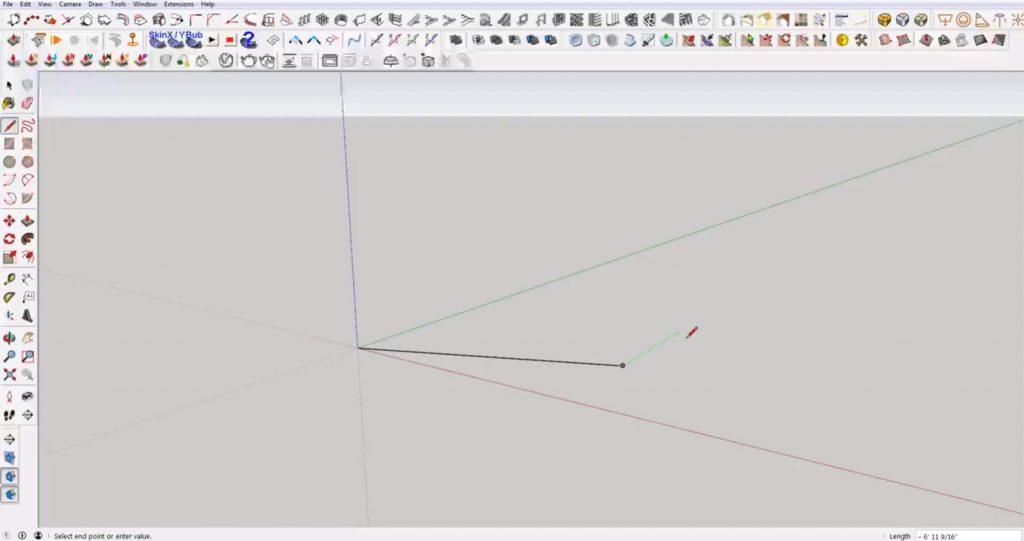
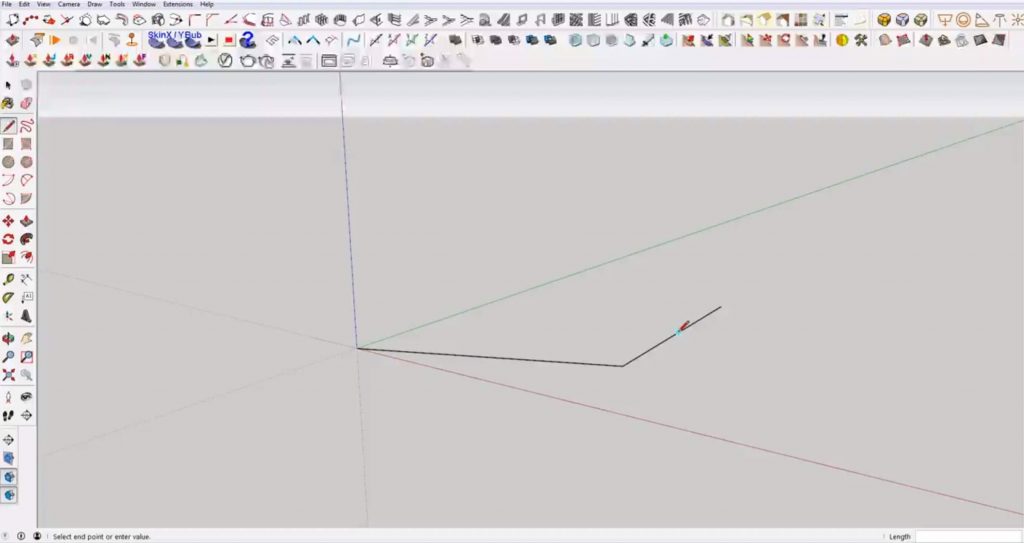
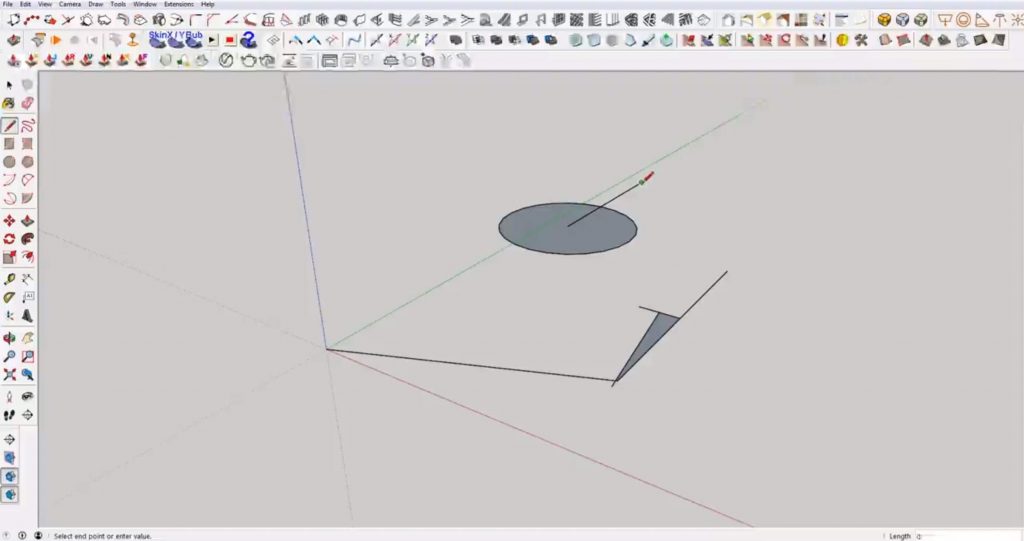
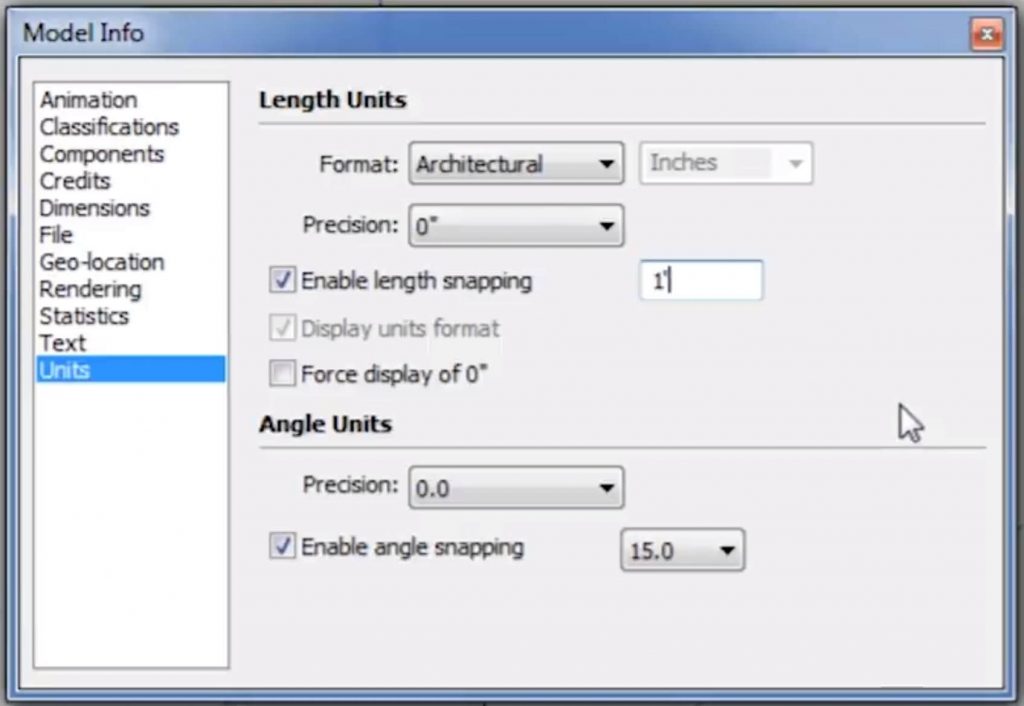
Window > Model Info > Units. Open the model info window by navigating to the “window” and selecting “model info” from the dropdown menu. Under the “units” tab you can adjust the length snapping to create a grid.
In the “precision” dropdown, change the measurement to “0 inches” (or whatever increment is appropriate for your case). Make sure “enable length snapping” is checked. Then, type “1 foot” into the length snapping box.
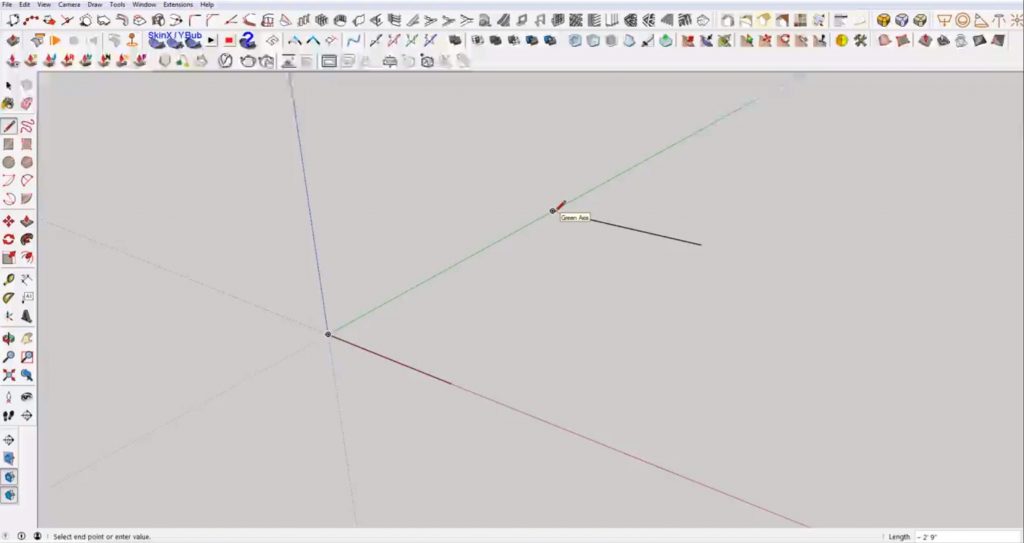
Now, if you open the line tool and hover along the red axis you will notice the length in the lower right corner increases by 1-foot increments. The difference between using a grid in Sketchup instead of another program is that it doesn’t set up a 3-dimensional grid throughout the model. For example, if you begin drawing a line in the middle of the model the distance from the origin may not be in 1-foot increments. However, once you start drawing the line, you will only be able to snap to 1 foot increments.
If you found this tutorial on how to snap in Sketchup helpful or you want to learn more tips, be sure to check out all of our tutorials here!
In this Sketchup create faces Q&A, we’ll go over a simple way to automatically create faces in Sketchup. This can be a helpful trick to use if you have a wireframe model and just need to close things up. No one wants to spend all day drawing lines to close off a shape!
We saw a sculptor who loves using Sketchup, but closing off every set of lines proves to be a very tedious task:
“I love Sketchup. I import my triangular autocad files and then manually give faces to all the triangles by drawing a line across the faceless triangle. Sometimes my sculptures have 10,000+ triangles I need to give faces to. This is a tedious task; a true test of my sanity. Is there an automated plugin for turning three connecting lines without a face into one with a face?”
You’ll be glad to hear, the answer is “yes!” In this brief tutorial, we’ll take a look at how to use a plugin called Eneroth Face Creator to automatically create faces. You can find the Eneroth Face Creator plugin here. If you need help installing it, check out our plugin tutorial to learn how to easily install Sketchup plugins!
Import. First, import your 2D AutoCAD model, or draw a few shapes in Sketchup. If this is your first time testing out the plugin, make sure you delete the faces of the shapes in Sketchup so that you can see how the plugin works. In this example, we drew each triangle at a different angle and in separate planes. This way we can demonstrate that the plugin will generate faces for a shape no matter what plane it is in.
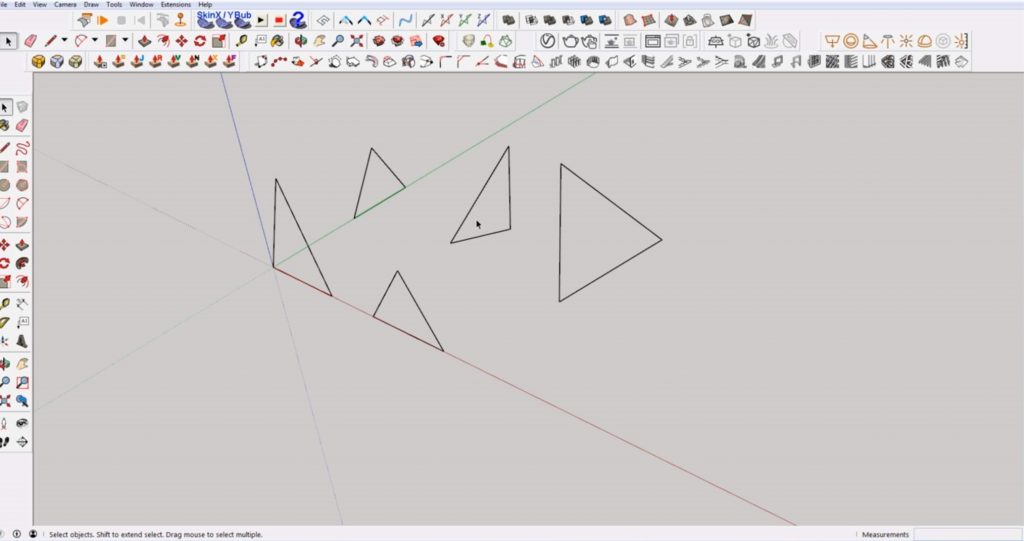
Select. Once you have your shapes drawn or your model imported, use the selector tool to select all of the shapes.
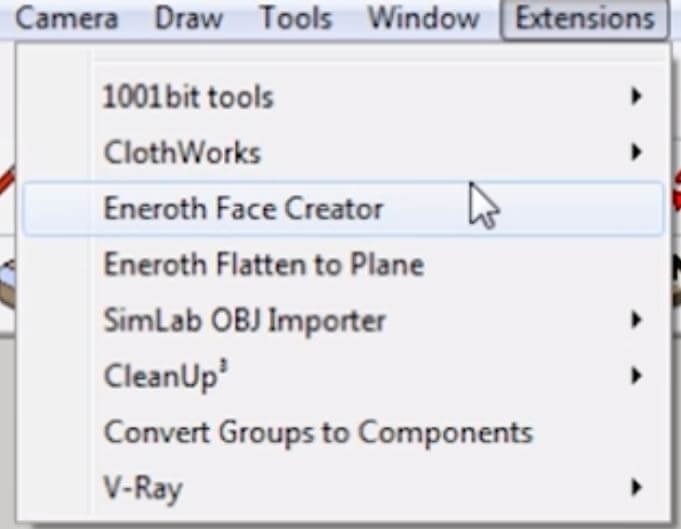
Extensions > Eneroth Face Creator. Navigate to the “extensions” tab in the menu bar and select “Eneroth Face Creator” from the dropdown menu. You can see that Sketchup automatically creates faces for each of the shapes. No line drawing required!
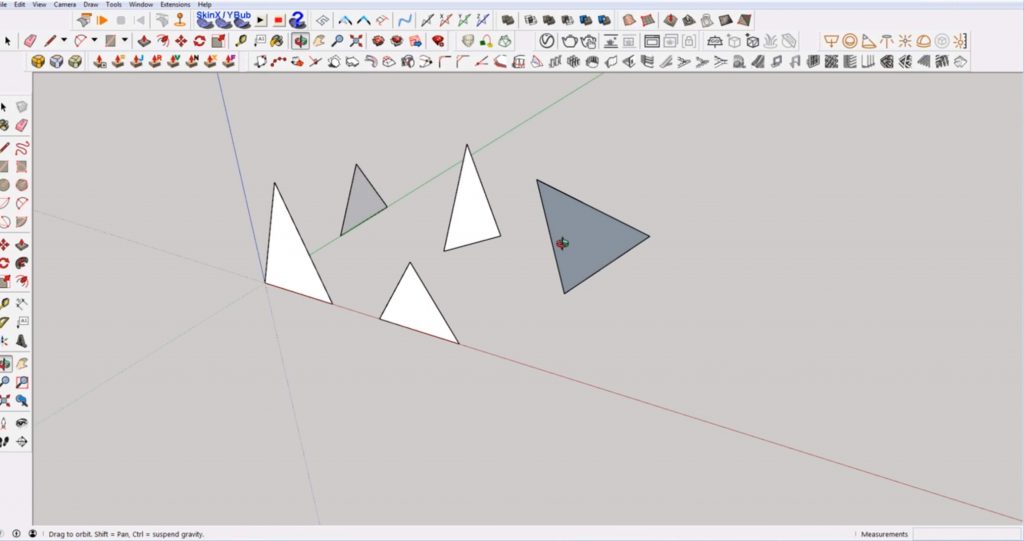
Of course, there may be times when you will be importing a much more complex 3D model. Thankfully, the Sketchup create faces plugin works just the same with a 3D shape!
Import. Import your 3D model into Sketchup.
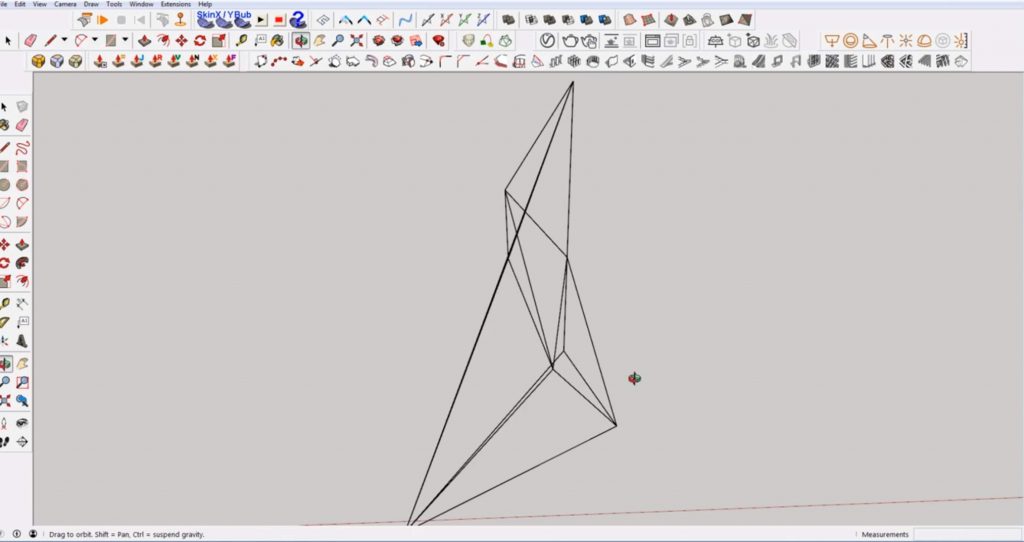
Select. Use the selector tool to select the entire model.
Extensions > Eneroth Face Creator. Select “Eneroth Face Creator” from the “extensions” dropdown menu. Again, your model will automatically generate faces for each triangle-no matter how complex the shape may seem!
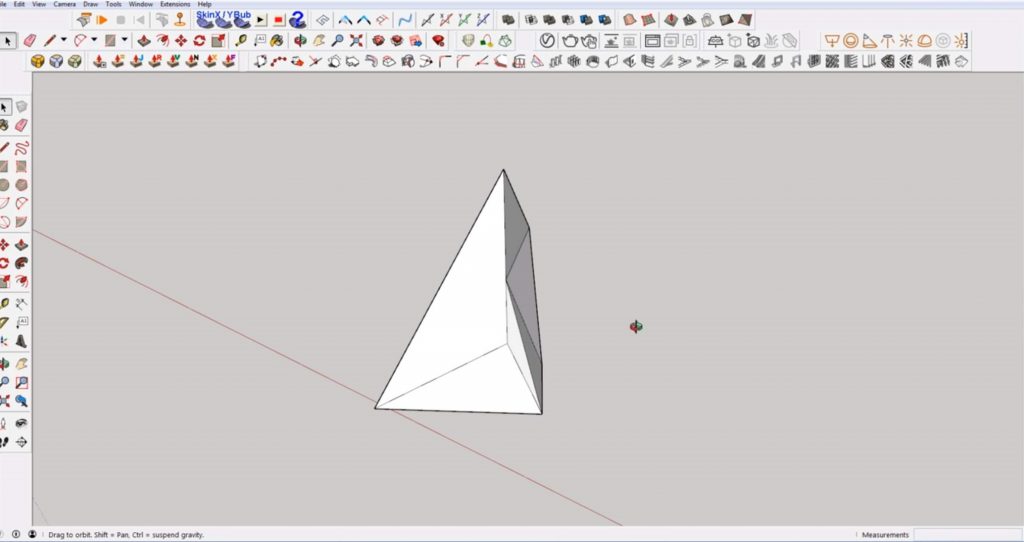
It’s as simple as that! Don’t forget to grab the Eneroth Face Creator plugin before you get started. Once you have it installed, you’ll be able to create faces faster than you import your model-all while keeping your sanity!
Was this tutorial helpful? Using this Sketchup create faces plugin is so simple and helps us shave off so much time when modeling! We want to know, what is your favorite Sketchup plugin to use? Let us know in the comments!
In this tutorial, we’ll show you how you can quickly turn a DWG to 3D in Sketchup. Before we get started, it’s important to note that the method we are going to use is a Sketchup Pro feature only! If you’re looking for a way to import a DWG with the free version, you can check out our other video tutorial here.
In this tutorial, we’ll show you a few simple steps to create a 3D plan that you can use for modeling, rendering, or just for fun!
File > Import. The first step is to simply import your DWG file. Go to “file” > “import” and select the file you want to use. Click “import.”
Explode. Once your image is imported, right-click and select “explode.” This will make the geometry easier to work with in Sketchup.
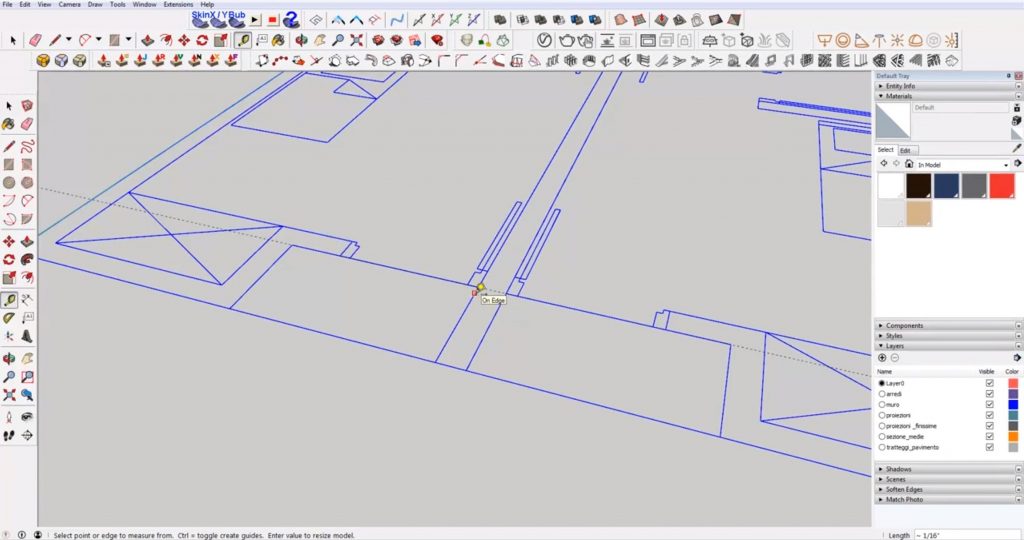
Scale Floor Plan. You may notice that your floor plan imports very small or larger! To scale it correctly, use the tape measure tool and measure an object you know the dimensions of. Doorways are a good example because they typically have standard widths (for instance the main door is likely around 36″). Click at the starting and ending point of the object you are going to measure and then type in the correct dimensions. Press “enter.” A message will pop up asking if you want to resize the model. Click “yes.”
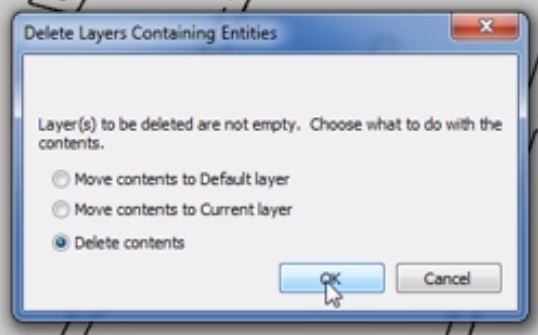
Delete Unnecessary Layers. When converting a DWG to 3D, you only need to worry about the walls. Sketchup will recognize the original layers from your AutoCAD file, and having all of them can be distracting. You can hide the layers, but it’s best to just go ahead and delete them. Under the “layers” tab in the default tray, select the layer you want to delete. Then click on the “-” button to delete it. A message box will pop up asking what you want to do with the contents. Select “delete contents” and hit “ok.”
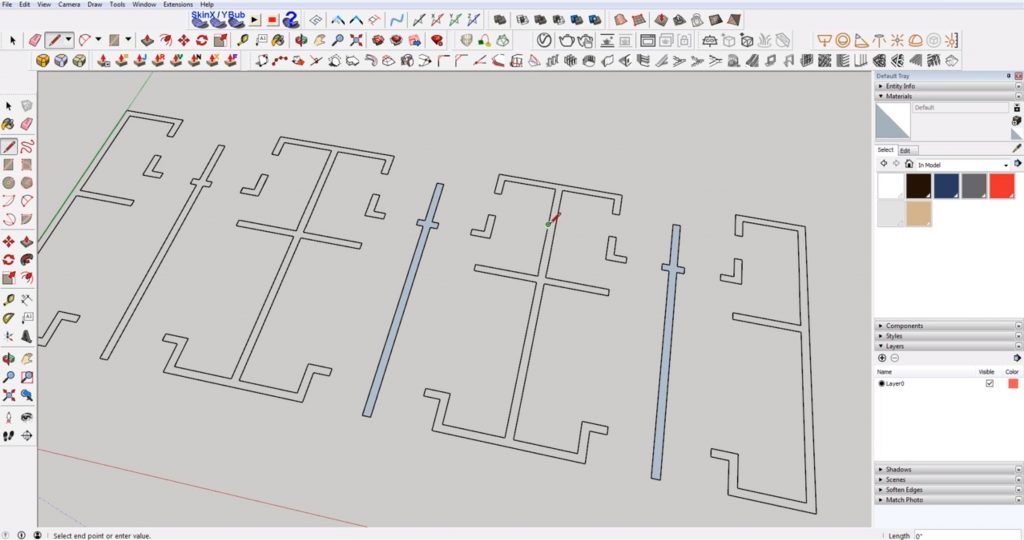
Clean it Up. You may have to close off some lines in the DWG, but this is normal. Use the “line” tool to close off any gaps in the drawing and you will begin to create some faces. The next step is to make the rest of the wall’s faces, but we have a bit of a cheat to make this a little easier.
Make Group. Select the DWG and right click to select “make group.”
Move. Hit “M” to use the move command and hold the “up” arrow key to move the floor plan up along the blue axis.
Draw a Rectangle. Hit “R” to open the rectangle tool. Draw a rectangle underneath the floor plan and scale it so it covers the entire plan.
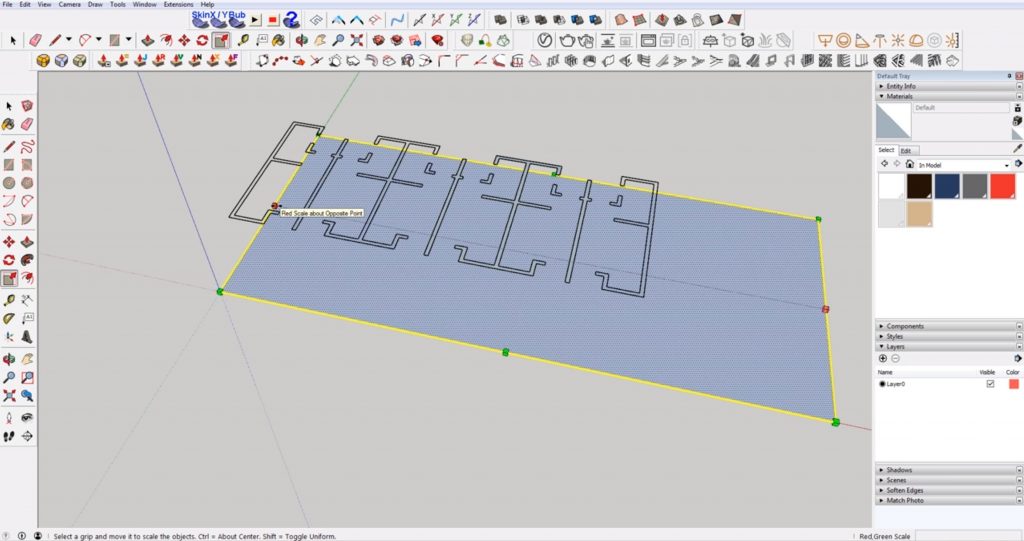
Select Group > Drape. Select the floor plan group you just created and then click on the “drape” tool in the top menu bar. This will ‘drape’ the lines of your plan onto the flat surface of the rectangle. This makes it easier to get all of the walls from the plan. Hit “E” and use the eraser tool to get rid of the rectangle. Now you have a floor plan!
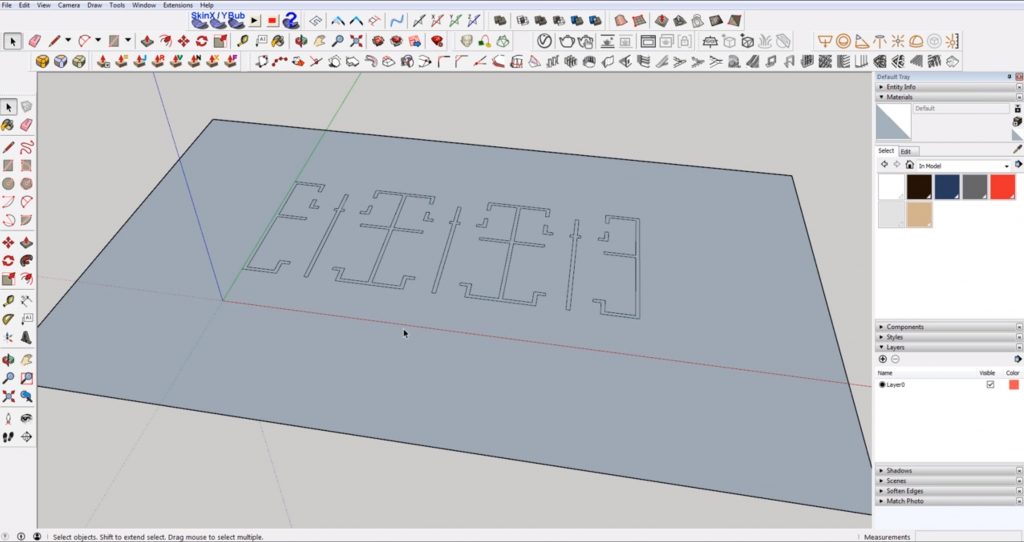
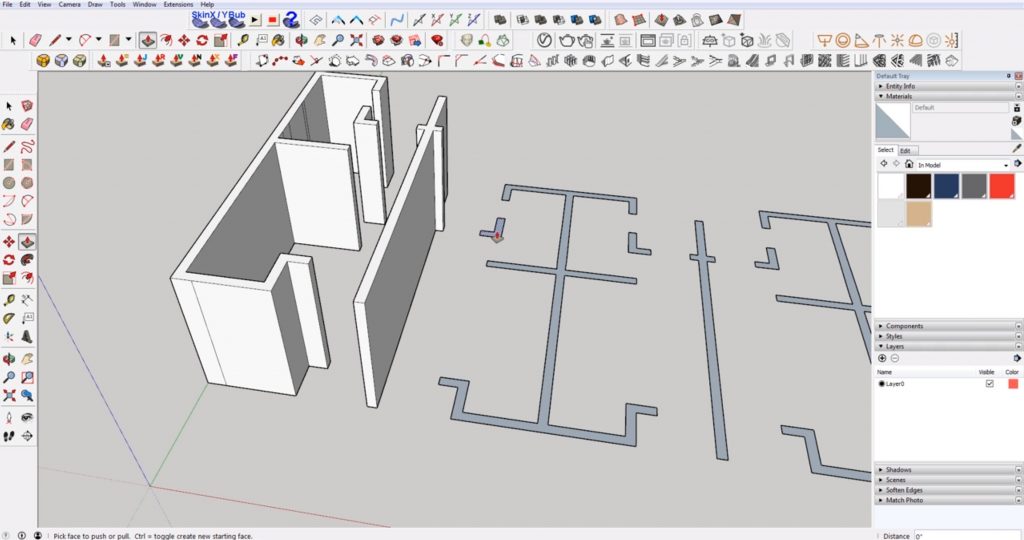
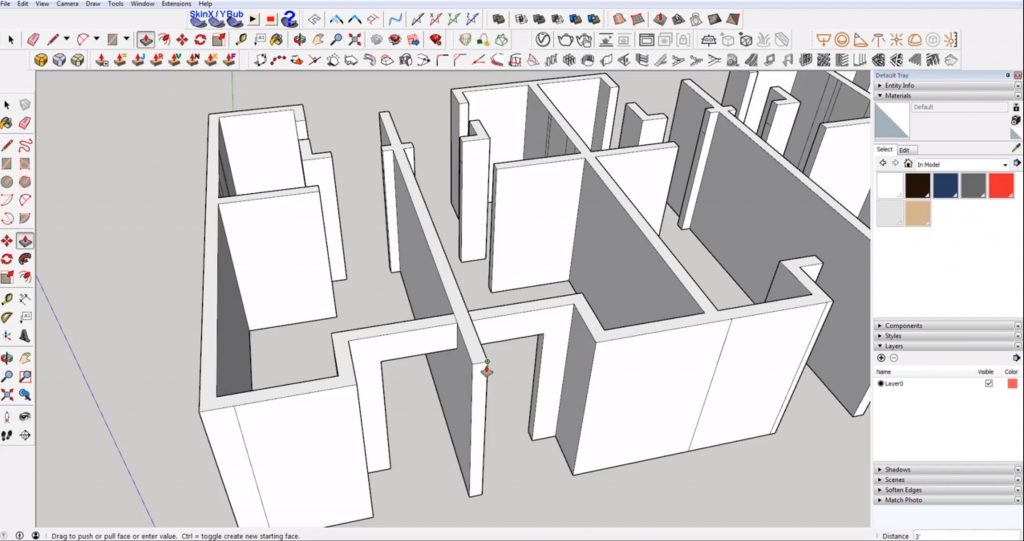
Hit “P.” Use the “push/pull” tool to extrude the walls from the DWG to 3D. Click on a wall to extrude it and type in the ceiling height. Hit “enter.” Now, you can just double click on the rest of the walls to extrude them to the same height.
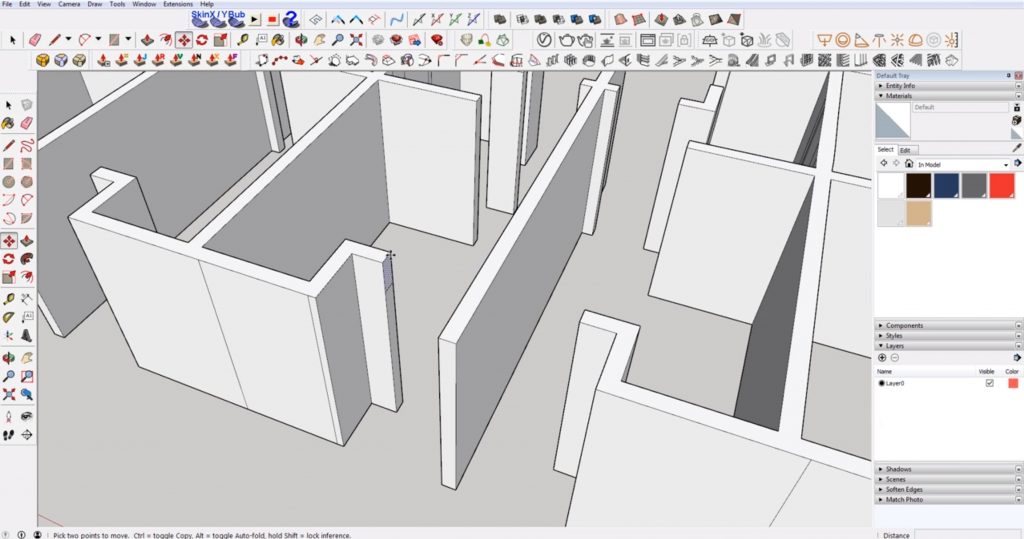
Add the Headers. In one of the door openings, use the line tool to draw a line at 6’-8”. Copy the box you just created and move it to each of the door openings. Then use the “push/pull” tool to drag the header across the door frame. Once you finish drawing everything, go back and use the eraser tool to delete any unnecessary lines, or hold “ctrl” while using the eraser tool to hide the line.
If you want to learn how to turn a sketch floor plan into 3D, check out this tutorial. Don’t forget to visit our Sketchup tutorials page to learn even more tips!
There are a few reasons you may want to reduce your Sketchup file size: maybe you are an architect who received a file from a consultant, and you need to remove some components to make it smaller, or perhaps you are working with a really large file and you simply want to reduce it so it is easier to work with and faster to load.
In this tutorial, we’ll go over a simple way to decrease your file size no matter what the reason may be!
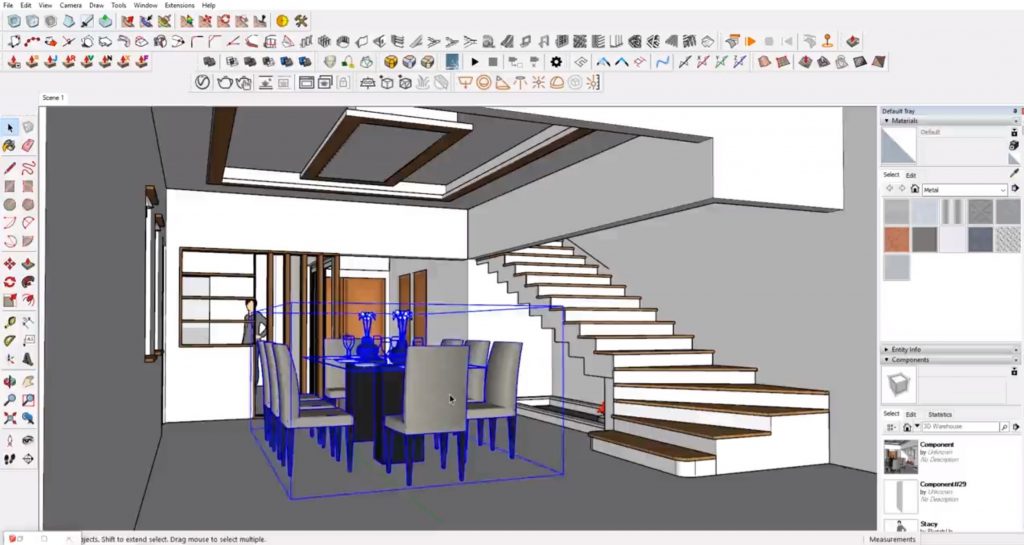
Default Tray > Components. If you go to the default tray on the righthand side of your screen, you will notice a “components” tab. Click on the tab to view a list of the different components within your model. You can begin to delete certain components that you don’t need in your model, but it won’t make the file size significantly smaller. To do this, you will have to purge the components from your actual Sketchup file.
SAVE A COPY AS! Before continuing, make sure you save a copy of your original Sketchup file! This way, if you end up needing a component you deleted later, you have a way to go back to it. Once you save a new document, you won’t have a way to get back to the original, so make sure you save!
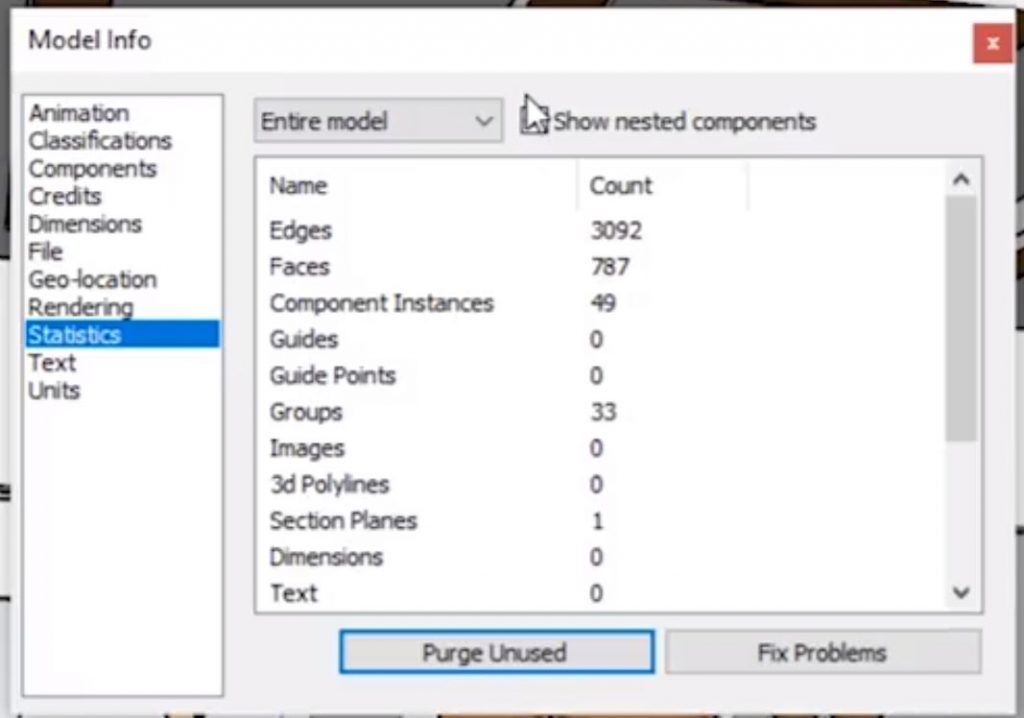
Window > Model Info > Statistics. In order to make a significant difference in the Sketchup file size you will need to open the “model info” window. Navigate to “window” and select “model info” from the dropdown menu. Then, click on the “statistics” tab. Check the box that says “show nested components.” This will help you visualize what’s going on within the model.
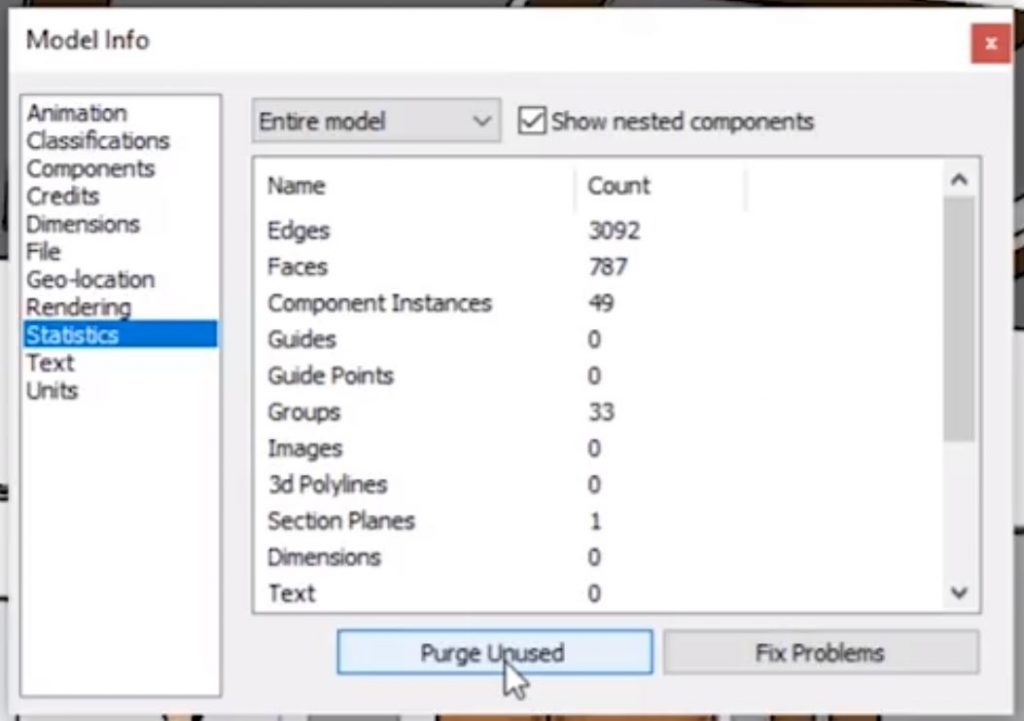
Purge Unused. In the “model info” window, click on the button that says “purge unused.” If you look at the numbers in the “statistics” tab it may not look like much happened, but it actually deleted all of the components you weren’t using. Now, if you hit save and look at the size it should be significantly smaller than the original.
You can also reduce the file size within the Sketchup Web App. With the app open, click on the “components” icon in the righthand toolbar to open the “components” tab. There is a button at the top of the tab with a recycling icon on it. Click on this button to purge any unused components in your model.
You can check out this tutorial if you need help importing components into the Sketchup web app.
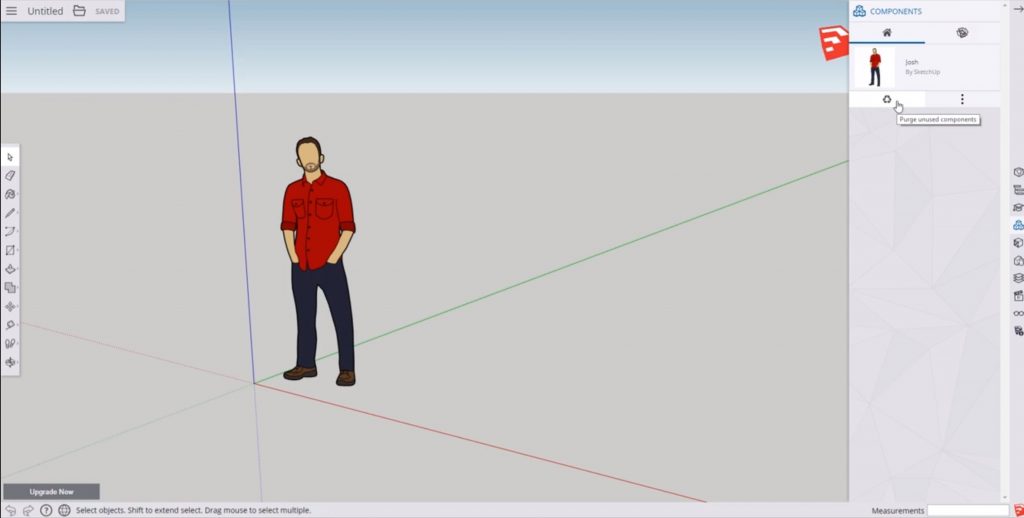
Trying to work with a large file can be frustrating, but with these easy steps you’ll be able to reduce your file size and speed up your work time! What other Sketchup tips do you want to learn? Let us know in the comments!
Can I use the 3D Warehouse from Sketchup for free online? Can you import items from the 3D Warehouse into the Sketchup web app? Is there an easy way to import components into the Sketchup Web App? There are a lot of questions floating around about how to use and how to import components in the Sketchup web app.
“I feel like I’m going in circles here. I’ve never used the web version of this software and it’s unclear whether I am able to import models either via 3D warehouse or downloaded from 3d warehouse…”
Have you been asking yourself the same thing? Good news, the simple answer to all of these questions is “yes!” If you have a similar question or just need help getting started with the Sketchup Web App, check out this tutorial! We’ll go over the simple steps to import components 3D Warehouse. In order to import components from the 3D warehouse to your model, you’ll have to open the web app version of Sketchup first. You can find that here by clicking on this link: app.sketchup.com.
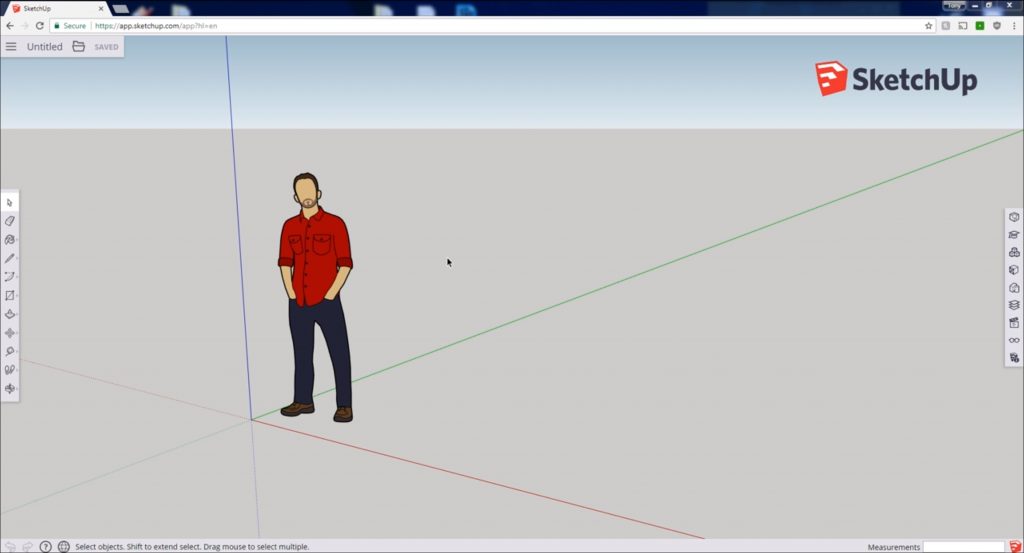
Open the Web App. Before you start importing models from the 3D warehouse, you will have to open the Sketchup Web App window. To do this, you can type app.sketchup.com into your url, or click on the link here to open: app.sketchup.com.
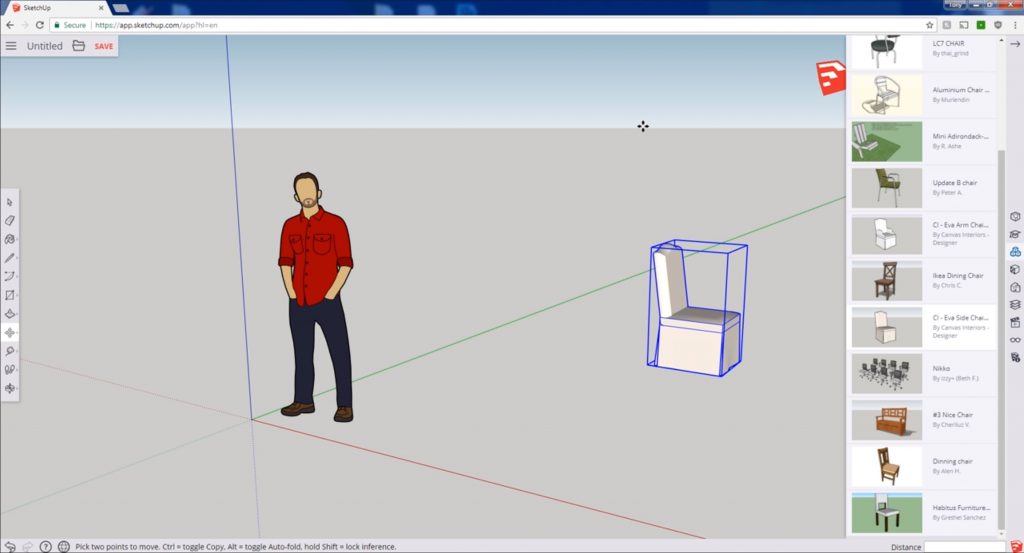
Components > Search 3D Warehouse. Now that you have the app open, you can begin importing! The steps to importing components are pretty simple. If you look on the right side of the screen you will see a gray toolbar with a few small icons. The third icon down is made up of three small boxes. This will open the “components” tab. Click on this icon and the “components” tab will open on the right side of the screen. At the top of the “components” tab there is a search bar. From here, you can use the search bar and search the 3D Warehouse for components in the Sketchup web app to import.
Search > Enter. Using the search bar at the top of the “components” tab, type in the object you want to import and hit “enter.” For example, we searched for “chairs.” A list of chair models will appear underneath the search bar and you can scroll through these results until you find the one you like. Once you find the component you want to use, simply click and drag it into your model.
That’s it! Now that you know the steps to import components in the Sketchup web app, you can pretty much download anything into your model!
If you liked this tutorial, be sure to check out our other tutorials on using the 3D Warehouse and Sketchup. You don’t want to miss out on our full list of tutorials here! We have articles on everything from creating simple shapes to modeling an entire building!
What do you use the Sketchup Web App for most often? What other tips and tricks do you want to learn? Be sure to let us know in the comments before you go!
In this tutorial we’re going to show you how to set up and use scenes in sketchup. You can use Sketchup scenes to create an animation, walkthrough, or even simply to speed up your workflow! To get started, open up a model you want to create scenes for. Ready? Let’s get started!
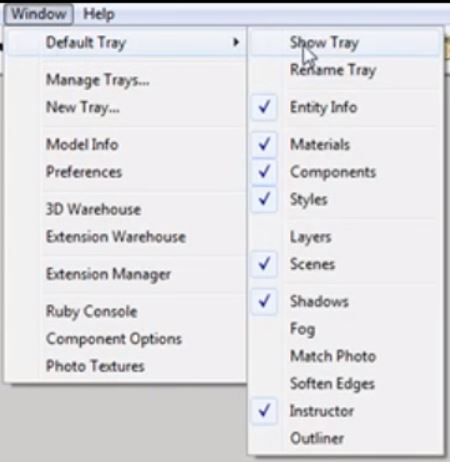
Opening the Default Tray. To open the default tray, navigate to “window” > “default tray” and select “show tray.” The tray will open on the right side of your screen. Use the triangular toggle button to close “styles” and open the “scenes” tab.
Add Scene. Click on the “+” below the scenes tab to add a scene. A window will pop up asking what you want to do with your style changes. Select “save as new style” and then click “create scene.”

When you create a scene, they will appear in the scene window and as tabs just above your modelling window. To change the name of a scene, simply type whatever name you want in the “name” box in the “scenes” tab. Underneath the “name” box you can select what properties to save. For now, keep all of the boxes checked.
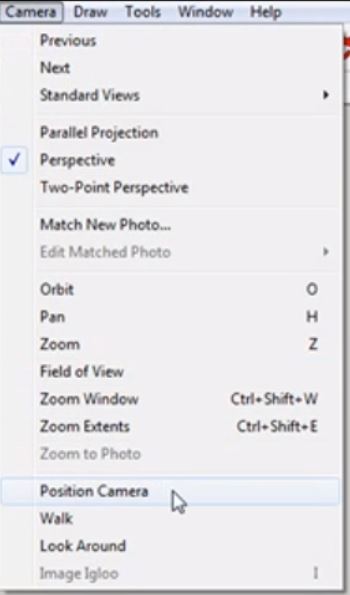
Camera > Position camera. Next, you want to place a camera. Hover over “camera” and select “position camera.” Click in your model to place the camera. It will be positioned at eye level. An eye icon will appear and you can click and drag the icon to adjust the view.
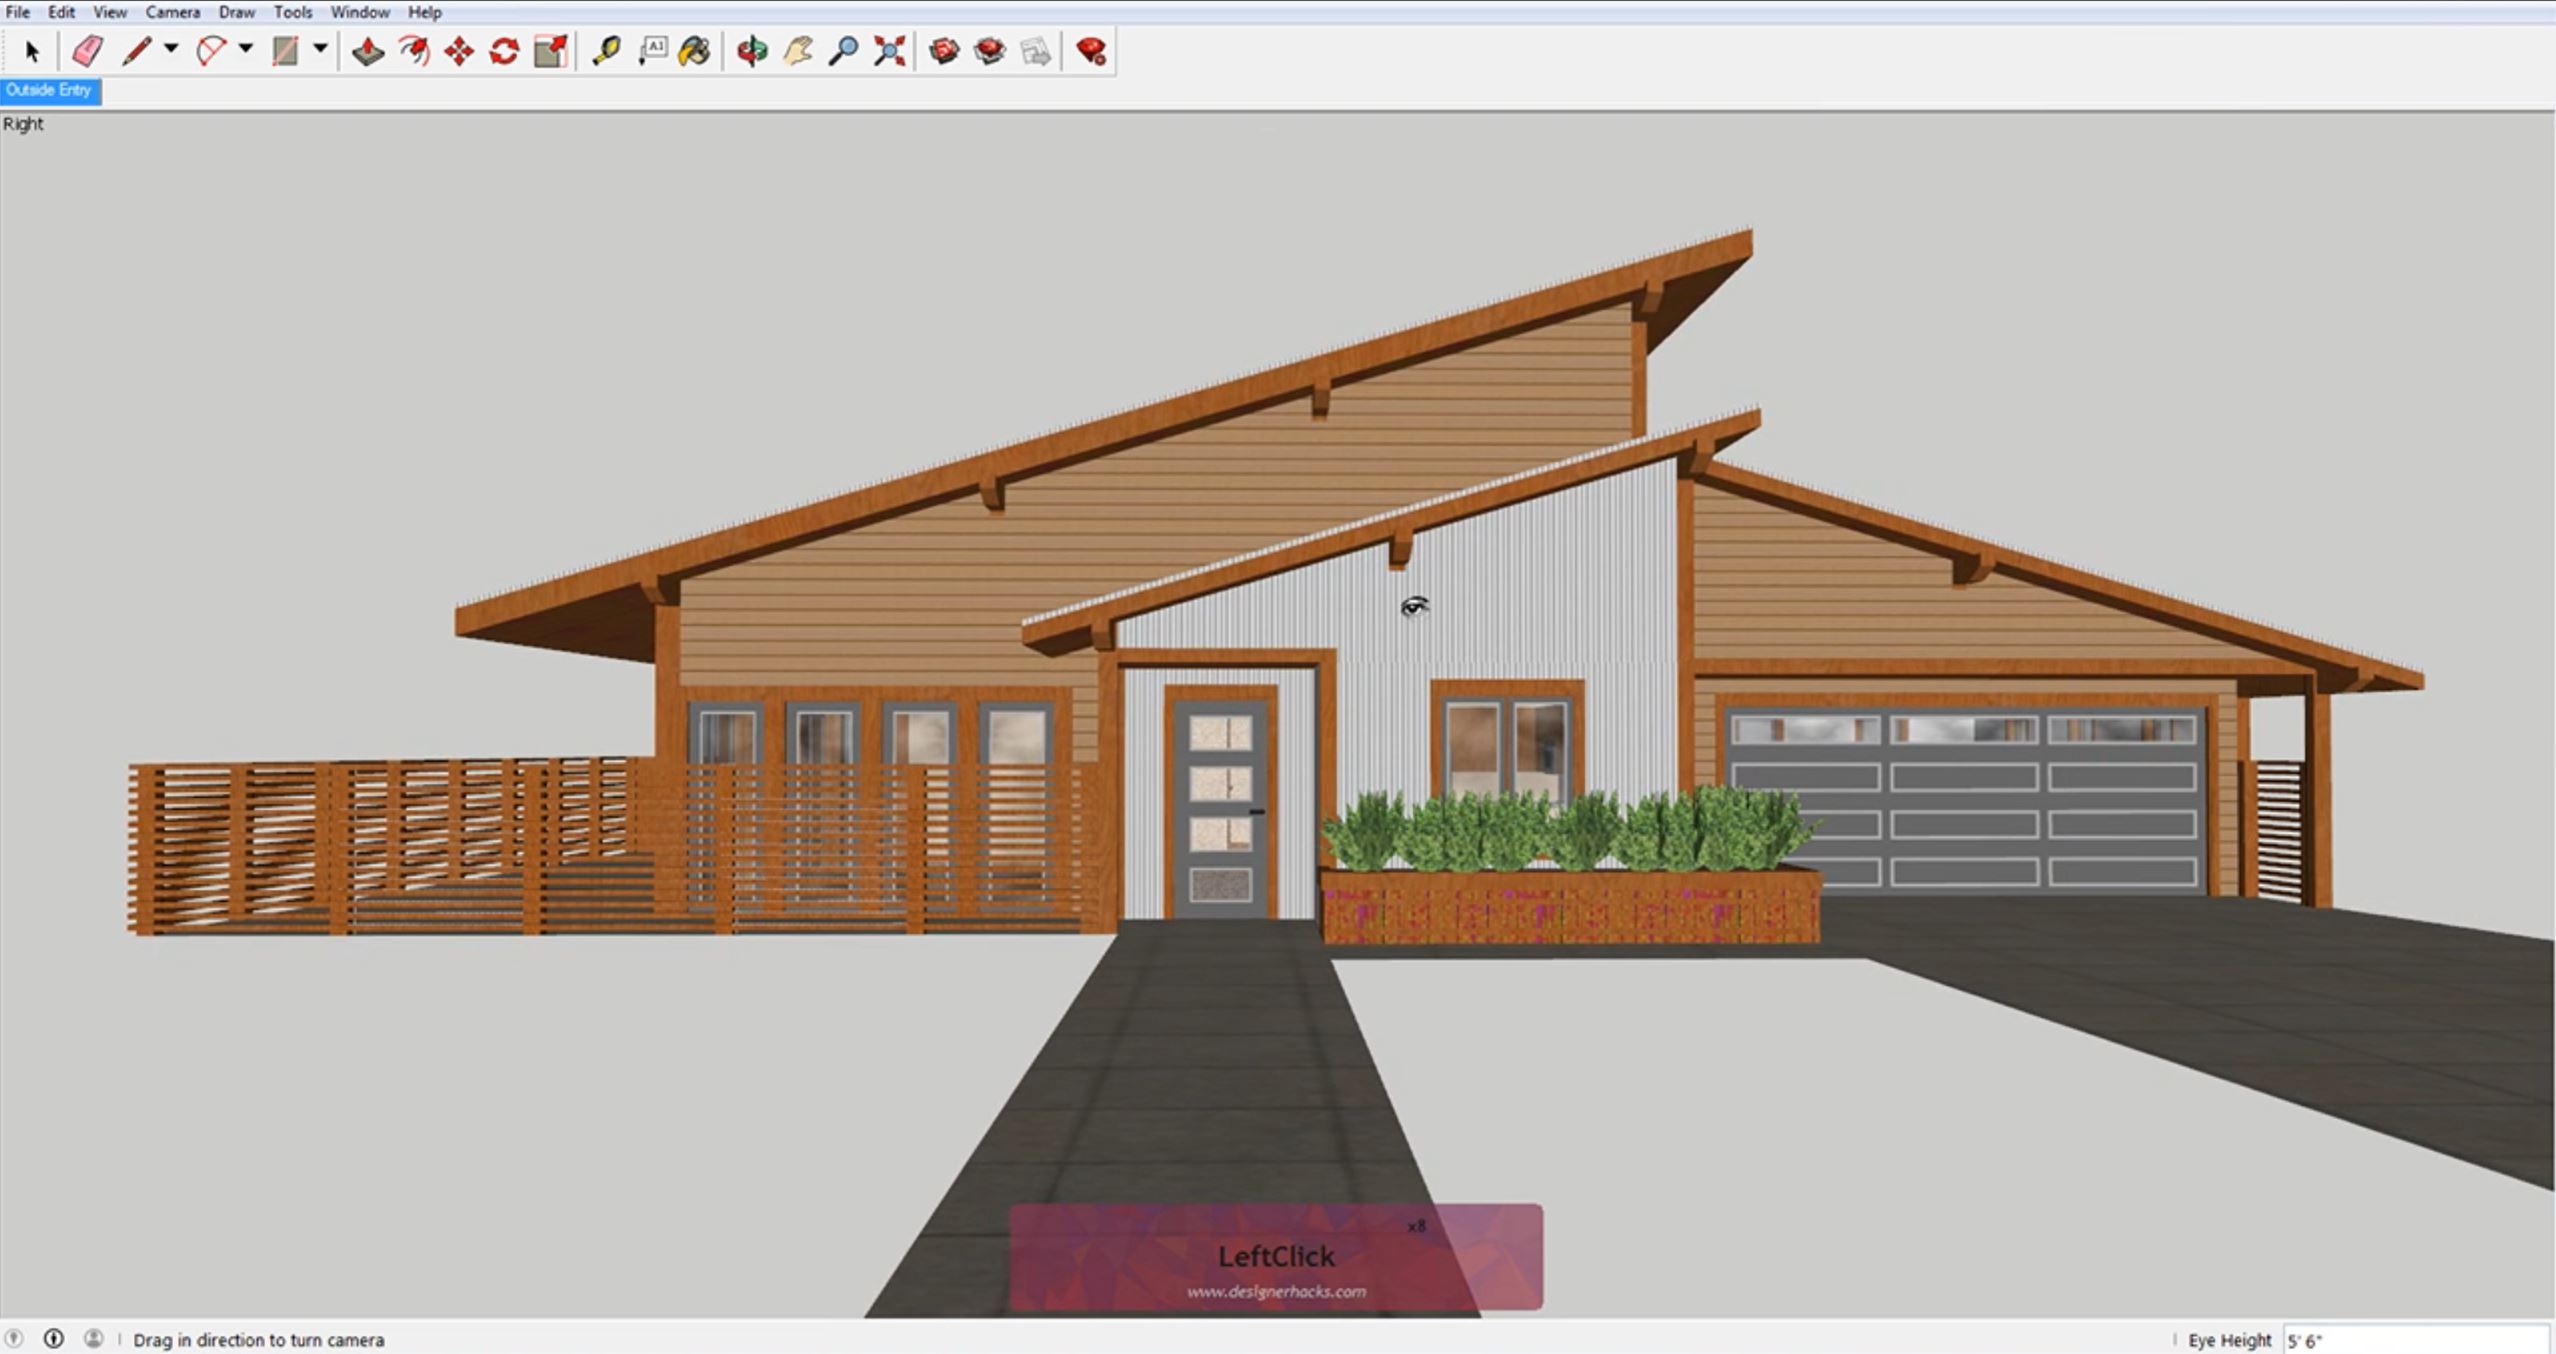
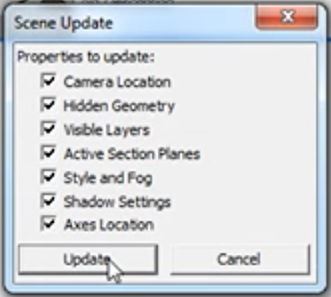
Update Scene. Right click on your first scene in the default tray to update the scene. Leave all of the properties checked and click “update.”
Add Scene. Click on the “+” below the scenes tab to add another scene from your current view. This time select “walk” from the camera drop down menu. Use the walk tool to move inside your model until you find a view you want to use. You can change the eye height in the bottom right corner to lift or lower the camera.
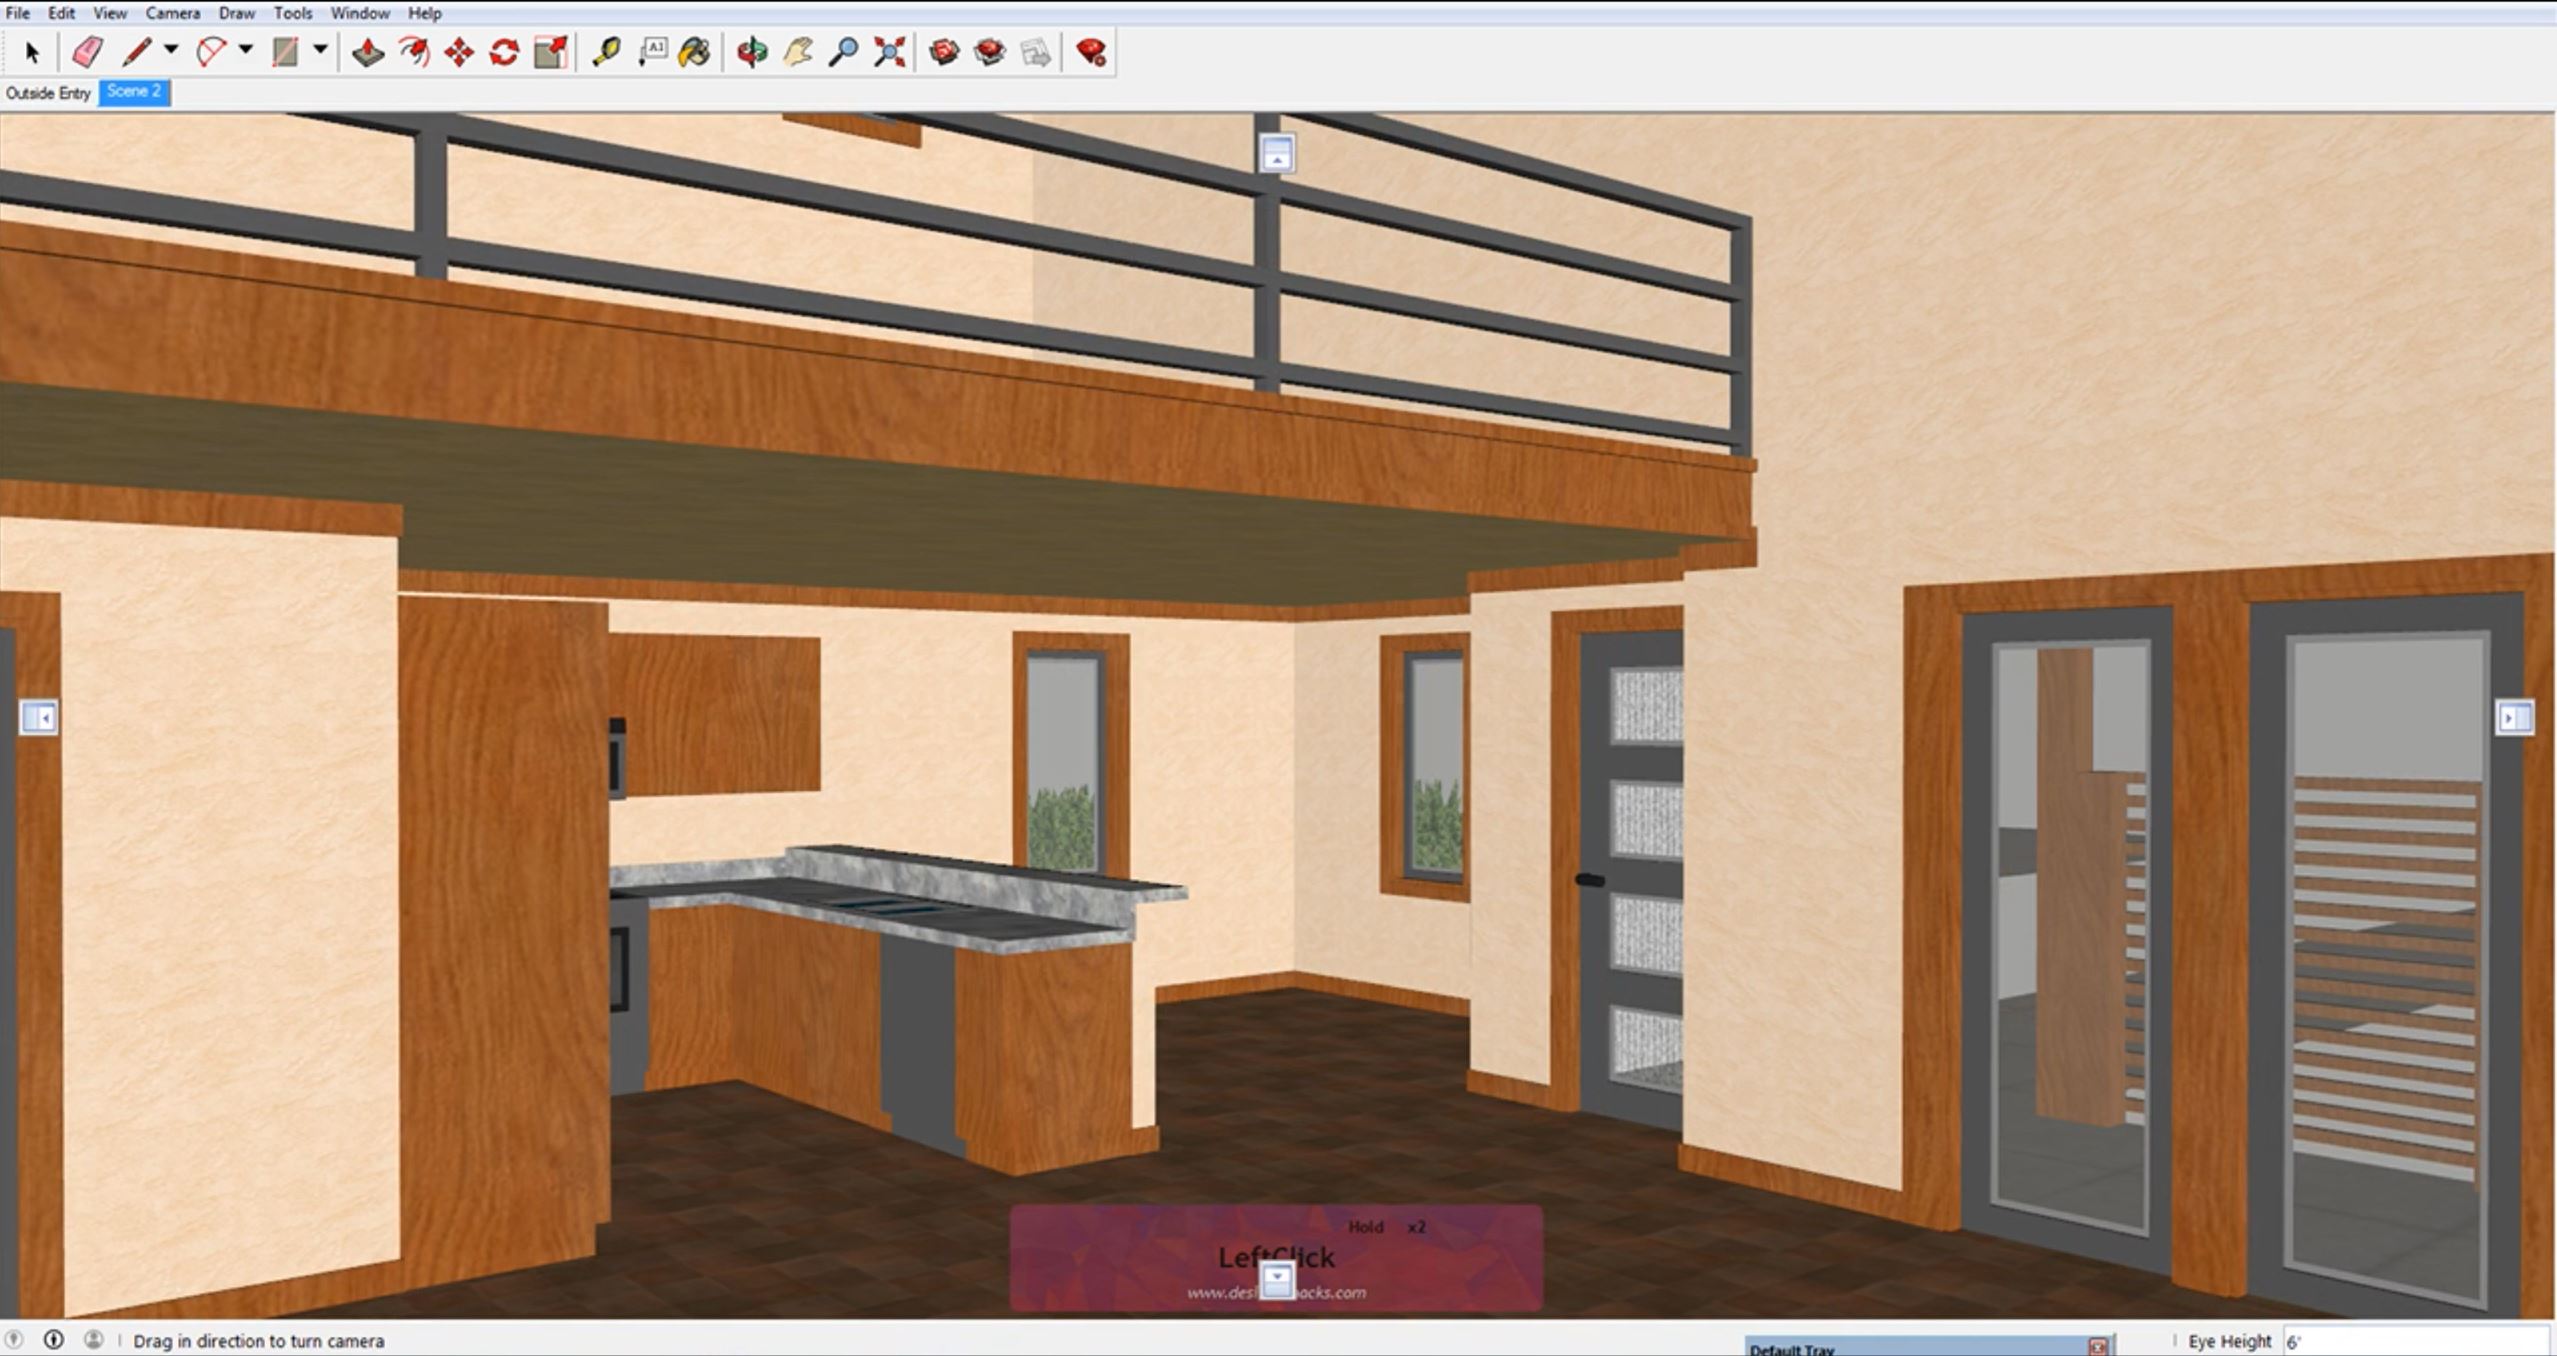
Update Scene. When you find a view you are happy with, right click on the second scene in the default tray and select “update scene.” Double click on the first scene to return to it.
Working Scene. A working scene will give you a more generic scene that will allow you to continue working without all of the added detail that can slow down your work flow.
Default Style. Open the “styles” tab in the default tray. Select a default style by clicking on the “select” tab and choosing “default styles” from the dropdown menu. Default styles with a green stopwatch indicate that they are best for working because they load faster. Select the one that says “hidden line.”
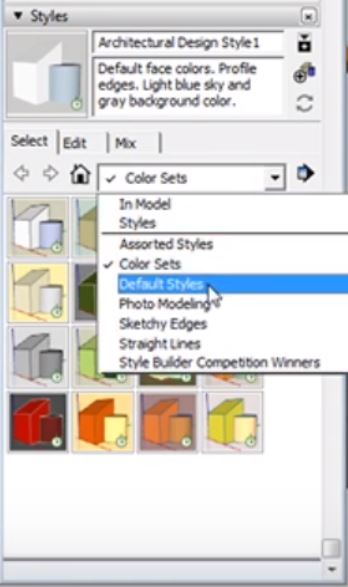
Update Scene. Once you select a default style, update your scene. In the “scenes tab,” uncheck all of the properties except for “style and fog” and “shadow settings.” Update the scene again.
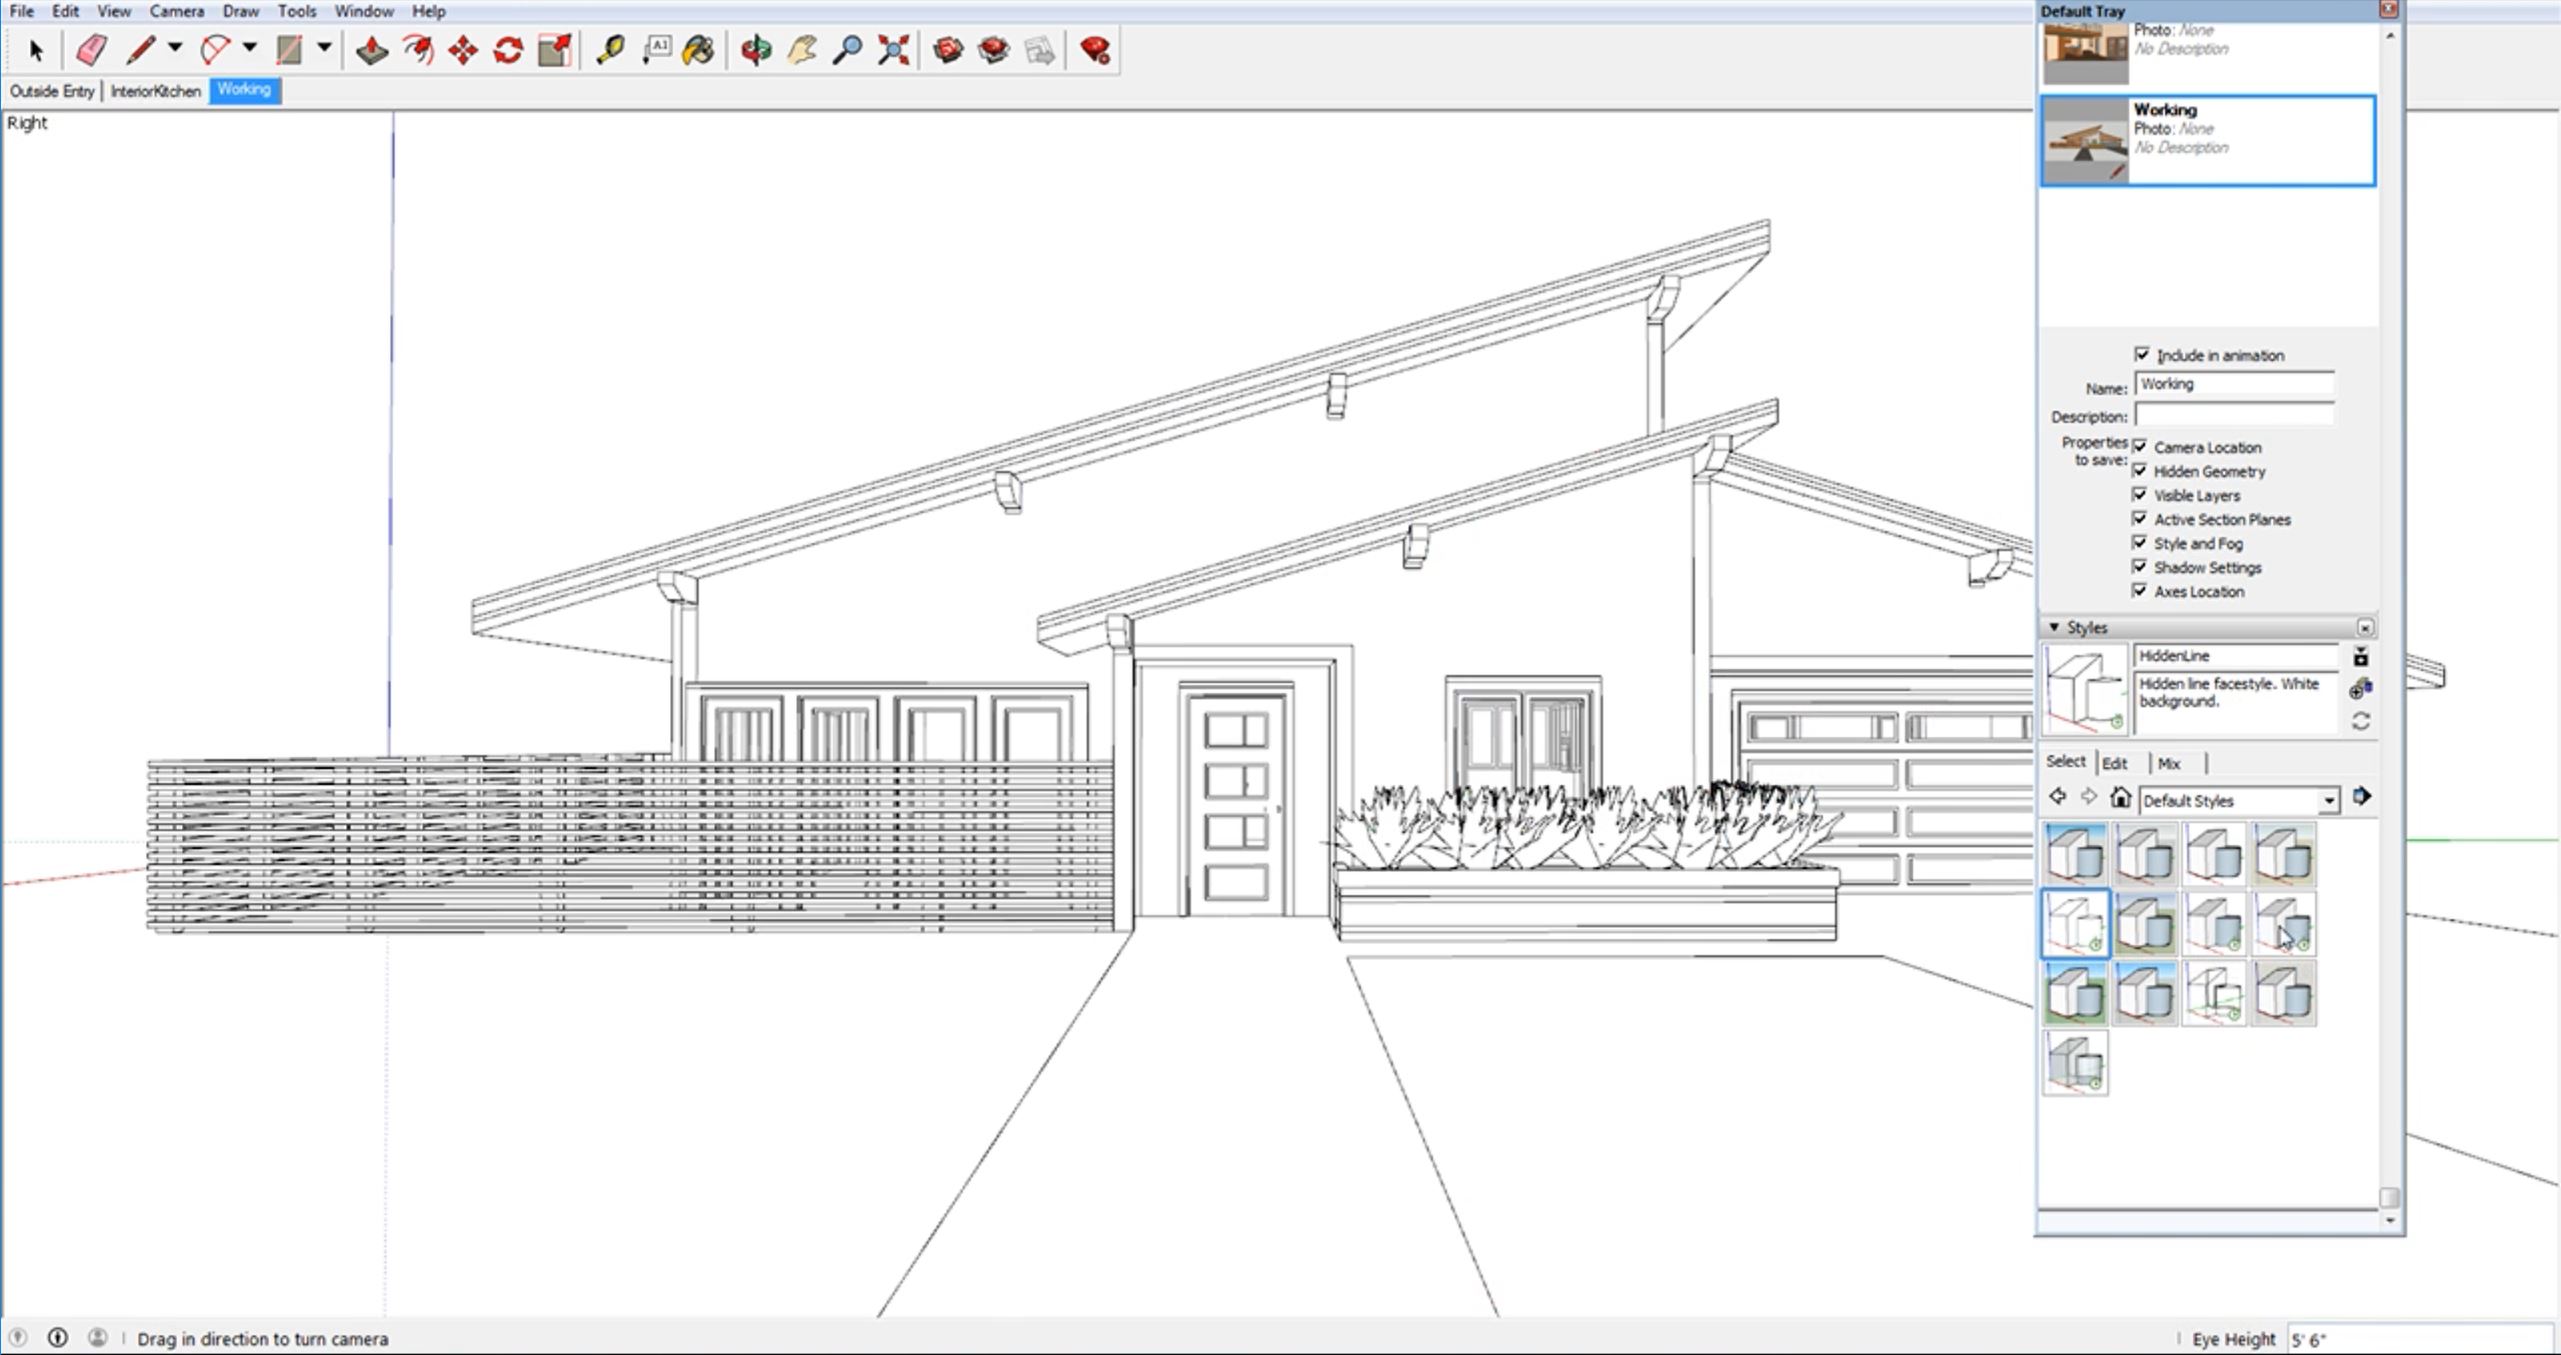
You can access the working scene from any view. For example, double click on one of your Sketchup scenes and then select “working view.” This will change the current view you are in to have the same settings as the working view without taking you back to the original working view scene. You can now use this trick to speed up Sketchup and work at a faster pace from any view!
Wondering how to take a Sketchup model and use it to print a 3D model? It’s simple! All you have to do is install a plugin and export your file from Sketchup to STL. This will allow you to turn your Sketchup model into a 3D printable file. You can use an existing model you have, or download one from the 3D Warehouse.
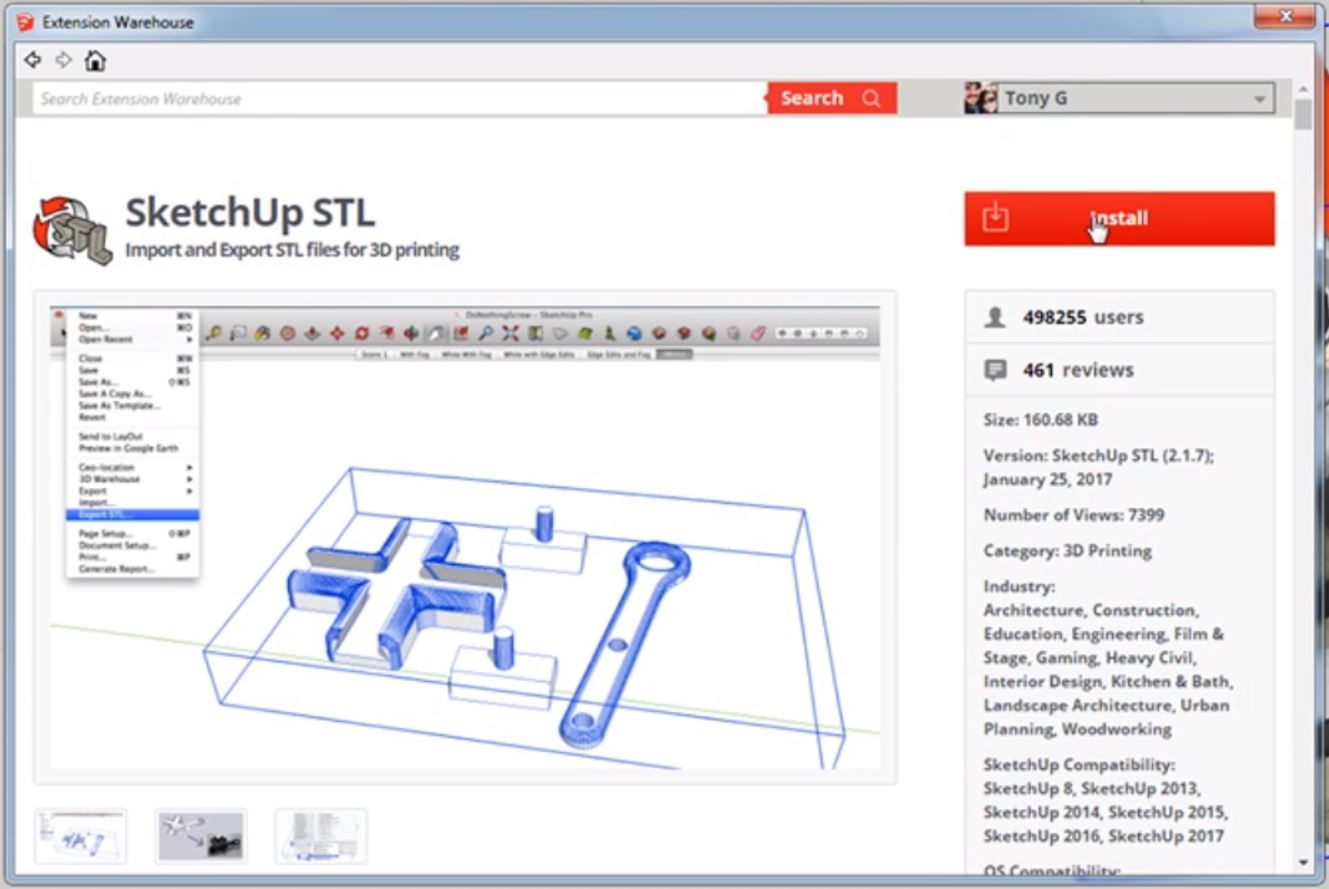
Window > Extension Warehouse. Click on the “extension warehouse” button in the top menu bar. If you do not have that bar for any reason, simply navigate to “window” and click on “extension warehouse.” The extension warehouse window will pop up.
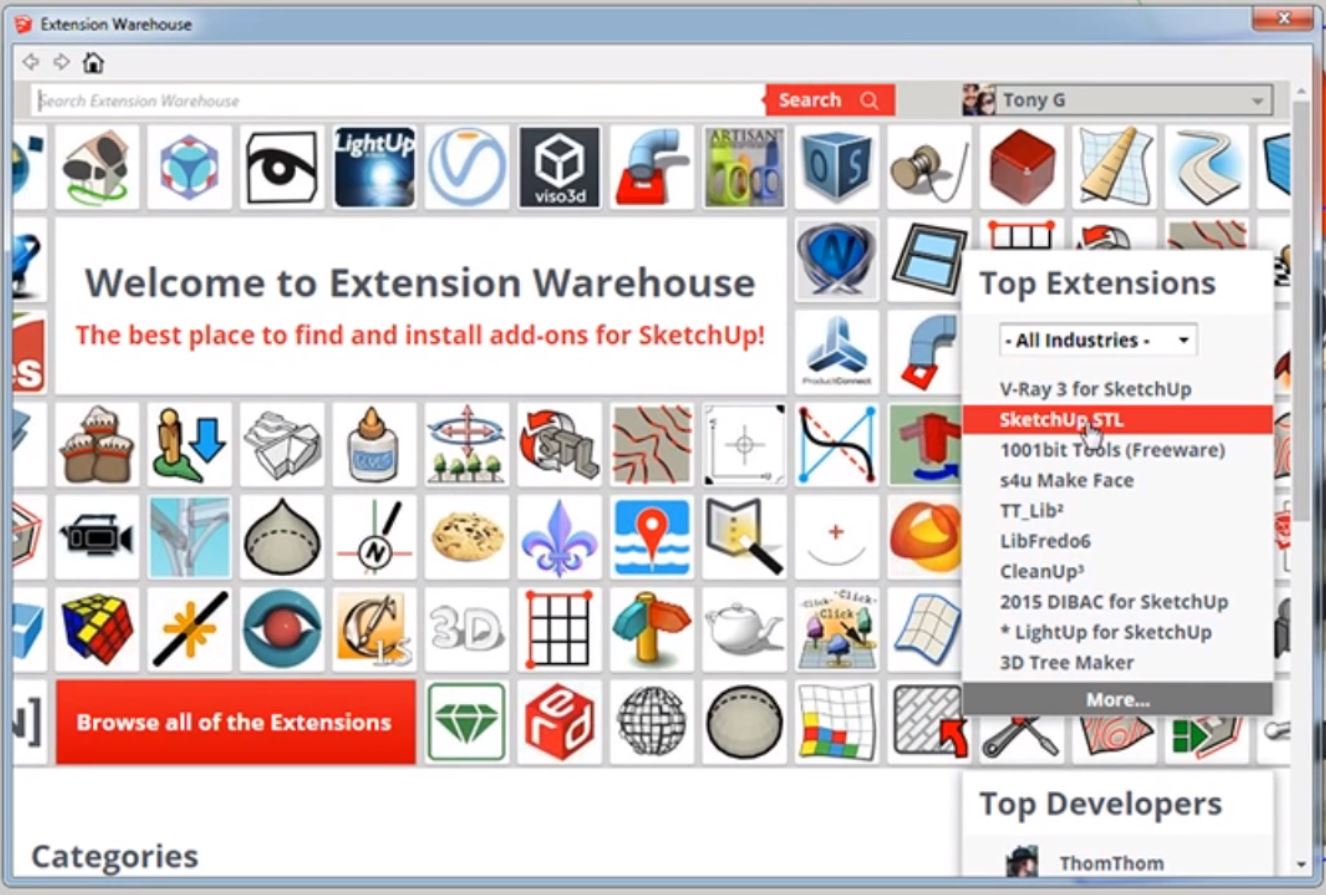
Search STL. Once the extension warehouse window opens you can search for the plugin. You may notice the “Sketchup STL” option in the right box labeled “Top Extensions.” You can select it from there, but if it is not listed you can just use the search bar. Type in “STL” in the search bar at the top left of the window.
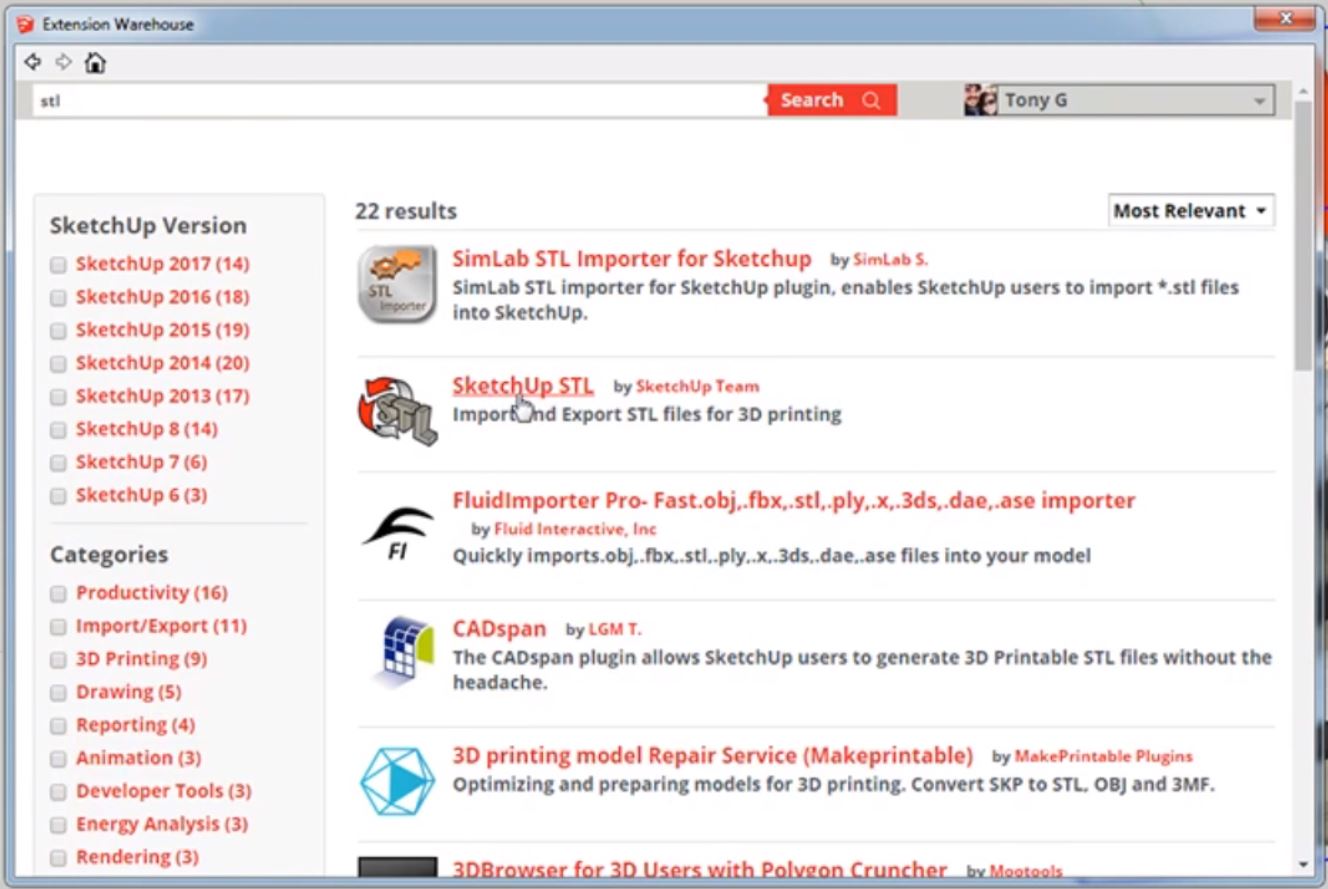
Select Sketchup STL. After you enter your search, a bunch of different options will come up. Select the one that says “Sketchup STL” by Sketchup Team. We know this one is from a trustworthy source because it was made by Sketchup.
Install. To install the plugin, click on the red “install” button in the top right corner. A message will appear asking you if you want to install the plugin, select “yes.” After it is installed, another message will appear letting you know it has been successfully installed. Click “ok” to continue.
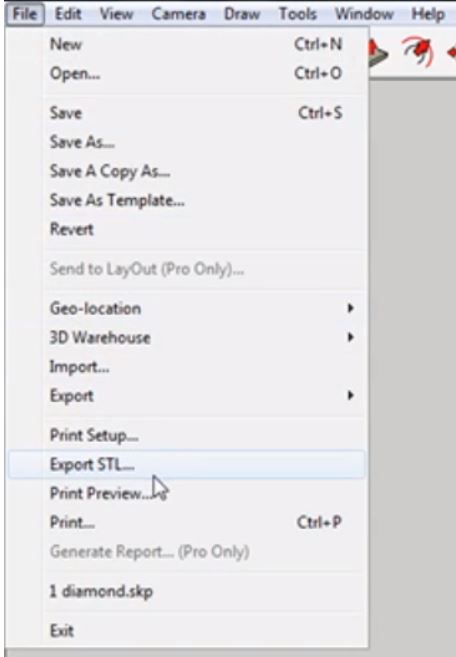
File > Export STL. Now that you have the plugin installed all you have to do is export your file from Sketchup to STL. To do this, go to “file” and click on “export STL.” A small window will open with some export options. You can choose to select “export only current selection.” This is a good option if you have multiple models in your Sketchup file. Select the units and file format that will work with your 3D printer. (If you are unsure of the settings, you may have to contact the manufacturer of your printer.)
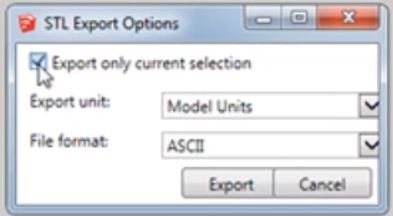
Export. Once you have your export settings selected, hit “export.” You will then be able to choose where you want to save your file and then click “save” to finish.
You may have to export your model to another file depending on the type of 3D printer you have, but STL files are pretty universal so you should be able to use it for a variety of projects.
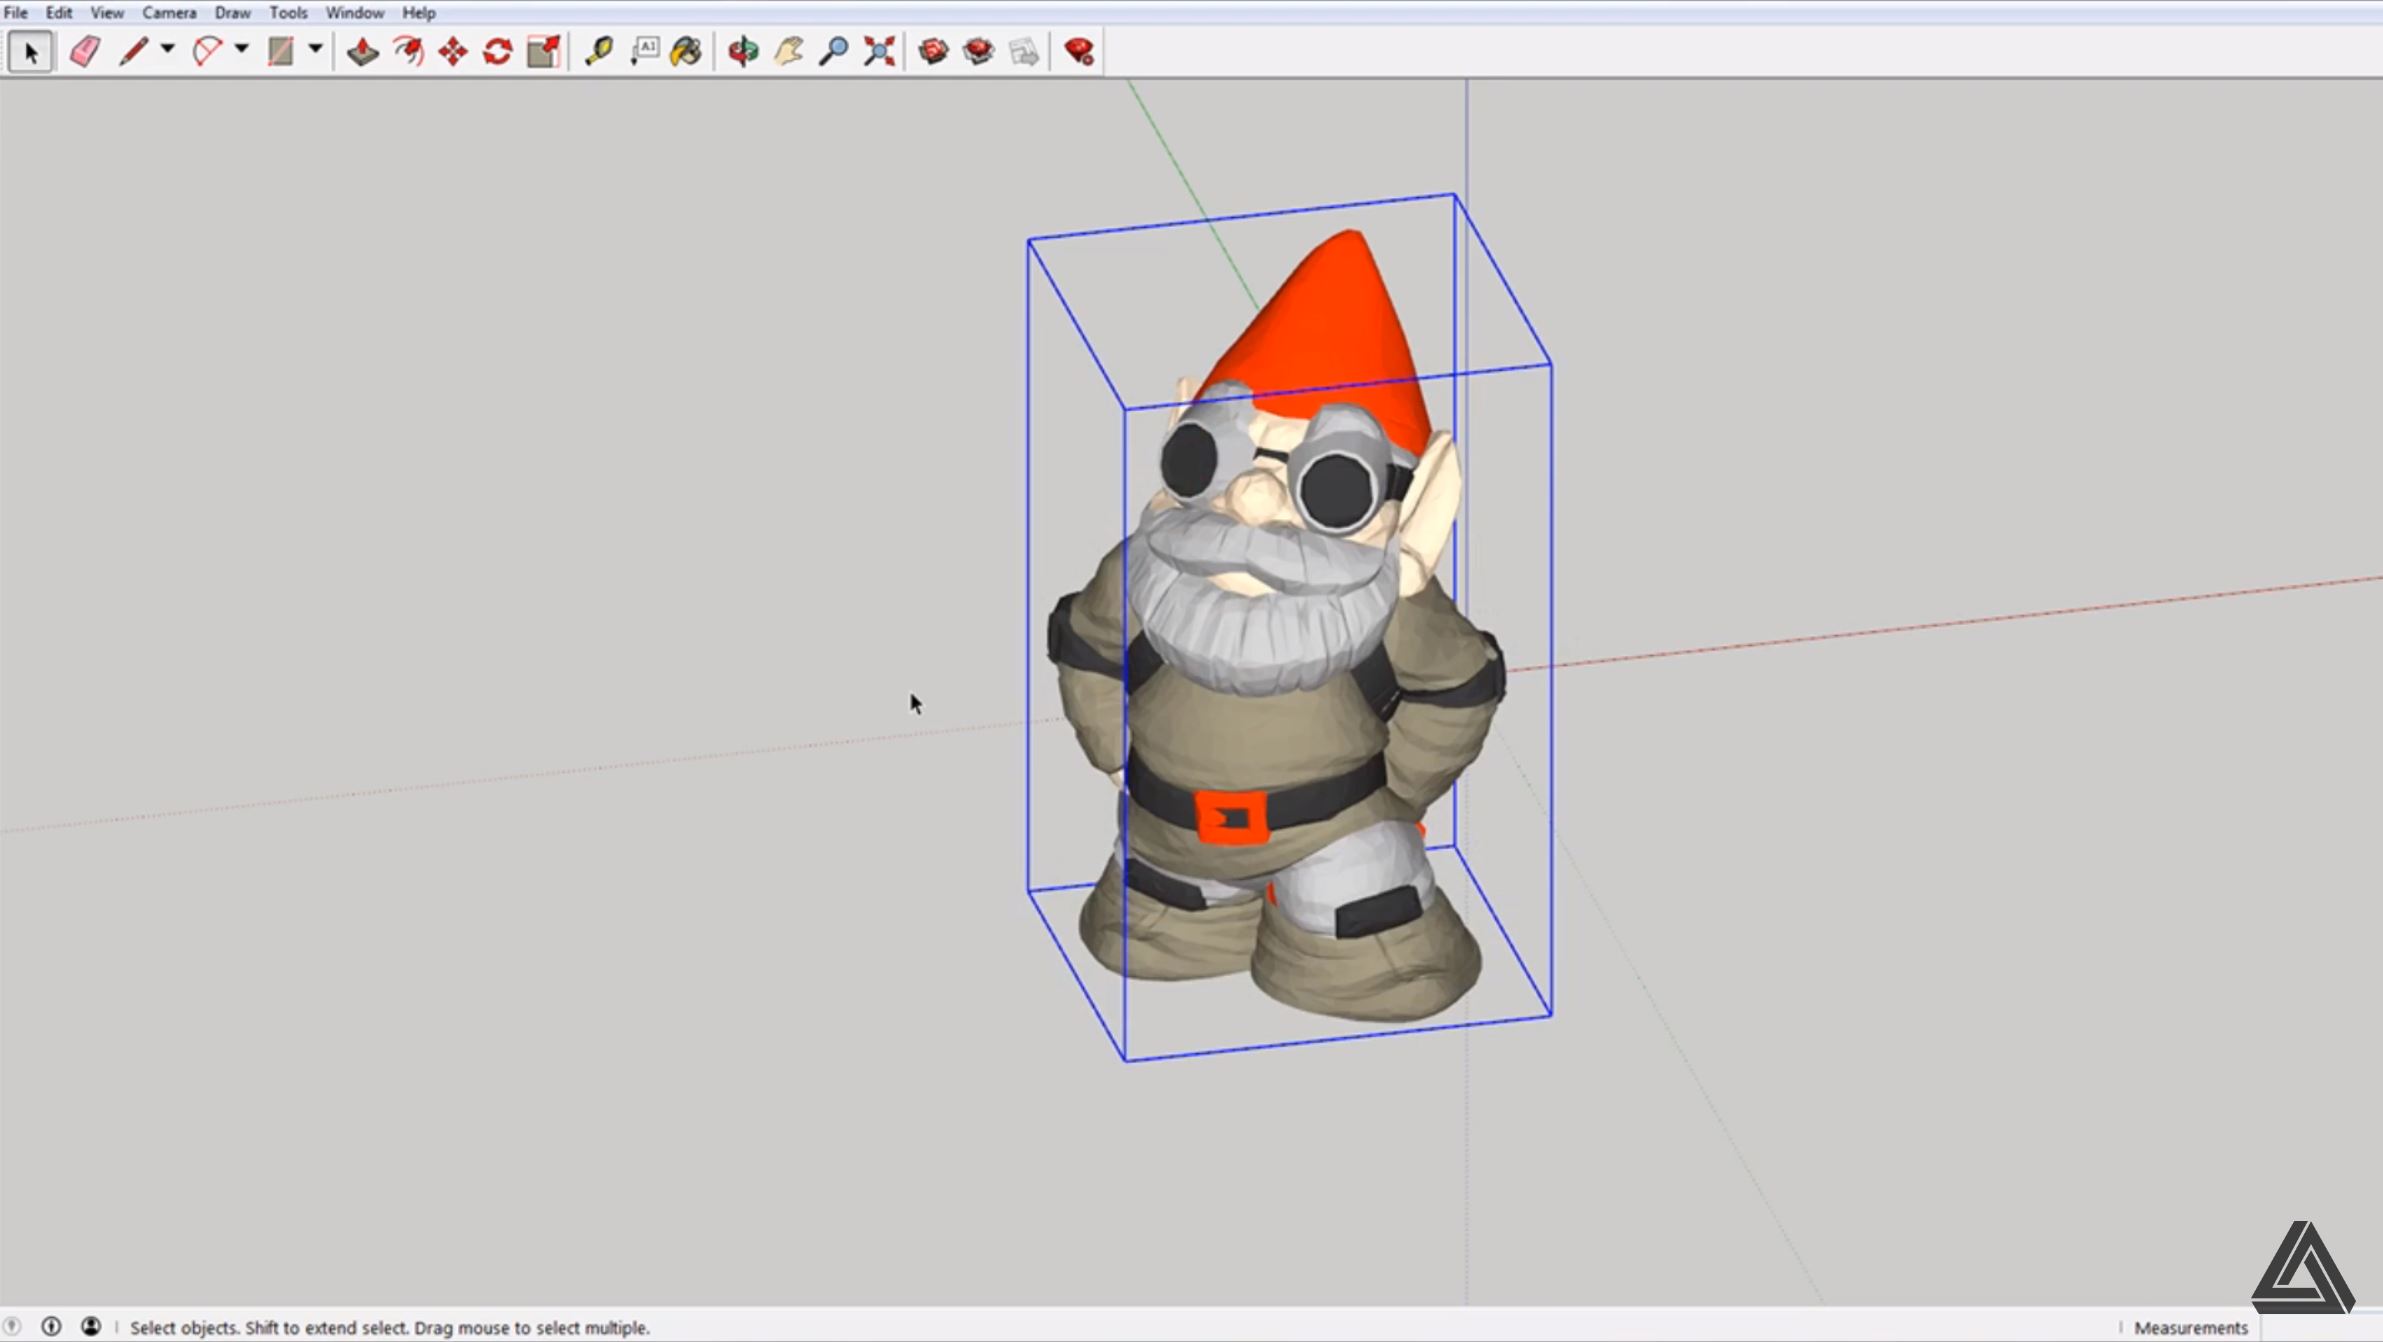
You can now easily export your models from Sketchup to STL files! Sketchup has plenty of other useful plugins you can use to make your projects easier. Looking for more plugins for printing? Check out how you can unfold faces of a model here. What files will you be 3D printing next? Let us know in the comments below!
Do you ever find yourself using the same tool over and over again, asking yourself why there isn’t a Sketchup shortcut for it? It can really become a pain when you want to use a tool quickly and you have to click the same three buttons over and over and over…. Not fun. Lucky for you there’s a quick and easy way to create your own Sketchup shortcuts for the tools you use most often! Follow these simple steps below and you’ll be flying through your projects in no time:
Window>preferences>shortcuts. Click on window>preferences and then select “shortcuts” from the system preferences window. To the right, there will be a list of functions to choose from.
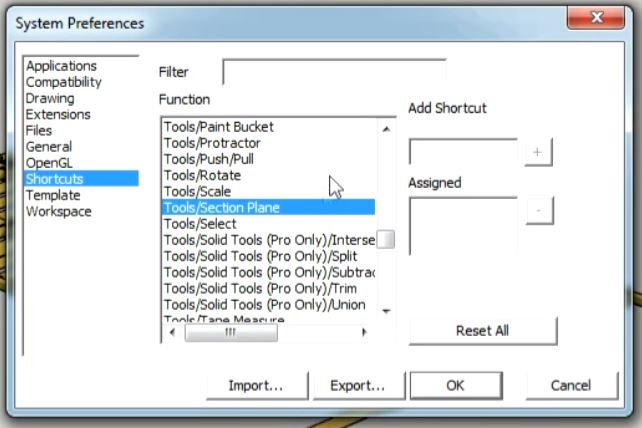
Tools/section plane. Select “tools/section plane” from the list of fuctions. In the “add shortcut” box, type in a letter or symbol you would like to use for the shortcut. Try to think of a symbol that corresponds with the tool so it is easy to remember. In this case, “/.”
Click +. When you have chosen a symbol, click “+” to assign it. If a letter or symbol is already being used, a window will pop up asking if you would like to reassign the symbol. If you would, select “yes.” If you would like to select a different symbol, select “no” and try a different one.
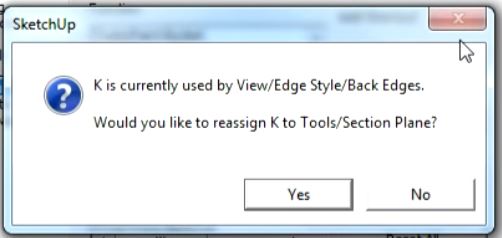
Hit ok. When you successfully assign a symbol, you will notice the letter or symbol you chose now appears in the “assigned” box. Click “ok” to close the system preferences window and test out your new shortcut.
Tools>section plane. If you hover over tools>section plane, you will see the symbol you assigned next to it. This is a quick way to see the assigned symbol in case you ever need a quick reminder of what you selected.
Press /. Press “/” (or whatever symbol you assigned) and the section plane tool should automatically appear. You can now quickly access the section plane tool with the press of a button! No more clicking a bunch of buttons to get to one tool. Yay!
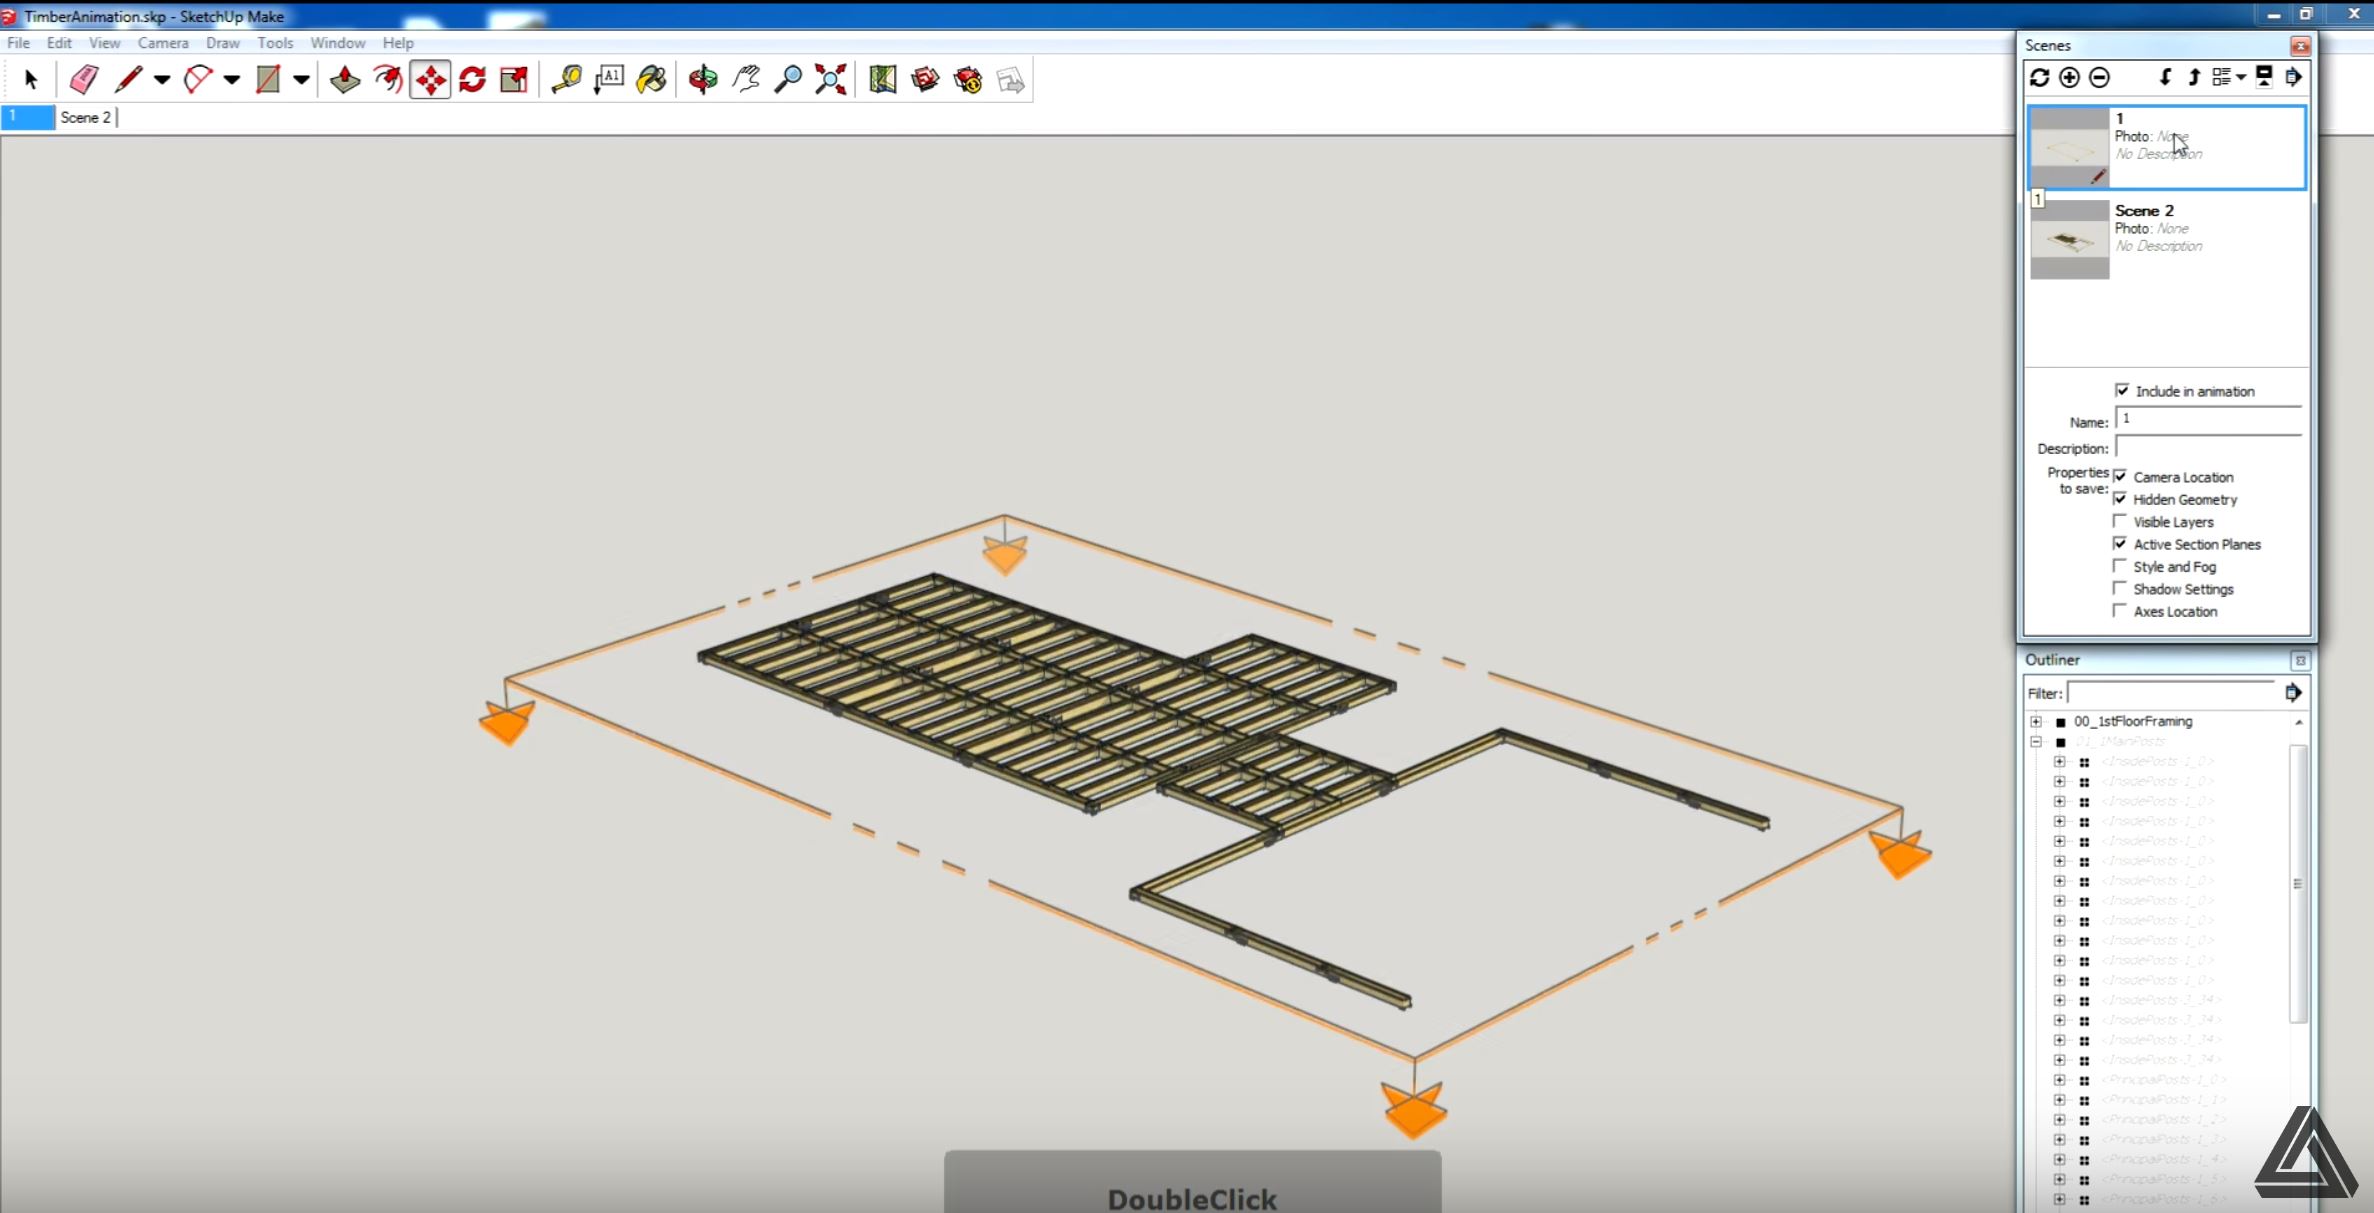
Follow these steps and you can create custom Sketchup shortcuts for any tool!
As you can see in the video, this shortcut can be very helpful in making a quick animation, or you can use it to customize your work flow needs. You can even use the same steps to edit current shortcuts if you would like to select a different symbol that is easier for you to use or remember.
There are plenty of other tips and tricks you can use to speed up your work time in Sketchup. There may be things you don’t even realize are slowing you down, check out our advice on how to speed up Sketchup here.
What Sketchup shortcuts do you use most often? What tool will you be making a shortcut for next? Let us know in the comments below!
If you stumbled onto this site, there’s a good chance you already know how to install sketchup, but just in case, I want to walk you step by step through the process.
First you’re going to want to download sketchup. On this site I have links for you to download both current and past versions.
Why might you want a past version of sketchup? When Trimble acquired Sketchup from Google in 2012 they changed the terms of service agreement. Any free version of Sketchup past Sketchup 8 cannot be used for commercial purposes. That means that past that point, you can’t use sketchup to make money. If you’re going the free route but still want to use the software to make money, you should get version 8 or earlier.
Now that that’s out of the way and you’ve download the version you want to install, double click on the install file.
[two_third]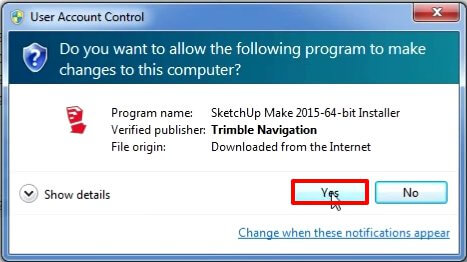 [/two_third] [one_third_last]You may be prompted to grant the installer permission before proceeding. If the verified publisher is Trimble Navigation or Google, you’re good to go. Click Yes.[/one_third_last] [two_third]
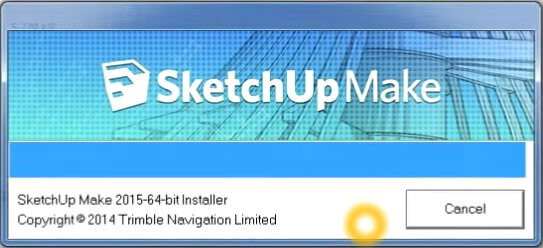
[/two_third] [one_third_last]Some files will then be unpacked to your computer. This should only take a few minutes. [/one_third_last] [two_third]
[/two_third] [one_third_last]After the install files are unpacked to your computer, the Setup Wizard will start. Click Next.[/one_third_last] [two_third]
[/two_third] [one_third_last]If this is your first time installing sketchup you’ll want to read through the license agreement. If you accept, check the box and click next.[/one_third_last] [two_third]
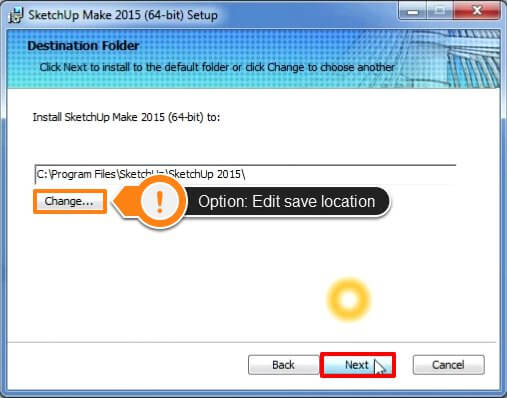
[/two_third] [one_third_last]The setup wizard gives you the option to change where you’d like to save your files. For any number of reasons you may want to change this. I’m usually fine with the default location. After selecting your save location, hit next. [/one_third_last] [two_third]
[/two_third] [one_third_last]Now you’re ready! Just hit install to go through the process and install sketchup![/one_third_last] [two_third]
[/two_third] [one_third_last]You may be presented with a dialogue box like this if you need to exit out of some programs before the installation can proceed. Save anything you have open, click “Close the applications and attempt to restart them.” and then click OK.[/one_third_last] [two_third]
[/two_third] [one_third_last]Click finish. We’re almost there![/one_third_last] [two_third]
[/two_third] [one_third_last]The last step will ask you to restart your computer. Save all your open windows and click Yes.[/one_third_last] [two_third]
[/two_third] [one_third_last]Once your computer has restarted you’ll notice three new icons on your desktop. Layout, Sketchup, and Style Builder. Layout is great for putting together presentations or drawings, the style builder is great for… well… building styles. These are great tools that supplement Sketchup. If you’re just getting started you’ll just want to double click the Sketchup icon.[/one_third_last] [two_third]
[/two_third] [one_third_last]Click start using sketchup.[/one_third_last] [two_third]
[/two_third] [one_third_last]You’ll be asked to choose a default template. This can be changed at any time. Click ‘Select a template’.[/one_third_last] [two_third]
[/two_third] [one_third_last]When choosing a template consider a few things. What style do you like? What measuring system do you want to use? What increment of unit makes the most sense for the size you’ll be modelling at? Select your template. Again, no pressure. You can change this at any time.[/one_third_last] [two_third]
[/two_third] [one_third_last]Sketchup is open now! If this is your first time with Sketchup you may want to run through some of our Sketchup tutorials. Hope you enjoy![/one_third_last]
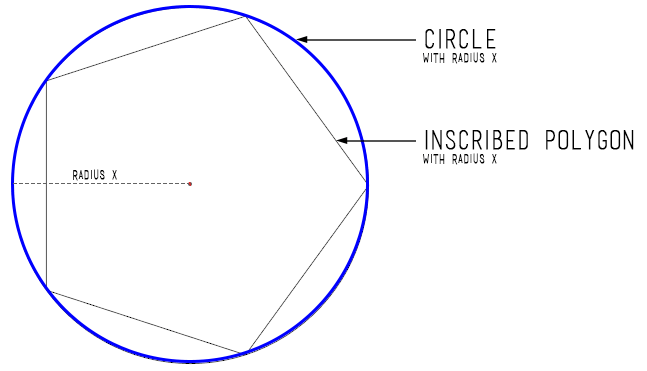
In this sketchup tutorial, I’m going to teach you how to create equilateral polygons in sketchup. It’s only going to take you a matter of seconds and you won’t have to manually draw every side.

Adding 3D text to your sketchup models can help add a level of detail that will bring your models up to the next level. Because text is full of weird shapes and curves, it can be a pain to get what your looking for. So let’s break it down.
Hope this helps! Let me know below if you have any questions with creating 3d text. Also feel free to share any images showing how you used 3D text to really level up your design!
Learning how to install Sketchup plugins and extensions can immensely increase your productivity, but it isn’t so intuitive. It’s important that you learn the difference between tools, plugins, and extensions so moving forward you’re not confused about what’s what. After that’s clear, I’ll take you through step by step on how to install extensions the automatic and manual way. Finally, I’ll teach you how to install plugins and give some resources on where you can find plugins and extensions on your own.
After clicking that you should see something similar to this window:
I have three go to resources for when I’m looking to install sketchup plugins and extensions
I put together 5 essential plugins to help you get started if you’re new to all this plugin and extension business!
We have a tutorial page ready if you’re excited about you’re new found productivity and want to learn more too.
Find this helpful? Know of anyone having trouble trying to install sketchup plugins or extensions? Share this with them!
If you’ve been buried in your work, it’s possible that you missed the release of Sketchup 2014 on February 28, 2014. With the rollout comes some pretty awesome new features so we’re here to break it down and feed you the tasty stuff.
If you’d like to simply go and download the latest version checkout our page showing how to get google sketchup free.
As an aside, if you’d like us to host the embedded code of your model on our website, just ‘like’ our facebook page and leave us a request by posting a comment with a link to your model in the 3d warehouse.
Some manufacturers have placed some of their products on the 3d warehouse as well, making it easier then ever to create convincing, accurate models.
Have you tried out Sketchup 2014 yet? What’s your favorite new feature? Let us know below!
The process of importing google earth terrain and/or map into sketchup is pretty seamless (probably because when google first acquired sketchup they were hoping to use it to populate the 3d buildings in google earth). So lets get right to it.
Once you generally know where your site location is, open sketchup, hit the file tab and scroll down to Geo-location>Add Location… from here you can search as you would in google maps for your site. For example if you wanted to search for a site in Philadelphia, you could type in Philadelphia, PA to start panning around to find what your looking for. You can also enter a specific address if you have that as well.
Once you’ve found your site, you need to decide if you want more contextual (broader) information on your site or more detailed information.
Broader information is the way to go if you don’t plan on modelling the site, or you’re in a rural setting with not much around to be too concerned about.
More detailed information is helpful for the opposite; if you plan on modelling the site and/or it’s in a dense urban context.
Once you’ve decided on what kind of information you want, you’ll know how to set your zoom. A close-up zoom is what you should use to get more detailed information and a zoomed-out view is what you should use to get broad information.
Use the pins to change the area you’d like to import to your model. Hit grab once you’re satisfied by your selection to import into your modelling space.
If you are kind of an information pirate like I am and want to have the most site information possible (or you find you want to expand your site), that’s easy to do. Simply go back to to File>Geo-location>Add Imagery to expand your site with additional imagery.
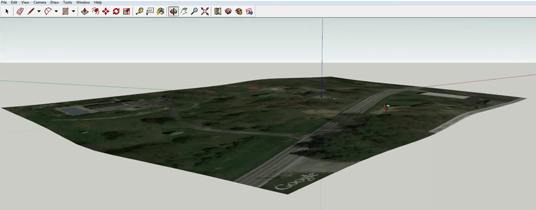
Lastly, to toggle the 3d site terrain on and off go to File>Geo-location>Show Terrain.
If you found this sketchup tutorial on how to import a google map with terrain helpful please like and share it.
Even if you’re an experienced sketchup user it’s possible dynamic components aren’t a part of your digital toolbox yet. In the below video, we showcase the kind of things that you can do with dynamic components and give you a quick walk through on how to find some.
Notes:
To find dynamic components in the 3d warehouse look for the ‘![]() ‘ symbol in the upper right of the component preview box.
‘ symbol in the upper right of the component preview box.
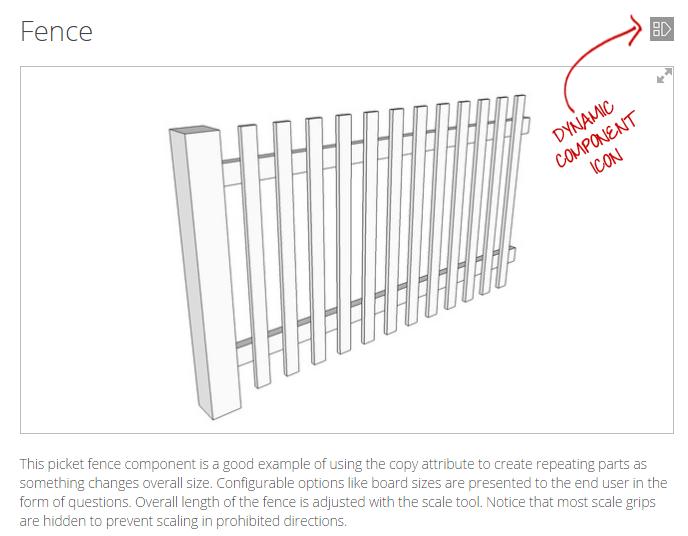
This symbol identifies what’s dynamic and what’s not. If you’d prefer to not sift through the good and bad, you can checkout some of ones we use at designer hacks.
If you would like to download past versions of google sketchup free look at the list below! We also have links to download the latest and greatest of this incredibly popular software.
Once you’ve downloaded the software check out our Sketchup tutorials which are organized by skill level. If that’s not enough, Sketchup provides their own resources.
As always, feel free to tweet us any specific questions @designerhacks or post on our facebook page.
For many years we’ve provided links to download most past versions of sketchup here. However, recently we’ve decided to narrow down things and provide only the free versions of sketchup that are most important. If you’d like to see the full list of versions you can see that here.
Important notes:
*The most recent version of sketchup can be downloaded and used as a trial free for 30 days
*Sketchup Make 2017 is the last free desktop version of sketchup
*Sketchup 8 is the last free version of sketchup that allows you to use it for commercial use.
Want to know the first steps when getting started with sketchup? We think sketchup is one of the 5 best free tools for designers and we want you have the best resources are to learn it. We’ve gathered helpful videos from youtube to help you get off on the right foot. In no time you’ll be modeling like a pro.
If you still need to download sketchup, no problem! Head on over to our page that lets you know how you can get sketchup free!
Google and trimble have put together a bunch of tutorial videos tackling this very question. We’ve bundled the 10 best ones in a youtube playlist here. Or you can watch them individually.
The best way to learn anything is through practice. Take sketchup for a spin and just start clicking around. Give yourself a small project like modeling a table or a chair. Sketchup is a really intuitive program so it’s easy to learn with little or no formal training! What’s even better news is that’s how most of the people we know learned it!
When you can’t figure out how to do something, type your question into your favorite search engine. Since sketchup is free, there are a ton of people using it and a lot of questions have been asked and answered online. There have only been a handful of times that I’ve needed to use another program to model in. So if you can’t do something, chances are there’s a way. If you have a specific question, feel free to leave it in the comments below for us to answer!
It’s no secret that using groups and components in your sketchup models makes modelling a ton easier, but did you know that depending which you use will also affect your sketchup file size? I took a look comparing the size of files that all contained the same rectangular prism. The three files contained either ungrouped, grouped, or component of the exact same count of identical rectangular prisms. The results are below. Any cell with the word crash in it… Well… Crashed sketchup repeatedly.
| 6 faces | 24 faces | 96 faces | 384 faces | 1,536 faces | 6,144 faces | 24,576 faces | 98,304 faces | 196,608 faces | 393,216 faces | 786,432 faces | |
| Ungrouped | 10kb | 17kb | 31kb | 91kb | 283kb | 1,154kb | 4,994kb | Crash | Crash | Crash | Crash |
| Grouped | 11kb | 14kb | 20kb | 30kb | 51kb | 154kb | 547kb | 2,033kb | 3,981kb | 7,949kb | Crash |
| Component | 11kb | 14kb | 20kb | 31kb | 68kb | 166kb | 507kb | 2,037kb | 4,014kb | 7,953kb | 15,884kb |
The results are pretty strikingly clear. Not only do ungrouped faces make it cumbersome to model, they also dramatically increase your sketchup file size. Oddly enough, groups created consistently slightly lower file sizes than components.
