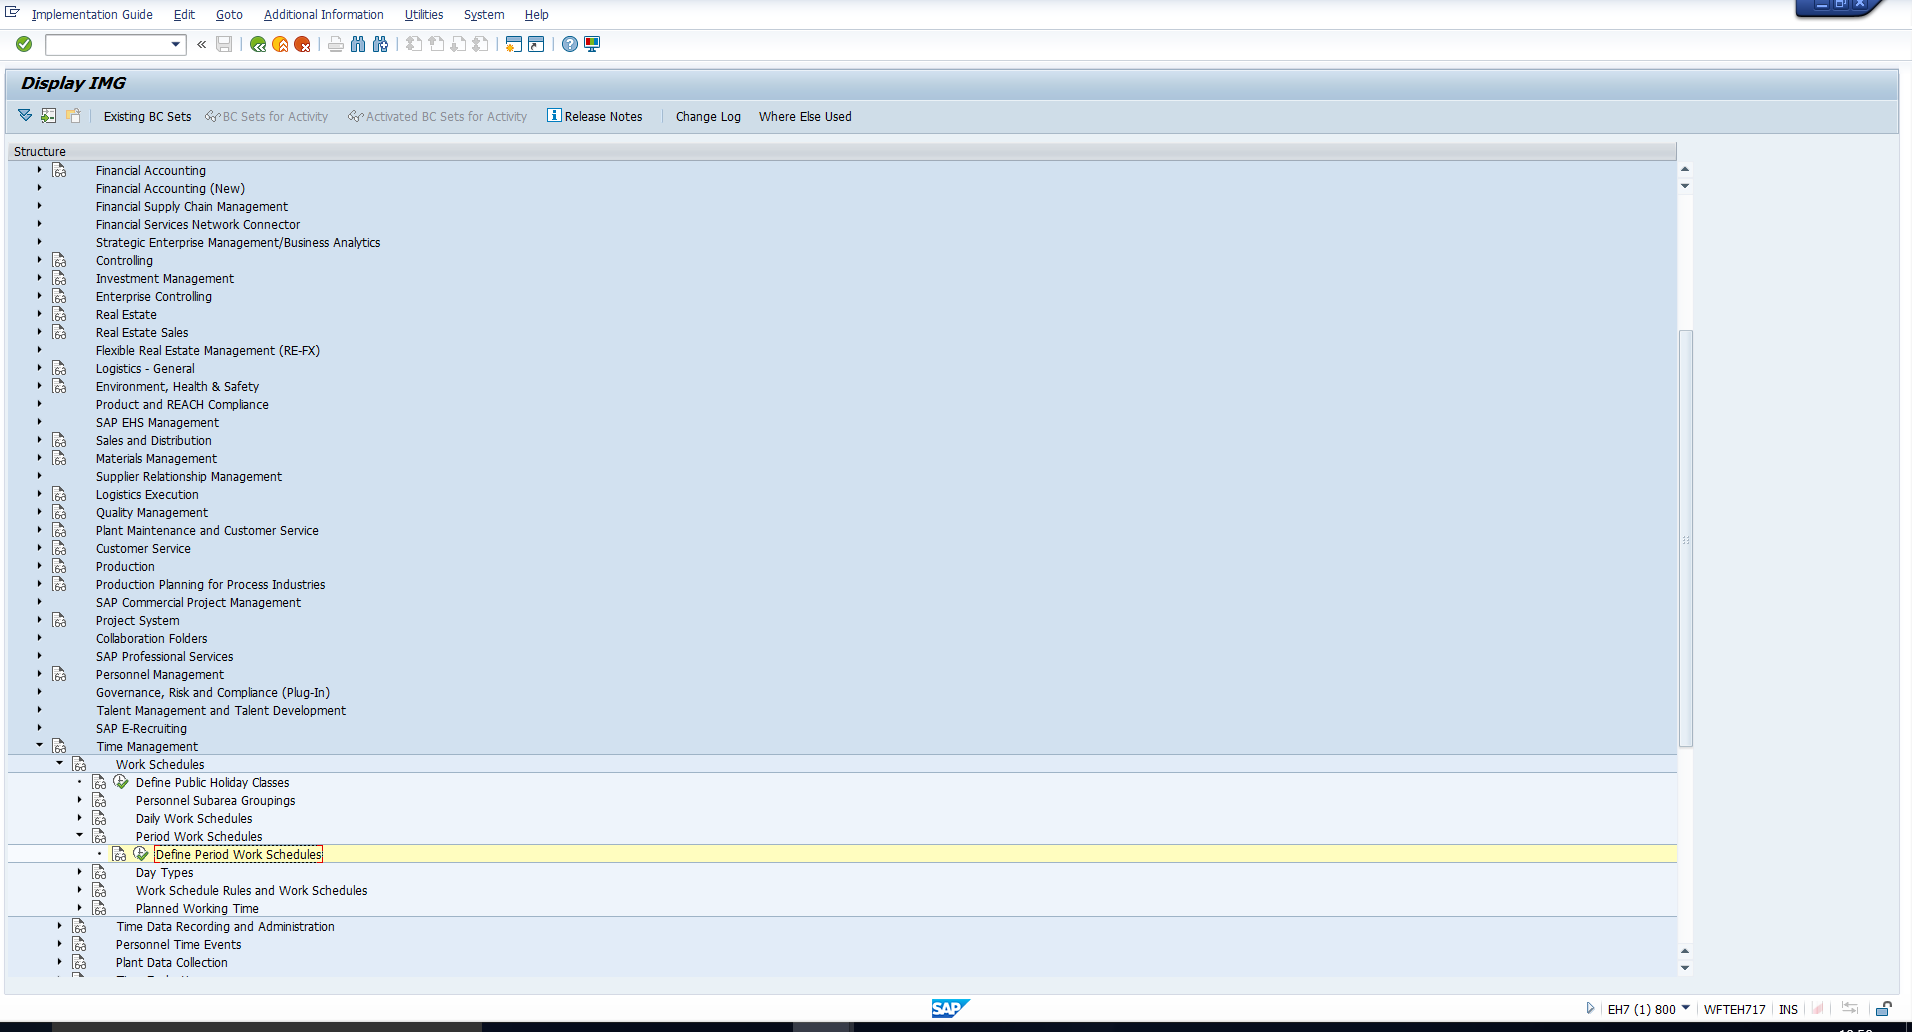
 Figure 1: IMG Path to Configure SAP Period Work Schedule
Welcome to the tutorial on SAP Period Work Schedule and Day Types. We have already explained the concept of SAP Period Work Schedule in the tutorial SAP Work Schedules and Their Elements. In this tutorial, we will explain how to configure SAP Period Work Schedule. We will also familiarize you with the concept of Day Types and Day Type Selection rules. This tutorial is part of our free SAP HCM training course.
Prior to configuring SAP Period Work Schedule, you must ensure that the required Daily Work Scheduleshave been created. Once this has been done, you can proceed with configuring SAP Period Work Schedule.
To do this, access the Implementation Guide using the transaction code SPRO. Then follow the path mentioned below:
Time Management – Work Schedules – Period Work Schedules – Define Period Work Schedules
This path has been depicted in Figure 1.
 Figure 1: IMG Path to Configure SAP Period Work Schedule
When you execute the highlighted activity, you will see the screen depicted in Figure 2.
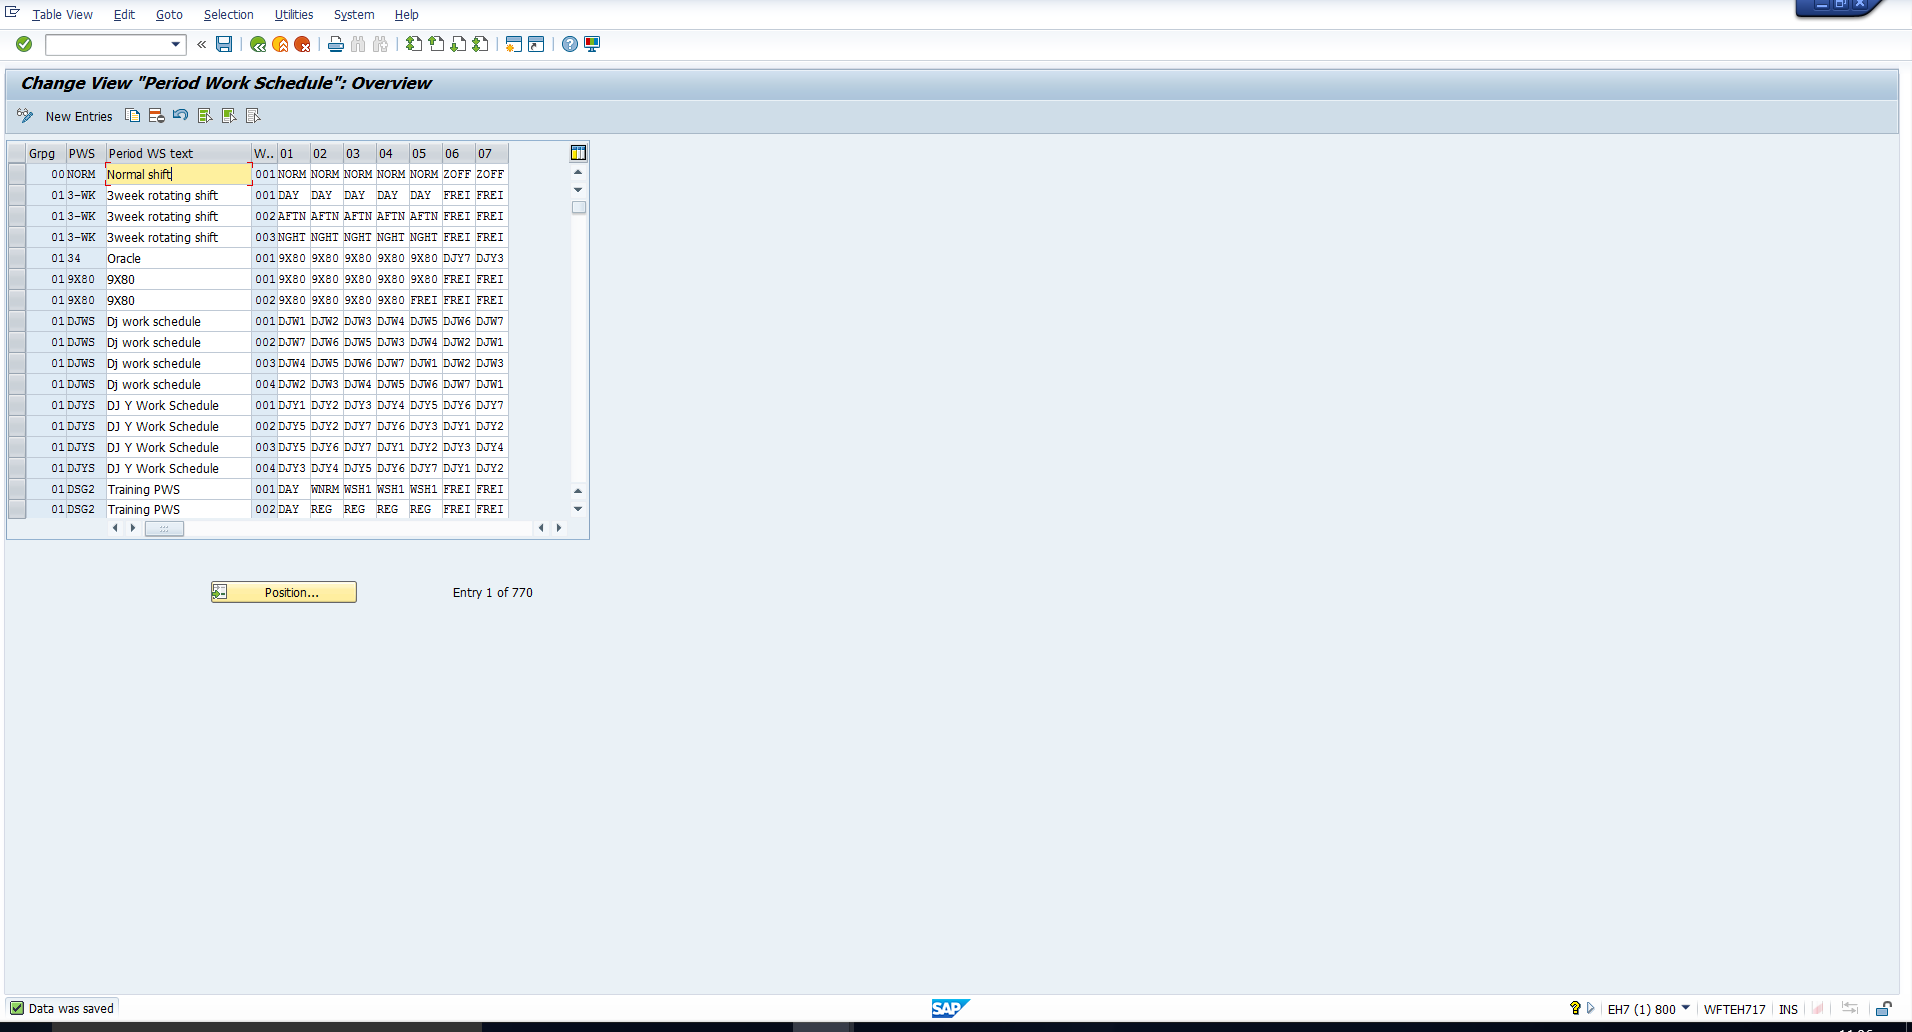 Figure 2: Overview of SAP Period Work Schedules
This screen depicts an overview of the Period Work Schedules that have been configured in the system. You can see that some Period Work Schedules occupy just one row of the table, while others occupy multiple rows. The rationale for this is that each row basically corresponds to a week. So, as a rule, a Period Work Schedule that spans ‘n’ weeks will be represented by ‘n’ rows in this table. For your reference, we have highlighted two examples in Figure 3. The Period Work Schedule NORM (Normal shift) spans a single week, while the Period Work Schedule 3-WK (3week rotating shift) extends across three weeks.
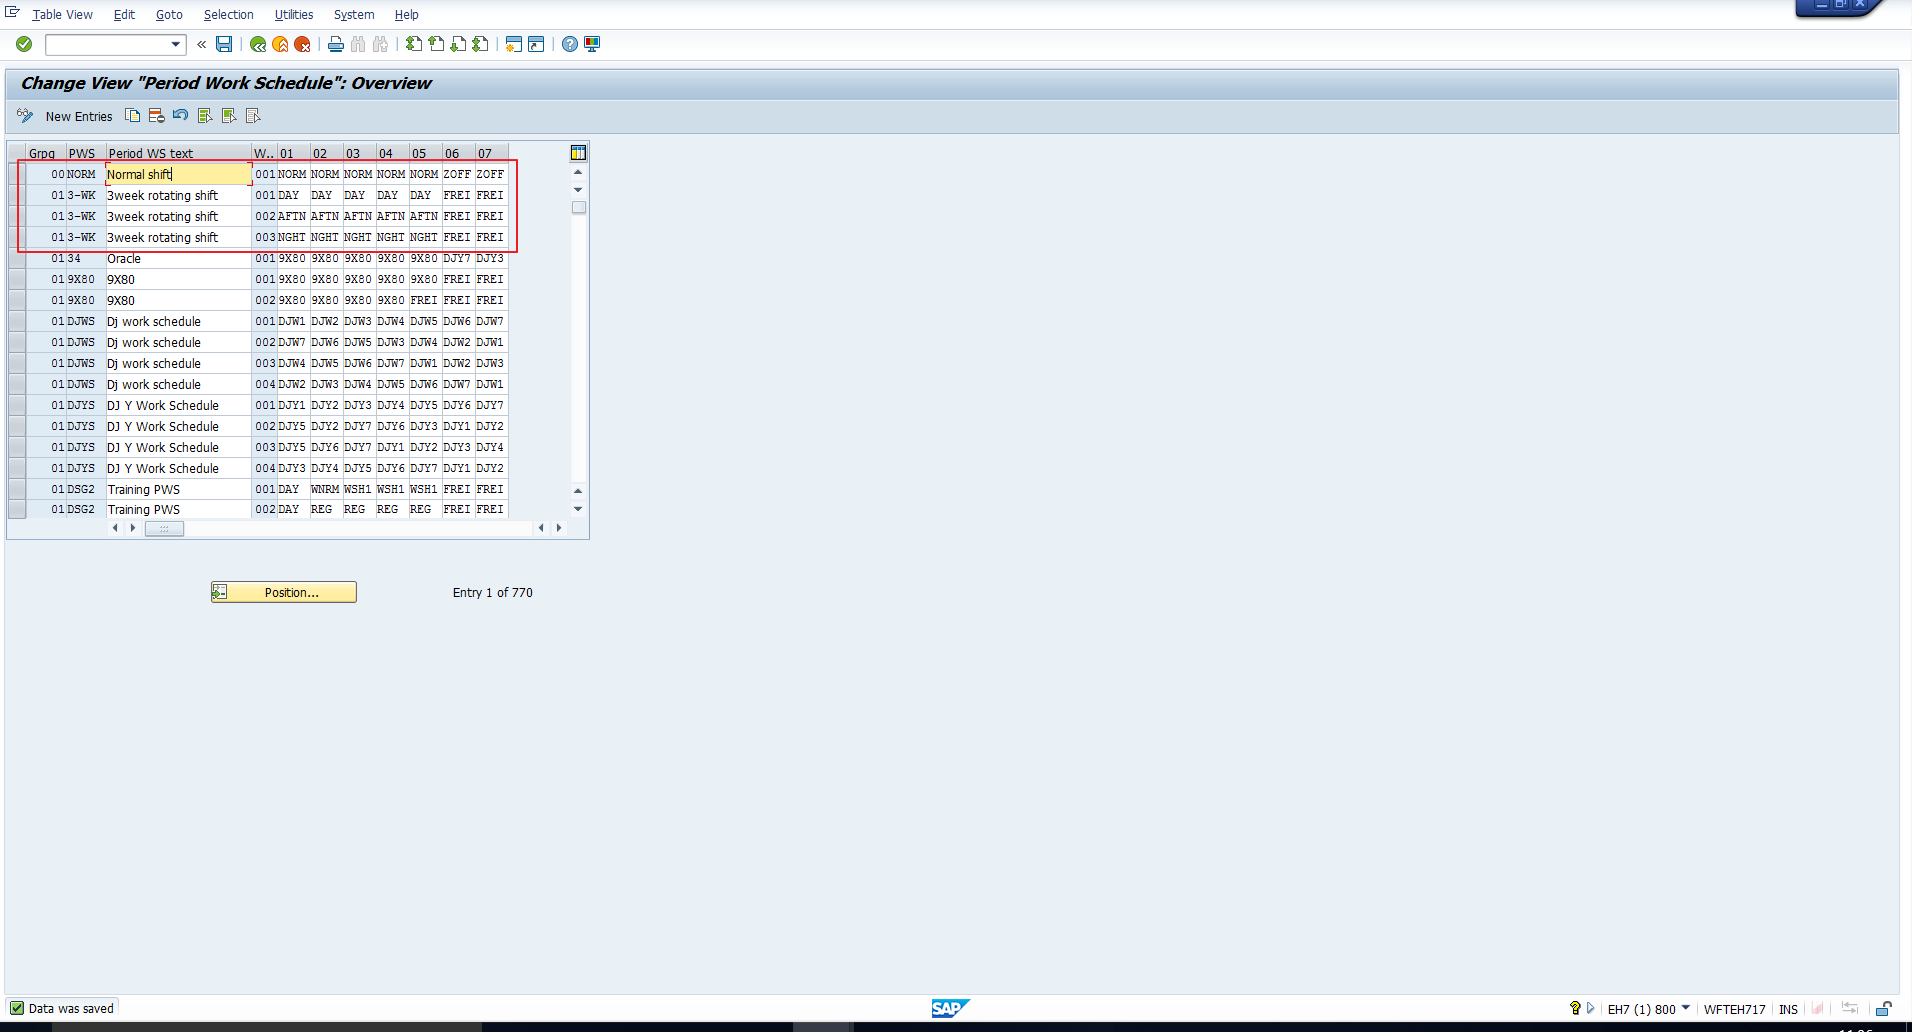 Figure 3: Examples of a Single-Week and a Three-Weeks Period Work Schedules
As explained in the tutorial SAP Work Schedules and Their Elements, you can arrive at the appropriate length of SAP Period Work Schedule by determining the shortest period after which the shift pattern repeats itself.
We will explain the meaning of the columns of this table below:
Grouping – This is the Personnel Subarea grouping for Daily Work Schedules. This concept has already been explained in the tutorial on SAP Break Schedule Configuration.
PWS – This is the Period Work Schedule Key. It can have a maximum length of four characters.
Period Work Schedule Text – This is the Period Work Schedule text, which should be meaningfully assigned. It can have a maximum length of twenty characters.
Week no.- This is the week number for which the sequence of Daily Work Schedules is entered in the next seven columns.
01– In this column, enter the Daily Work Schedule applicable to Day 01 (Monday) of that week.
02– In this column, enter the Daily Work Schedule applicable to Day 02 (Tuesday) of that week.
03– In this column, enter the Daily Work Schedule applicable to Day 03 (Wednesday) of that week.
04– In this column, enter the Daily Work Schedule applicable to Day 04(Thursday) of that week.
05– In this column, enter the Daily Work Schedule applicable to Day 05(Friday) of that week.
06– In this column, enter the Daily Work Schedule applicable to Day 06 (Saturday) of that week.
07– In this column, enter the Daily Work Schedule applicable to Day 07(Sunday) of that week.
Consider a company where the employees have to work from 9 am to 6 pm, Monday to Friday. Saturday and Sunday are weekly offs. Let us configure SAP Period Work Schedule to meet this requirement.
We can use the Daily Work Schedule ZTES which we had created in the tutorial SAP Daily Work Schedule Configuration.
To create a new Period Work Schedule, click on the ‘New entries’ button that we have highlighted in Figure 4.
This will take you to the blank screen shown in Figure 5.
Enter the details shown in Figure 6. You can see that we have assigned the Daily Work Schedule ZTESfrom Monday to Friday. The Daily Work Schedule OFF (with zero working hours) has been assigned to Saturday and Sunday, as per the requirement. Note that you can enter a suitable Period Work Schedule key in accordance with your organization’s naming convention.
Then save the Period Work Schedule by clicking on the “Save” icon. With this, the Period Work Schedule has been successfully configured.
A Day type is basically used to indicate the following for each day:
The following day types are pre-defined by SAP:
You can see these day types via the below IMG path:
Time Management – Work Schedules – Day types – Define Day Types
This path has been depicted in Figure 7.
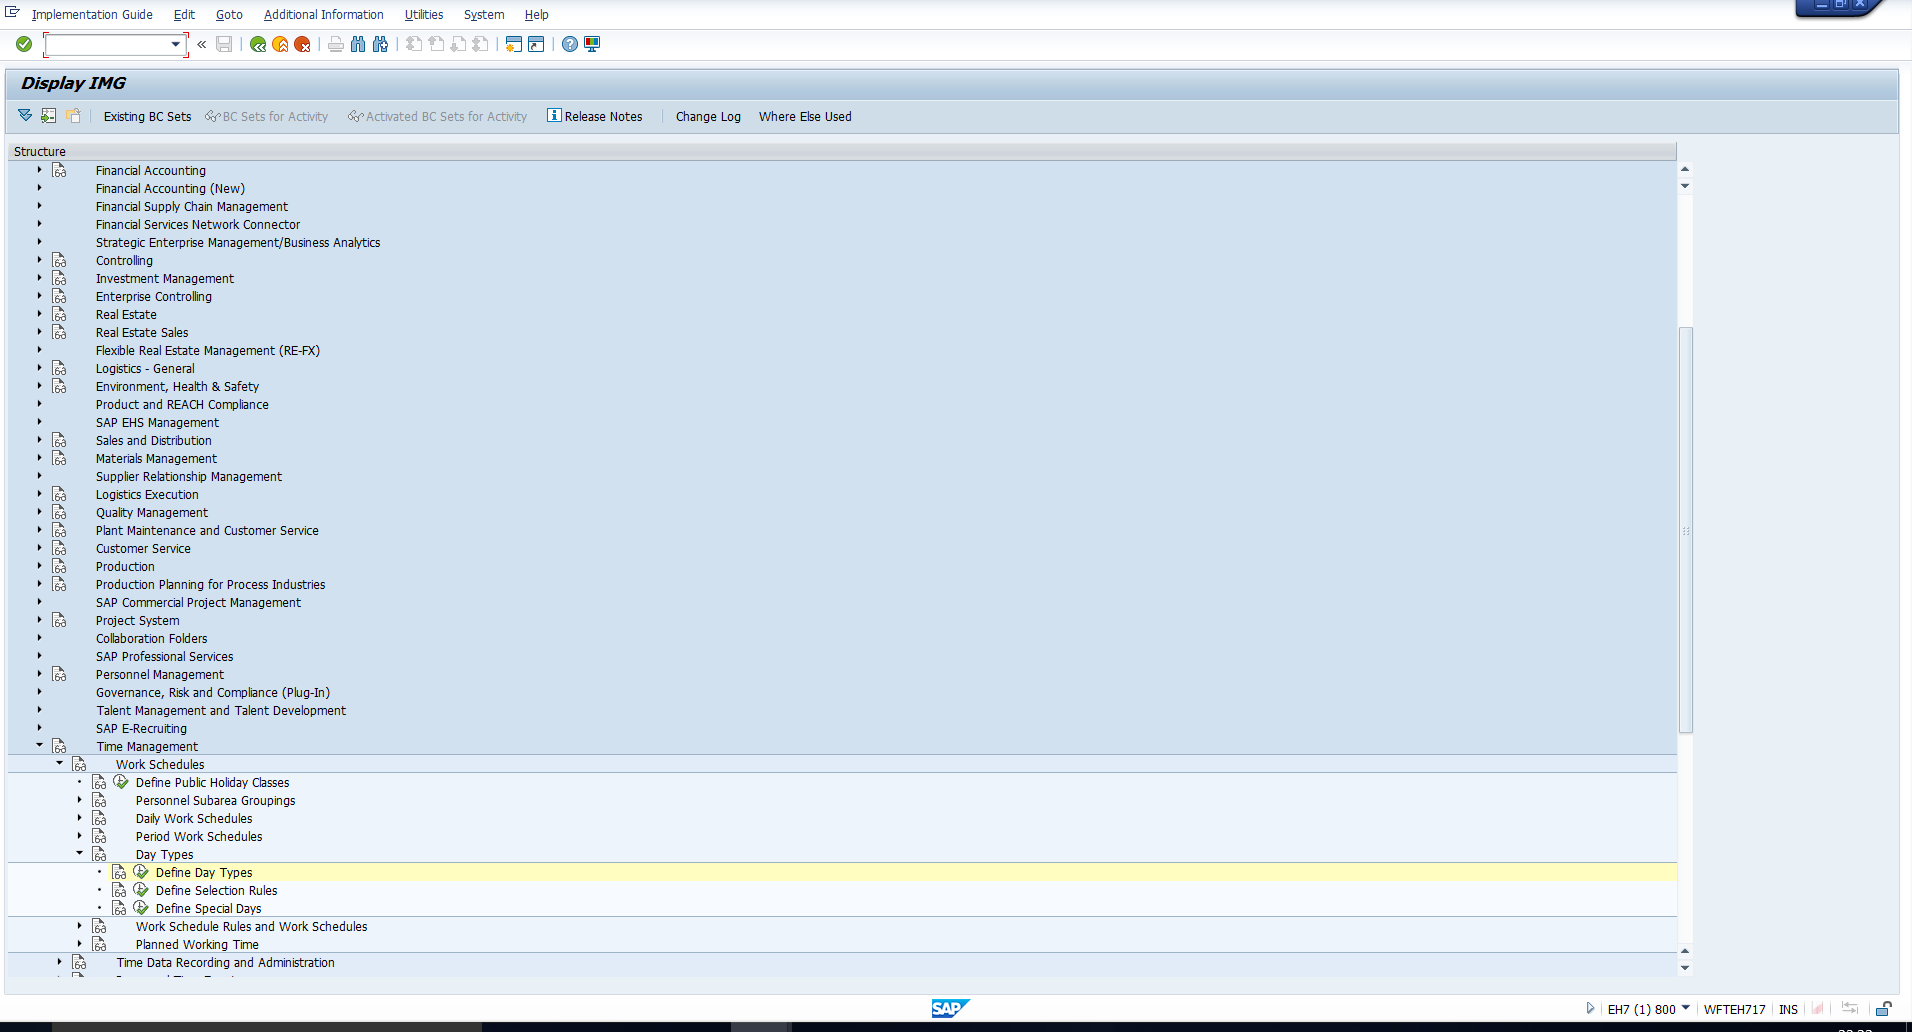 Figure 7: IMG Path to Define Day Types
Execute this activity and the screen depicted in Figure 8 will follow.
Here you can see the standard SAP day types. It is recommended that you do not edit these, as they are used by various personnel calculation rules for time evaluation and payroll in the standard system. You can create new entries if required, for your company-specific policies. Usually, though, the above day types suffice.
These rules are used to specify which day types should be assigned to public holidays on weekdays and public holidays on weekends. For each public holiday class, you must specify which day type should be assigned to public holidays on weekdays, Saturdays and Sundays.
To check the pre-configured selection rules or to define new ones, follow the IMG path below:
Time Management – Work Schedules – Day types – Define Selection Rules
This path has been depicted in Figure 9.
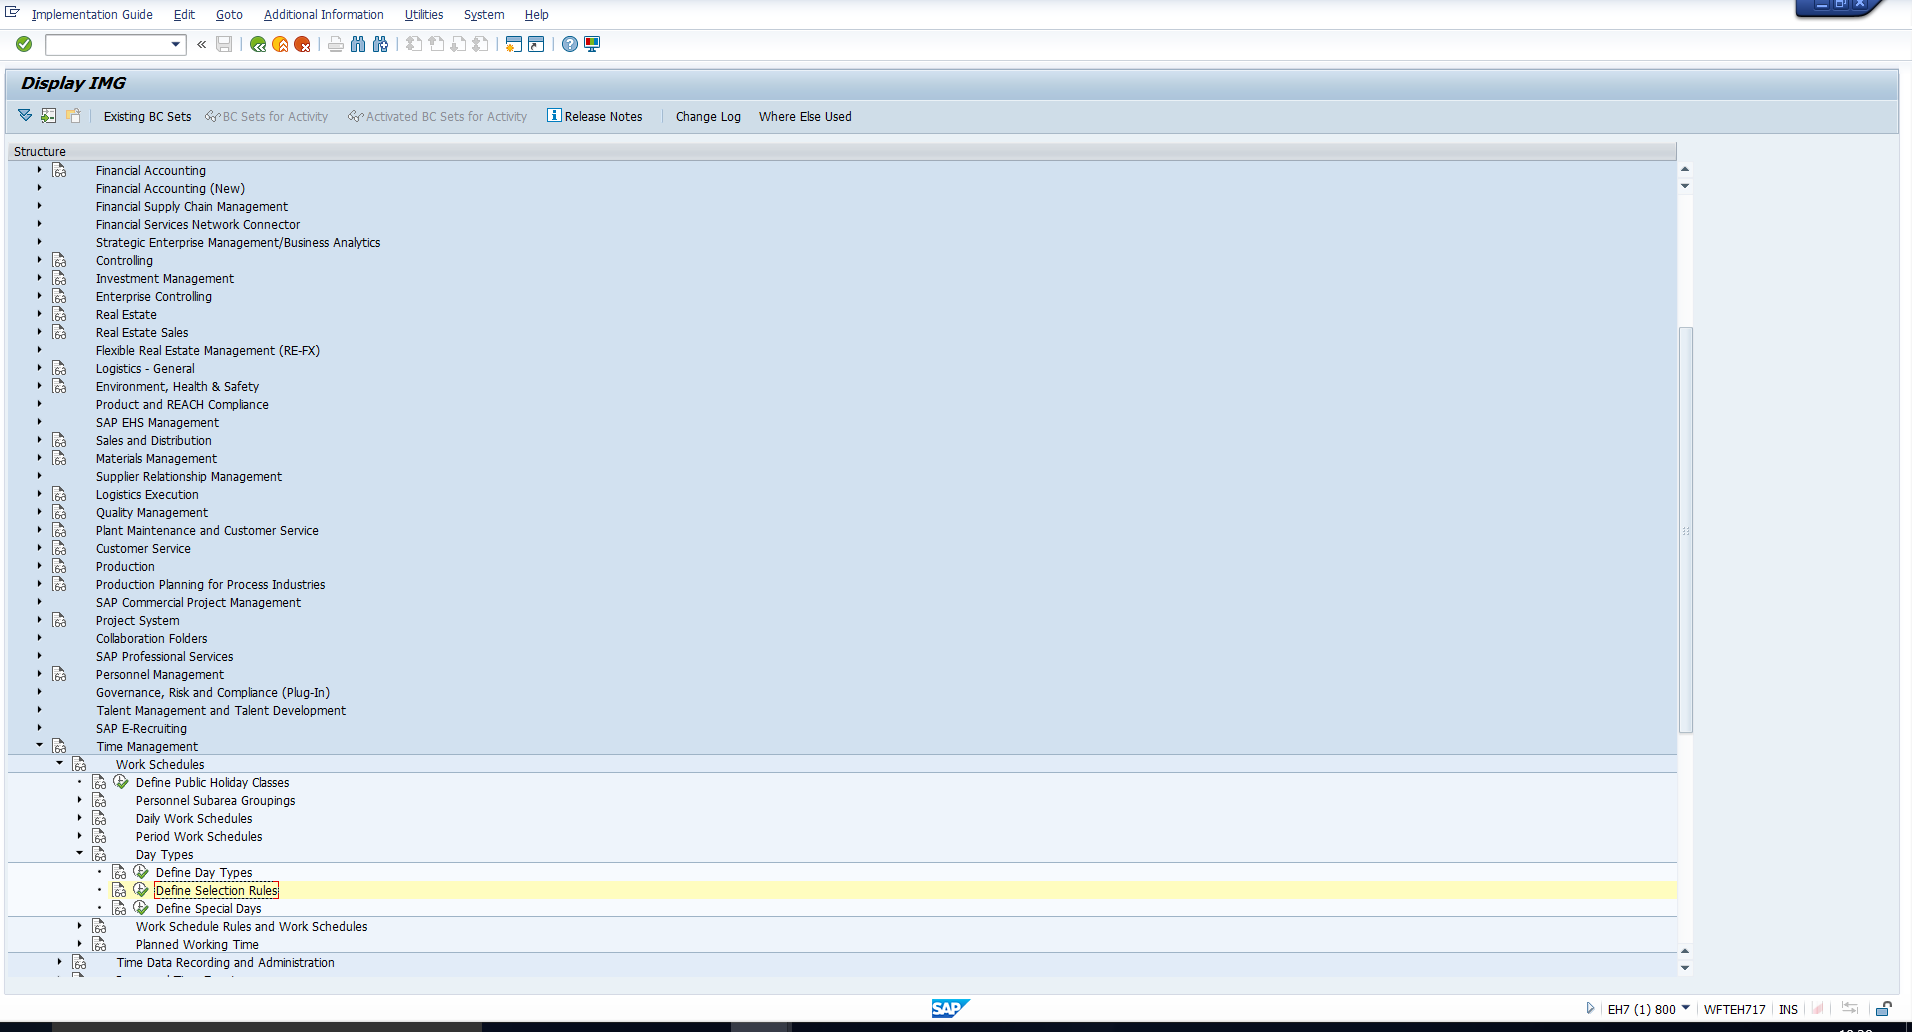 Figure 9: IMG Path to Define Selection Rules
Executing this activity takes you to the screen in Figure 10. You can see three columns for each rule. The first contains the set of Day types that should be respectively assigned to Holiday Class 0, 1, 2, 3, 4, 5, 6, 7, 8, 9, if the day is a weekday. The second contains the set of Day types that should be respectively assigned to Holiday Class 0, 1, 2, 3, 4, 5, 6, 7, 8, 9, if the day is a Saturday. The third contains the set of Day types that should be respectively assigned to Holiday Class 0, 1, 2, 3, 4, 5, 6, 7, 8, 9, if the day is a Sunday.
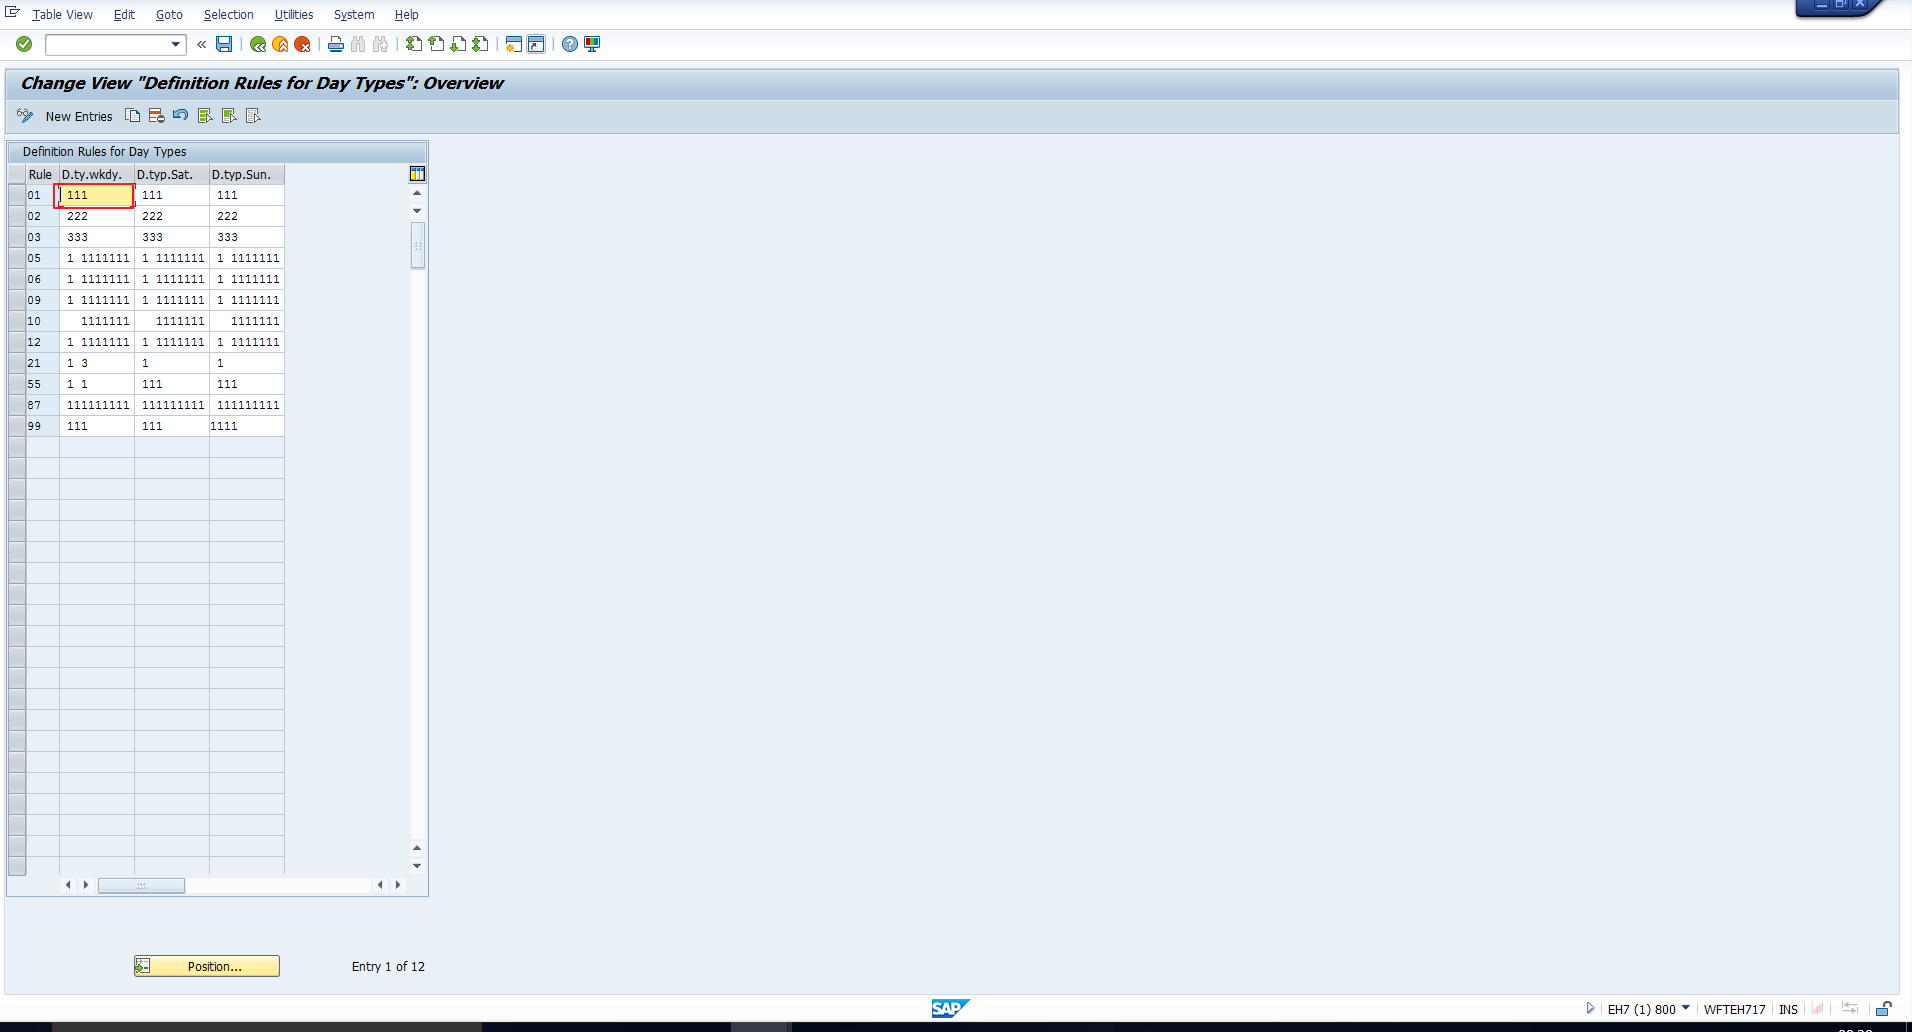 Figure 10: SAP Day Type Selection Rules
Prima facie, this screen appears rather confusing. We’ve tried to simplify it with the representation shown in Figure 11. Here you can see that for each Holiday Class from 0-9, the required Day type has been assigned. So the highlighted part of Figure 10 can be simply interpreted as the highlighted part of Figure 11.
 Figure 11: Interpreting a Selection Rule
Using this, let’s analyse Rule 01. We can interpret that Rule 01 specifies that on Weekdays, Saturdays and Sundays, for Holiday Classes 1, 2 and 3, the Day type will be 1 (Off/Paid). Otherwise, the Day type will be blank (Work/Paid).
Assume that an organization uses two Holiday classes as below:
Assume that there are two Employee Subgroups, say, workmen and managers. The policy is that workmen should work on public holidays (holiday class 1) on weekdays, while managers get the day off. Both workmen and managers are paid for the public holiday.
Whereas, if the holiday falls on a Saturday or Sunday, workmen and managers both get a paid off.
To meet this requirement, we can create two Selection rules as illustrated in Figures 12 and 13.
 Figure 12: Selection Rule for Workmen
 Figure 13: Selection Rule for Managers
In Figure 12 (selection rule for workmen), if the day is Saturday or Sunday, and the holiday class is 1 (public holiday), the Day type ‘1’ (Off /Paid) is assigned. But if the day is a weekday, and the holiday class is 1 (public holiday), the Day type ‘0’ or blank (Work /Paid) is assigned.
In Figure 13 (selection rule for managers), for all days (Saturday, Sunday or any weekday), if the holiday class is 1 (public holiday), the Day type ‘1’ (Off /Paid) is assigned.
These rules can be configured in SAP as illustrated in Figure 14. Here, 78 is the selection rule for workmen and 79 is the selection rule for managers. These rules will then be assigned to the appropriate Employee Subgroups when we create Work schedule rules, which we will see in the next tutorial.
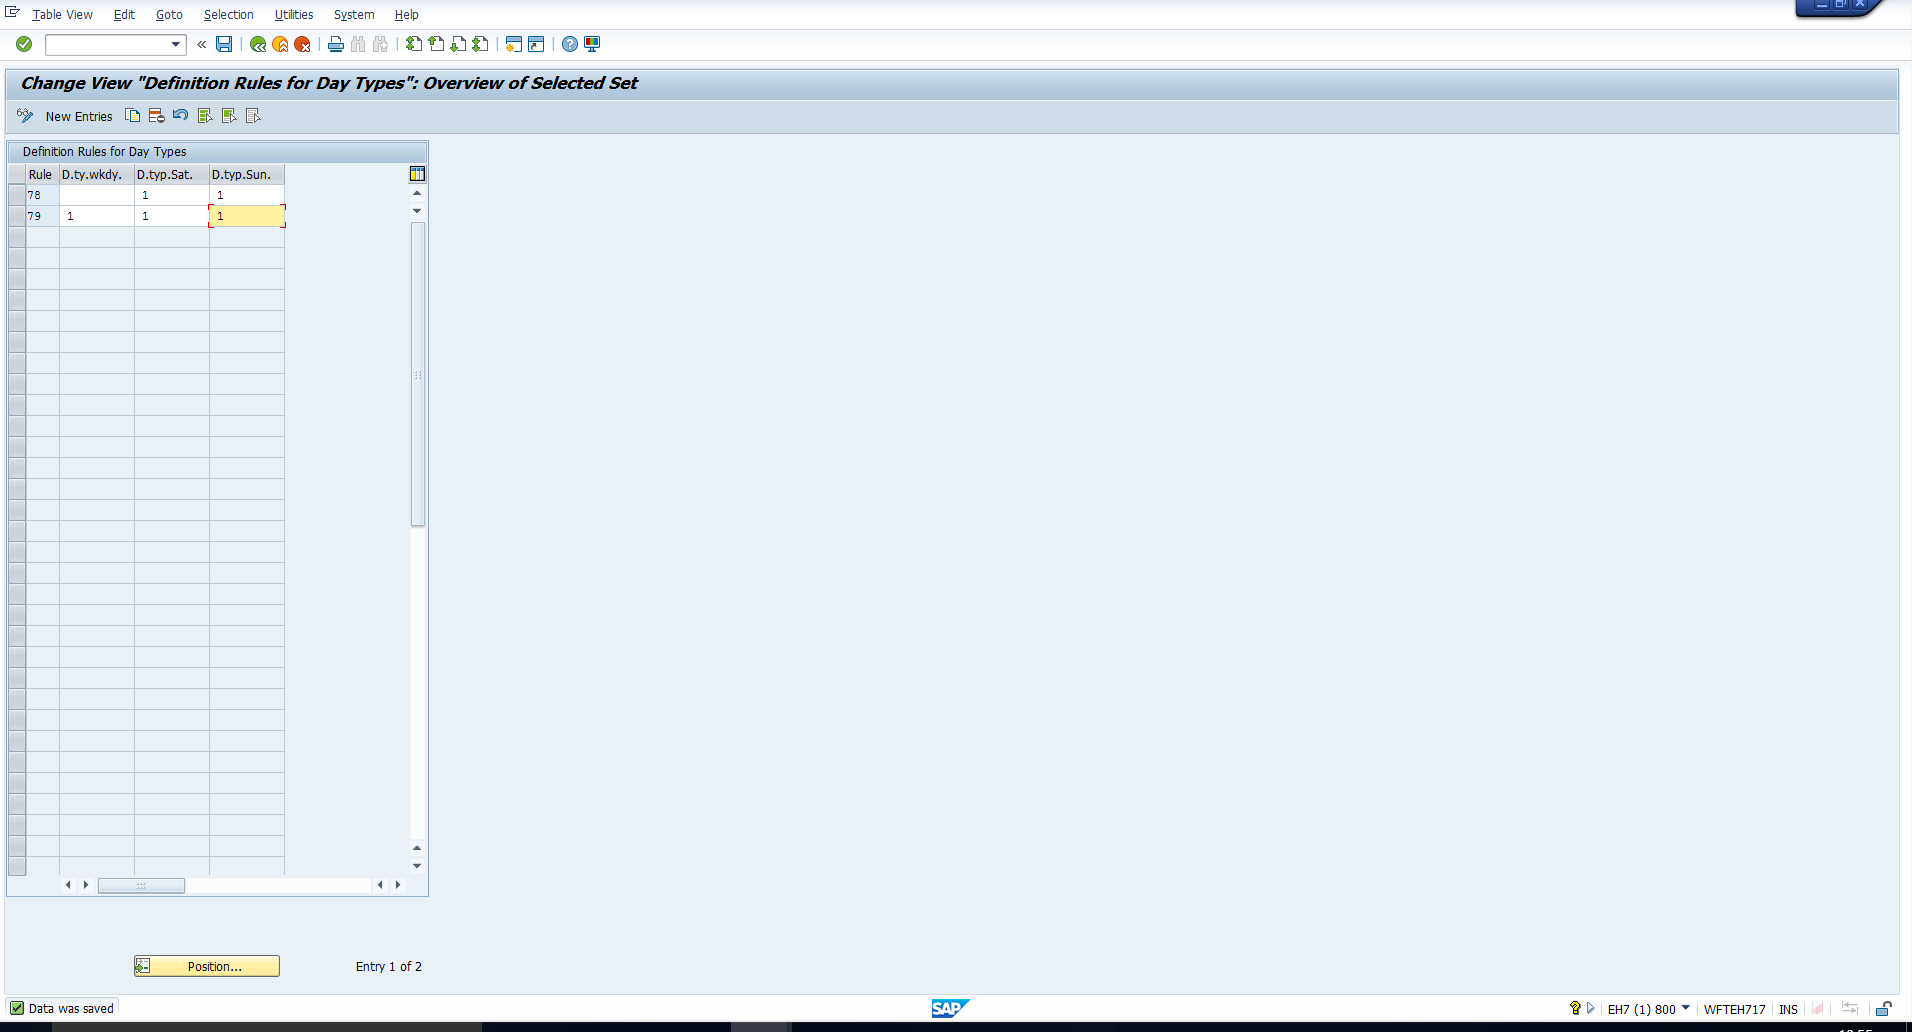 Figure 14: Newly Created Selection Rules
—