SAP Basis
Posted by Superadmin on January 04 2019 04:44:34
SAP Basis
Basis is a set of programs and tools that act as an interface with Database, Operating system, communication protocols and other SAP modules like FI, HCM, SD etc. This course will introduce different features of Basis.
What should I know?
The course is designed for beginners with little or no basis experience. But knowledge of SAP basics is a plus. Refer the tutorials sequentially one after the other to increase the efficacy of learning.
Training Syllabus
Introduction to Basis
| Tutorial |
Introduction to Basis |
| Tutorial |
Guide to Install SAP GUI aka FrontEnd |
| Tutorial |
What is SAP Instance And SID |
| Tutorial |
Learning Sap Architecture |
Clients
| Tutorial |
What is Client ? How to Create a New Client in SAP |
| Tutorial |
All About Client Copy – Local,Remote, Import/Export |
| Tutorial |
How To Delete a Client |
User Authorization
| Tutorial |
How to Create a User |
| Tutorial |
How to Lock/Unlock a User |
| Tutorial |
How to Limit Logon Attempts? |
| Tutorial |
How to set Password Restrictions |
Background Jobs
| Tutorial |
Background Job Processing |
| Tutorial |
How to Monitor a Background Job |
| Tutorial |
How to Delete a Background Job |
Transport Management System
| Tutorial |
Introduction to Transport Management System (TMS) |
| Tutorial |
How to configure TMS (Transport Management System) |
| Tutorial |
How to configure Transport Routes and Layers |
| Tutorial |
What is Transport Request? How to Import/Export it & check logs? |
Patch Administration
| Tutorial |
Support Package & Stack Updates – Ultimate Guid |
| Tutorial |
SAP Kernel Updates |
| Tutorial |
SAP System Monitoring & Performance Checks |
| Tutorial |
How to trace if an OSS Note is deployed in your landscape |
RFC
| Tutorial |
Introduction to RFC (Remote Function Call) |
| Tutorial |
How to Configure and Test RFC |
Data Migration
| Tutorial |
All About IDOC:Definition, Architecture, Implementation |
| Tutorial |
What is SAP LSMW ? |
Check!
| Tutorial |
SAP Basis Interview Question |
| Tutorial |
SAP Basis Quiz |
What is BASIS?
Basis is a set of programs and tools that act as an interface with Database, Operating system, Communication protocols and business applications (such as FI, CO, MM,etc). Full form of BASIS is "Business Application Software Integrated solution"
SAP applications such as FI,CO,PP etc. can run and communicate with each other across different Operating systems and Databases with the help of BASIS.
Nowadays Basis is known as Netweaver.
Alias of BASIS is SAP Application Server Technology and alias of NetWeaver is SAP Web Application Server.
After adding java stack (the applications which are developed in J2EE,BSP,JSP,etc..) enhanced security standard for business process. Both ABAP and Java stack can be monitored from one platform. Netweaver supports standard protocols such as HTTP,SMTP,XML,SOAP,SSO,WEBDAV,WSDL,WMLSSO,SSL,X.509 and Unicode format(representation of handling text).
We can say Basis is the operating system for SAP applications and ABAP. Basis provides services like communication with the operating system, database communication, memory management, runtime collection of application data, web requests, exchanging business data etc...
Basis supports a number of known operating systems (Unix flavors,Microsoft windows server edition, AS400,z/OS,etc) and databases (Oracle,DB2,Informix,Maxdb,Microsoft SQL Server,etc)..
As we know BASIS is a set of tools. This tool has the following different functionalities:-
SAP Basis consultant’s responsibilities:-
SAP Basis is a middleware tool for applications, operating system, and database.SAP Basis consultant should able to do the following tasks:-
- SAP application server monitoring, ABAP dump, and system log analysis.
- Performance tuning
- Database maintenance, Database backup schedule and restore
- R/3, NetWeaver, solution manager installation,etc..
- SAP license maintenance.
- SAP landscape, transport management system installations, etc
- Client creating, client copying, client deletion, etc
- Creating user, assigning roles, locking and unlocking users,etc
- Background jobs scheduling, job monitoring, job deletion, etc
- Profile and operation mode maintenance
- Applying support patches, upgrading and installing add-ons
- SNOTE applying and removing errors.
- System copy, System refresh ,etc
This a generic list. There are many other responsibilities that a Basis consultant shoulders. Every day you learn something new!
Before you can configure and use the SAP GUI, you need to download the software from the SAP Marketplace as per steps below -
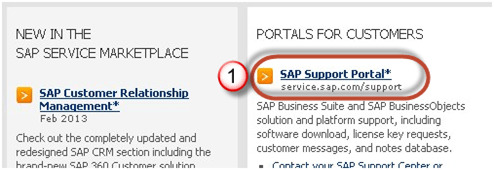
Step 1) Goto service.sap.com to Download SAP GUI 7.40 for Windows
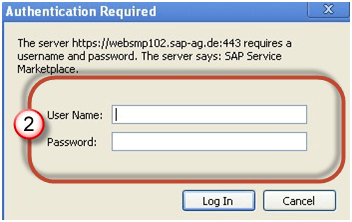
Step 2) Enter S-user and password as provided by SAP.
Step 3) Goto "Software Downloads."
Step 4) Choose "Browse our Download Catalog."
Step 5) Choose SAP Frontend components
Step 6) Choose SAP GUI for your OS. In this demo, we will select Windows-
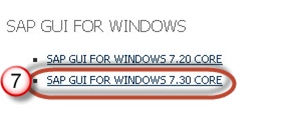
Step 7) Choose SAP GUI 7.30 Core which is the latest one.
Step 8) Choose installation
Step 9) Choose Add to download Basket
Step 10) Choose the Download Basket
Step 11) Choose Your download and it will begin.
Time to configure your GUI
Once the download is complete and you have installed the software, it's time to configure it -
Step 1) Click on create the button as shown below.
Step 2) Click next button
Step 3) Fill the Server details
- Connection Type: - Custom Application Server(Particular one host)
- Description: - Name of instance
- Application Server: - IP address of remote application server
-
Instance number which you can find from os level (Unix)
Goto /usr/sap/sid/DVEBGMS00 Here instance number = 00
- System ID: - As per you setting which you have specified during installation time.
Step 4) Created system will be there in the list as per shown below.
Double Click on the instance to log-in to a SAP Server.
What is an Instance?
Sap Instance is a group of resources such as
- Memory
- Work Processes
- Dispatcher
- Gateway
usually for a single application or database server within a SAP R/3 client-server environment.
There are three types of instances:-
- Dialog instance
- Central Instance
- Database Instance
SAP System= Dialog Instance + Central Instance + Database Instance.
For one SAP system, all three instances share the same directory.
- Dialog Instance: - Dialog instance exists in the application layer. Its purpose is to maintain the load on the server. Dialog instance exists on the different host. If a number of dialog instance increases hardware resources, dispatcher, workprocesses also increases so that more number of users can login at a time.
- Central Instance: - Central instance can also work as dialog instance. But the main thing is that it contains Enqueue and message servers. All dialog instances communicate with central instance before requesting database with message server. When an instance is started, the dispatcher process attempts to establish a connection to the message server so that it can announce the services it provides (DIA, BTC, SPO, UPD, etc.).Lock table is managed in central instance by enqueue service.
- Database Instance: - As normal database instance accepts requests from central instance to fulfill the user's requests. As lock management system provided by enqueue server, it will provide service to users.
What is SID?
SID is a unique identification code for every R/3 installation (SAP system) consisting of a database server & several application servers. SID stands for SAP System Identification. SAPSID — a three-character code such as C11, PRD, E56, etc.)
Logical System Names: -
When data is distributed between different systems, each system within a network has to be clearly identifiable. The "logical system" deals with this issue.
A logical system is an application system in which the applications work together on a common database. In SAP terms, the logical system is a client.
Since the logical system name is used to identify a system uniquely within the network, two systems cannot have the same name if they are connected to each other as BW systems or as source systems, or if there are plans to connect them in any way.
Example for production system logical system name might be:-
SID – PBG
SID Description - P=Production(type) , B=BW(component) , G=Germany.(plant name)
Logical System name-
PBGCLNT100.This form is easy to understand.
What is SAP R/3?
SAP R/3 is a 3 tier architecture consisting of 3 layers
- Presentation
- Application
- Database
In simple words, it’s a client server architecture.
- R signifies Real-time system
- 3 represents - 3-tier architecture.
User's PC:- Users can access SAP system in two ways:-
- Through SAP GUI
- Through Web browser
It's called front-end. Only the front-end is installed in the user's PC not the application/database servers.
Front-end takes the user's requests to database server and application servers.
Application Servers: - Application server is built to process business-logic. This workload is distributed among multiple application servers. With multiple application servers, the user can get the output more quickly.
Application server exists at a remote a location as compared to the location of the user PC.
Database Server: -Database server stores and retrieves data as per SQL queries generated by ABAP and Java applications.
Database and Application may exist on the same or different physical location.
Understanding different SAP layers
Presentation Layer:
The Presentation Layer contains the software components that make up the SAPgui (graphical user interface). This layer is the interface between the R/3 System and its users. The R/3 System uses the SAPgui to provide an intuitive graphical user interface for entering and displaying data.
The presentation layer sends the user's input to the application server, and receives data for display from it. While a SAPgui component is running, it remains linked to a user's terminal session in the R/3 System.
Application Layer:
The Application Layer consists of one or more application servers and a message server. Each application server contains a set of services used to run the R/3 System. Theoretically, you only need one application server to run an R/3 System. In practice, the services are distributed across more than one application server. The message server is responsible for communication between the application servers. It passes requests from one application server to another within the system. It also contains information about application server groups and the current load balancing within them. It uses this information to assign an appropriate server when a user logs onto the system.
Database Layer:
The Database Layer consists of a central database system containing all of the data in the R/3 System. The database system has two components - the database management system (DBMS), and the database itself. SAP has manufactured its own database named Hana but is compatible with all major databases such as Oracle.All R/3 data is stored in the database. For example, the database contains the control and customizing data that determine how your R/3 System runs. It also contains the program code for your applications. Applications consist of program code, screen definitions, menus, function modules, and various other components. These are stored in a special section of the database called the R/3 Repository, and are accordingly called repository objects. R/3 repository, objects are used in ABAP workbench.
Understanding the components of SAP R/3 3-tier Architecture:-
ABAP+Java System Architecture
- Message Server:It handles communication between distributed Dispatchers in ABAP system.
- Dispatcher Queue: Various work process types are stored in this queue.
-
Dispatcher: It distributes requests to the work processes.
-
Gateway: It enables communication between SAP system and between SAP system and external systems.
-
ABAP-Work processes: - It separately executes dialog steps in R/3 applications.
Types of work processes are given as below:-
-
Memory-pipes: It enables communication between ICM and ABAP work processes.
-
Message Server: It handles java dispatchers and server processes.It enables communication within java runtime environment.
-
Enqueue Server:It handles logical locks that are set by the executed Java application program in a server process.
-
Central Services: Java cluster requires a special instance of the central services for managing locks and transmitting messages and data. Java cluster is a set of processes that work together to build the reliable system. Instance is group of resources such as memory, work processes and so on.
-
Java Dispatcher: It receives the client requests and forwards to the server process.
-
SDM: Software Deployment Manager is used to install J2EE components.
-
Java Server Processes: It can processes a large number of requests simultaneously.
-
Threading: Multiple Processes executes separately in the background, this concept is called threading.
-
ICM: It enables communication between SAP system and HTTP, HTTPS, SMTP protocol. It means by entering system URL in the browser you can access SAP from browser also.
One more component is JCO. JCO is used to handle communication between java dispatcher and ABAP dispatcher when system is configured as ABAP+Java.
How the SAP Logon Process works?
Step 1) Once a user clicks on the SAP system from GUI, the user request is forwarded to Dispatcher.
Step 2) Request is stored in Request queues first. Dispatcher follows First in First out rule. It will find free work process and if available will be assigned.
Step 3) As per user request, particular work process is assigned to user. For example, when user login to the system then Dialog work process is assigned to the user. If user runs a report in background then background work process is assigned to the user.When some modifications are done at database level then update workprocess is assigned.So as per user's action workprocess is assigned.
Step 4) Once user is assigned the dialog workprocess then user authorizations, user's current setting are rolled in to work-process in shared memory to access user's data.Once dialog step is executed then user's data is rolled out from workprocess. Thus shared memory will be cleaned and other user's data can be saved in shared memory area. Dialog step means the screen movements. In a transaction, when a users jumps from one screen to other the process is called a dialog step.
Step 5) First work process will find the data in the buffer. If it finds data in buffer then there is no need to retrieve data from database. Thus response time is improved and this process is called hit.If it does not find the data in buffer then it will find the data in database and this process is called miss. Hit ratio should be always higher than miss ratio. It improves the performance of system .
Step 6) Other requested data is queried from the database and once the process is complete,the result is sent back to GUI via dispatcher.
Step 7) At the end user's data is removed from shared memory so the memory will be available to other users.This process is called roll-out.
What is a SAP Client?
Client is a 'Customer'. in SAP. We can say that each customer maps to one client. Within one SAP instance, a number of Clients can be created. No need to install separate softwares for each and every customer.It provides isolation ,one client cannot see the data of another client.
As depicted above 100 and 200 clients exist under one roof. We can create a number of clients in SAP Application (from 000 to 999)
What does client contain?
-
Application Data- Application data is the data that are stored in the database tables.
- Customizing Data - Customizing data is data created by customers when they customize their systems
- User Master Record- A user master record defines the authorizations assigned to a user. Basis consultants are responsible for maintaining the user master record and assigning authorizations.
Advantages of Client concept: -
- Clients enable SAP SAS providers to install a small number of SAP Systems, but still cater to a large number of customers.
- Costs are not only saved by sharing hardware and software but multiple customers also use the same application solution, including administration and support.
- Clients help establish your SAP landscape. For instance, you can have a client for the development team, a client for a test team and a production client.
SAP comes with three "standard clients": -
- 000
- 001
- 066
000 Client: - We can find this clients in the system as soon as we install SAP r/3 software. This is called master client. Client 000 contains a simple organizational structure of a test company and includes parameters for all applications, standard settings, and configurations for the control of standard transactions and examples to be used in many different profiles of the business applications. It contains client independent data.
001 Client: - This clients is a copy of the 000 client including the test company. This client's settings are client-independent if it is configured or customized. People normally use 001 clients to create a new client.
066 Client: - This client is called early watch client. The SAP earlywatch alert is a diagnosis service, for solution monitoring of SAP and non-SAP systems in the SAP Solution Manager. Alert may contain Performance issue, average response time, current system load, Database administration,etc..
How to create a new client?
Theoretically, we can create clients from 000 to 999.But maintenance of such a large number of clients becomes a challenge.
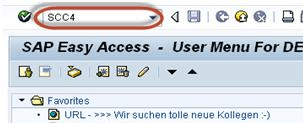
Step 1) Execute T-Code SCC4
Step 2) It will bring you to the initial screen of SAP clients.
Click New Entry to make a new SAP Client
Step 3)
- Enter basic details as given below.
- Client number & description
- City to which client Belongs (etc, NY-New York)
- Logical system may be <SID>CLNT<Client Number>
- Std Currency may be (etc EUR)
- Client roles may be Customizing, Demo, Training/Education, Production, etc..
- Enter your client specific data and set permission for the clients as per your requirement
- Save
- Press F3 to come back to SCC4
Step 4) New client will be there in the list.Here we have created client 100.
Client Copy
We can generate a blank client with SCC4.But how to fill the data in the client?"Answer is the client copy."
Client copy means "transferring client specific data" within the same instance(SID) or between different instances(SID).
Client copy can be performed with three different methods -
- Local client copy.
- Remote client copy.
- Client Import/Export.
Below brief details are given about client copy methods.
Local Client Copy: - This method is used to copy client within the same instance (SID).It is done by T-code SCCL.
Remote Client Copy: -This method is used to copy client between different instances(SID).It is performed by T-code SCC9.
Client Import/Export: - This method is used to copy client between different instances(SID).It is performed by T-code SCC8
Client Copy Pre-steps
To avoid data inconsistencies there are few pre-steps to be performed before starting client copy:-
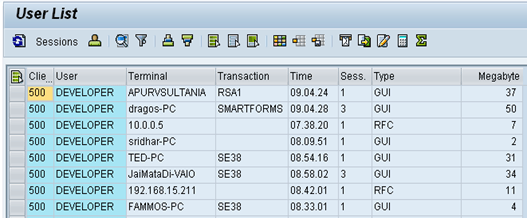
1) Disconnect and lock business users(SU10).You can end the session of active users in the system through SM04. Once all users are logged out, check that no canceled or pending update requests exist in the system.
2) Suspend all background jobs
- Execute SE38 as given below.
- Fill program name with "BTCTRNS1" as above figure.
- Press Execute.
3) For a local copy, the system must have enough space in the database or tablespace.
For remote copy, target system must have enough space in the database or tablespace. Check space using Tx DB02.
4) To avoid inconsistencies during client copy users should not be allowed to work in source client.
5) rdisp/max_wprun_time parameter should be changed to 2000 second as a SAP recommendation . Although you use parallel processes and schedule job in the background, dialog processes will be used.
Local Client Copy
Local client copy is performed using Tcode SCCL.
Scenario:-
- Source Instance & client := DKM-000
- Target Instance & client := DKM-202
Step 1) Create an entry for your new target client using SCC4. In our scenario, we will create client 202 in DKM system.Log on to this newly created target client (DKM-202) with user SAP* and default password pass.
Step 2) Excute T-code SCCL.
Step 3)
- Select your desired profile
- Enter Source client.
- Enter Description
Step 4) By default Client Copy is executed as a single process. A Single process will take a lot of time. We will distribute the workload of single the process to parallel(multiple) processes which will reduce time in copying a client.
- Select Goto from the menubar.
- Select Parallel Process.Parallel processes are used to exploit the capacity of database better
Step 5) Always execute long running processes in background mode rather than foreground/dialog mode. In fact, some processes run more quickly in the background.
Step 6) The client copy logs are available in SCC3. Status - "Successfully Completed" means client copy is completed.
Remote Client Copy:-
This technique uses Remote function call. You can view RFC from SM59. This technique depends on the network, so network connectivity must be strong enough.
Scenario:-
Source Instance & client := BD1-101
Target Instance & client := DKM-202
Step 1) Log on to the target system. Here we will log on to DKM system. Create a new target client entry(202) using SCC4. Log on to this new target client with user SAP* and default password "pass".Here we will log on to DKM-200 system.
Step 2) Execute Transaction Code SCC9.
Step 3) Fill the basic details as per your requirement.
Step 4) Select Parallel Process.Parallel processes are used to exploit the capacity of database better.
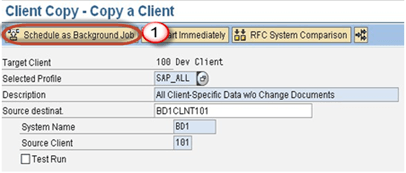
Step 5) Schedule the client copy in background
Step 6) The client copy logs are available in SCC3 as given below.
Client Import/Export
For large database, it is recommended to use client import/export instead of remote client copy.
Scenario:-
Source Instance & client := PKT-300
Target Instance & client := DKM-202
This technique always starts with client export step.
Note: - You must have enough space in the /usr/sap/trans_SID file system to perform the client export.
How to export client?;
Step 1) Log on to the target system(DKM). Create an entry for your new target client using SCC4. Log on to the source system/source client(PKT).
Step 2)Before you import a Client you need to export.Export is nothing but transferring data files and co-files from source system's database to target system's import buffer.Execute T-code SCC8.
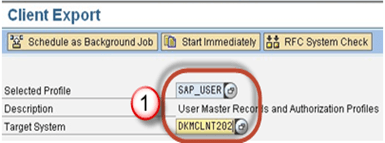
Step 3)
- Select profile
- Choose target system.
Step 4) Schedule the export in background
Step 5) Once the job is executed data files and co-files of profiles from PKT system's database are transferred to DKM system's import buffer.Once we will import request in DKM only then it will be reflected in a database of DKM system.
Depending on the chosen export profile there can be up to 3 transport requests created:
- Request PKTKO00151 will hold the cross-client data,
- Request PKTKT00151 will hold the client dependent data,
- Request PKTKX00151 will also hold some client dependent data.
How to import the client?
Step 1) Log on to the newly created target client(DKM-202) using SAP* and password pass.
Step 2) Start the STMS_IMPORT transaction
As shown below, import queue will open
Step 2) Select the transport requests generated by client export .Import theses transport requests on the target client.
The transport requests should be imported in the following sequence:
- Request PKTKO00151
- Request PKTKT00151
- Request PKTKX00151
The system automatically detects these are client export transport requests and automatically performs the import of the 3 requests.
The import logs can be seen in STMS_IMPORT.
Step 3) Post import phase:-
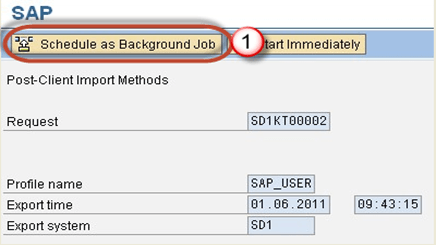
Once the import is done, execute SCC7 to perform the post client import actions,
Schedule the post import job in background.
Step 4) Import log will be available in SCC3. The Client is successfully imported.
Following are the detailed steps to Delete a client in SAP
Step 1) T-code which is used for client deletion is SCC5.
Step 2) Click on "delete in the background" to run client deletion as background job. You can also check the option "Delete an entry from T000" table.
Table "T000" contains clients' entry which we have created in SCC4.
Step 3) Check the status of client deletion process using SM50.
Workprocess overview will open. "BGD" denotes background workprocess.
Once complete. Client will be deleted
Following are the detailed steps to Create a user in SAP
Step 1) Execute T-code SU01
Step 2)
- Enter Username which you want to create.
- Click the create button
Step 3) In the next screen
- Click the Address tab.
- Enter Detials
Step 4) Choose the user type in Logon Data tab.
There are 5 types of users in sap:-
- Dialog user: - Normally it is used for interactive system access from GUI (used for human users)
- System user: - Normally it is used for Background processing, communication within a system.
- Communication user: - It is used for external RFC calls.
- Service user: - Dialog user available to a larger, anonymous group of users.
- Reference user: - General, non-person related users that allows the assignment of additional authorizations. Example, Internet users created with transaction SU01. No logon is possible.
Step 5) Type the initial password for 2 times.
On first logon of the new user , system will ask to re-set the password.
Step 6)
- Select the roles tab
- Assign roles as per requirements
Step 7)
- Select the profiles tab
- Assign profiles as per requirements
You can assign SAP_ALL and SAP_New profile to user for full authorization.
- SAP_ALL:You assign this profile to users who are to have all R/3 authorizations, including super-user authorization.
- SAP_NEW:You assign this profile to users who have access to all currently unprotected components. The SAP_NEW profile grants unrestricted access to all existing functions for which additional authorization checks have been introduced. Users can therefore continue to work uninterrupted with functions which are subject to new authorization checks which were not previously executed.
Step 8)
- Press save
- Then the back button (F3) button
User will be created!
Locking a user
The Purpose of locking user is to temporarily deactivate the users so that they cannot longer access the system.
Users can be locked in 2 ways:-
- Automatically
- Explicitly/Forcefully
Automatically: - There are two possibilities when users get lock automatically
- Maximum number of failed attempts:- controlled via the parameter login/fails_to_user_lock. If a value is set to 3 it means after 3 failed attempts user will be locked.
- Auto unlock time: - "login/failed_user_auto_unlock" defines whether user locked due to unsuccessful logon attempts should be automatically removed at midnight.
Explicitly/Forcefully: We can lock and unlock users in 2 ways-
- Lock single user (SU01)
-
Lock multiple user (SU10)
Procedure to lock a single user
Step 1) Execute T-code SU01
Step 2) Enter a username in User field.
Step 3) Press Lock/Unlock button
Step 4) In the next screen, Press Lock button again to lock the user.
Procedure to lock multiple users
Step 1) Execute T-code SU10
Step 2) Enter users a username in User field.
Step 3) Press Lock/Unlock button
All the users listed will be locked
Procedure to unlock a user
Step 1) Execute T-code su01
Step 2) Enter username in User field.
Step 3) Press Lock/Unlock button
Step 4) Press Unlock button
Procedure to unlock multiple users
Step 1) Execute T-code SU10
Step 2) Enter users' username in User field.
Step 3) Press Unlock button
Users will be unlocked
Before we learn to limit logon attempts we need to know parameter -
What is a parameter?
Parameter is the set of keys and values to manage the SAP system.There are two types of parameters -
- Static: - It needs a restart. It doesn't effect to the system immediately once you set the value for it.
- Dynamic: - It does not need restart. It effects to the system immediately once you set the value for it.
How to view a parameter?
Step 1) Execute T-code RZ11.
Step 2)
- Put parameter name "login/fails_to_session_end" in text-field.You can put any Parameter name.
- Click Display
Step 3) The screen below shows the current value set for the parameter by the admin
In order to change a parameter, click the pencil icon and make desired changes
Important Parameters to limit login attempts
- login/fails_to_session_end: This parameter specifies the number of times that a user can enter an incorrect password before the system ends the logon attempt. The parameter is to be set to a value lower than the value of parameter
- login/fails_to_user_lock: This parameter specifies the number of times that a user can enter an incorrect password before the system locks the user against further logon attempts. Default value is 12. You can set it to any value between 1 and 99 inclusive.
You can use the following system profile parameters to specify the minimum length of a password and the frequency with which users must change their password.
Specifying Impermissible Passwords
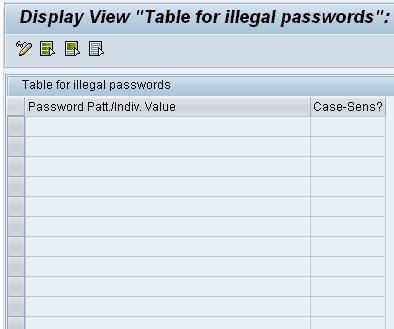
You can prevent users from choosing passwords that you do not want to allow. To prohibit the use of a password, enter it in table USR40. You can maintain table USR40 with Transaction SM30. In USR40, you can specify impermissible passwords generically if you want. There are two wildcard characters:
- ? stands for a single character
- * stands for a sequence of any combination characters of any length.
123* in table USR40 prohibits any password that begins with the sequence "123."
*123* prohibits any password that contains the sequence "123."
AB? prohibits all passwords that begin with "AB" and have one additional character: "ABA", "ABB", "ABC" and so on.
To set restriction for password follow the below procedure:-
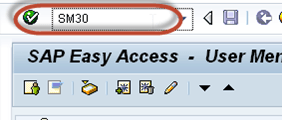
Step 1) Execute T-code SM30.
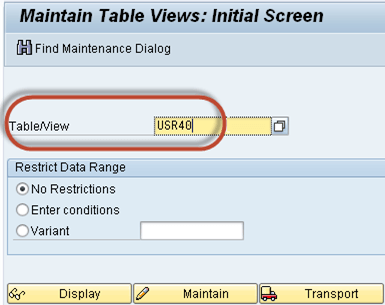
Step 2) Enter the table name USR40 in "Table/View" field.
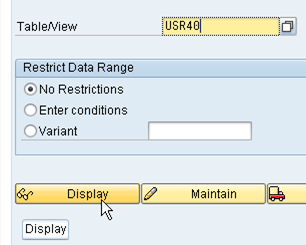
Step 3) Click Display button.
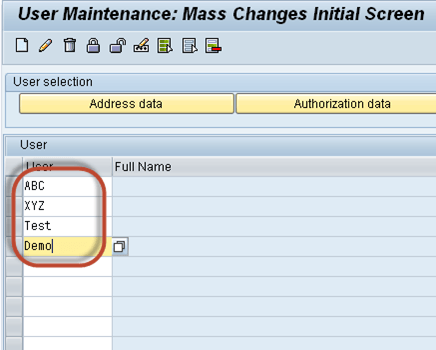
Step 4) Enter password expression string.
That's it for password management!
What is a Background Job?
Background job is a non-interactive process that runs behind the normal interactive operations. They run in parallel and do not disturb interactive (foreground jobs) processes and operations.
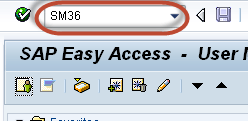
It is scheduled from SM36. You can analyze it from SM37 by viewing its job log.
Advantages of Background Jobs
- It reduces manual effort & automates the task.
- It can be scheduled as per user's choice.
- It reduces user interaction and can run seamlessly in the background without user input
- Once you define the variant for background job, the user doesn't have to worry about value input in the field. Thus, user confusion is also reduced.
- Ideal for time- consuming/resource intensive programs which can be scheduled to run in the night(when system load is low).
Background jobs are classified into three categories -
- Class A (High/critical Priority): - Some tasks are urgent or critical and must be scheduled with class A priority job. Class A priority reserves one or more background work processes. Users have to decide how many background work processes should be assigned to Class A priority job. Suppose a user chooses 2 background work processes for this category then available background work processes for class B and C = (Total number of work processes set in operation modes RZ03)- (Background work processes allowed to class A category).
- Class B(Medium Priority): - Once Class A jobs are completed , Class B job will start executing in the background before class C jobs.
- Class C(Low Priority): -It runs after both class A and class B jobs are completed.
Possible status of background jobs
- Scheduled: - You have defined the program name and variant but not defined start condition like Start Date, End Date, Frequency etc. That means you have not defined when a job should be scheduled in system.
- Released: - All required criteria are fulfilled for job definition. Start condition is must for the job to be in release status.
-
Ready: - All the required conditions are met to run the job in a background workprocess. But job scheduler has put the job in the queue because it is waiting for background workprocess to be free.
-
Active: - Job has started running in the background. We cannot change the status of the job once it is in Active status.
-
Finished: - Job is executed successfully. It means the desired task is competed without any error.
-
Cancelled: - There are two possibilities for this. The Administrator has forcefully canceled the job or there might be some issue with job. You can investigate this from Job logs.
How to schedule the background job?
You can schedule the background job using SM36. Planned or immediate jobs can be scheduled.
Step 1) Execute T-code SM36.
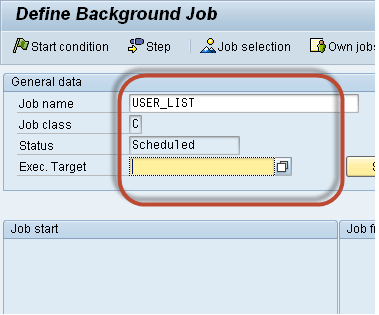
Step 2) Fill the job name, priority(A/B/C) and the target server. Background jobs once scheduled on a target server run on that server. Main purpose of defining target server is the workload balancing.
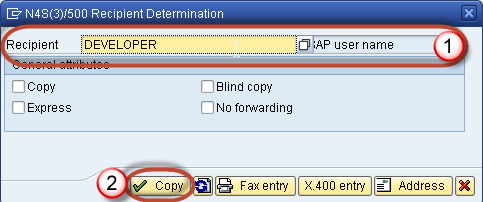
Step 3) Click on "spool list recipient". You will get output in your mailbox. You can check email from SBWP.
Step 4) Insert your SAP username and click the copy button.
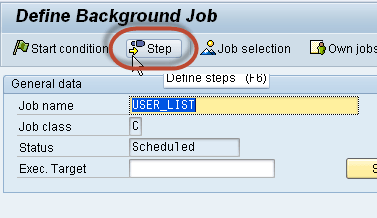
Step 5) Click Step button to define ABAP program, variant's details, etc.
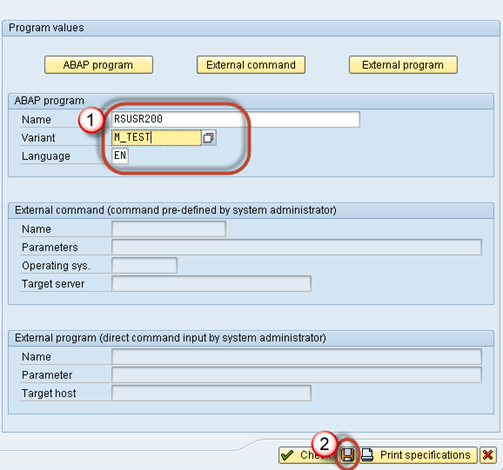
Step 6) Define program name, variant details.
- Enter your program name, Variant name in the field. If you have not created variant as per your requirement, then leave it blank.
- Press save button.
Step 7) Once you schedule the job you will get the following screen.
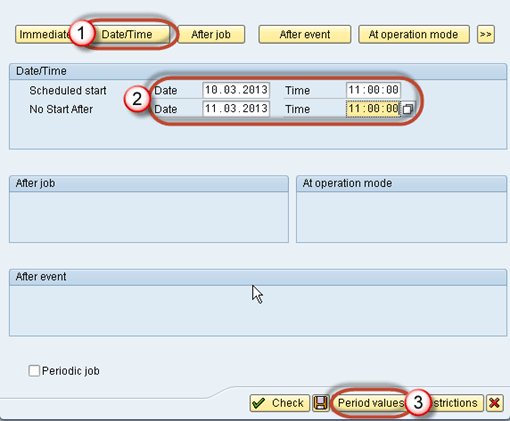
Step 8) Click Start conditions to fill start date, end date, frequency, etc for job. If you do not specify start condition then job will always remain in scheduled status. A job in scheduled status will never run.
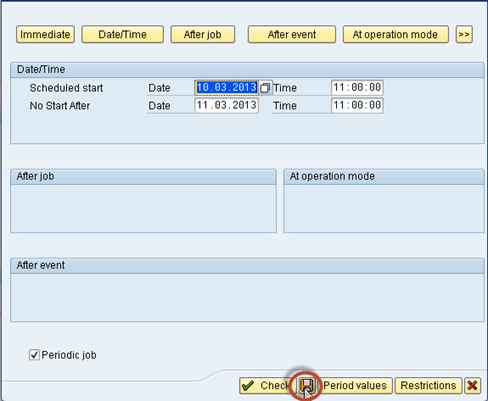
- Click on Date/Time(For periodic jobs). If you click "Immediate" then job will start running right away. But it will not be set as periodic job. It's like "press and run."
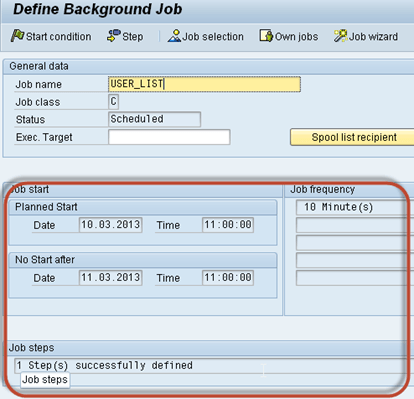
- Define job's start date/time, end date/time. The job will be released only once it meets its Scheduled start date/time.
- Press periodic values.
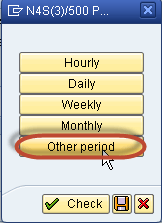
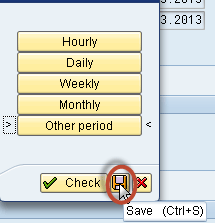
Step 9) Click on Hourly/Daily/Weekly period to define the frequency of the job as per your requirement.We will select Other Period
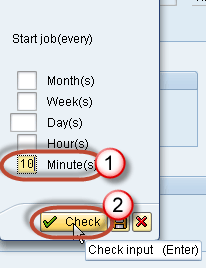
Step 10) Here you specify the recurring criteria of the job.For example, You can have the Job run after every 5 days from the Start Date. Here we select job to run every 10 minutes
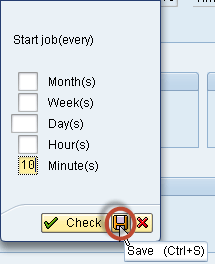
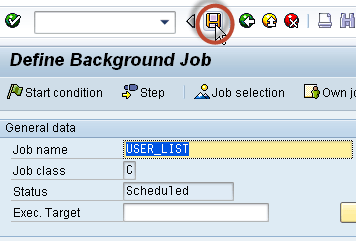
Step 11) Click on save button.
Step 12) Click on save again.
Step 13) Click save again
Step 14) Once Job step and start conditions are defined the following window will appear.
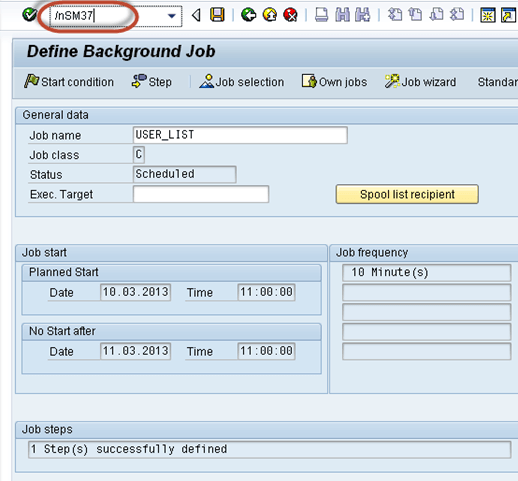
Step 15) Press save.
Step 16) Goto SM37 to know the status of the job.
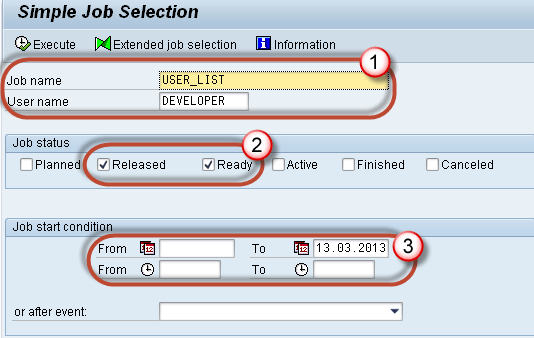
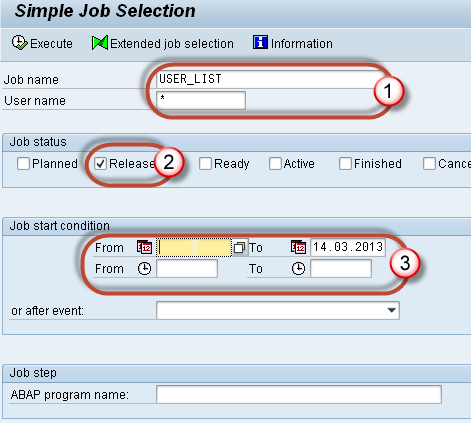
Step 17) Select your criteria for the job which you want to monitor.
- Put your job name and username who scheduled the job.
- Select the status of the job.
- Specify the date range. In our scenario, we just specify the end date while keeping From Date Open.
Step 18) You will get the following screen. Look at the status, it's a released means start conditions are met, and the job is in the queue is waiting for background work process to be free.
How to Reschedule a background job
Rescheduled jobs will not run in the future. Remeber, you cannot deschedule the job once it's in active status.
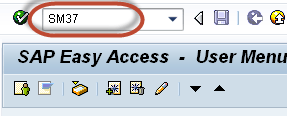
Step 1) Execute SM37.
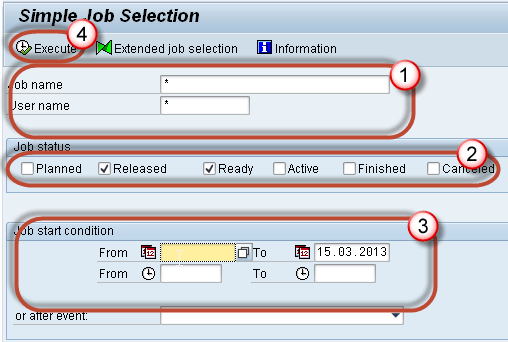
Step 2) Fill the criteria.
- Job name and username by which job is scheduled.
- Select the status. To deschedule the job you can only select Released/Ready status.
- Specify the date range.
- Press Execute(F8) button.
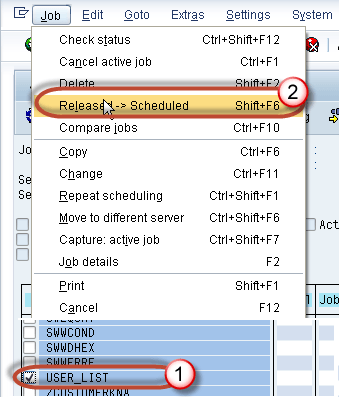
Step 3) Select specified job and press Job -> (Released -> Scheduled).
Step 4) You will find the message in the status bar once you press "Released -> Scheduled".
Monitoring background job is important because once you schedule the job it might be canceled due to some error. To investigate the root cause use SM37.
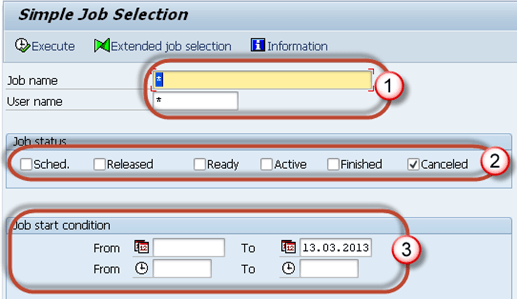
Step 1) Execute T-code SM37.
Step 2) Fill the required criteria.
- Job name and username(who scheduled the job). You can put * to get details of all jobs scheduled by all the users.
- Select job status which you want to monitor. If you find that a background job is not completed, select Canceled status.
- Put the date range as per your requirement.
Step 3) You will get a screen as shown below.
Step 4) Click on Job Log button to trace the error due to which job was canceled.
Step 5) You will get the following details. In the below example, job was canceled since there was an issue with RFC connection to the remote system. As a resolution use SM59 to check if there is an authorization issue to the remote system.
Sometimes jobs in Active status may also cause an issue.
You may face issues like tablespaces are full; the duplicate job is running with the same name and timing, job is selecting or updating large data, etc.
You can also check such jobs from SM37. Follow the procedure as below.
Step 1) Execute SM37.
Step 2) Fill the required criteria.
- Job name and username(by which job is scheduled).
- Select job status which you want to monitor. If you find a system performance issue or if a task is not completed for a very long time, then select active status.
- Put the date range as per your requirement.
Step 3) Look into Duration column (which signifies the job is running since n seconds). If you find a large number in duration then investigate the job details from job log. Some jobs use a large number of data.Using SE16 check table entries for the tables used by the job.
Sometimes jobs show to be in Active Status even though they are completed.
How to correct them? Follow the below set of procedure -
Step 1) As shown above, Execute T-code SM37 and select the job with an active status.
Step 2) Select the active job which is causing the problem.
Step 3) Click the Job->Check status.
Step 4) In the status bar of the window you will find as below message. This will repair Job Status if there was a problem
Step 5) If still job is in running status then goto SM50. Below screen will open. Have a look at "Reason" column which shows any errors or exceptional issue. Investigate it further.
Why Delete Background Job?
Old jobs occupy space on the system. To avoid any inconsistencies within the system normally we delete the logs. Because if the file system gets full, your SAP system will crash!
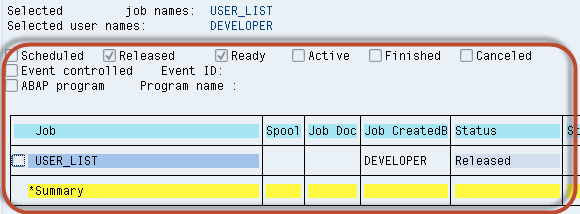
You can delete jobs in two ways:-
- Multiple jobs at once.
- Single job deletion.
Delete Multiple Jobs at once
The best way to do this is use report RSBTCDEL2(New version of RSBTCDEL). Old job logs will be deleted and will not show in the job overview.
Step 1) Execute T-code SE38.
Step 2) Put the program name in the field as RSBRCDEL2.
Step 3) Fill the proper details.
- Which job do you want to delete?If you put * means all jobs. If you want to delete jobs from a specific user, give UserName.
- Specify Status of Job to be deleted. Specify time period of Deletion. For instance, delete jobs older than 14 days.NOTE: Once the job is inactive status, it is impossible to delete them.
- Specify Commit. Commit value is proportional to program performance. If the commit value is high then job deletion will run faster. Recommended value is >= 1000.
- Check Test run to simulate the deletion. Jobs will not be deleted. Once you are sure only then uncheck the Test run.
- Press Execute.
Single job deletion
You can also delete a single job from SM37.
Step 1) Execute SM37.
Step 2) Fill your criteria.
- Job name and username
- Status of the job.
- Select the date range.
Step 3) Select the job you want to delete
Step 4) Goto Job-> Delete.
You can also delete the jobs from OS level under directory
/usr/sap/<SID>/SYS/global/<CLNT>JOBLG. Folder.
But deletion from OS level may cause Temse inconsistency issue.To remove inconsistencies goto SP12-> Consistency check.Once you get the list , delete the objects.
Normally, Job- SAP_REORG_JOBS (Program to Delete old background jobs) must be scheduled within the system with program RSBTCDEL2 at the daily frequency.
What is TMS?
TMS is used to move, manage, control, copy development objects and customizing settings in an orderly fashion across SAP systems in a landscape through pre-defined transport routes (RFC Connections). The transport process basically consists of exporting of objects out of the source SAP system and importing them into the target SAP system/s. TMS Stands for Transport Management System
Why do we need a Transport System?
The CTS components play an important role in the overall development and customization environment. CTS stand for Change and Transport System
CTS is an instrument for:
- Administering & controlling new development requests.
- Managing transports
- Recording of where and by whom changes are made
- Configuring systems landscape
Overview of CTS Components
- CTO (Change and Transport Organizer) – It's the main tool for managing, browsing, and registering the changes done on the repository and customizing objects. It's the central point for organizing the development projects. SE01 is the transaction with the new extended view.
- Transport Tools – The actual transports happen in the back-end at the OS level using transport tools, which are part of SAP Kernel and includes the program R3trans and the transport control program tp.
- (TMS) Transport Management System
SAP System-Landscape
The system landscape (also known as SAP System Group) is the arrangement of SAP servers. Ideally, in a SAP environment, a three-system landscape is recommended. It consists of the
- Development Server – DEV
- Quality Assurance Server - QAS
- Production Server - PRD.
Transport cycle in a very basic sense is the release of new Developments/ Customizing Changes from DEV which are imported in both Quality and Production systems. However, import in PRD can happen only once integration Testing and quality check have been performed in QAS (and marked as checked).
What is Customizing? How does TMS help in Customizing
- Customizing is a process to adapt the SAP system according to the customer's need. To perform the customizing, users and consultants take help of SAP Reference Implementation Guide (IMG), which is accessible through transaction SPRO.
- Customizing is ideally done in DEV. The Transport Organizer (SE01) is used in conjunction with IMG to record and transport customized changes further.
Most of the Customizing changes (though, not all) are client-specific, i.e., the changes are supposed to be reflected in a particular client only and not intended for all the system clients. When the Transport Request is exported, it extracts the relevant table entries from the database of the SAP system and copies them to the transport directory. Relevant table entries are locked when the customizing transaction is being used. However, they are unlocked as soon as the changes are saved to a Transport Request.
Repository and Development Changes
- Apart from customizing already existing objects, new developments are also required in most of the cases. Development object is any object that is created (developed) by you in SAP system.
- A Collection of all such objects (client-specific or cross-client) is called Repository.
- Development is mostly done with the help of ABAP Workbench (SE80). Therefore such changes are also known as Workbench Changes.
-
Examples:
- ABAP Dictionary Objects: Tables, Domains, Data elements, etc.
- ABAP Programs, function modules, menus, screens
- Documents, Application defined transport-objects, etc.
- Workbench is also fully integrated with TMS, to record and transport the changes.
Most of the Workbench changes (though, not all), are cross-client, i.e. changes will be reflected in all the system clients of the target system. Objects transported from the source system overwrite objects in the target system that has the same names.
Clients and the type of Data in SAP System
- Conceptually, client is a technical and organizational independent unit, that contains its own set of data (Master Data, Application/ Operational data, Customizing Data)
- Clients create separate environments for users from different user groups or with a different purpose, within same SAP system, without actually using the different database.
- From the Technical point of view, a client is specified using 3-digit numeric ID, which also acts as the value for the table field 'MANDT', in the case of client-specific jobs.
Among client specific data, there are 3 types of data:
- User Master Data contains the user login information, including the username, the password and the user defaults, the authorization profiles or roles, and the other useful information such as user groups, communication and so on. This data is physically present in a specific set of tables (the USR* tables).
- Customizing Data contains the configuration settings to customize organizational structure and the business processes for the companies implementing SAP. This data is client dependent and is stored in tables known as customizing tables.
- Application Data are also client dependent and normally users distinguish two types' master data and transactional data.
- Master Data such as vendor master, material master (tables such as MARA)
- Transactional data such as sales order, financial documents, Production Orders (POs) and so on.
Client Customization Options
Transport Directory and Its configuration
SAP Transport Directory:
- It is the global transport directory (/usr/sap/trans), which is actually a shared location (residing in the Domain Controller System) among all the member systems of a landscape (system group). It also contains certain subdirectories, that are created automatically during the installation of the SAP system. This is mandatory for setting up the Transport Management System.
- Basically, Transport Directory is the location where all the changes are saved (in the form of files) after they are released from DEV. Therefore, it acts as a source for the changes to be eventually imported in QAS and PRD. Hence, we have to make sure that the transport directory is shared properly among all the systems in a landscape.
As an example, in Windows NT, the shared directory location can be accessed using the following address: \\<SAPTRANSHOST>\sapmnt\trans where SAPTRANSHOST (Domain Controller System's address) is defined in the host's file in Windows Directory of all SAP systems in the landscape. Domain Controller – is one of the systems in a landscape that acts as an overall controller for change management and transport process in the landscape. Domain Controller is chosen (out of D / Q / P) by the team of system administrators, on the basis of system availability and the time of installation.
Main Subdirectories:
- Cofiles: Contains Change Request Information files with complete details and commands.
- Data Files: Contains the actual values and data to be used in implementing the change.
- Log: Contains Transport logs, traces or statistics, used for troubleshooting, in case any error occurs in the transport process.
- EPS: Download directory for advanced corrections and support packages
Other Subdirectories are:
- bin: Configuration files for tp (Transport Program) and TMS
- old data: Old Exported Data for archival or deletion
- actlog: Action logs for all requests and tasks
- buffer: Transport buffer for each system declaring the transports to be imported
- sapnames: Information regarding transport requests made by respective users
- tmp: Temporary and data log files
Setting up of Transport Directory and TPPARAM
- While configuring TMS, one of the main pre-requisite is to setting up the Transport Directory and the Transport Parameter file.
- It ensures that the Directory is shared properly among all the systems in a Landscape, for that all the systems taking part in the group/landscape are to be included in the global configuration file TPPARAM (transport parameter file), located under the binsubdirectory of /use/sap/trans. We have to make sure that the entries for all the participating systems are made in this file.
- In case, any entry is missing, copy another system's entry and change the values (for instance, System ID, Host name)
- At the time of installation, transport directory & the sub-directories are created automatically, including an initially configured template of TPPARAM file.
Operating System Tools - TP and R3trans
tp – The Transport Control Program:
- tp is the SAP program that administrators use for performing and planning transports between systems and also in upgrades of the SAP systems. This is used by the CTO and TMS.
- Actually, tp uses other special tools/programs and utilities to perform its functions. Mainly, it calls R3trans utility program. However, it also offers a more extensive control of the transport process, ensuring the correct sequence of the exported/imported objects, to avoid severe inconsistencies in the system, which may arise due to the wrong sequence.
- tp is located in the standard runtime directory of the SAP system: /usr/sap/SYS/<SID>/exe/run. It is automatically copied in the installation process.
- As a pre-requisite, the tp global parameter file (TPPARAM), must be maintained, specifying at least, hostnames of the systems taking part in the transport process.
- tp is mainly used for performing imports in target systems. It uses utilities called Import Dispatchers – RDDIMPDP & RDDIMPD_CLIENT_<nnn>, these are ought to be scheduled as background jobs in every system where imports will be performed. If for any reason they are deleted, we can schedule these jobs by running report RDDNEWPP.
- These jobs are actually "event triggered", meaning that tp sends a signal (an event) to the R/3 system and the job starts. These events are named as SAP_TRIGGER_RDDIMPDP and SAP_TRIGGER_RRDIMPDP_CLIENT.
R3trans – The Transport Control Program:
- R3trans is the SAP system transport program that can be used for transporting data between different SAP systems. It is normally not used directly but called from the tp control program or by the SAP upgrade utilities.
- tp controls the transports and generates the r3trans control files, but does not connect to the database itself. All the "real work" is done from R3trans.
- It supports the transporting of data between systems running on different OS and even different DB.
STMS is the transport tool that assists the CTO for central management of all transport functions. TMS is used for performing:
- Defining Transport Domain Controller.
- Configuring the SAP system Landscape
- Defining the Transport Routes among systems within the system Landscape
- Distributing the configuration
Transport Domain Controller – one of the systems from the landscape that contains complete configuration information and controls the system landscape whose transports are being maintained jointly. For availability and security reasons, this system is normally the Productive system.
Within transport domain, all systems must have a unique System Ids and only one of these systems is identified as the domain controller, the transport domain controller is the system where all TMS configuration settings are maintained. Any changes to the configuration settings are distributed to all systems in the landscape. A transport group is one or more systems that share a common transport directory. Transport Domain – comprises all the systems and the transport routes in the landscape. Landscape, Group, and Domain are the terms that are used synonymously by system administrators.
TMS Configuration
Step 1: Setting up the Domain Controller
Step 2: Transaction STMS
Step 3: Adding SAP systems to the Transport Domain
- Log on to SAP systems (to be added in the domain) in client 000 and start transaction STMS.
- TMS will check the configuration file DOMAIN.CFG and will automatically propose to join the domain (if the domain controller already created). 'Select' the proposal and save your entries.
- For security purpose, system status will still be in 'waiting' status, to be included in the transport domain.
- For complete acceptance, login to Domain Controller System (Client 000) -> STMS -> Overview -> Systems. New system will be visible there. From the menu choose 'SAP System' -> Approve.
Step 4: Configuring Transport Routes
Package – (formerly known as Development Class) is a way to classify the objects logically belonging to the same category or project. A package can also be seen as an object itself and is assigned to a specific transport layer (in consolidation route), therefore, changes made in any of the development object belonging to a particular Package, will be transmitted towards target system through a designated Transport Layer only, or else the change will be saved as a Local (non-transportable) modification.
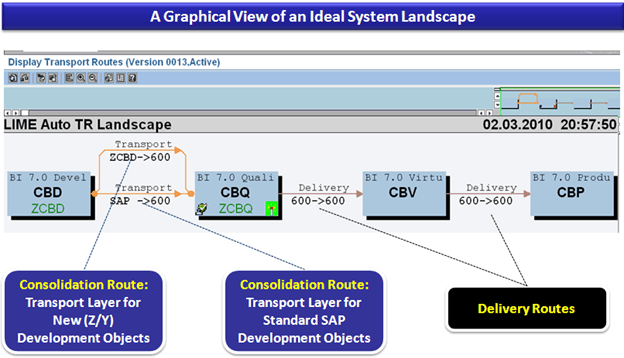
Consolidation routes – We need to establish a consolidation route for each transport layer. Development/ Integration system is taken as the source of these consolidation routes. Quality assurance/ Consolidation system as the transport target. Any modified objects that have a consolidation route for their transport layer can be included in change/transport requests. After the request has been released the objects can be imported into the consolidation system. If the changes are made to the objects with no consolidation route set-up (or in Customizing requests without a transport target) for their transport layer, such changes will be automatically taken as local change requests, i.e., not-transportable. Only one consolidation route per transport layer per system can be set-up.
Setting up Transport Routes
Once the Domain and other systems of a landscape are defined, we need to connect them with the help of proper transport routes (and layers). As for many customers' systems landscape fall into the same categories, the TMS provides some standard system groups that can be used for easily defining routes. When standard options are used, routes are generated automatically; we can select one of the following options:
- Single System
- Two-System landscape: DEV and PRD
- Three System landscape: DEV, QAS, and PRD
If we need to define a more complex transport system, we can also use standard options initially and there after defining additional consolidation and delivery routes.
Transport Routes – Standard Configuration
Transport Routes – Manual Configuration
Transport Routes
Distributing and Verifying the Configuration
What is a Transport Request?
- Transport Requests (TRs) – is a kind of 'Container / Collection' of changes that are made in the development system. It also records the information regarding the type of change, the purpose of transport, request category and the target system. It is also known as Change Requests.
- Each TR contains one or more change jobs, also known as change Tasks (minimum unit of transportable change). Tasks are stored inside a TR, just like multiple files are stored in some folder. TR can be released only once all the tasks inside a TR are completed, released or deleted.
- Change Task is actually a list of objects that are modified by a particular user. Each task can be assigned to (and released by) only one user. However multiple users can be assigned to each Transport Request (as it can contain multiple tasks). Tasks are not transportable by themselves, but only as a part of TR.
Change requests are named in a standard format as: <SID>K<Number> [Not modifiable by system administrators]
- SID – System ID
- K – Is fixed keyword/alphabet
- Number – can be anything from a range starting with 900001
Example: DEVK900030
Tasks also use the same naming convention, with 'numbers' consecutive to the number used in TR containing them.
For Example, Tasks in the above mentioned TR Example can be named as: DEVK900031, DEVK900032 …
- The project manager or designated lead is responsible to create a TR and assign the project members to the TR by creating task/s for each project member.
- Hence, she/he is the owner with control of all the changes that are recorded in that TR and therefore, she/he can only release that TR.
- However, assigned project members can release their respective change tasks, once completed.
Workbench Request – contains repository objects and also 'cross-client' customizing objects. These requests are responsible for making changes in the ABAP workbench objects.
Customizing Request – contains objects that belong to 'client-specific' customizing. As per client settings, these requests are automatically recorded as per when users perform customizing settings and a target system is automatically assigned as per the transport layer (if defined).
SE01 – Transport Organizer – Extended View
Create a Change Request
>
Release the Transport Request (Export Process)
- Position the cursor on the TR name or a Task name & choose the Release icon (Truck), a record of the TR is automatically added to the appropriate import queues of the systems defined in the TMS.
- Releasing and importing a request generates export & import logs.
The Import Process
Importing TRs into the target system
- After the request owner releases the Transport Requests from Source system, changes should appear in quality and production system; however, this is not an automatic process.
- As soon as the export process completes (releasing of TRs), relevant files (Cofiles and Data files) are created in the common transport directory at OS level and the entry is made in the Import Buffer (OS View) / Import Queue (SAP App. View) of the QAS and PRD.
- Now to perform the import, we need to access the import queue and for that, we need to execute transaction code STMS -> Import Button OR select Overview -> Imports
- It will show the list of systems in the current domain, description, and a number of requests available in Import Queue and the status.
Import Queue -> is the list of TRs available in the common directory and are ready to be imported into the target system, this is the SAP Application View, at the OS level it is also known as Import Buffer.
The Import Status
Import Queue shows some standard 'status icons' in the last column, here are the icons with their meanings, as defined by SAP:
In case, a request is not added automatically in the import queue/buffer, even though the OS level files are present, then we can add such requests by the following method, however, we should know the name of intended TR:
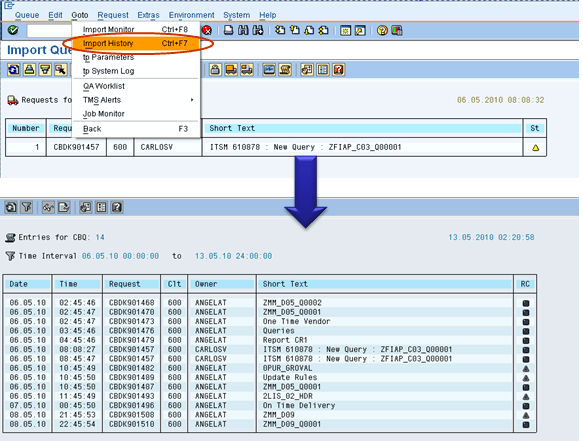
Import History
We can also check the previous imports that happened in the system as follows:
Transport logs and return codes
-
After the transport has been performed, the system administrator must check whether it was performed properly or not, for that SAP has provided us with the following type of logs (SE01 -> GOTO -> Transport Logs):
- Action Log – which displays actions that have taken place: exports, test import, import and so forth.
- Transport Logs – which keep a record of the transport log files.
-
One of the important information provided by logs are the return codes:
- 0: The export was successful.
- 4: Warning was issued but all objects were transported successfully.
- 8: A warning was issued and at least one object could not be transported successfully.
- 12 or higher: A critical error had occurred, generally not caused by the objects in the request.
What is a Support Package?
- When an end user of SAP finds a bug in the SAP product, he reports the same to SAP support. SAP programmers inspect the bug and develop a correction for the bug. This correction is known as SNOTE (SAP Note).
- With time, multiple end users, report bugs for which SAP releases SNOTE. SAP collects all these corrections in one place and this collection is called SUPPORT PACKAGE. This support package also includes enhancements to earlier versions of SAP.
- In simple words collection of SAP NOTES is called as SUPPORT PACKAGE.
- Support Packages are implemented in SAP system using Transaction SPAM (Support Package Manager)
What is Support Package Stack (SPS)?
The Support Package Stack is a list of ABAP and Java Support Packages for all software components (SC) included in SAP NetWeaver. It is used to bring each Software Component of SAP NetWeaver to a defined Support Pack (SP) level.
Support Package Stack, commonly known as STACK bundles all required components or individual patches that are already tested together and recommended applying as SPS instead of individual patch (until and unless you face some problem which requires certain components to be patched).
Go to http://service.sap.com/sp-stacks/, select your NW version to check the current SPS level and other details.
What are Support Pack Stack version numbers?
Support Package Stacks have a release number, and a Stack number, Example, SAP NetWeaver '04 Support Package Stack 11.
Each software component has a separate sequence of Support Packages. The following list contains the technical names of a number of components and the notation for their Support Packages:
- COP (Component Package):
- SAP_APPL (SAP APPL Support Package): SAPKH<rel><no>
- SAP_BASIS (Basis Support Package): SAPKB<rel><no>
- SAP_ABA (Application Basis SP): SAPKA<rel><no>
- SAP_HR (SAP HR Support Package): SAPKE<rel><no>
- SAP_SCM (SCM Support Package): SAPKY<rel><no>
- SAP_BW (BW Support Package): SAPKW<rel><no>
- SAP_CRM (CRM Support Package): SAPKU<rel><no>
Pre-requisites for Support Package implementation:
- Support packages should be always applied in client 000.
- The user to be used for the support package implementation must have authorizations equivalent to DDIC or SAP*
- Call the transaction SPAM and see if any previous Support Package import is incomplete. You can proceed ahead unless the previous support package import is successful.
- Ensure that there is enough space in the transport directory. The transport directory is located at /usr/sap/trans
Steps to Upgrade the Support Package:
Step 1: Download Support Packs
Support Packages are available in SAP Support Portal, under service.sap.com/patches.
Step 2: Loading Support Packages:
To load support packages we have two options:-
- From Application Server
- From Front End
From Application Server
- Download the support packages from service marketplace and save them at OS level in directory /usr/sap/trans.
- Uncompress these files using sapcar executable
sapcar –xvf <support package name>
After uncompressing the support packages at OS level the .PAT and .ATT files are stored in /usr/sap/trans/EPS/in directory.
Next, load the Support Packages into SAP system by choosing Support Package -->Load Package --> From Application Server
From Front End
Choose Support Package --> Load Packages --> From Front End
Step 3: SPAM/SAINT Update:
A SPAM/SAINT Update contains updates and improvements to Support Package Manager (SPAM) and Add-On Installation Tool (SAINT). There is always one SPAM update for each release. SPAM/SAINT update is mandatory before any support package upgrade.
Step 4: Defining Queue
Queue contains the Support Packages available for the different SAP Components installed in your system. This Queue information is derived from the support pack uploaded in Step 2.
1.On the initial screen in Support Package Manager, choose Display/Define.
2.A list of installed software components (for example, SAP_BASIS, SAP_HR, SAP_BW) is displayed.
3.Once you select the required component, the current queue appears. This queue contains the Support Packages available for the selected component in your system. If you want to define the queue for another software component, choose Other Component. If the displayed queue meets your requirements, you can confirm it by choosing Confirm Queue
Step 5: Importing Queue.
Once you a define a Queue (Step 4) while selecting a particular component (for which we want to upgrade support pack), we need to do 'Import queue' to start importing/applying that particular selected support pack (as per the standard SAP process).
Choose Support Package --> Import Queue
To become familiar with known problems and issues, always read the note mentioned in above screenshot.
The support package import has been started
Step 6: Confirming Queue:
Confirm that the queue has been imported successfully into your system. This allows you to import Support Packages in the future. You will not be able to import Support Packages further, if you do not confirm the queue.
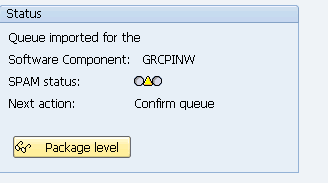
Once Queue has been imported, SPAM status becomes YELLOW
Confirm successful import of the Support Packages into your system by choosing Support Package à Confirm.
Checking Logs
-
IMPORT LOG: It displays logs for Support Package Manager Phases that are used by transport control program tp(transport control program).
Go to-->Import log-->Queue
-
ACTION LOG: It contains information about the actions that take place during the individual phases (while importing the current queue).
It also includes information about the point at which a phase was stopped, as well as detailed error information.
To display the logs for the current queue Go to-->Action log
- While the support packages are being imported, logs are made into the tmp directory (path: usr/sap/trans/tmp)
- Once the import process is completed logs can be viewed from the log directory (path: usr/sap/trans/log)
What is a Kernel?
- The Kernel is a central program which acts as an interface between SAP application and operating system.
- The Kernel consists of the executable programs that reside under the path "/sapmnt/<SID>/exe" (UNIX) or \usr\sap\SID\SYS\exe\run (Windows)
- These files help startup the R/3 system, initialize the memory, create buffers and start managing the requests from users and effectively utilizing of hardware resources.
- The kernel is also responsible for starting and stopping all the application services like dispatcher, message server, collector etc.
Why Kernel Upgrade?
- SAP Kernel is the core of the application. Like all other applications, the Kernel contains the executable files (.EXE files for stating various processes in SAP).
- The Kernel is the heart of the operating system. It contains those files which are used to run every event in SAP. E.g.|: starting database, shutdowns of the database, starting sap, shutdown of sap, saposcol, to uncar the sap files etc.
- That's the reason why when a Kernel upgrade is done it means new versions of the various EXE files replace the older versions.
How to check Kernel Version?
There are many ways to check the Kernel Version -
Method 1) Logon to SAP system and go to SM51 à Release Notes
Method 2) Logon to SAP system and go to System tab in the menu bar and select Status
Method 3) Logon in operating system, switch to user <SID>adm and give the command disp+work
You can also give disp+work –version
Download Kernel from Service Marketplace
- Go to "SAP Service Marketplace. " (https:\\service.sap.com) You will need your OSS ID and password.
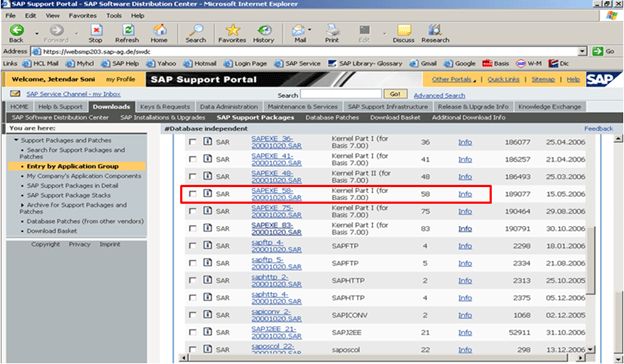
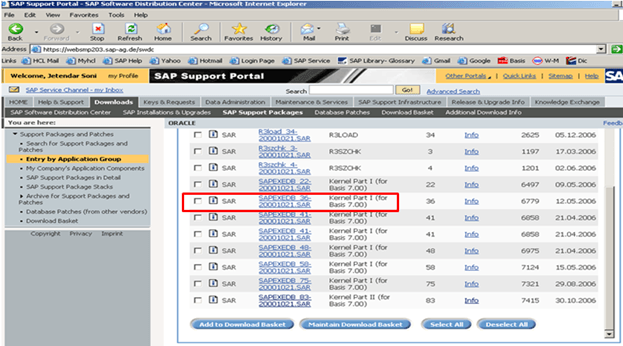
- Then go to Downloads à SAP Support Packages -> Entry By Application Group -> SAP Kernel 6.00 64 Bit -> Select your OS (LINUX/WINDOWS/SOLARIS/AIX) -> Database Dependent and Database independent Kernel Patch.
- Two SAR files SAPEXE.SAR and SAPEXEDB.SAR are downloaded from Service Marketplace.
Database Independent
Database Dependent: ORACLE
Kernel Upgrade Steps:
Step 1: Create a new Directory at OS level with enough space. Name of Dir can be "exe_new<ddmmyy>".
Step 2: Transfer these SAPEXEDB.SAR & SAPEXE.SAR files which you have downloaded to the new directory at OS level.
Step 3: Change your current directory to path .SAR files are created (cd /sapmnt/PR2/exe_new20122006). Check the directory path with command 'pwd' to ensure you are in the same dir (exe_new<ddmmyy>).
Step 4: Now uncompress these. SAR files by sapcar exe. The command used for the same would be
SAPCAR –xvf sapexe. SAR
SAPCAR –xvf sapexedb.SAR
Step 5: Now create one more directory in that path with the name "exe_old<ddmmyy>". Take the backup of existing kernel.Copy (only copy not move) the existing kernel from exe directory to "exe_old<ddmmyy>"
Step 6: Now stop the SAP application. (For kernel upgrade the shutdown of database is not essential but we need to stop the SAP application)
stopsap r3
Step 7:
Then copy the files from the new kernel directory exe_new<ddmmyy> to the existing kernel directory exe
cp -rp /sapmnt/<SID>/exe_new<ddmmyy>/* /sapmnt/<SID>/exe/
Step 8: This will copy / replace all the files in the existing kernel directory with a new kernel files.
Then check the kernel version from OS level by the command disp+work. It should show that the patch number has been increased.
Step 9:
Then logon to OS level as root (specific to UNIX). In the kernel directory, there is a script called saproot.sh. Execute this script
./saproot.sh <SID>
Step 10: This script assigns the correct permissions to all the executable programs in the kernel such br* file etc...
Step 11:
Then start the SAP system
startsap r3
Step 12: Now you can also check the kernel version level from SM51 or by selecting system à status
What is System Monitoring?
System monitoring is a daily routine activity and this document provides a systematic step by step procedure for Server Monitoring. It gives an overview of technical aspects and concepts for proactive system monitoring. Few of them are:
- Checking Application Servers.
- Monitoring System-wide Work Processes.
- Monitoring Work Processes for Individual Instances.
- Monitoring Lock Entries.
- CPU Utilization
- Available Space in Database.
- Monitoring Update Processes.
- Monitoring System Log.
- Buffer Statistics
Some others are:
- Monitoring Batch Jobs
- Spool Request Monitoring.
- Number of Print Requests
- ABAP Dump Analysis.
- Database Performance Monitor.
- Database Check.
- Monitoring Application Users.
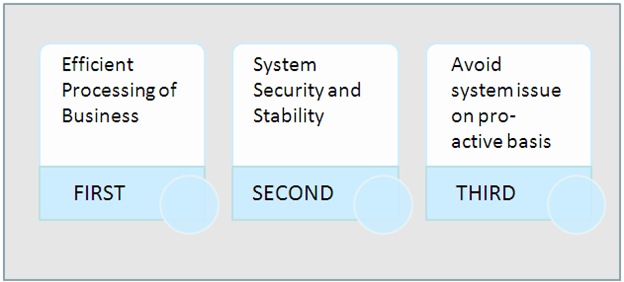
Why Daily Basic checks / System Monitoring?
How do we do monitor a SAP System?
Checking Application Servers (SM51)
This transaction is used to check all active application servers.
Here you can see which services or work processes are configured in each instance.
Monitoring Work Processes for Individual Instances SM50:
Displays all running, waiting, stopped and PRIV processes related to a particular instance. Under this step we check all the processes; the process status should always be waiting or running. If any process is having a status other than waiting or running we need to check that particular process and report accordingly.
This transaction displays a lot of information like:
- Status of Work process (whether it's occupied or not)
- If the work process is running, you may be able to see the action taken by it in the Action column.
- You can which table is being worked upon
Some of the typical problems:
- The user takes a long time to log on/not able to logon/online transaction very slow. This could be the result of the DIA work processes are fully utilized. There could be also the result of long running jobs (red indicator under the Time column). If necessary you can cancel the session by selecting the jobs then go to Process>Cancel Without core. This will cancel the job and release the work process for other user/process
- Some users may have PRIV status under Reason column. This could be that the user transaction is so big that it requires more memory. When this happen the DIA work process will be 'owned' by the user and will not let other users use. If this happens, check with the user and if possible run the job as a background job.
- If there is a long print job on SPO work process, investigate the problem. It could be a problem related to the print server or printer.
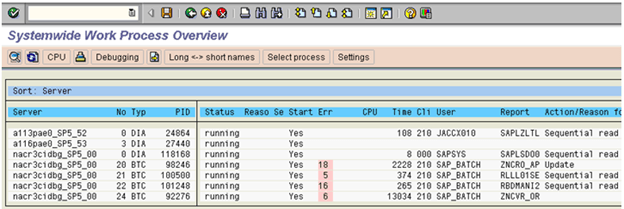
Monitoring System-wide Work Processes (SM66)
By checking the work process load using the global work process overview, we can quickly investigate the potential cause of a system performance problem.
Monitor the work process load on all active instances across the system
Using the Global Work Process Overview screen, we can see at a glance:
- The status of each application server
- The reason why it is not running
- Whether it has been restarted
- The CPU and request run time
- The user who has logged on and the client that they logged on to
- The report that is running
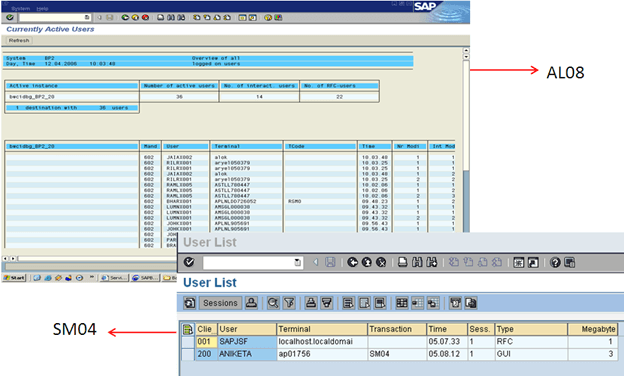
Monitor Application User (AL08 and SM04)
This transaction displays all the users of active instances.
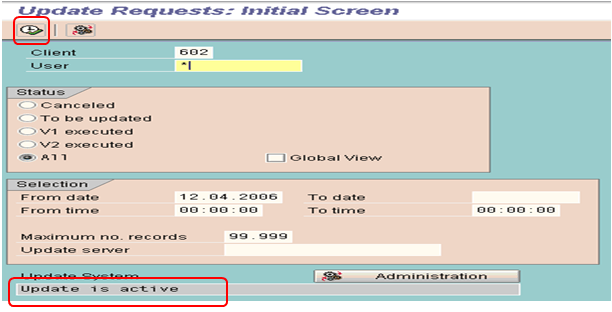
Monitoring Update Processes (SM13)
Execute Transaction SM13 and put '*' in the field USER and click on button.
If there are no long pending updates records or no updates are going on then this queue will be empty as shown in the below screen shot.
But, if the Update is not active then find the below information:
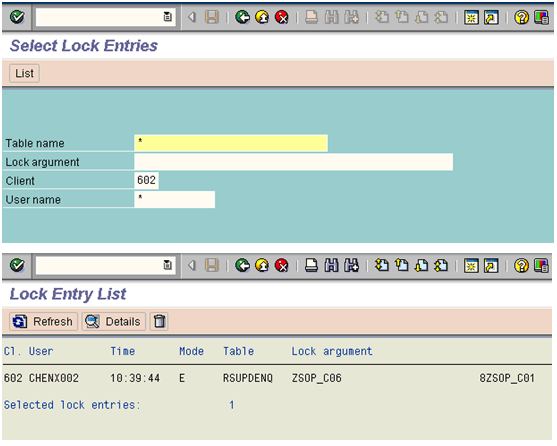
Monitoring Lock Entries (SM12)
Execute Transaction SM12 and put '*' in the field User Name
SAP provides a locking mechanism to prevent other users from changing the record that you are working on. In some situations, locks are not released. This could happen if the users are cut off i.e. due to network problem before they are able to release the lock.
These old locks need to be cleared or it could prevent access or changes to the records.
We can use lock statistics to monitor the locks that are set in the system. We record only those lock entries which are having date time stamp of the previous day.
Monitoring System Log (SM21)
We can use the log to pinpoint and rectify errors occurring in the system and its environment.
We check the log for the previous day with the following selection/option:
- Enter Date and time.
- Select Radio Button Problems and Warnings
- Press Reread System Log.
Tune Summary (ST02)
Step 1: Go to ST02 to check the Tune summary.
Step 2: If you see any red values, in SWAPS, double –click the same.
Step 3: In the below screen click on the tab 'Current Parameters'
Step 4: Note down the value and the Profile parameters
Step 5: Go to RZ10 (to change the Profile parameter values)
Step 6: Save the changes.
Step 7: Restart the server to take the new changes effect.
CPU Utilization (ST06)
Idle CPU utilization rate must be 60-65%, if it exceeds the value then we must start checking at least below things:
- Run OS level commands – top and check which processes are taking most resources.
- Go to SM50 or SM66. Check for any long running jobs or any long update queries being run.
- Go to SM12 and check lock entries
- Go to SM13 and check Update active status.
- Check for the errors in SM21.
ABAP Dumps (ST22)
Here we check for previous day's dumps
Spool Request Monitoring (SP01)
For spool request monitoring, execute SP01 and select as below:
- Put '*' in the field Created By
- Click on execute button.
Here we record only those requests which are terminated with problems.
Monitoring Batch Jobs (SM37)
For Monitoring background jobs, execute SM37 and select as below:
- Put '*' in the field User Name and Job name
- In Job status, select: Scheduled, Cancelled, Released and Finished requests.
Transactional RFC Administration (SM58)
Transactional RFC (tRFC, also originally known as asynchronous RFC) is an asynchronous communication method which executes the called function module in the RFC server only once.
We need to select the display period for which we want to view the tRFCs and then select '*' in the username field to view all the calls which have not be executed correctly or waiting in the queue.
QRFC Administration (Outbound Queue-SMQ1)
We should specify the client name over here and see if there any outgoing qRFCs in waiting or error state.
QRFC Administration (Inbound Queue-SMQ2)
We should specify the client name over here and see if there any incoming qRFCs in waiting or error state.
Database Administration (DB02)
After you select Current Sizes on the first screen we come to the below screen which shows us the current status of all the tablespaces in the system.
If any of the tablespaces is more than 95% and the auto extent is off then we need to add a new datafile so that the database is not full.
We can also determine the history of tablespaces.
We can select Months, Weeks or Days over here to see the changes which take place in a tablespace.
We can determine the growth of tablespace by analyzing these values.
Database Backup logs (DB12)
From this transaction, we could determine when the last successful backup of the system was. We can review the previous day's backups and see if everything was fine or not.
We can also review the redo log files and see whether redo log backup was successful or not.
Quick Review
Daily Monitoring Tasks
- Critical tasks
- SAP System
- Database
Critical tasks
|
No
| Task | Transaction | Procedure / Remark |
|
1
|
Check that the R/3System is up. |
|
Log onto the R/3 System |
|
2
|
Check that daily backup executed without errors |
DB12 |
Check database backup. |
SAP System
|
No
| Task | Transaction | Procedure / Remark |
|
1
|
Check that all application servers are up. |
SM51 |
Check that all servers are up. |
|
2
|
Check work processes (started from SM51). |
SM50 |
All work processes with a “running” or a “waiting” status |
|
3
|
Global Work Process overview |
SM66 |
Check no work process is running more than 1800 second |
|
3
|
Look for any failed updates (update terminates). |
SM13 |
- Set date to one day ago
- Enter * in the user ID
- Set to “all” updates Check for lines with “Err.”
|
|
4
|
Check system log. |
SM21 |
Set date and time to before the last log review. Check for:
- Errors
- Warnings
- Security messages
- Database problems
|
|
5
|
Review for canceled jobs. |
SM37 |
Enter an asterisk (*) in User ID.Verify that all critical jobs were successful. |
|
6
|
Check for “old” locks. |
SM12 |
Enter an asterisk (*) for the user ID. |
|
7
|
Check for users on the system. |
SM04AL08 |
Review for an unknown or different user ID and terminal.This task should be done several times a day. |
|
8
|
Check for spool problems. |
SP01 |
Enter an asterisk (*) for Created ByLook for spool jobs that have been “In process” for over an hour. |
|
9
|
Check job log |
SM37 |
Check for:
|
|
10
|
Review and resolve dumps. |
ST22 |
Look for an excessive number of dumps. Look for dumps of an unusual nature. |
|
11
|
Review buffer statistics. |
ST02 |
Look for swaps. |
Database
|
No
| Task | Transaction | Procedure / Remark |
|
1
|
Review error log for problems. |
ST04 |
|
|
2
|
Database GrowthMissing Indexes |
DB02 |
If tablespace is used more than 90 % add new data file to itRebuild the Missing Indexes |
|
3
|
Database Statistics log |
DB13 |
|
What is OSS Note?
OSS Note is frequently released bug fixes, new program developments or enhancements or other miscellaneous updates by SAP. OSS stands for “Online SAP Support"
At times before you begin work, it will be required to check whether a particular note is present in your SAP system
To ensure that a particular OSS note is present in your SAP system, execute the following steps:
a)In SAP command prompt, Enter TCode # SNOTE
b) In the next screen, Click SAP Note Browser
c) Type in your SAP Note Number in the corresponding text field and click execute
d) Next Screen shows status of the SAP note
For a background, a SAP note could have any of the following seven statuses -
- Can be implemented
- Cannot be implemented
- Completely implemented
- Incompletely implemented
- Obsolete
- Obsolete version implemented
- Undefined Implementation State
What is RFC?
RFC is a mechanism that allows business applications to communicate and exchange information (in pre-defined formats) with other systems. RFC stands for 'Remote Function Call'
RFC consists of two interfaces:
- A calling interface for ABAP Programs
- A calling interface for Non-SAP programs.
Any ABAP program can call a remote function using the CALL FUNCTION...DESTINATION statement. The DESTINATION parameter tells the SAP System that the called function runs in a system other than the callers.
Syntax-
CALL FUNCTION 'remotefunction'

DESTINATION dest

EXPORTING f1 =

IMPORTING f2 =

TABLES t1 =

EXCEPTIONS
Logical Destinations are defined via transaction SM59 and stored in Table RFCDES
Functions of the RFC interface
- Converting all parameter data to the representation needed in the remote system
- Calling the communication routines needed to talk to the remote system.
- Handling communications errors, and notifying the caller, if desired ( using EXCEPTIONS parameter of the CALL FUNCTION).
RFC is a SAP protocol to handle communications between systems to simplify the related programming. It is the process of calling a function module which is residing on a different machine from the caller program. RFCs can be used to call a different program on the same machine as well, but usually, it is used when 'calling' and 'called' function modules/ programs are running on separate machines.
In SAP, RFC Interface system is used for setting-up RFC connections between different SAP systems, and also between a SAP and an external (non-SAP) system.
Must Know Details About RFC
- SAP Uses CPIC (Common Programming Interface for Communication) Protocol to transfer data between Systems. It is SAP Specific protocol. Remote Function Call (RFC) is a communications interface based on CPI-C, but with more functions and easier for application programmers to use
- The RFC library functions support the C programming language and Visual Basic (on Windows platforms)
- RFC connections can always be used across the entire system.This means that an RFC connection you have defined in client 000 can also be used from client 100 (without any difference).
- RFC is the protocol for calling special subroutines (function modules) over the network. Function modules are comparable with C functions or PASCAL procedures. They have a defined interface through which data, tables and return codes can be exchanged. Function modules are managed in the R/3 System in their own function library, called the Function Builder.
- The Function Builder (transaction SM37) provides application programmers with a useful environment for programming, documenting and Testing function modules that can be called locally as well as remotely. The R/3 System automatically generates the additional code (RFC stub) needed for remote calls.
- You maintain the parameters for RFC connections using transaction SM59. The R/3 System is also delivered with an RFC-SDK (Software Development Kit) that uses extensive C libraries to allow external programs to be connected to the R/3 System.
- The only difference between a remote call of a function module to another server and a local call is a special parameter (destination) that specifies the target server on which the program is to be executed.
The RFC Advantages:
RFC helps to reduce the efforts of programmers, by letting them avoid the re-development of modules and methods at remote systems. It is capable enough to:
- Convert the data into the format understandable by the remote (target) system.
- Convert the data into the format understandable by the remote (target) system.
- Call up certain routines which are necessary to start communication with the remote system.
- Handle errors that might occur in the process of communication.
Types of RFC:
Synchronous
Requires both the systems (client and server) to be available at the time of communication or data transfer. It is the most common type and is required when the result is required immediately after the execution of sRFC.
sRFC is a means of communication between systems where acknowledgments are required. The resources of the Source System wait on the target system and ensure that they deliver the message/data with ACKD. The Data is consistent and reliable for communication.
The issue is if the target system is not available, the source system resources wait until target system is available. This may lead to the Processes of source system to go into Sleep/RFC/CPIC Mode at target systems and hence blocks these resources.
Used for
- For communication between systems
- For communication between SAP Web Application Server to SAP GUI
Asynchronous
It is communication between systems where acknowledgments are not required (it is similar to postcard delivery).It doesn't require both the systems to be available at the time of execution and the result is not immediately required to be sent back to the calling system.
The Source System resource does not wait for the target system as they deliver the message/data without waiting for any acknowledgment. It is not reliable for communication since data may be lost if the target system is not available. Used for -
- For communication between systems
- For parallel processing
Transactional
It is a special form of aRFC. Transactional RFC ensures transaction-like handling of processing steps that were originally autonomous.
Transactional RFC is an asynchronous communication method that executes the called function module in the RFC server only once, even if the data is sent multiple times due to some network issue. The remote system need not be available at the time when the RFC client program is executing a tRFC. The tRFC component stores the called RFC function, together with the corresponding data, in the SAP database under a unique transaction ID (TID). tRFC is similar to aRFC as it does not wait at the target system (Similar to a registered post). If the system is not available, it will write the Data into aRFC Tables with a transaction ID (SM58) which is picked by the scheduler RSARFCSE (which runs for every 60 seconds). Used For-
- Extension of Asynchronous RFC
- For secure communication between systems
Queued
Queued RFC is an extension of tRFC. It also ensures that individual steps are processed in sequence.
To guarantee that multiple LUWs (Logical Unit of Work/ Transaction) are processed in the order specified by the application. tRFC can be serialized using queues (inbound and outbound queues). Hence the name queued RFC (qRFC). Used For-
Types of RFC Connections
Type 3 - entries specify the connection between ABAP systems. Here, we must specify the host name / IP address. You can, however, specify logon information if desired. This is applicable for both type of RFCs, between ABAP systems and external calls to ABAP systems
Type I - entries specify ABAP systems connected to the same database as the current system. These entries are pre-defined and cannot be modified. Example entry name: ws0015_K18_24
- ws0015=host name
- K18=system name (database name)
- 24=TCP-service name
Type T - destinations are connections to external programs that use the RFC API to receive RFCs. The activation type can be either Start or Registration. If it is Start, you must specify the host name and the pathname of the program to be started.
How to Code an RFC?
1.In the function module attributes tab (transaction code SE37), set the processing type as Remote-enabled module to create a remote function module.
2.Write the code for the function module.
3.Define the destination of the RFC server in the RFC client system that calls the remote function ( via SM59 transaction).
4.Declaring Parameters: All parameter fields for a remote function module must be defined as reference fields, that is, like ABAP Dictionary fields.
5.Exceptions: The system raises COMMUNICATION_FAILURE and SYSTEM_FAILURE internally. You can raise exceptions in a remote function just as you would in a locally called function.
Debugging Remote Function Calls
- It is not possible to debug a remote function call to another system.
- However, when testing ABAP-to-ABAP RFC calls, you can use the ABAP debugger to monitor the execution of the RFC function in the remote system.
- With remote calls, the ABAP debugger (including the debugging interface) runs on the local system. Data values and other run information for the remote function are passed in from the remote system.
This tutorial is divided into 4 sections
Step 1: Setup an RFC connection
Step 2: Trusted RFC connection
Step 3: Testing an RFC connection
Step 4: Error Resolution
Step 1: Procedure to setup an RFC connection:
Enter Transaction Code SM59
In the SM59 screen, you can navigate through already created RFCs connection with the help of option tree, which is a menu-based method to organize all the connections by categories.
Click the 'CREATE' button. In the next screen , Enter -
- RFC Destination – Name of Destination (could be Target System ID or anything relevant)
- Connection Type – here we choose one of the types (as explained previously) of RFC connections as per requirements.
- Description – This is a short informative description, probably to explain the purpose of connection.
After you'SAVE'the connection, the system will take you to 'Technical Settings' tab, where we provide the following information:
- Target Host– Here we provide the complete hostname or IP address of the target system.
- System Number – This is the system number of the target SAP system.
- Click Save
In the 'Logon and Security' Tab, Enter Target System information
- Language – As per the target system's language
- Client – In SAP we never logon to a system, there has to be a particular client always, therefore we need to specify client number here for correct execution.
- User ID and Password – preferably not to be your own login ID, there should be some generic ID so that the connection should not be affected by constantly changing end-user IDs or passwords. Mostly, a user of type 'System' or 'Communication' is used here. Please note that this is the User ID for the target system and not the source system where we are creating this connection.
Click Save. RFC connection is ready for use
Note: By default, a connection is defined as aRFC. To define a connection as tRFC or qRFC go to Menu Bar -> Destination aRFC options / tRFC options ; provide inputs as per requirements. To define qRFC, use the special options tab.
Step 2: Trusted RFC connection
There is an option to make the RFC connection as 'Trusted'. Once selected, the calling (trusted) system doesn't require a password to connect with target (trusting) system.
Following are the advantages for using trusted channels:
- Cross-system Single-Sign-On facility
- Password does not need to be sent across the network
- Timeout mechanism for the logon data prevents misuse.
- Prevents the mishandling of logon data because of the time-out mechanism.
- User-specific logon details of the calling/trusted system is checked.
The RFC users must have the required authorizations in the trusting system (authorization object S_RFCACL).Trusted connections are mostly used to connect SAP Solution Manager Systems with other SAP systems (satellites)
Step 3: Testing the RFC Connection
After the RFCs are created (or sometimes in the case of already existing RFCs) we need to test, whether the connection is established successfully or not.
As shown above we go to SM59 to choose the RFC connection to be tested and then we expand drop down menu - "Utilities->Test->…". We have three options:
Connection test -> This attempts to make a connection with the remote system and hence validates IP address / Hostname and other connection details. If both systems are not able to connect, it throws an error. On success, it displays the table with response times. This test is just to check if the calling system can reach the remote system.
Authorization Test -> It is used to validate the User ID and Password (provided under 'logon and security' tab for the target system) and also the authorizations that are provided. If a test is successful, then the same screen will appear as shown above for the connection test.
Unicode Test -> It is to check if the Target system is a Unicode or not.
Remote Logon –>This is also a kind of connection test, in which a new session of the target system is opened, and we need to specify a login ID and Password (if not already mentioned under 'Logon and Security' tab). If the user is of type 'Dialog' then a dialog session is created. To justify the successful connection test, output will be the response times for the communication packets, else error message will appear.
Step 4: What went wrong?
If somehow the RFC connection is not established successfully, we can check the logs (to analyze the issue) at OS level in the 'WORK' director. There we can find the log files with the naming convention as "dev_rfc<sequence no.>" and the error description can be read from such files.
What is an IDOC?
IDOC is simply a data container used to exchange information between any two processes that can understand the syntax and semantics of the data.
In other words, an IDOC is like a data file with a specified format which is exchanged between 2 systems which know how to interpret that data.
IDOC stands for " Intermediate Document"
When we execute an outbound ALE or EDI Process, an IDOC is created.
In the SAP System, I DOCs are stored in database. Every IDOC has a unique number(within a client).
In this tutorial you will learn:
Key Features
- IDOCs are independent of the sending and receiving systems.(SAP-to-SAP as well as Non-SAP)
- IDOCs are based on EDI standards, ANSI ASC X12 and EDIFACT. In a case of any conflict in data size, it adopts one with greater length.
- IDOCs are independent of the direction of data exchange e.g. ORDERS01: Purchasing module: Inbound and Outbound
- IDOCs can be viewed in a text editor. Data is stored in character format instead of binary format.
Structure of an IDOC
The I doc structure consists of 3 parts -
- The administration part(Control Record)- which has the type of idoc, message type, the current status, the sender, receiver etc. This is referred to as the Control record.
- The application data (Data Record) - Which contains the data. These are called the data records/segments.
- The Status information (Status Record)- These give you information about the various stages the idoc has passed through.
You can view an I-DOC using transaction WE02 or WE05
As seen the screenshot above IDOC record has three parts Control, Data and Status. Let's look into them in detail - Control Record
- All control record data is stored in EDIDC table. The key to this table is the IDOC Number
- It contains information like IDOC number, the direction(inbound/outbound), sender, recipient information, channel it is using, which port it is using etc.
- Direction '1' indicates outbound, '2' indicates inbound.
Data Record
- Data record contains application data like employee header info, weekly details, client details etc
- All data record data is stored in EDID2 to EDID4 tables and EDIDD is a structure where you can see its components.
- It contains data like the idoc number, name and number of the segment in the idoc, the hierarchy and the data
- The actual data is stored as a string in a field called SDATA, which is a 1000 char long field.
Status Record
- Status record is attached to an I-DOC at every milestone or when it encounter errors.
- All status record data is stored in EDIDS table.
- Statuses 1-42 are for outbound while 50-75 for inbound
IDOC Types
An I DOC Type, (Basic) defines the structure and format of the business document that is to be exchanged. An IDOC is an instance of an IDOC Type , just like the concept of variables and variables types in programming languages. You can define IDOC types using WE30
What is a Segment?
A Segment defines the format and structure of a data record in I-DOC. Segments are reusable components.
For each segment SAP creates
- Segment Type (version independent)
- Segment Definition (version dependent)
- Segment Documentation
The last 3 characters is the version of the segment
Definitions keep changing as per the version but the segment type remains the same.
Transaction:WE31
What is Extension IDOC type?
An IDOC is of 2 types:-
- Basic
- Extension
SAP provides many a pre-defined Basic IDOC Types which can not be modified. In case you want to add more data to these restricted basic type you may use an extension type. Most of the times you will NOT use extension.
Documentation
Each IDOC are thoroughly documented in transaction WE60
Message Type
A message represents a specific type of document that is transmitted between two partners Ex. Orders, orders responses, invoices etc
An idoc type can be associated with many message types
Also, a message type can be associated with different idoc types. Transaction WE81
IDOC Views
An IDOC type can be used for more than one message type, which results in IDOCs containing more fields than required for a particular message type.
IDOC views are used to improve performance in generating IDOCs to ensure only the relevant segments are filled with data. IDOC Views are important only for Outbound Processing.
Partner Profiles
A partner is defined as a business partner with whom you conduct business and exchange documents
In the partner profile of a partner that we exchange Idocs with, we maintain the parameters that are necessary for exchanging the data. The transaction used is WE20.
Port
The port defines the technical characteristics of the connection between your SAP system and the other system you want to transfer data with (subsystem). The port defines the medium in which data is exchanged between the 2 systems.
There are different types of ports. The 2 most commonly used are the TRFC ports used in ALE and File ports which EDI uses.
For TRFC ports we have to give the name of the logical destination created using SM59.
When using file port you can specify the directory where the IDOC file should be placed. The other system or the middleware will pick up the file from here. The Function module can be used to generate a file name for the idoc. While Testing you can use "Outbound file" to specify a constant file name. The tab "outbound trigger" can be used to supply information if we want to trigger some processing on the subsystem when an idoc is created at this location. We have to specify the command file name and the directory which has to be run.
This is so CONFUSING!
Let's understand the process of creating an IDOC with an example -
- Whenever a Purchase Order (PO) is created we want to send the IDOC to a vendor.
- The PO is sent in the form of an IDOC to the vendor (partner). That partner has to be EDI enabled in that system. SAP should realize that it could send doc to this vendor electronically.
- The PO sent as an outbound idoc by the customer will be inbound idoc for the vendor. The SAP system on the vendor's side can process this to create an application document (a sales order) on their system.
- Quotation, RFQ, PO, SO, Invoice, delivery note etc are some of the commonly exchanged documents through IDOC
The process of data transfer out of your SAP system is called the Outbound process, while that of data moving into you SAP system is called Inbound process. As a developer or a consultant who will be involved in setting up theses process for your organization. Here are the steps how to set them up-
The Outbound Process
Steps Involved -
- Create segments(WE31)
- Create an idoc type(WE30)
- Create a message type (WE81)
- Associate a message type to idoc type(WE82)
- Create a port(WE21)
- If you are going to use the message control method to trigger idocs then create the function module for creating the idoc and associate the function module to an outbound process code
- Otherwise, create the function module or stand-alone program which will create the idoc
- Create a partner profile(WE20) with the necessary information in the outbound parameters for the partner you want to exchange the idoc with.Trigger the idoc.
The Inbound Process
Steps Involved-
- Creation of basic Idoc type (Transaction WE30)
- Creating message type (Transaction WE81)
- Associating the Message type to basic Idoc type (Transaction WE82)
- Create the function module for processing the idoc
- Define the function module characteristics (BD51)
- Allocate the inbound function module to the message type(WE57)
- Defining process code (Transaction WE42)
- Creation of partner profile (Transaction WE20)
What is BAPI?
Business Application Programming Interface(BAPI) are standardized programming interfaces (methods) enabling external applications to access business processes and data in the R/3 System.
They provide stable and standardized methods to achieve seamless integration between the R/3 System and external applications, legacy systems and add-ons.
BAPIs are defined in the BOR(Business object repository) as methods of SAP business object types that carry out specific business functions.They are implemented as RFC-enabled function modules and are created in the Function Builder of the ABAP Workbench.
Some BAPIs and methods provide basic functions and can be used for most SAP Business Objects.These are called STANDARDIZED BAPI's.
List of Standardized BAPIs:
- BAPIs for Reading Data - GetList() , GetDetail() , GetStatus() , ExistenceCheck()
- BAPIs for Creating or Changing Data- Create() ,Change(),Delete() and Undelete() ,
- BAPIs for Mass Processing -ChangeMultiple(), CreateMultiple(), DeleteMultiple().
How to create a BAPI
Step 1.Go to transaction swo1 (Tools->Business Framework -> BAPI Development ->Business Object builder ) .Select the business object, according to the functional requirement for which the BAPI is being created.
Step2.Open the business object in change mode. Then Select Utilities ->API Methods ->Add method.Then enter the name of the function module and select Continue.
Step 3.In the next dialog box, following information needs to be specified :
- Method : Suggest an appropriate name for the method,
- Texts : Enter description for the BAPI,
- Radio buttons : Dialog, Synchronous, Instance-independent . BAPI 's are usually implemented synchronously.
Step4.To create the method select Yes in the next dialog box.
Step5.After the program has been generated and executed, check the program in the method just created.Thus , a BAPI is created.
Testing the BAPI
You can test the BAPI by Testing the individual method of the Business Object in the Business Object Builder. ( or one can use the transaction 'SWUD' to test the method ) .
Releasing and freezing the BAPI
- To release the BAPI , first release the function module ( using transaction se37 ) .
- Set the status of the method to 'released' in the Business Object Builder ( using transaction SWo1 - Edit-> change status-> released. )
You can also use the BAPI Explorer (Transaction code BAPI) for 360' view on BAPI
1) What is SAP Basis?
SAP basis acts as an operating system or a platform for SAP applications to run. It supports the entire range of SAP applications.
2) What is the difference between Developer Trace, System Log and System Trace?
a) System Trace: When you want to record internal SAP system activities, system trace is used. The trace is useful in diagnosis internal problems within SAP system and the host system.
b) System Log : To know the recent logs for application server and CI, System log is referred.
c) Developer Trace: In the event of problems, developer trace, records the technical information about the error or problem
For problem analysis and system monitoring Developer trace or System log is used.
3) In a situation where My SAP system is down (Users unable to login to SAP system), how to analyze the problem?
a) Check the Database status
b) SAP services
c) SAP management console ( Dispatcher, IGS and Message Server)
d) You need to find out trace root on the basis of point at serial no ( c ).
e) Check network connectivity if everything is ok
4) What is private mode?
In private mode, the heap data is exclusively allocated by the user and is no more shared or available across the system. This occurs when your extended memory is exhausted.
5) What is OSP$ mean?
Two users “OPS$adm” and “OPS$SAP” Service are created in your SAP system and to connect and communicate with database internally this user mechanism is used.
6) What are the different types of RFC and explain what Transactional RFC is?
RFC (Remote Function Call) is a mechanism to communicate and exchanging the information between other SAP systems. There are four types of RFC’s system
a) Synchronous RFC ( S RFC)
b) Asynchronous RFC (A RFC)
c) Transactional RFC ( T RFC)
d) Queued RFC (Q RFC)
Transactional RFC ( T RFC ) : This type of RFC is similar to asynchronous RFC, but by allocating a transaction ID (TID) it makes sure that the request sent multiple times due to an error must process only for once. In T RFC the remote system does not have to be available at the moment unlike asynchronous RFC.
7) What is OCM and how to apply OCM Patches?
OCM stands for online correction system, by using SPAM you can apply OCM Patches.
8) How to perform a SAP-export and import tables in SAP from OS level?
To export or import tables in SAP from OS level you have to follow three steps and by using R3trans utility in SAP
Step 1: Collect all list of tables to be exported
Step 2: Check whether enough disk space is available in the directory where you going to export.
Step 3: Create two control files for R3trans which will be used for import and export.
9) What is the difference between – support package, kernel and SAP note?
SAP Note: An error in a single transaction or program is removed by implementing a SAP note.
Kernel: Kernel contains the executable files (.EXE) like other applications and when a Kernel upgrade is done a new version of the EXE file replaces the older versions.
Support Package: SAP support packages is a bunch of corrections, this can be used by applying transaction SPAM
10) How can you find the list of objects that have been repaired in the system?
The list of objects that have been repaired can be found in the system having ADIRACCESS keys.
11) What is the purpose of table TADIR?
Table TADIR contains object directory entries.
12) Is it possible to install SAP patches when other users are online?
When other users are online we can’t install SAP patches, as support manager will not be able to update and it will terminate it. So it is always feasible to better apply support packs when there is no users login into the system.
13) Mention what is the difference between SDM and JSPM?
JSPM ( Java Support Package Manager) is used to apply support packages on deployed software components. In other words it’s a tool that allows you to install the components and support packages.
SDM ( Software Delivery Manager) is used for importing Java Support Packages. To deploy and manage software packages received from SAP, SDM tool is used.
JSPM uses SDM for the deployment purpose
14) What is the procedure to disable import all option from STMS in SAP?
To disable import all option from STMS in SAP, steps are:
a) Go to STMS T-code
b) Go to menu option overview
c) Select System
d) Choose SAP System
e) Go to transport tool tab
f) Create parameter “No_Import_All” with value set as 1
g) Save it
15) Mention the use of personalized tab and parameter tab in user master record?
Parameter Tab: It will allow access to assign T-code on which one has to work
Personalization Tab: It is required for RFC connection between systems other than user personal information
16) What is the different type of users in SAP?
Different types of users in SAP are
a) Dialog Users
b) System Users
c) Communication Users
d) Service Users
e) Reference Users
17) Explain what is the use of reference and service user in SAP?
- Service User: For “service user” initial password or expiration of password are not checked. Only admin has rights to change the password, users cannot. Multiple logins are possible.
Usage: Service users are for anonymous users. Minimum authorization should be given to such type of users
- Reference User: For this kind of users GUI login is not possible.
Usage: In case of emergency, with the help of reference user, it is possible to provide one user authorization to another user.
18) Explain how you can restrict multiple logins of user in SAP? What are the thing you have to take care of while writing the ID’s?
To restrict multiple logins you have to set the parameter as
Parameter should set in RZ10
a) login/multi_login_users= set to 1 to activate (If this parameter is set to value 1, multiple dialog logons to the R/3 system are blocked)
b) login/disable_multi_gui_login= List out the users that should be allow to logon for multiple times
While writing the user ID’s things to be taken care are, list the user IDs separated by commas “..” , between user IDs do not leave space characters and to see the changes restart the R/3 instance.
19) At OS level how you can change the number of work process? How you can analyze the status of work process at OS level?
To change the number of work process at the OS level, you can increase the no. of work processes by modifying the parameter rdisp/wp_no_=
Status of a WP at OS level can be checked by executing dpmon.
20) Explain how to define logon groups?
Logon groups can be defined using the Tcode smlg. In order to do that you have to create the group and then assign the instances for that particular group.
21) What is SAP single stack system?
A single stack system is defined by SAP system either with JAVA as runtime engine or SAP Netweaver as ABAP.
Eg: Single Stack System (Java) is SAP Enterprise Portal System (Ep)
Single Stack System (ABAP) is SAP ERP (ECC)
22) What are the tools to install JAVA patches?
To use the JAVA patches , SAP installer (SAPinst.exe) is employed. SDM and JSPM are the latest versions of tools used to deploy Java Patches.
23) Explain what is “Data Sets” in SAP?
To solve queries which cannot be solved by using the method interfaces, a set of information is used. This set of information is known as “ Data Sets”.
24) At O.S level where to check for system logs of SAP application?
To check the system logs of SAP application at OS level, SAPMMCà SAP systemsà SIDàSysLog
25) Explain what is LUW (logical unit of work)?
A list of steps among t-code in known as logical LUW
26) Explain what is heterogenous system copy and homogenous system copy ?
Homogenous system copy= Same OS + Same Database
Heterogeneous system copy= Different OS + Different database or same database
27) Explain what are the functional modules used in sequence in BDC?
Using BDC programming a data can be transferred successfully. There are 3 functional modules which can be used in a sequence.
a) BDC _OPEN_GROUP: Name of the client, sessions and user name are specified in these functional modules.
b) BDC_INSERT: It is used to insert the data for one transaction into a session.
c) BDC_CLOSE_GROUP: It is used to close the batch input session.
28) Explain what is an “OK” code is and what is the difference between “t-code” and “OK” code?
An “OK” code is used by a program to execute a function for example after a push button has been clicked.
Transaction code or “t-code” is a “shortcut” that helps a user to run a program.
29) Explain how client refresh is different than client copy?
Client refresh is overwriting or copying to existing client, while copying the newly created client is called client copy.
30) What is a background processing batch scheduler?
To check the schedule background jobs and to execute them parameters like rdisp/btctime is used. These parameters define background processing batch scheduler.
31) Explain what is SAP IDES?
SAP Internet Demonstration and Evaluation System or SAP IDES, this system demonstrate the functionality of various SAP solutions used by important customers.
32) Explain what is the purpose of TDEVC ?
The purpose of TDEVC contains development classes and packages.
33) How many types of work processes are there in SAP ?
There are seven types of work processes they are:
a) Dialog
b) Enque
c) Update
d) Background
e) Spool
f) Message
g) Server
h) Gateway
34) What is the role of “ Application Server” ?
Application Server takes the request from the user and if the request requires data then it connects to the database server and gives output.
35) What is process for applying patches?
Process for applying patches are:
a) Download patches from the service .sap.com to Trans Directory
b) Using CAR command extract the patches in the Trans Directory
c) Using SAPM, import patches into SAP level and Apply
36) How to perform the transport?
Transport can be done through STMS_IMPORT or through FTP.
37) What are the types of transport queries?
a) Customising Request
b) Workbench Request
c) Transport of Copies
d) Re-location
38) Explain what is business KPIs ?
Business KPIs are Key Performance Indicators. It indicates the performance of a company at a strategic level. They help in leading the company on the desired track by comparing company’s previous performance with the market leaders in the same market.
39) Explain what is the importance of table T000?
Table T000 contains a list of defined clients, where we can maintain transaction code SCC4.
40) What is SAPS ?
SAPS stands for SAP Application Performance Standard, which is a hardware independent unit which describes the performance of a system configuration in SAP environment.
41) Mention what is the difference between Central Instance & Application Server?
Central Instance has message server and dialog, update, spool, enque, gateway, background work processes.
Application server has dialog, update, spool, gateway and background work process.
42) In what ways you would know whether a system is Unicode or Non-unicode?
By code sm51 t-code we can see whether it is Unicode or non-unicode. In this code we can find the release notes button in the application tool bar if you click on that you can see the total information like Database, Kernel version, Unicode or non- Unicode.
43) In SAP basis what are the different types of transport requests?
Four types of transport requests are there
a) Customizing request
b) Workbench request
c) Transport request
d) Relocation
44) What is logical system? How to create and why?
For communication between systems within the landscapes logical system is required. It enables the system to recognize the target system as an RFC destination.
TCODE used is SPRO
45) How you can assign an object to 100 roles at time?
To assign an object to 100 roles at time,
a) Go to sell T-code from there go to the table agr_agrs.
b) You will be asked for Access key
c) Enter the objects that needs to be added to 100 roles
d) Select the range of roles in which the object needs to be added
e) Save or Activate whatever option is given
46) On a particular system how you can get a list of the users with development access on a particular system?
By using table “DEVACCESS” you can get a list of the users with development access.
47) How can you view locked transactions?
To view locked transactions you need to look in field CINFO, table TSTC. Within SAP you can either use SE11 or SE16 to browse the table contents. Make sure that you enter “A0” as the “HEX01 data element for SYST” starting value and “A9” as the ending value. This will list all the transactions locked in the system.
48) What is an ‘OK’ code? What are the differences an ‘OK’ code to a ‘T-code’?
OK code is used by a program to execute a function for example after a pushbutton has been clicked. A transaction code is a “shortcut” that helps a user run program.
49) How you can disable the ‘Import All’ button on STMS for the queues?
a) Login to your Transport Domain Controller
b) Run STMSàOverviewàSystem
c) Choose the system you want to disable ‘Import All’
d) Go to Transport Tool tab
e) Add/Create parameter “ No_IMPORT_ALL” set its value to 1
50) How you can apply SAP notes to SAP system?
a) Goto Tcode SNOTE
b) GOTO MenuàDownload SAPNote
c) Give the Note No
d) After downloading check the status, if implemented
e) Select Note, GOTO Menu SAPNoteàImplement Note
51) Mention what is the purpose of table USR02?
This table stores passwords and User IDS.
52) What is the difference between kernel replacement and support package?
Kernel replacement is the replacement of the SAP executable on the OS level, while support package contains fixes to the ABAP code within a SAP instance.
53) Which are the most frequent errors encountered while dealing with TRANSPORTS ?
Return code (4) indicates import ended with warning.
Return code (8) indicates not imported ended with error
Return code (12) indicates import is cancelled.
Return code (16) indicates import is cancelled.
54) How will go about doing a client copy ?
You can do a client copy using the SCCL transaction
55) List the difference between asynchronous and synchronous transport -
Synchronous Transport - Dialog or batch process are blocked until import is ended
Asynchronous Transport - Dialog or batch process is released after import is started.
55) How will determine whether your SAP server is Unicode or ASCII ?
Go to SM51 , Click Release Notes. Entry corresponding to ICU Version will tell you whether your system is ASCII or Unicode.
56) List the types of Transport requests?
There are 4 types of transport requests in SAP -
1. Customizing Request
2. Workbench Request
3. Transport of Copies
4. Relocation
57) What is the difference between Consolidation and Development route ?
In consolidation route - objects can be changed and they can transport from one system to other. This is the route between development to quality
In Development route - Objects can not be changed and they can not be transported from one system to other. This is the route between quality to production
58) How will you define logon groups ? What is Load Balancing in SAP ?
You can set the logon group using SMLG transaction.
59) What is supplementation language ?
Default SAP systems are pre-installed with English and German.
SAP does support many other language which may not full translate from the default English and German. To fill this gap , Supplementary language (a program) is installed.
60) Is SAP a database ?
NO . SAP is not a database but it uses databases from other vendors like Oracle. Although SAP has recently released its own database HANA
61) Which transaction do you use to check Buffer Statistics ?
ST02 , RZ10

