Introduction to Django Session
Sessions are server side cookies. In every web application certain user-oriented inputs will be stored on both server and client(Web browser) end. This data when stored on the server end it is named as Sessions. The data stored on the client end is named as cookies. These sessions came into play in Django framework to ensure the security of the application. These sessions helps to attain the abstraction of how cookies are generated and sent and received. So based on the importance of the data considered for saving lot of security potholes can be successfully attested by implementing these sessions.
Methods to Catch Session Data
Django Sessions can be captured and stored on the server end by three ways.
- Store Sessions onto the connected middleware database.
- Store Sessions onto a file.
- Store Sessions onto a temporary cache.
1. Store Sessions onto the connected middleware database
This is the predominant method for catching session data. The below settings need to be inplace for triggering this setup.
Code:
INSTALLED_APPS = [
'django.contrib.admin',
'django.contrib.auth',
'django.contrib.contenttypes',
'django.contrib.sessions',
'django.contrib.messages',
'django.contrib.staticfiles',
'Django_app1',
] MIDDLEWARE = [
'django.middleware.security.SecurityMiddleware',
'django.contrib.sessions.middleware.SessionMiddleware',
'django.middleware.common.CommonMiddleware',
'django.middleware.csrf.CsrfViewMiddleware',
'django.contrib.auth.middleware.AuthenticationMiddleware',
'django.contrib.messages.middleware.MessageMiddleware',
'django.middleware.clickjacking.XFrameOptionsMiddleware',
]
2. Store Sessions onto a file
Here sessions are captured to an input file. The server id must have sufficient access specifications for capturing sessions through this technique.
3. Store Sessions onto a cache
In this technique Sessions are captured in temporary cache. All session data captured by will be erased if the application or the server is restarted. Persistent cache services can also be created.
The below settings parameters need to be in place for activating the cache oriented sessions.
Code:
SESSION_ENGINE = 'django.contrib.sessions.backends.cache'
CACHES = {
'default': {
'BACKEND': 'django.core.cache.backends.locmem.LocMemCache'
}
}
INSTALLED_APPS = [
'django.contrib.admin',
'django.contrib.auth',
'django.contrib.contenttypes',
'django.contrib.sessions',
'django.contrib.messages',
'django.contrib.staticfiles',
'Django_app1',
] MIDDLEWARE = [
'django.middleware.security.SecurityMiddleware',
'django.contrib.sessions.middleware.SessionMiddleware',
'django.middleware.common.CommonMiddleware',
'django.middleware.csrf.CsrfViewMiddleware',
'django.contrib.auth.middleware.AuthenticationMiddleware',
'django.contrib.messages.middleware.MessageMiddleware',
'django.middleware.clickjacking.XFrameOptionsMiddleware',
]
Creating a Session in Django
Given below shows creating a session:
1. SETTINGS.PY changes
We use cache based session capturing, so the lines are inserted into the SETTINGS.py file.
Example:
(SETTINGS.py)
Code:
SESSION_ENGINE = 'django.contrib.sessions.backends.cache'
CACHES = {
'default': {
'BACKEND': 'django.core.cache.backends.locmem.LocMemCache'
}
}
INSTALLED_APPS = [
'django.contrib.admin',
'django.contrib.auth',
'django.contrib.contenttypes',
'django.contrib.sessions',
'django.contrib.messages',
'django.contrib.staticfiles',
'Django_app1',
] MIDDLEWARE = [
'django.middleware.security.SecurityMiddleware',
'django.contrib.sessions.middleware.SessionMiddleware',
'django.middleware.common.CommonMiddleware',
'django.middleware.csrf.CsrfViewMiddleware',
'django.contrib.auth.middleware.AuthenticationMiddleware',
'django.contrib.messages.middleware.MessageMiddleware',
'django.middleware.clickjacking.XFrameOptionsMiddleware',
]
2. Create a forms.py file in the application
The forms.py file is similar to models.py. All fields used in the form will be declared here under a form class.
Example:
(forms.py)
Code:
from django import forms
class Valueform(forms.Form):
user = forms.CharField(max_length = 100)
last_name = forms.SlugField()
3. Create a view for the form
A Django view method is created for the form in the views.py file. An object for the form class is created here. This object is used as a value for the context dictionary in the template rendering.
- A post is performed in the rendered page.
- Through ValueForm class the data of the post is captured into a variable.
- The is_valid() is a mandatory check, which is used to verify whether the captured data is valid. The process of validation here will be performed internally by Django. Additionally if value.is_valid() is not performed then cleaned_data[] cannot be used.
- The session value of first name is captured in the below instance.
request_iter.session[first_name] = first_name
- In this example the sessions are logically assembled so that is the same first name is entered twice it will enter into the sessions page.
Example:
(views.py)
Code:
from django.shortcuts import render
from django.http import  HttpResponse
from Django_app1.forms import Valueform
defformView(request_iter):
form = Valueform()
if request_iter.method == "POST":
value = Valueform(request_iter.POST)
if value.is_valid():
first_name = value.cleaned_data['first_name'] if request_iter.session.has_key(first_name):
print(request_iter.session.items())
return render(request_iter, 'Session.html' )
else:
request_iter.session[first_name] = first_name
return render(request_iter, 'Form_Handeling.html', {"form":form})
return render(request_iter, 'Form_Handeling.html', {"form":form})
4. Formulate a HTML file for displaying the form
A HTML file needs to be created in the templates directory for displaying the form, here the file is template tagged using the below tag,
{{ form.as_p }}
Here “as_p” is used for better designing of the form elements.
{% csrf_token %} line is used for attesting the internal security verification performed by Django.
Example:
Code:
<!DOCTYPE html>
<html lang="en" dir="ltr">
<head>
<meta charset="utf-8">
<title>Django App1</title>
</head>
<body>
<h1><u> FORMS HANDELING IN DJANGO </u></h1
<div style = "max-width:470px;">
{{ form.as_p }}
{% csrf_token %}
<input type="submit" class="btnbtn-primary" value="submit">
</div>
</body>
</html>
5. Formulate a HTML file for displaying the page which is triggered when sessions are activated
A HTML file needs to be created in the templates directory for displaying the Session page.
Example:
Code:
<!DOCTYPE html>
<html lang="en" dir="ltr">
<head>
<meta charset="utf-8">
<title>Django App1</title>
</head>
<body>
<h1><u> SESSION PAGE IS TRIGGERED </u></h1>
</body>
</html>
6. Tag the view in urls.py file
This is the process of creating a url for the view.
- Import the library from django.conf.urls import url.
- Declare a url entry in the urlpatterns list.
url(url_path, view_to_be_tagged, name_for_this_view)
Example:
Code:
from django.contrib import admin
from django.conf.urls import url
from Django_app1 import views
urlpatterns = [
url(r'^$',views.index,name='index'),
url(r'formpage/',views.form_view,name='form'),
url(r'admin/', admin.site.urls), ]
Output:
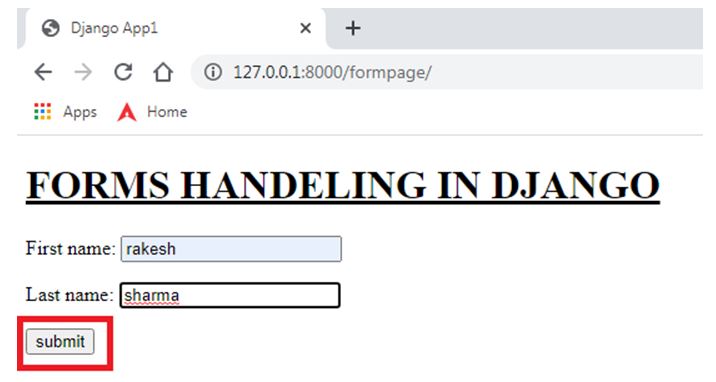
Attempt 1:

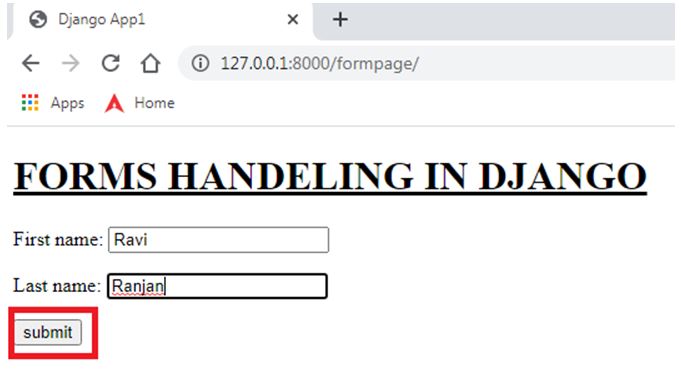
Attempt 2:


End result:


Output Explanation:
Here the first name and last name are submitted by the user, when the name Rakesh Sharma is submitted for the second time the session value is recollected and session page is triggered. The name raviranjan is triggered in between both these insertions. The server side data printed onto the console is also pasted as the last snapshot. In this last snapshot we can notice the value of the sessions captured.
We can notice the entered first name values by the user are captured as separate entries inside a dictionary with the identified first name itself as both the key and value for the dictionary values of each entry. More significantly the session page is rendered when the rakesh value in first name is entered for the second time. This precisely explains how session data are recollected and processed.
Conclusion
Sessions are always an impressive method for increasing the efficiency of the web application. It gives the flexibility for the user so that they could much smoothly traverse across the application. Django offers the most sophisticated method for handling these sessions in a very precise manner. The above examples show how efficiently cache based sessions help in capturing user data for efficient processing.

