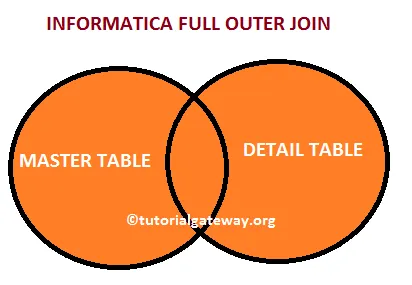
The Full Outer Join in Informatica is another option available in Joiner Transformation which is used to return all the existing records from Master table and Detail table.
Let us see the visual representation of the Full Outer Join in Informatica for better understanding.

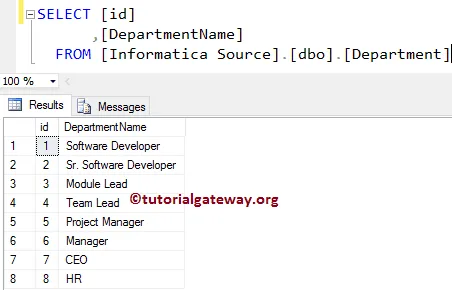
In this article, we are going to perform Informatica Full Outer Join on two SQL tables using Joiner Transformation. Before we start designing the Mapping let us look at our two source tables on which we are going to perform Full Outer Join in Informatica.
Department Table inside the Database is:

Employees Table inside the Database is:

Full Outer Join in Informatica Example
Before we start configuring Informatica Full Join, First connect to the repository service with your Admin Console credentials.
TIP: Please refer to Normal Join, Master Outer Join, and Detail Outer Join articles to understand the remaining Joins.
Step 1: Creating Source Definition for Full Outer Join in Informatica
Once you connected successfully, Please navigate to Source Analyzer and define your Sources. In this Informatica Full outer join example, we are using Department and Employee tables from SQL Server database as our source definitions.
Please refer Database Source to understand the steps involved in creating source definition

Step 2: Creating an Informatica Full Outer Join in Target Definition
Please navigate to Target Designer and define the Target. In this example, we are using the already created SQL table (Full Outer Join in Informatica) as our target definition. Please refer Create a Target table using Source Definition to understand the steps involved in creating a target definition

Step 3: Creating Mapping for Full Outer Join in Informatica
In order to create a new mapping, Please navigate to Mappings menu in Menu Bar and select the Create.. option. This will open the Mapping Name window as shown below. Here, you have to write a unique name for this mapping (m_Full_Outer) and click OK button.
TIP: Please refer Mapping article to understand the steps involved in creating Mapping.

Next, Drag and drop the Employee and Department source definitions from Sources folder to the mapping designer. Once you drag the source, PowerCenter Designer will automatically create the default transformation called source qualifier.
Step 3(a): Creating Joiner Transformation in Informatica
In order to create Joiner transformation in Informatica, Please navigate to Transformation menu in Menu Bar and select the Create.. option as we shown below.

Once you click on the Create.. option, Create Transformation window will be opened. Please select the Joiner transformation from a drop-down list and specify the unique name (JNR_FULL) for this transformation and click on Create button

Once you click on the Create button, the Joiner transformation will be added to the mapping designer. In order to perform Full Outer Join, Joiner Transformation requires some data. So, we have to connect the Source definition with the transformation using the Autolink.. option (or select and Drag required fields).

Double click on the Joiner transformation to configure the join conditions. From the below screenshot you can see the list of available options in the Ports tab:
- M: Please checkmark the Column(s) that you want to use as Master table. From the below screenshot you can observe that Joiner Transformation automatically selected the Employee table as Master table

It is always good practice to select the table holding the least records as Master table. That’s why we are selecting a Department table as our Master table.
NOTE: You don’t have to select each and every column present in the Master table. If you select One column from Employee then Informatica will automatically the remaining columns.

Below Informatica Full outer join screenshot will show you the list of available options in the Properties tab:
- Join Type: In this example, we are performing Full Outer Join so, we are selecting the Full Outer Join from the drop-down list.
- Sorted Input: If we are using the sorted data then check mark this option.

Within the Condition tab, we have to specify the condition. In this example, we are going to perform Full Outer Join on Department and Employee table based on the condition Department. id = Employee.Depart Id. So, click on the New button (beside scissors) to create a new condition and select the columns names from Master and detail list

Once you finish configuring the Joiner Transformation properties, Click OK to close the transformation window.
Next, Drag and drop the target definition (Full Outer Join in Informatica) from Targets folder to the mapping designer and connect the Joiner Transformation with the target definition. Please use the Autolink.. option to connect them.

Before we close the Mapping, Let us validate the mapping by going to Mapping Menu bar and selecting the Validate option.
Step 4: Create a Workflow for Full Outer Join in Informatica
Once we finish creating the Mapping we have to create the workflow for it. PowerCenter Workflow manager provides two approaches to create a workflow.
In this Informatica Full Outer Join example, we will create the Workflow manually. In order to create a new Workflow, Please navigate to Workflows Menu and select the Create option. This will open Create Workflow window as shown below. Please provide the unique name (wf_Full_Outer) and leave the default settings.

Once we created the workflow, our next step is to create a session task for our mapping.
NOTE: We strictly recommend to refer Workflow article to understand the steps involved in creating Workflow manually.
Step 4(a): Creating Session for Informatica Full Outer Join
There are two types of sessions:
- Non-reusable Session Task: Please refer Session article to understand the steps involved in it.
- Reusable Session Task: Please refer to the Reusable Session article to understand the steps involved in it.
For this Informatica Full Outer Join example, we are going to create Non-reusable Session. Please navigate to Tasks Menu and select the Create option to open the Create Task window. Here you have to select the Session as Task type (default) and enter a unique name (S_Full_Outer) for the session.
Once you click on the Create button, a new window called Mappings will be opened. Here you have to select the mapping you want to associate with this session. From the below screenshot you can observe that, we are selecting the mapping (m_Full_Outer) that we created earlier (in Step 3).

Double click on the Session Task to configure it. Although we have to configure Sources, targets, and some common properties, we are explaining only a few properties. We strictly recommend visiting the Session article to understand the remaining properties.
From the below screenshot you can observe that we assigned the $target variable to Connection Value and check marked the Truncate target table option to truncate the existing data from the destination table.

From the below screenshot you can observe that the Full Outer Join in Informatica workflow is a valid one. Now, Let us start the Workflow by navigating to Workflows menu and selecting the Start Workflow option.

Once you select the Start Workflow option, the PowerCenter Workflow monitor will be opened to monitor the workflow. From the below screenshot you can observe that our Informatica Full Outer Join workflow is executed without any errors.

Let us open the SQL Server Management Studio to check whether we successfully performed the Full Outer Join in Informatica using the Joiner Transformation or not.


