Users Online
· Members Online: 0
· Total Members: 188
· Newest Member: meenachowdary055
Forum Threads
Latest Articles
Articles Hierarchy
HBase Tutorials for Beginners
How to Download & Install Hbase
HBase can be installed in three modes. The features of these modes are mentioned below.
- Standalone mode installation (No dependency on Hadoop system)
- This is default mode of HBase
- It runs against local file system
- It doesn't use Hadoop HDFS
- Only HMaster daemon can run
- Not recommended for production environment
- Runs in single JVM
- Pseudo-Distributed mode installation ( Single node Hadoop system + HBase installation)
- It runs on Hadoop HDFS
- All Daemons run in single node
- Recommend for production environment
- Fully Distributed mode installation ( MultinodeHadoop environment + HBase installation)
- It runs on Hadoop HDFS
- All daemons going to run across all nodes present in the cluster
- Highly recommended for production environment
For Hadoop installation Refer this URL Here
In this tutorial- you will learn,
How to Download Hbase tar file stable version
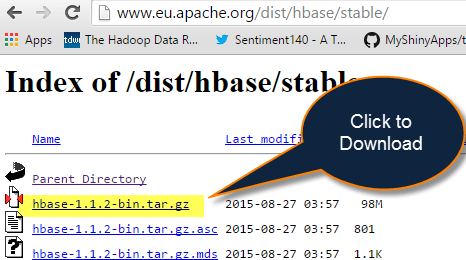
Step 1) Go to the link here to download HBase. It will open a webpage as shown below.
Step 2) Select stable version as shown below 1.1.2 version
Step 3) Click on the hbase-1.1.2-bin.tar.gz. It will download tar file. Copy the tar file into an installation location.
Hbase - Standalone mode installation:
Installation is performed on Ubuntu with Hadoop already installed.
Step 1) Place hbase-1.1.2-bin.tar.gz in /home/hduser
Step 2) Unzip it by executing command $tar -xvf hbase-1.1.2-bin.tar.gz. It will unzip the contents, and it will create hbase-1.1.2 in the location /home/hduser
Step 3) Open hbase-env.sh as below and mention JAVA_HOME path in the location.
Step 4) Open ~/.bashrc file and mention HBASE_HOME path as shown in below
| export HBASE_HOME=/home/hduser/hbase-1.1.1 export PATH= $PATH:$HBASE_HOME/bin |
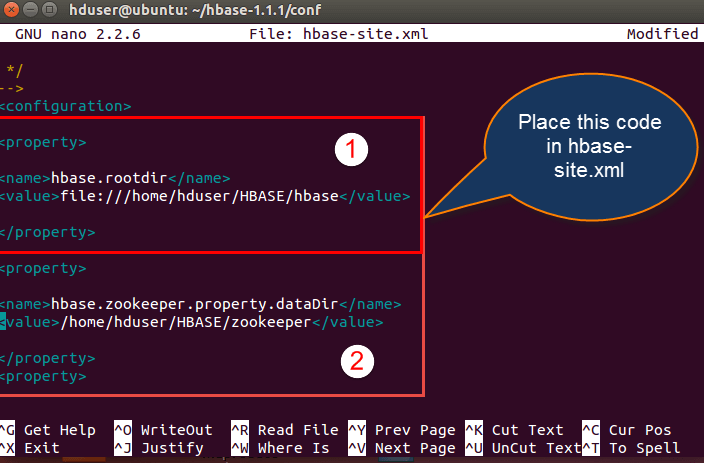
Step 5) Open hbase-site.xml and place the following properties inside the file
hduser@ubuntu$ gedit hbase-site.xml(code as below)
<property>

<name>hbase.rootdir</name>

<value>file:///home/hduser/HBASE/hbase</value>

</property>

<property>

<name>hbase.zookeeper.property.dataDir</name>

<value>/home/hduser/HBASE/zookeeper</value>

</property>
Here we are placing two properties
- One for HBase root directory and
- Second one for data directory correspond to ZooKeeper.
All HMaster and ZooKeeper activities point out to this hbase-site.xml.
Step 6) Open hosts file present in /etc. location and mention the IPs as shown in below.
Step 7) Now Run Start-hbase.sh in hbase-1.1.1/bin location as shown below.
And we can check by jps command to see HMaster is running or not.
Step8) HBase shell can start by using "hbase shell" and it will enter into interactive shell mode as shown in below screenshot. Once it enters into shell mode, we can perform all type of commands.
The standalone mode does not require Hadoop daemons to start. HBase can run independently.
Hbase - Pseudo Distributed mode of installation:
This is another method for Hbase Installation, known as Pseudo Distributed mode of Installation. Below are the steps to install HBase through this method.
Step 1) Place hbase-1.1.2-bin.tar.gz in /home/hduser
Step 2) Unzip it by executing command$tar -xvf hbase-1.1.2-bin.tar.gz. It will unzip the contents, and it will create hbase-1.1.2 in the location /home/hduser
Step 3) Open hbase-env.sh as following below and mention JAVA_HOME path and Region servers' path in the location and export the command as shown
Step 4) In this step, we are going to open ~/.bashrc file and mention the HBASE_HOME path as shown in screen-shot.
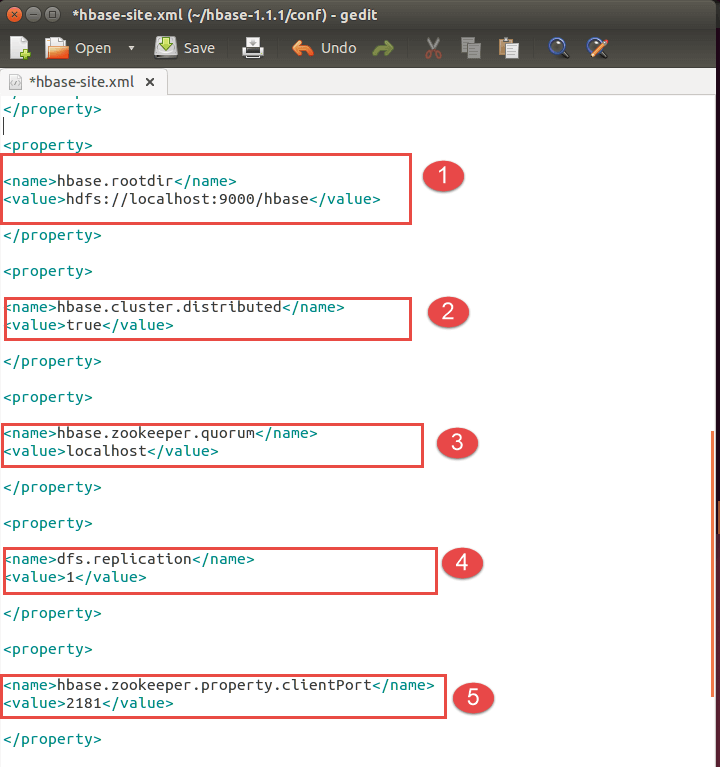
Step 5) Open HBase-site.xml and mention the below properties in the file.(Code as below)
<property>

<name>hbase.rootdir</name>

<value>hdfs://localhost:9000/hbase</value>

</property>

<property>

<name>hbase.cluster.distributed</name>

<value>true</value>

</property>

<property>

<name>hbase.zookeeper.quorum</name>

<value>localhost</value>

</property>

<property>

<name>dfs.replication</name>

<value>1</value>

</property>

<property>

<name>hbase.zookeeper.property.clientPort</name>

<value>2181</value>

</property>

<property>

<name>hbase.zookeeper.property.dataDir</name>

<value>/home/hduser/hbase/zookeeper</value>

</property>
- Setting up Hbase root directory in this property
- For distributed set up we have to set this property
- ZooKeeper quorum property should be set up here
- Replication set up done in this property. By default we are placing replication as 1.
In the fully distributed mode, multiple data nodes present so we can increase replication by placing more than 1 value in the dfs.replication property
- Client port should be mentioned in this property
- ZooKeeper data directory can be mentioned in this property
Step 6) Start Hadoop daemons first and after that start HBase daemons as shown below
Here first you have to start Hadoop daemons by using"./start-all.sh" command as shown in below.
After starting Hbase daemons by hbase-start.sh
Now check jps
Hbase - Fully Distributed mode installation:-
- This set up will work in Hadoop cluster mode where multiple nodes spawn across the cluster and running.
- The installation is same as pseudo distributed mode; the only difference is that it will spawn across multiple nodes.
- The configurations files mentioned in HBase-site.xml and hbase-env.sh is same as mentioned in pseudo mode.


